


 本文详细介绍了如何在Vue项目中引入Three.js库,展示了基本几何体创建、材质处理、光照效果、相机设置、以及使用OrbitControls和GUI进行交互的示例代码,包括顶点、法线和性能优化等内容。
1.vue中引入threejs
npm install three --save
// 引入three.js
import * as THREE from 'three';
2.基本几何体创建,不同材质,不同光源,相机,GUI创建,法向量,自定义顶点等示例代码
<template>
  <main class="gl-main">
    <div id="webgl"></div>
  </main>
</template>
<script setup lang="ts">
import { nextTick } from 'vue'
// 引入three.js
import * as THREE from 'three'
// 引入轨道控制器扩展库OrbitControls.js
import { OrbitControls } from 'three/addons/controls/OrbitControls.js'
//引入性能监视器stats.js
import Stats from 'three/addons/libs/stats.module.js'
// 引入dat.gui.js的一个类GUI
import { GUI } from 'three/addons/libs/lil-gui.module.min.js'

// 创建场景
const scene = new THREE.Scene()
//创建一个几何对象Geometry
const geometry = new THREE.BoxGeometry(50, 50, 50)
//创建一个材质对象Material,MeshBasicMaterial:基础材质不受光照影响
// const material = new THREE.MeshBasicMaterial({
//   color: 0xff0000, //0xff0000设置材质颜色为红色
//   transparent: true, // 开启透明
//   opacity: 0.5 //设置透明度
// })

// MeshLambertMaterial:漫反射材质受光照影响
const material = new THREE.MeshLambertMaterial({
  color: 0xce21bc
  // wireframe: true //线条模式渲染mesh对应的三角形数据
})
// 两个参数分别为几何体geometry、材质material
const mesh = new THREE.Mesh(geometry, material) //网格模型对象Mesh
//设置网格模型在三维空间中的位置坐标,默认是坐标原点
mesh.position.set(0, 0, 0)
scene.add(mesh)
// AxesHelper:辅助观察的坐标系
const axesHelper = new THREE.AxesHelper(150)
scene.add(axesHelper)

//环境光 会照亮场景里的全部物体(氛围灯),前提是物体是可以接受灯光的,这种灯是无方向的,即不会有阴影。
const ambientLight = new THREE.AmbientLight(0xffffff, 0.4)
scene.add(ambientLight)
// //点光源:两个参数分别表示光源颜色和光照强度
// // 参数1:0xffffff是纯白光,表示光源颜色
// // 参数2:表示光照强度,可以根据需要调整
// const pointLight = new THREE.PointLight(0xffffff, 100000)
// pointLight.position.set(100, 100, 100) //点光源位置
// scene.add(pointLight) //点光源添加到场景中
// // 光源辅助观察器
// const pointLightHelper = new THREE.PointLightHelper(pointLight, 10)
// scene.add(pointLightHelper)

// 平行光
const directionalLight = new THREE.DirectionalLight(0xffffff, 1)
// 设置光源的方向:通过光源position属性和目标指向对象的position属性计算
directionalLight.position.set(200, 200, 200)
// 方向光指向对象网格模型mesh,可以不设置,默认的位置是0,0,0
directionalLight.target = mesh
scene.add(directionalLight)
// DirectionalLightHelper:可视化平行光
const dirLightHelper = new THREE.DirectionalLightHelper(directionalLight, 5, 0xff0000)
scene.add(dirLightHelper)

// 定义相机输出画布的尺寸(单位:像素px)
const width = window.innerWidth //宽度
const height = window.innerHeight //高度

// 相机投影1.正投影相机:OrthographicCamera(不会因为距离远近而产生变形,通常用于2D,工程设计图等),2.透视投影相机:PerspectiveCamera(近小远大,物体变形)
// 实例化一个透视投影相机对象
const camera = new THREE.PerspectiveCamera(30, width / height, 1, 3000)
// 根据需要设置相机位置具体值
camera.position.set(300, 300, 300)
//相机观察目标指向Threejs 3D空间中某个位置
// camera.lookAt(0, 0, 0) //坐标原点
camera.lookAt(mesh.position) //指向mesh对应的位置

// 创建渲染器对象
const renderer = new THREE.WebGLRenderer({ antialias: true })
// renderer.setClearColor(0x444444, 1) //canvas画布颜色
renderer.setSize(width, height) //设置three.js渲染区域的尺寸(像素px)
// renderer.render(scene, camera) //执行渲染操作

// 获取你屏幕对应的设备像素比.devicePixelRatio告诉threejs,以免渲染模糊问题
renderer.setPixelRatio(window.devicePixelRatio)
//创建stats对象
const stats = new Stats()
//stats.domElement:web页面上输出计算结果,一个div元素,
document.body.appendChild(stats.dom)
// 循环渲染函数
function render() {
  stats.update()
  renderer.render(scene, camera) //执行渲染操作
  mesh.rotateY(0.01) //每次绕y轴旋转0.01弧度
  window.requestAnimationFrame(render) //请求再次执行渲染函数render,渲染下一帧
}

render()
// 设置相机控件轨道控制器OrbitControls
const controls = new OrbitControls(camera, renderer.domElement)
// 如果OrbitControls改变了相机参数,重新调用渲染器渲染三维场景,使用循环渲染函数就不需要监听change事件
// controls.addEventListener('change', function () {
//   renderer.render(scene, camera) //执行渲染操作
// }) //监听鼠标、键盘事件

// onresize 事件会在窗口被调整大小时发生
window.onresize = function () {
  // 重置渲染器输出画布canvas尺寸
  renderer.setSize(window.innerWidth, window.innerHeight)
  // 全屏情况下:设置观察范围长宽比aspect为窗口宽高比
  camera.aspect = window.innerWidth / window.innerHeight
  // 渲染器执行render方法的时候会读取相机对象的投影矩阵属性projectionMatrix
  // 但是不会每渲染一帧,就通过相机的属性计算投影矩阵(节约计算资源)
  // 如果相机的一些属性发生了变化,需要执行updateProjectionMatrix()方法更新相机的投影矩阵
  camera.updateProjectionMatrix()
}

// 将渲染器生成的画布元素添加到界面容器
nextTick(() => {
  document.getElementById('webgl')?.appendChild(renderer.domElement)
})

// 实例化一个gui对象,属性调节面板
const gui = new GUI()
gui.domElement.style.right = '10px'
gui.domElement.style.width = '300px'
// 环境光子菜单
const ambientFolder = gui.addFolder('环境光')
ambientFolder.close()
ambientFolder.add(ambientLight, 'intensity', 0, 1).name('环境光调节') // 环境光调节
// 材质子菜单
const matFolder = gui.addFolder('材质')
matFolder.close()
matFolder.addColor(material, 'color').name('材质颜色') // 环境光调节

//创建一个空的几何体对象
const geometry2 = new THREE.BufferGeometry()
//类型化数组创建顶点数据
const vertices = new Float32Array([
  100,
  100,
  100, //顶点1坐标

  100,
  100,
  150, //顶点2坐标

  150,
  100,
  150, //顶点3坐标

  150,
  100,
  100, //顶点5坐标

  100,
  50,
  100, //顶点7坐标

  100,
  50,
  150, //顶点8坐标

  150,
  50,
  150, //顶点9坐标

  150,
  50,
  100 //顶点11坐标
])

// Uint16Array类型数组创建顶点索引数据
const indexes = new Uint16Array([
  // 下面索引值对应顶点位置数据中的顶点坐标
  0, 1, 2, 0, 2, 3, 4, 5, 6, 4, 6, 7, 0, 5, 1, 0, 4, 5, 1, 5, 6, 1, 6, 2, 2, 6, 7, 2, 7, 3, 4, 6, 7
])
// 索引数据赋值给几何体的index属性
geometry2.index = new THREE.BufferAttribute(indexes, 1) //1个为一组

// 矩形平面,有索引,两个三角形,有2个顶点重合,有4个顶点
// 每个顶点的法线数据和顶点位置数据一一对应
const normals = new Float32Array([
  0,
  0,
  1, //顶点1法线( 法向量 )
  0,
  0,
  1, //顶点2法线
  0,
  0,
  1, //顶点3法线
  0,
  0,
  1, //顶点4法线
  0,
  0,
  1, //顶点4法线
  0,
  0,
  1, //顶点4法线
  0,
  0,
  1, //顶点4法线
  0,
  0,
  1 //顶点4法线
])
// 设置几何体的顶点法线属性.attributes.normal
geometry2.attributes.normal = new THREE.BufferAttribute(normals, 3)

// 创建属性缓冲区对象
//3个为一组,表示一个顶点的xyz坐标
const attribue = new THREE.BufferAttribute(vertices, 3)
// 设置几何体attributes属性的位置属性
geometry2.attributes.position = attribue
// 点渲染模式
const material2 = new THREE.PointsMaterial({
  color: 0xffff00,
  size: 10.0 //点对象像素尺寸
})
const points = new THREE.Points(geometry2, material2) //点模型对象
scene.add(points)

// 线材质对象
const material3 = new THREE.MeshLambertMaterial({
  color: 0xff0000, //线条颜色
  side: THREE.DoubleSide //两面可见
})
// 创建线模型对象
const line = new THREE.Line(geometry2, material3)
// scene.add(line)

// 闭合线条
const line2 = new THREE.LineLoop(geometry2, material3)
scene.add(line2)

//非连续的线条
const line3 = new THREE.LineSegments(geometry2, material3)
// scene.add(line3)
</script>
<style scoped>
.gl-main {
  width: 100%;
  height: 100%;
  position: relative;
}
#webgl {
  width: 100%;
  height: 100%;
  position: absolute;
}
</style>
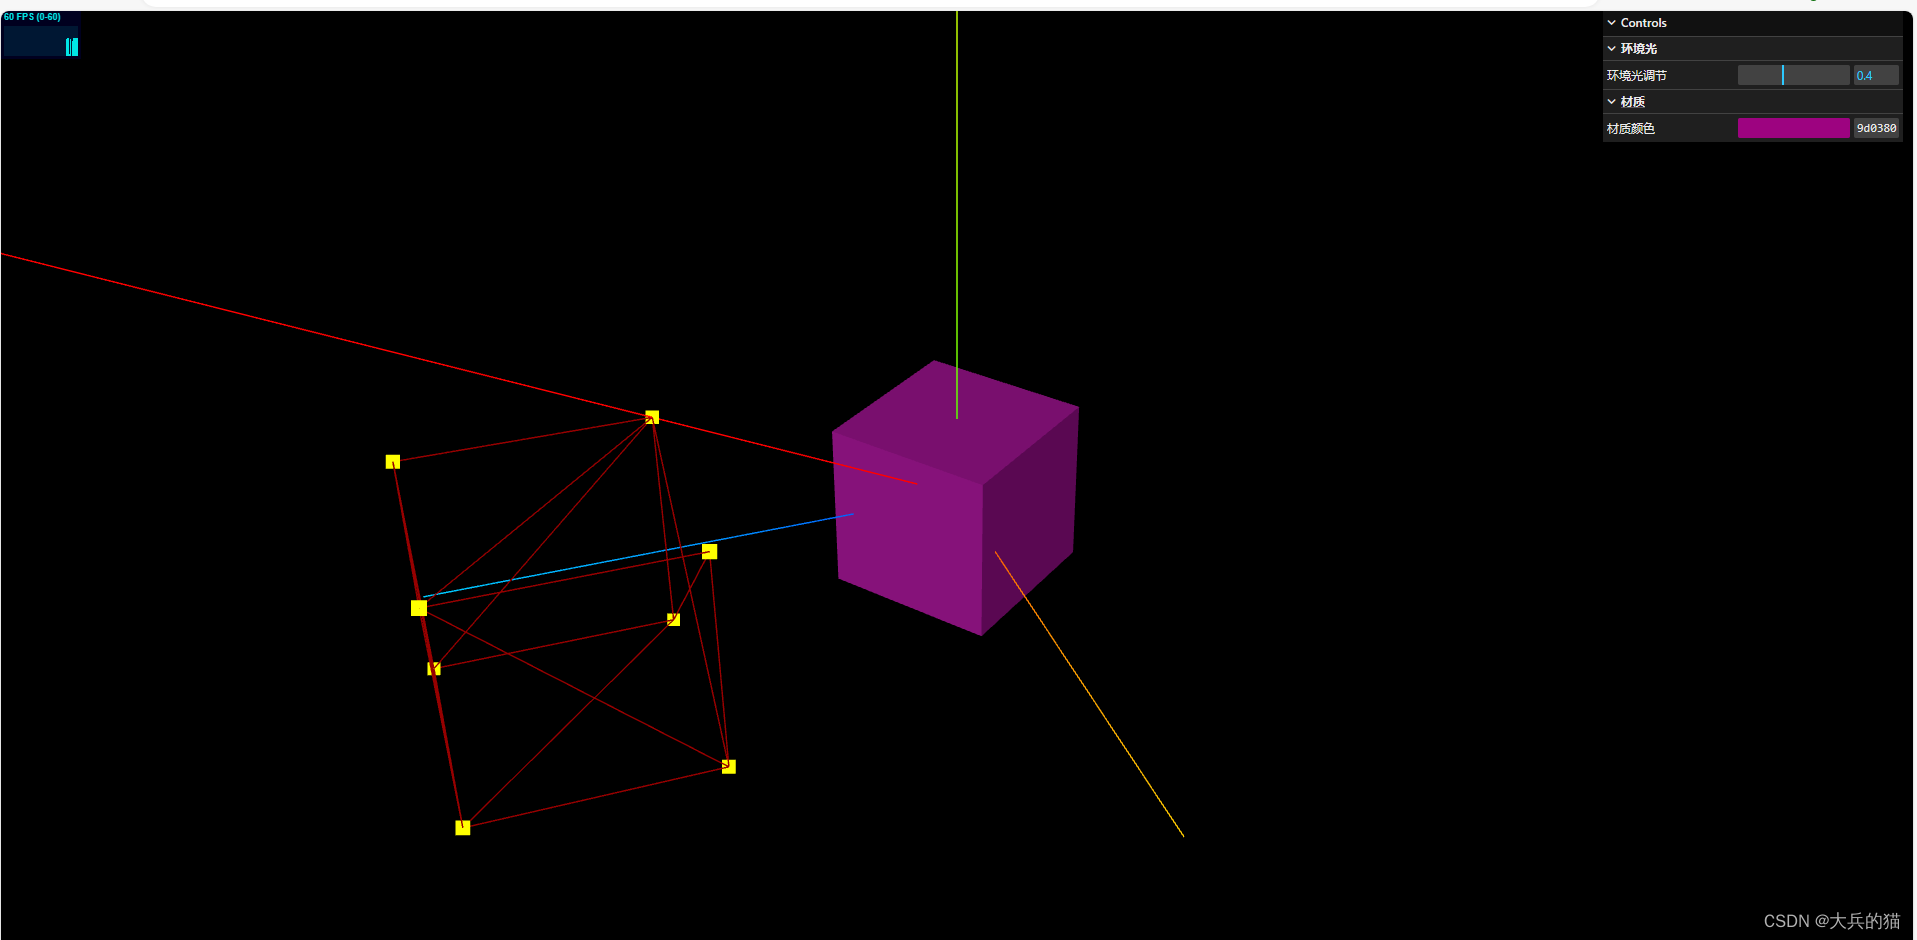
3.运行示例


 2209
2209

 被折叠的 条评论
为什么被折叠?
被折叠的 条评论
为什么被折叠?
 到【灌水乐园】发言


