


 本文详细介绍了Zabbix5.0在CentOS8上的企业级安装部署过程,包括环境准备、依赖包安装、数据库配置、Zabbix组件安装、图形化配置、数据采集及监控、Grafana集成和交换机SNMP监控。通过此文,读者可以掌握完整的Zabbix监控系统搭建步骤。
作者联系微信号:NateIT
1.安装环境准备
yum -y update (所有都升级和改变)
升级所有包,系统版本和内核,改变软件设置和系统设置
yum -y upgrade(不变内核和设置,升级包和系统版本)
升级所有包和系统版本,不改变内核,软件和系统设置
1.1检查操作系统版本
[root@huaxun ~]# cat /etc/redhat-release
CentOS Linux release 8.2.2004 (Core)
1.2检查服务器主机名称和修改主机名称
检查主机名称
[root@huaxun ~]# hostnamectl
修改主机名hostname
静态,瞬态或灵活,分别对应 “--static”,“--transient”或“--pretty”选项、我们永久修改主机名称,用“--static”选项
[root@huaxun ~]# hostnamectl --static set-hostname zabbixserver
[root@huaxun ~]# hostnamectl
[root@huaxun ~]# cat /etc/hostname
修改hosts文件
[root@huaxun ~]# vi /etc/hosts
[root@huaxun ~]# reboot
完成以上操作后重启系统。
1.3 关闭防火墙及SElinux
[root@huaxun ~]# systemctl stop firewalld.service
[root@huaxun ~]# systemctl disable firewalld.service
(1)设置开机启用防火墙:systemctl enable firewalld.service
(2)设置开机禁用防火墙:systemctl disable firewalld.service
(3)启动防火墙:systemctl start firewalld
(4)关闭防火墙:systemctl stop firewalld
(5)检查防火墙状态:systemctl status firewalld
开放10050端口
# 开放10050端口
firewall-cmd --zone=public --add-port=10050/tcp --permanent
# 开放80端口
firewall-cmd --zone=public --add-port=80/tcp –permanent
# 配置立即生效
firewall-cmd --reload
SELinux关闭
接着将SELinux关闭,运行如下命令编辑SELINUX配置文件:
并将SELINUX=enforcing改成SELINUX=disable,如下:
[root@huaxun ~]# vi /etc/selinux/config
# This file controls the state of SELinux on the system.
# SELINUX= can take one of these three values:
# enforcing - SELinux security policy is enforced.
# permissive - SELinux prints warnings instead of enforcing.
# disabled - No SELinux policy is loaded.
SELINUX=disabled
# SELINUXTYPE= can take one of three values:
# targeted - Targeted processes are protected,
# minimum - Modification of targeted policy. Only selected processes are protected.
# mls - Multi Level Security protection.
SELINUXTYPE=targeted
SELinux有三种模式:Enforcing, Permissive 和 Disable,Enforcing模式就是应用SELinux所设定的Policy,所有违反Policy的规则(Rules)都会被SELinux拒绝,Permissive和Enforcing的区别就在于,前者还是会遵循SELinux的Policy,但是对于违反规则的操作只会予以记录而并不会拒绝操作,Disable 顾名思义就是完全禁用SELinux;
修改完成后,重启机器,重启后运行getenforce命令查看已经关闭SELinux。
[root@huaxun ~]# getenforce
Disabled
[root@huaxun ~]# /usr/sbin/sestatus -v
SELinux status: disabled
1.4安装依赖包
[root@zabbixserver ~]# yum install -y httpd mariadb-server mariadb php php-gd libjpeg* php-ldap php-odbc php-pear php-xml php-xmlrpc php-mhash
[root@zabbixserver ~]# rpm -qa httpd php mariadb
备注:可能用到的指令
安装指令
undo yum install mariadb mariadb-server -y
查看是否安装成功
rpm -qa | grep mariadb
常用命令:
# 查看 mariadb 安装位置
rpm -ql mariadb
# 设置开机自动启动
systemctl enable mariadb
# 开启mariadb服务
systemctl start mariadb
# 关闭 mariadb 服务
systemctl stop mariadb
# 重启mariadb服务
systemctl restart mariadb
1.5相关配置
[root@zabbixserver ~]# vi /etc/httpd/conf/httpd.conf
将servername设置为192.168.10.218:80,在DirectoryIndex中添加index.php,如下:
# ServerName gives the name and port that the server uses to identify itself.
# This can often be determined automatically, but we recommend you specify
# it explicitly to prevent problems during startup.
#
# If your host doesn't have a registered DNS name, enter its IP address here.
#
ServerName 39.99.160.163:80
#
# DirectoryIndex: sets the file that Apache will serve if a directory
# is requested.
#
<IfModule dir_module>
DirectoryIndex index.html index.php
</IfModule>
接着配置php.ini,如下:
[root@zabbixserver ~]# vi /etc/php.ini
将date.timezone设置为PRC:
PRC就是The People's Republic of China
[Date]
; Defines the default timezone used by the date functions
; http://php.net/date.timezone
date.timezone = PRC
1.6开始启动http和mysql数据库
[root@zabbixserver ~]# systemctl start httpd
[root@zabbixserver ~]# systemctl start mariadb
[root@zabbixserver ~]# ss -naplt | grep httpd
[root@zabbixserver ~]# ss -naplt | grep mysqld
设置开机自启动模式:
[root@zabbixserver ~]# systemctl enable httpd
[root@zabbixserver ~]# systemctl enable mariadb
1.7开始测试PHP功能
[root@zabbixserver ~]# vi /var/www/html/index.php
输入以下内容:
<?php
phpinfo();
?>
打开http://39.99.160.163,显示如下界面说明PHP运行正常。

1.8 Centos8上安装中文语言包
[root@zabbixserver ~]# yum install langpacks-zh_CN.noarch
1.9 配置并初始化数据库
设置mysql数据库root密码为zabbixroot,如下:
[root@zabbixserver ~]# mysqladmin -u root password zabbixroot
安装好数据库 初始化时报错 ERROR 1045 (28000): Access denied for user 'root'@'localhost' (using password: NO)
解决步骤如下:
1. 首先停掉数据库服务: systemctl stop mariadb.service
2. 使用mysqld_safe来启动mysqld服务器 :
mysqld_safe --user=mysql --skip-grant-tables --skip-networking &
显示: 退出Ctrl+c
3 . 登录 : mysql -u root mysql
4 . 修改root用户密码:
UPDATE user SET PASSWORD=PASSWORD('zabbixroot') where USER='root';
5 . 使用修改后的root用户和新密码zabbixroot登录数据库: mysql -uroot -p
The MariaDB server is running with the --skip-grant-tables option so it cannot execute this statement
创建用户时报错,执行语句为:
GRANT ALL PRIVILEGES ON *.* TO helei IDENTIFIED BY 'MANAGER' WITH GRANT OPTION;
解决:mysql> flush privileges;
[root@zabbixserver ~]# mysql -uroot -p
MariaDB [(none)]> CREATE DATABASE zabbix character set utf8 collate utf8_bin;
GRANT all privileges ON zabbix.* TO 'zabbix'@'localhost' IDENTIFIED BY 'zabbix123' with grant option;
GRANT all privileges ON zabbix.* TO 'zabbix'@'PXZB' IDENTIFIED BY 'zabbix123';
MariaDB [(none)]> create user zabbix@localhost identified by 'zabbix123';
MariaDB [(none)]> grant all privileges on zabbix.* to zabbix@localhost;
MariaDB [(none)]> quit
参考:
GRANT ALL PRIVILEGES ON *.* TO 'user'@'%' IDENTIFIED BY 'password' WITH GRANT OPTION; // %:表示从任何主机连接到mysql服务器
MariaDB [(none)]> GRANT all ON zabbix.* TO 'zabbix'@'zabbixserver' IDENTIFIED BY 'zabbix123' ;
GRANT all privileges ON zabbix.* TO 'zabbix'@'zabbixserver' IDENTIFIED BY 'zabbix123';
GRANT all privileges ON zabbix.* TO 'zabbix'@'localhost' IDENTIFIED BY 'zabbix123';
查看mysql数据库中的所有用户
SELECT DISTINCT CONCAT('User: ''',user,'''@''',host,''';') AS query FROM mysql.user;
删除账户
MariaDB [(none)]> SELECT DISTINCT CONCAT('User: ''',user,'''@''',host,''';') AS query FROM mysql.user;
+---------------------------------+
| query |
+---------------------------------+
| User: 'root'@'127.0.0.1'; |
| User: 'zabbix'@'39.99.160.163'; |
| User: 'root'@'::1'; |
| User: 'root'@'localhost'; |
| User: 'root'@'zabbixserver'; |
+---------------------------------+
5 rows in set (0.000 sec)
MariaDB [(none)]> drop user 'zabbix'@'39.99.160.163';
Query OK, 0 rows affected (0.000 sec)
MariaDB [(none)]> flush privileges;
Query OK, 0 rows affected (0.00 sec)
MariaDB [(none)]> quit
Bye
[root@zabbixserver ~]#
MariaDB [zabbix]> select host,user from mysql.user;
+--------------+--------+
| host | user |
+--------------+--------+
| % | user |
| 127.0.0.1 | root |
| ::1 | root |
| localhost | root |
| zabbixserver | root |
| zabbixserver | zabbix |
+--------------+--------+
6 rows in set (0.000 sec)
1.10安装依赖包
[root@zabbixserver ~]# yum -y install net-snmp net-snmp-devel curl curl-devel libxml2 libxml2-devel libevent-devel.x86_64
环境准备工作已经顺利完成!
2.安装并配置zabbix5.0
2.1 Zabbix包安装
[root@zabbixserver ~]# rpm -ivh https://repo.zabbix.com/zabbix/5.0/rhel/8/x86_64/zabbix-release-5.0-1.el8.noarch.rpm
[root@zabbixserver ~]# yum clean all
2.2组件安装
[root@zabbixserver ~]# yum install -y zabbix-server-mysql zabbix-web-mysql zabbix-apache-conf zabbix-agent
如果无法安装,修改yum,并执行yum clean all
再安装组件
cd /etc/yum.repos.d
zabbix.repo
root@zabbixserver yum.repos.d]# cat zabbix.repo
[zabbix]
name=Zabbix Official Repository - $basearch
#baseurl=http://repo.zabbix.com/zabbix/5.0/rhel/8/$basearch/
baseurl=http://mirrors.aliyun.com/zabbix/zabbix/5.0/rhel/8/$basearch/
enabled=1
gpgcheck=1
gpgkey=file:///etc/pki/rpm-gpg/RPM-GPG-KEY-ZABBIX-A14FE591
[zabbix-non-supported]
name=Zabbix Official Repository non-supported - $basearch
#baseurl=http://repo.zabbix.com/non-supported/rhel/8/$basearch/
baseurl=http://mirrors.aliyun.com/zabbix/zabbix/5.0/rhel/8/$basearch/
enabled=1
gpgkey=file:///etc/pki/rpm-gpg/RPM-GPG-KEY-ZABBIX
gpgcheck=1
2.3导入初始架构和数据
这种方法出差概率比较高
cat /usr/share/doc/zabbix-server-mysql*/create.sql.gz | mysql -uzabbix -p -h 192.168.1.10 zabbix
输入zabbix用户的密码zabbix123,开始导入。
或者导入数据
cd /usr/share/doc/zabbix-server-mysql/
gunzip create.sql.gz
mysql -uzabbix -pzabbix123
use zabbix
source /usr/share/doc/zabbix-server-mysql/create.sql
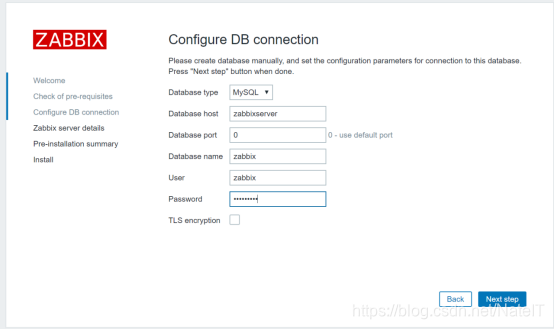
数据导入完成后开始配置zabbix server的配置文件,使配置文件中引用刚才创建的数据库,编辑/etc/zabbix/zabbix_server.conf文件:
[root@zabbixserver ~]# vi /etc/zabbix/zabbix_server.conf
完成如下DBHost、DBName、DBUser、DBPassword配置:
### Option: DBHost
# Database host name.
# If set to localhost, socket is used for MySQL.
# If set to empty string, socket is used for PostgreSQL.
#
# Mandatory: no
# Default:
DBHost=zabbixserver
### Option: DBName
# Database name.
#
# Mandatory: yes
# Default:
# DBName=
DBName=zabbix
### Option: DBSchema
# Schema name. Used for PostgreSQL.
#
# Mandatory: no
# Default:
# DBSchema=
### Option: DBUser
# Database user.
#
# Mandatory: no
# Default:
# DBUser=
DBUser=zabbix
### Option: DBPassword
# Database password.
# Comment this line if no password is used.
#
# Mandatory: no
# Default:
DBPassword=zabbix123
检查配置
cat /etc/zabbix/zabbix_server.conf|egrep -i "DBHost|DBName|DBUser|DBPassword"|grep -v "#"
接着配置zabbix配置文件zabbix.conf:
[root@zabbixserver ~]# vi /etc/php-fpm.d/zabbix.conf
将date.timezone设置成Asia/Shanghai,如下:
php_value[date.timezone] = Asia/Shanghai
; php_value[date.timezone] = Asia/Shanghai
注意:要去掉这个双引号,并且重启服务。
启动zabbix程序:
[root@zabbixserver ~]# systemctl restart zabbix-server zabbix-agent httpd php-fpm
[root@zabbixserver ~]# systemctl enable zabbix-server zabbix-agent httpd php-fpm
查看日志文件zabbix_server.log,没有相关错误,说明运行正常
[root@zabbixserver ~]# more /var/log/zabbix/zabbix_server.log
2.4开始图形化配置zabbix
输入http://39.99.160.163/zabbix,如下:
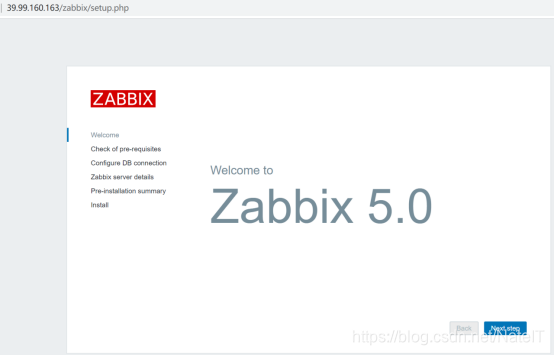

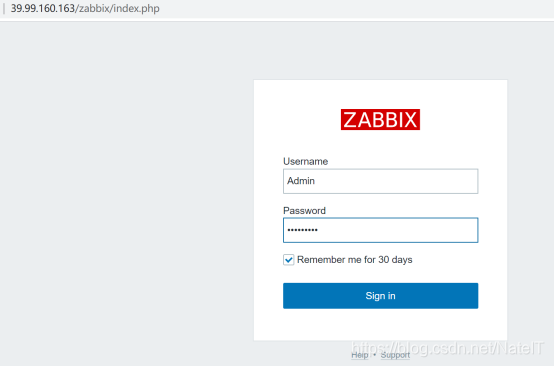
默认账号Admin
默认密码为zabbix
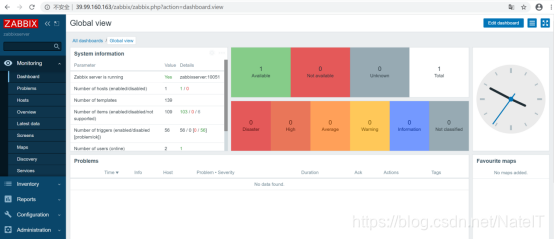
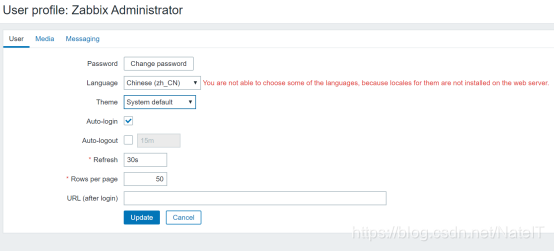
设置为中文界面,如下图。
![]()
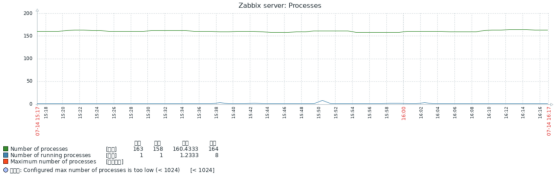
2.5将图形界面中的乱码修复为中文显示
默认zabbix在图形显示中中文显示为乱码,需要修复才能正常显示,如下图红框所示:
操作如下:
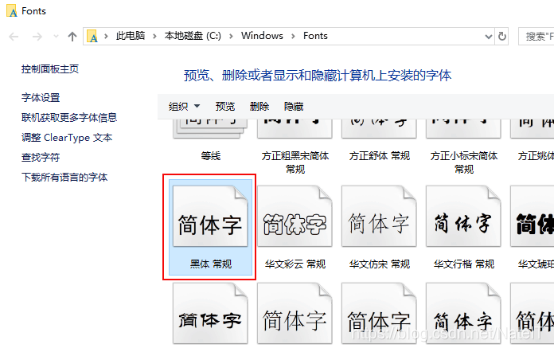
首先将WINDOWS FONTS文件夹中的黑体字复制至本机硬盘
将本地电脑上的黑体字体文件simhei.ttf复制到/usr/share/zabbix/assets/fonts/目录下,如下图
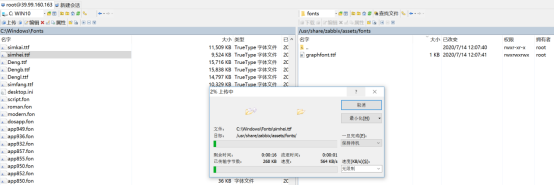
再通过修改vi /usr/share/zabbix/include/defines.inc.php文件,将红框位置中原graphfont修改为simhei,如下图,完成后保存退出。
![]()

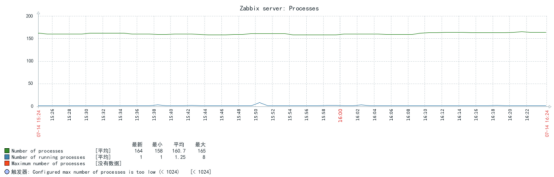
刷新图形界面,已能显示中文,如下。
3.通过zabbix agent(yum安装方式)实现CentOS8数据采集及监控
3.1安装包
首先关闭防火墙及SELinux,开始安装agent:
[root@localhost~]# rpm -Uvh https://repo.zabbix.com/zabbix/5.0/rhel/8/x86_64/zabbix-release-5.0-1.el8.noarch.rpm
开始安装:
[root@localhost ~]# yum install zabbix-agent
如果无法安装,修改yum
cd /etc/yum.repos.d
zabbix.repo
root@zabbixserver yum.repos.d]# cat zabbix.repo
[zabbix]
name=Zabbix Official Repository - $basearch
#baseurl=http://repo.zabbix.com/zabbix/5.0/rhel/8/$basearch/
baseurl=http://mirrors.aliyun.com/zabbix/zabbix/5.0/rhel/8/$basearch/
enabled=1
gpgcheck=1
gpgkey=file:///etc/pki/rpm-gpg/RPM-GPG-KEY-ZABBIX-A14FE591
[zabbix-non-supported]
name=Zabbix Official Repository non-supported - $basearch
#baseurl=http://repo.zabbix.com/non-supported/rhel/8/$basearch/
baseurl=http://mirrors.aliyun.com/zabbix/zabbix/5.0/rhel/8/$basearch/
enabled=1
gpgkey=file:///etc/pki/rpm-gpg/RPM-GPG-KEY-ZABBIX
gpgcheck=1
3.2配置zabbix_agentd.conf配置文件
/etc/zabbix/zabbix_agentd.conf
Server=192.168.10.218
ServerActive=192.168.10.218
Hostname=localhost.localdomain
完成后保存退出。
检查:
cat /etc/zabbix/zabbix_agentd.conf|egrep -i "Server|ServerActive|Hostname"|grep -v "#"
3.3配置文件修改后,开始启动服务
启动服务:
[root@localhost ~]# systemctl start zabbix-agent.service
重新启动服务
systemctl restart zabbix-agent.service
添加开机启动功能:
[root@localhost ~]# systemctl enable zabbix-agent.service
Created symlink /etc/systemd/system/multi-user.target.wants/zabbix-agent.service 鈫/usr/lib/systemd/system/zabbix-agent.service.
[root@localhost ~]#
查看agent服务是否已启动:
ps -ef|grep zabbix_agentd
[root@localhost ~]# ss -tnl | grep 10050
LISTEN 0 128 0.0.0.0:10050 0.0.0.0:*
LISTEN 0 128 [::]:10050 [::]:*
如上,已发现agentd进程运行,并且10050端口已启动。
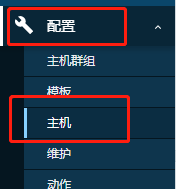
开始添加至ZABBIX5.0平台中,打开zabbix server主界面,选择“配置‘->”主机“,点击右上角的”创建“按扭,创建一台主机,如下图
链接zabbix agent for linux模板:

完成后可以看到列表,过几分钟后,可用性一栏中的ZBX变绿即表示监控正常。

4.Zabbix5.0监控MySQL
4.1MySQL服务器配置
4.1.1创建数据库监控账号
登录mysql并创建新用户(用于登录MySQL获取服务状态)
Mysql>GRANT USAGE ON *.* TO 'zabbix'@'localhost' IDENTIFIED BY 'passwd';
案例:
GRANT USAGE ON *.* TO 'zabbixmonitor'@'localhost' IDENTIFIED BY 'zabbixadmin';
Mysql>FLUSH PRIVILEGES;
(注:zabbix为数据库用户名,passwd为数据库用户密码)
4.1.2安装Zabbix Agent
上传zabbix agent的rpm包到mysql服务器并安装
rpm -ivh zabbix-agent-5.0.0-1.el7.x86_64.rpm
修改zabbix agent配置文件
vi /etc/zabbix/zabbix_agentd.conf
Server=127.0.0.1 //修改为zabbix-server的IP地址
ServerActive=127.0.0.1 //修改为zabbix-server的IP地址
Hostname=Zabbix server //自定义修改
查看sock文件路径
find / -name *.sock
//查找到的路径通常情况为/var/lib/mysql/mysql.sock
查找并拷贝Zabbix监控Mysql模板文件
find / -name user*_mysql.conf //查找
cp 查找到的目录 /etc/zabbix/zabbix_agentd.d/ //拷贝
cp -rp /usr/share/doc/zabbix-agent/userparameter_mysql.conf /etc/zabbix/zabbix_agentd.d/
新建文件夹
mkdir -p /var/lib/zabbix
修改文件
vi /var/lib/zabbix/.my.cnf
写入内容
[mysql]
user=zabbix //新创建的mysql用户的用户名
password=zabbix //新创建的mysql用户的密码
host=127.0.0.1
socket=/var/lib/mysql/mysql.sock
[mysqladmin]
user=zabbix //新创建的mysql用户的用户名
password=zabbix //新创建的mysql用户的密码
host=127.0.0.1
socket=/var/lib/mysql/mysql.sock
保存退出后重启zabbix agent
systemctl restart zabbix-agent
4.2zabbix配置
4.2.1方法一:同时添加主机监控及MySQL监控
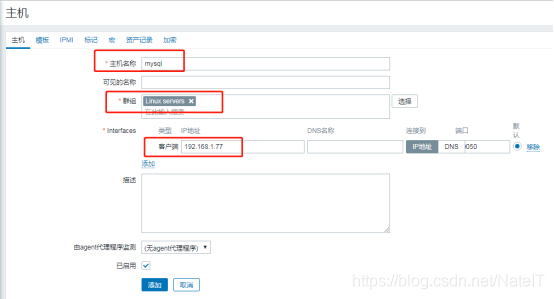
登录zabbix系统,点击配置——主机——创建主机
填写主机名称,选择群组,填写IP地址为mysql服务器IP
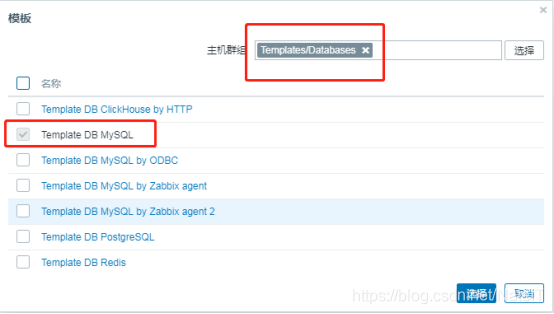
主机添加完成后点击进入该主机,选择mysql模板
4.2.2方法二:主机已经监控,增加MySQL监控
登录zabbix系统,点击配置——主机

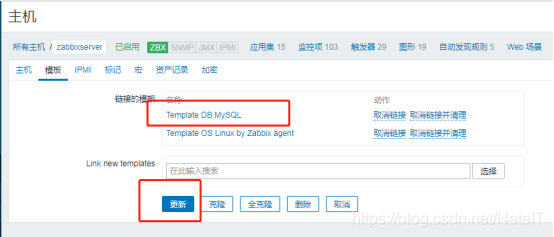
找到该主机并点击进入主机,点击模板
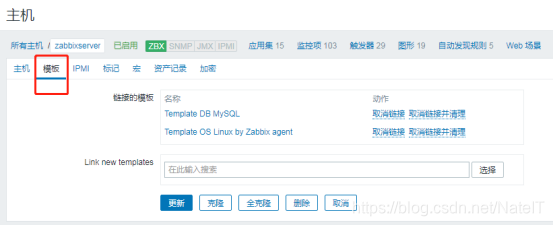
选择mysql模板后点击更新

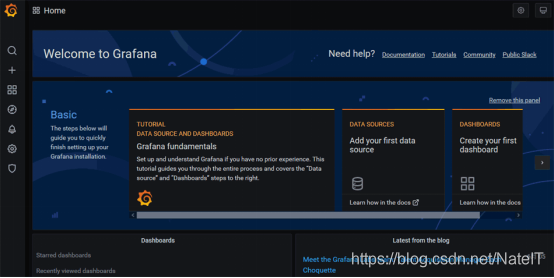
5安装Grafana7.1 并添加Zabbix数据源
Grafana 是一款采用 go 语言编写的开源应用,主要用于大规模指标数据的可视化展现,是网络架构和应用分析中最流行的时序数据展示工具,目前已经支持绝大部分常用的时序数据库。
开始安装Grafana
关闭防火墙及SELINUX:
[root@localhost ~]# systemctl stop firewalld.service
[root@localhost ~]#
[root@localhost ~]# systemctl disable firewalld.service
Removed symlink /etc/systemd/system/multi-user.target.wants/firewalld.service.
Removed symlink /etc/systemd/system/dbus-org.fedoraproject.FirewallD1.service.
(1)设置开机启用防火墙:systemctl enable firewalld.service
(2)设置开机禁用防火墙:systemctl disable firewalld.service
(3)启动防火墙:systemctl start firewalld
(4)关闭防火墙:systemctl stop firewalld
(5)检查防火墙状态:systemctl status firewalld
完成后,开始安装Grafana(或者使用清华大学镜像https://mirrors.tuna.tsinghua.edu.cn/grafana/yum/rpm/),下载:
[root@localhost ~]#wget https://mirrors.tuna.tsinghua.edu.cn/grafana/yum/rpm/grafana-7.1.0-1.x86_64.rpm
安装:
[root@localhost ~]# yum localinstall grafana-7.1.0-1.x86_64.rpm
启动grafana并设置为开机启动:
[root@localhost ~]# systemctl start grafana-server.service
[root@localhost ~]# systemctl enable grafana-server.service
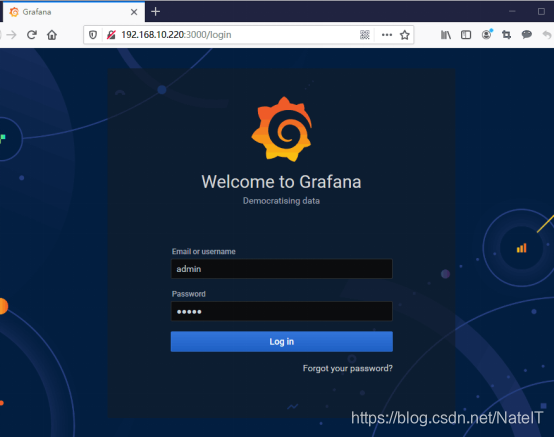
使用http://39.99.160.163:3000/login,输入用户名密码,都为admin:
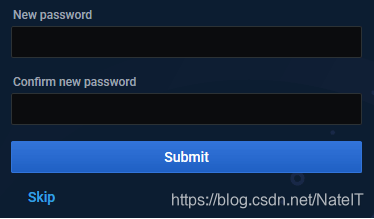
输入新密码:
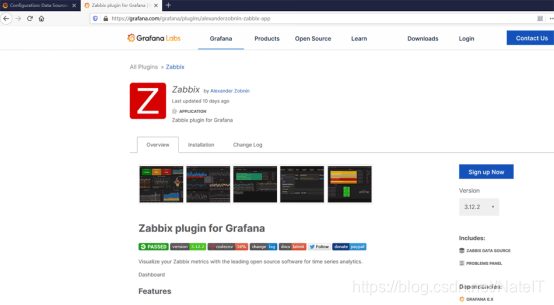
完成安装后,开始添加ZABBIX数据源:
进入Grafana官网页面,查看Installation安装方法
https://grafana.com/grafana/plugins/alexanderzobnin-zabbix-app
在Grafana服务器上使用命令grafana-cli plugins install alexanderzobnin-zabbix-app开始安装:
[root@localhost ~]# grafana-cli plugins install alexanderzobnin-zabbix-app
[root@ZB ~]# grafana-cli plugins install alexanderzobnin-zabbix-app
installing alexanderzobnin-zabbix-app @ 3.12.4
from: https://grafana.com/api/plugins/alexanderzobnin-zabbix-app/versions/3.12.4/download
into: /var/lib/grafana/plugins
✔ Installed alexanderzobnin-zabbix-app successfully
Restart grafana after installing plugins . <service grafana-server restart>
然后重启动Grafana服务:
[root@localhost ~]# systemctl restart grafana-server.service
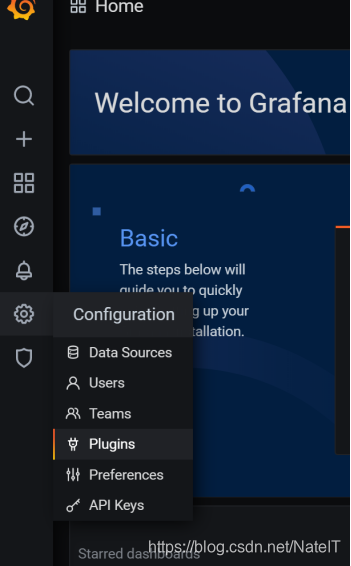
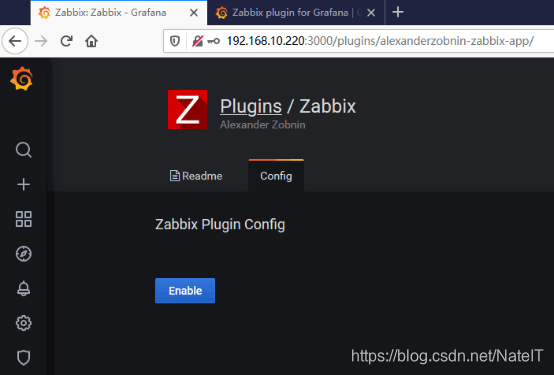
完成后进入刚安装成功的Plugins菜单的Zabbix插件,点击【Enable】启动插件,如下图
进入Configuration->Add data source
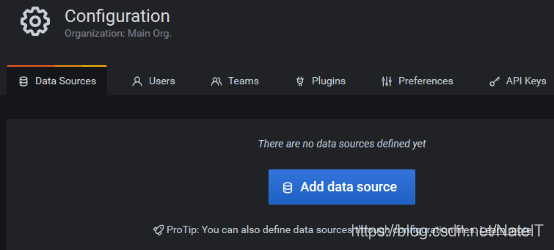
点击【Selcet】

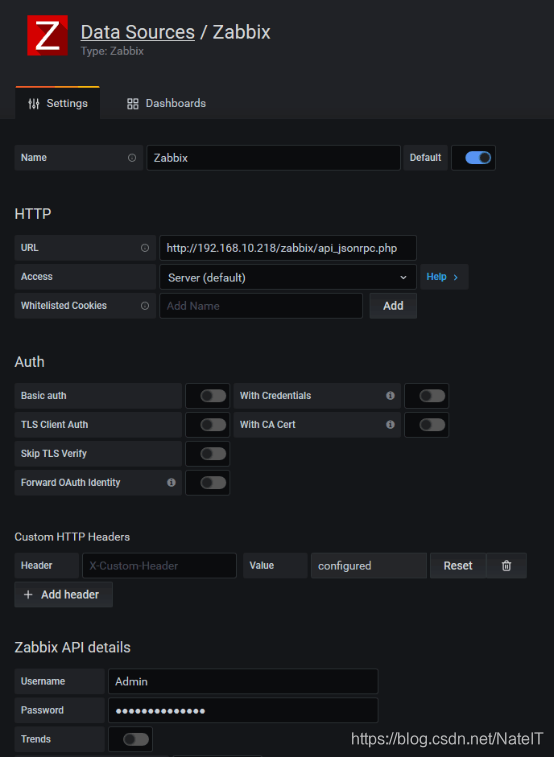
配置Data Sources中的Zabbix,输入ZABBIX URL:http://39.99.160.163/zabbix/api_jsonrpc.php,以及输入ZABBIX平台的用户名及密码
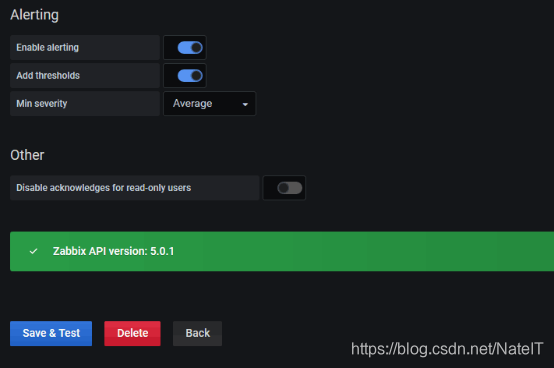
开启警告,完成后点击【Save&Test】测试并添加,如下图。
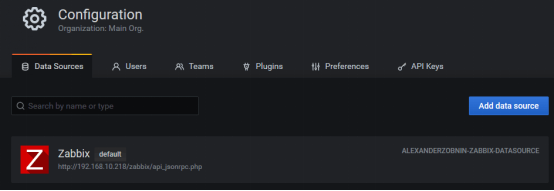
至此全部安装完成并设置,后期在面板中直接调用ZABBIX数据源即可。
6 Zabbix5.0监控cisco交换机配置
6.1开启交换机SNMP协议
连接交换机,运行enable进入用户模式。
Switch>enable
Switch#
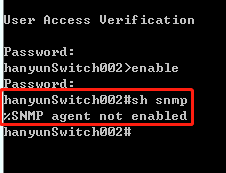
运行sh snmp查看SNMP协议是否开启
Switch#sh snmp
运行config t进入全局配置模式
Switch# config terminal
Switch<config>#
设置只读字符串, public为团体名称,ro为只读
Switch<config>#snmp-server community public ro
启用snmp陷井,允许交换机将所有类型SNMP Trap发送出去
Switch<config>#snmp-server enable traps snmp
SNMP采用版本2,public作为团体名称,192.168.1.75为zabbix-server地址
Switch<config>#snmp-server host 192.168.1.75 version 2c public
指定SNMP Trap的接收者为192.168.1.75(zabbix-server地址),发送Trap时采用public作为团体名称
Switch<config>#snmp-server host 192.168.1.75 traps public
设置vlan1虚接口IP地址做为snmp trap信息的发布地址
Switch<config>#snmp-server trap-source vlan 1
6.2配置zabbix
登录zabbix系统,点击配置——主机群组——创建主机群组创建一个snmp主机群组


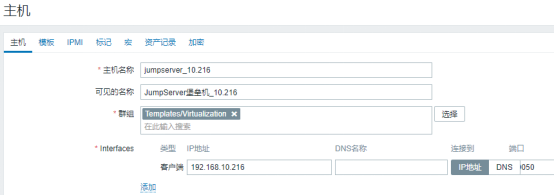
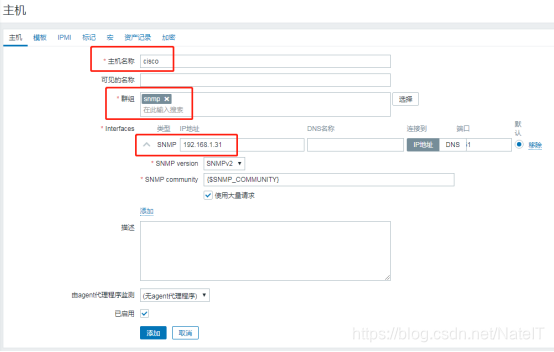
点击配置——主机——创建主机

填写主机名称,选择群组为snmp,移除客户端类型,点击添加按钮,添加SNMP类型

要移除这个。
然后,点击添加:
IP地址填写为交换机的IP地址
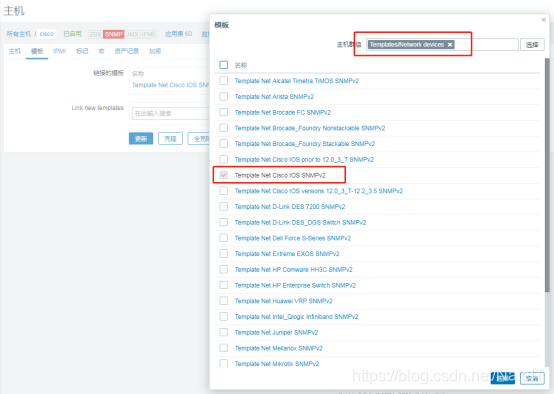
主机添加完成后点击进入该主机,选择模板
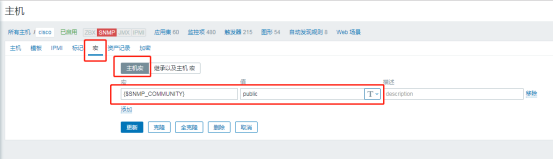
点击宏按钮添加主机宏
宏 {$SNMP_COMMUNITY} 值 public
7 Zabbix5.0触发器配置以及拓扑图配置介绍
7.1触发器配置
登录zabbix点击左侧导航栏的配置,点击主机

选择需要添加触发器的主机,点击触发器,右上角创建触发器

填写触发器相关基本内容
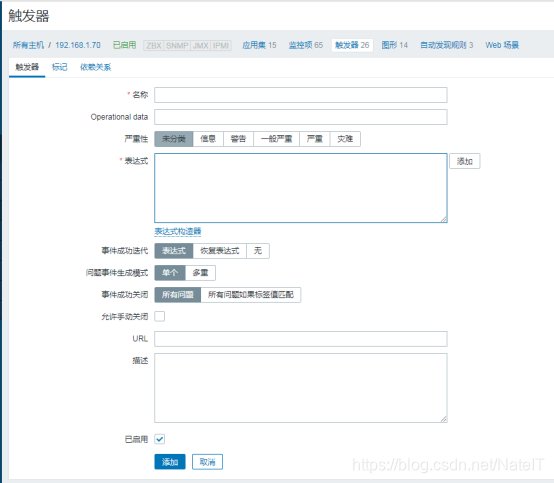
点击表达式的添加按钮,添加触发器的条件
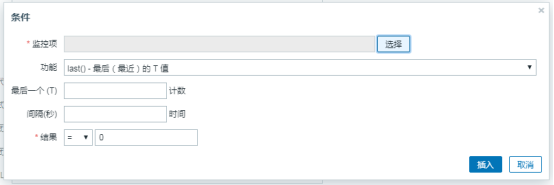
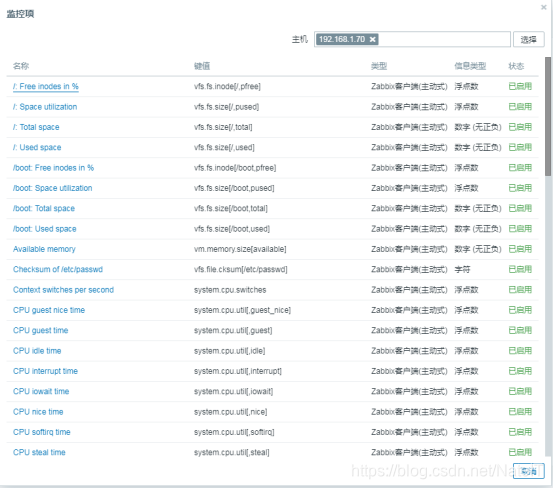
选择监控项,在此主机的某监控项上面添加触发条件
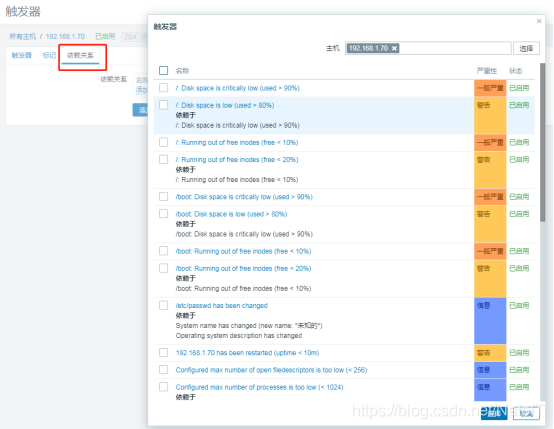
点击依赖关系,可根据需要添加依赖
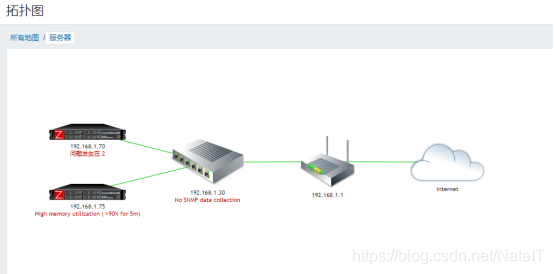
7.2拓扑图配置
登录zabbix点击左侧导航栏的检测,点击拓扑图

点击右上角创建拓扑图,填写相关信息
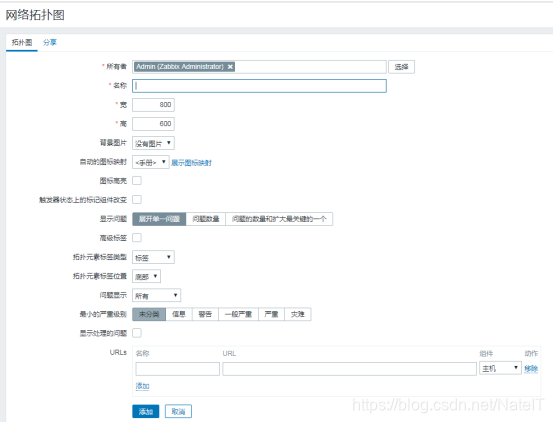
创建完成后,点击新创建的拓扑图,右上角编辑拓扑图

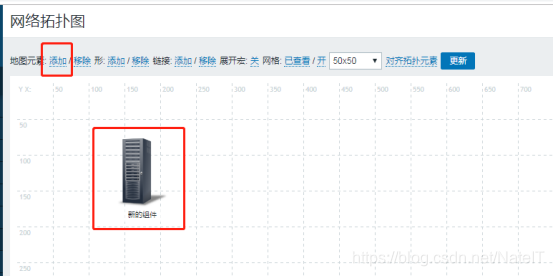
点击添加地图元素,即添加一个元素到拓扑图中
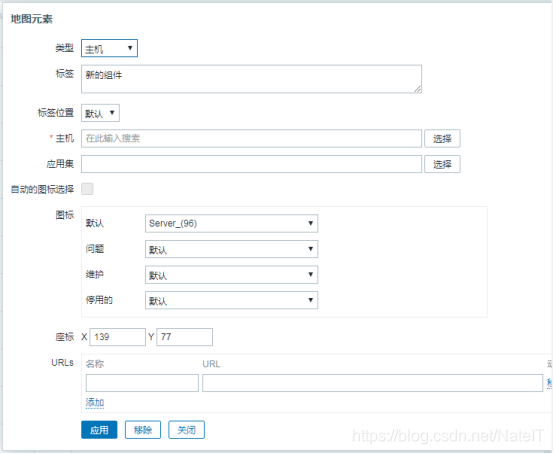
点击此元素,可对该元素进行修改,修改完成后点击应用
点击选择一个元素,按住Ctrl键选择其他元素,点击链接后面的添加,即将两个元素相连接
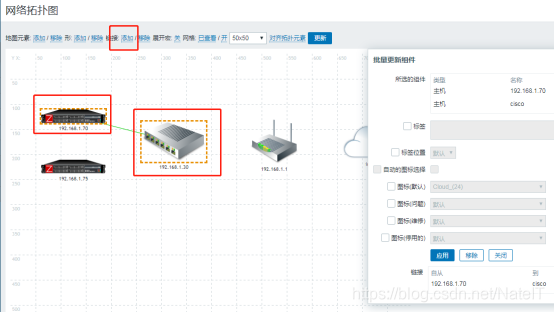
拓扑图编辑好之后,点击更新按钮保存
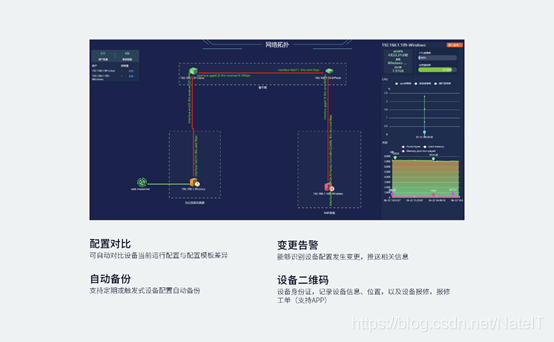
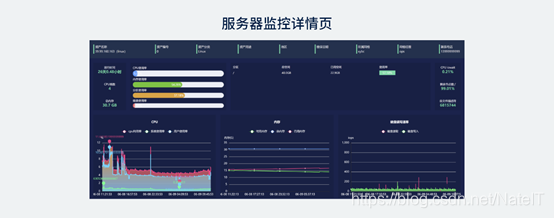
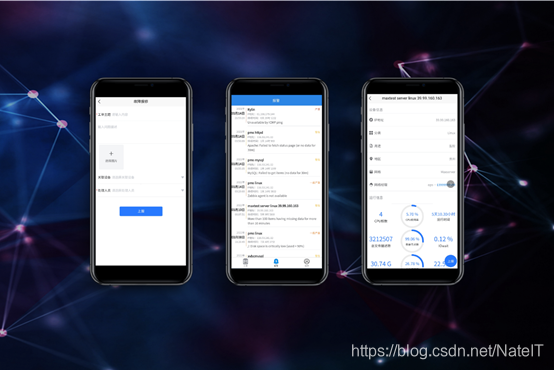
超级好用的IT监系统,Netpod网络星球会成为新一代运维监控软件吗?
感兴趣的同学,联系作者 NateIT


 357
357

 被折叠的 条评论
为什么被折叠?
被折叠的 条评论
为什么被折叠?
 到【灌水乐园】发言


