


目录
前言
在AI技术快速发展的浪潮中,Java生态系统迫切需要一套简洁高效的AI集成解决方案。Spring AI应运而生,不仅完美填补了这一技术空白,更凭借与Spring生态系统的深度整合,让开发者无需切换技术栈就能轻松构建企业级AI应用。
一、Spring AI 核心认知
1.1 技术定位与核心价值
Spring AI 并非 AI 模型本身,而是 “Spring 生态与 AI 模型的中间件”,核心价值体现在三方面:
解耦模型依赖:屏蔽不同 AI 服务(OpenAI/Anthropic/ 本地模型)的底层差异,提供统一 API
降低开发门槛:复用 Spring 注解驱动、自动配置、依赖注入等特性,无需从零学习 AI 模型调用
企业级适配:支持权限控制、可观测性、分布式部署,满足生产环境要求
1.2 版本支持与生态兼容性
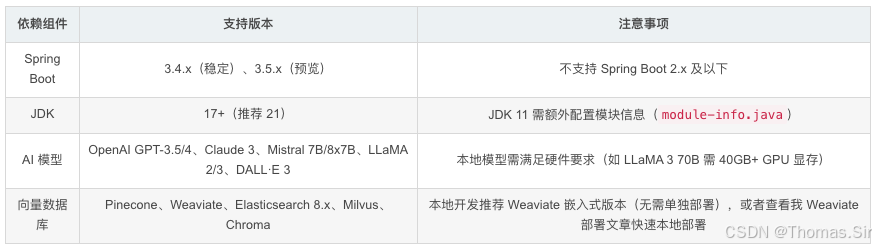
1.3 与其他 AI 集成框架对比

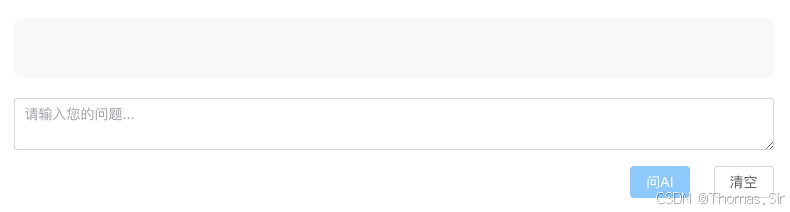
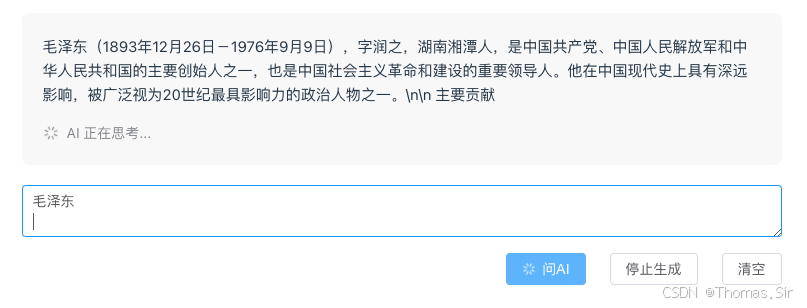
二、效果展示
三、快速入门
3.1 环境准备
-
JDK 配置
- 下载 JDK 17:选择 Oracle JDK 17 或 OpenJDK 17
- 版本验证:执行
java -version命令,确认输出包含 17.0.x 版本号- 环境变量设置:配置
JAVA_HOME变量指向 JDK 安装目录
-
AI 服务密钥准备
deepseek 密钥:
登录 deepseek 平台→ 进入个人中心 → API Keys→ 创建新密钥通义千问密钥:
登录通义千问平台→ 进入个人中心 → 密钥管理→ 创建 API 密钥本地模型:
无需密钥→ 需提前下载模型文件(如通过 Ollama 部署 LLaMA 3)
3.2 后端项目创建
主要技术栈
springboot 3.5.8 + jdk17 + spring-ai 1.1.0 + redis 6.0
pom.xml 配置
<?xml version="1.0" encoding="UTF-8"?>
<project xmlns="http://maven.apache.org/POM/4.0.0" xmlns:xsi="http://www.w3.org/2001/XMLSchema-instance"
	xsi:schemaLocation="http://maven.apache.org/POM/4.0.0 https://maven.apache.org/xsd/maven-4.0.0.xsd">
	<modelVersion>4.0.0</modelVersion>
	<parent>
		<groupId>org.springframework.boot</groupId>
		<artifactId>spring-boot-starter-parent</artifactId>
		<version>3.5.8</version>
		<relativePath/>
	</parent>
	<groupId>com.thoms</groupId>
	<artifactId>spring-ai</artifactId>
	<version>0.0.1-SNAPSHOT</version>
	<properties>
		<java.version>17</java.version>
		<spring-ai.version>1.1.0</spring-ai.version>
	</properties>
	<dependencies>
		<dependency>
			<groupId>org.springframework.boot</groupId>
			<artifactId>spring-boot-starter-security</artifactId>
		</dependency>
		<dependency>
			<groupId>org.springframework.boot</groupId>
			<artifactId>spring-boot-starter-web</artifactId>
		</dependency>
		<!-- Actuator for monitoring -->
		<dependency>
			<groupId>org.springframework.boot</groupId>
			<artifactId>spring-boot-starter-actuator</artifactId>
		</dependency>
		<!-- Micrometer for metrics -->
		<dependency>
			<groupId>io.micrometer</groupId>
			<artifactId>micrometer-core</artifactId>
		</dependency>
        <dependency>
            <groupId>org.springframework.ai</groupId>
            <artifactId>spring-ai-redis-store</artifactId>
        </dependency>
		<dependency>
			<groupId>org.springframework.ai</groupId>
			<artifactId>spring-ai-advisors-vector-store</artifactId>
		</dependency>
        <!-- Redis Dependencies -->
        <dependency>
            <groupId>org.springframework.boot</groupId>
            <artifactId>spring-boot-starter-data-redis</artifactId>
        </dependency>
		<dependency>
			<groupId>org.springframework.ai</groupId>
			<artifactId>spring-ai-starter-model-openai</artifactId>
		</dependency>
		<dependency>
			<groupId>org.springframework.ai</groupId>
			<artifactId>spring-ai-starter-vector-store-weaviate</artifactId>
		</dependency>
        <dependency>
            <groupId>org.projectlombok</groupId>
            <artifactId>lombok</artifactId>
        </dependency>
        <dependency>
            <groupId>org.springframework.boot</groupId>
            <artifactId>spring-boot-starter-test</artifactId>
            <scope>test</scope>
        </dependency>
    </dependencies>
	<dependencyManagement>
		<dependencies>
			<dependency>
				<groupId>org.springframework.ai</groupId>
				<artifactId>spring-ai-bom</artifactId>
				<version>${spring-ai.version}</version>
				<type>pom</type>
				<scope>import</scope>
			</dependency>
		</dependencies>
	</dependencyManagement>

	<build>
		<plugins>
			<plugin>
				<groupId>org.springframework.boot</groupId>
				<artifactId>spring-boot-maven-plugin</artifactId>
			</plugin>
		</plugins>
	</build>

</project>
application.yml 配置
spring:
  application:
    name: spring-ai
  ###### Deepseek 配置 #######
  ai:
    openai:
      api-key: sk-**************6cce8218b # 配置自己的key
      base-url: https://api.deepseek.com # 通义千问则配置 https://dashscope.aliyuncs.com/compatible-mode
      chat:
        options:
          model: deepseek-chat # 通义千问则配置 qwen-plus
          temperature: 1.3
          max-tokens: 4096
  ######## weaviate 向量数据库配置 #####
    vectorstore:
      weaviate:
        scheme: http
        host: localhost:8080
  #### 本地 Ollama 模型配置 ####
  #    ollama:
  #      base-url: http://localhost:11434
  #      chat:
  #        model: llama3
  #        temperature: 0.6
  #### Redis 配置 ####
  data:
    redis:
      # Redis服务器地址
      host: 127.0.0.1
      # Redis服务器端口
      port: 6379
      # Redis数据库索引(默认为0)
      database: 0
      # Redis服务器连接密码(默认为空)
      password: 123456
      # 连接超时时间
      timeout: 10s
      lettuce:
        pool:
          # 连接池最大连接数
          max-active: 20
          # 连接池最大阻塞等待时间(使用负值表示没有限制)
          max-wait: -1ms
          # 连接池最大空闲连接
          max-idle: 10
          # 连接池最小空闲连接
          min-idle: 2
server:
  port: 9999
Java 主要代码类
- ChatEntity.java
import java.io.Serializable;

/**
 * @author Thomas
 * @version v1.0
 * @createDate 2026/3/2 6:28 PM
 */

@Data
public class ChatEntity implements Serializable {
    /**
     * 用户ID-前端生成UUID
     */
    private String userId;
    /**
     * 查询内容-前端传过来
     */
    private String prompt;
}- AiConfig.java
import org.springframework.ai.chat.client.ChatClient;
import org.springframework.context.annotation.Bean;
import org.springframework.context.annotation.Configuration;

@Configuration
public class AiConfig {

    @Bean
    public ChatClient chatClient(ChatClient.Builder builder) {
        return builder.build();
    }
}-
SSEMsgType.java
/**
 * SSE消息类型枚举
 */
public enum SSEMsgType {
    MESSAGE("message", "单次发送的普通信息"),
    ADD("add", "消息追加,适用于流式stream推送"),
    FINISH("finish", "消息发送完成"),
    CUSTOM_EVENT("custom_event", "自定义消息类型"),
    DONE("done", "消息发送完成");

    public final String type;
    public final String value;

    SSEMsgType(String type, String value) {
        this.type = type;
        this.value = value;
    }
}-
SSEServer.java
package com.thomas.springai.sse;

import lombok.extern.slf4j.Slf4j;
import org.springframework.util.CollectionUtils;
import org.springframework.web.servlet.mvc.method.annotation.SseEmitter;

import java.io.IOException;
import java.util.Map;
import java.util.concurrent.ConcurrentHashMap;
import java.util.function.Consumer;

/**
 * 构造 SSE 服务
 * @author thomas
 * @createDate 2026.3.3
 */
@Slf4j
public class SSEServer {
    /**
     * 存放所有用户的SseEmitter连接
     */
    private static final Map<String, SseEmitter> sseClients = new ConcurrentHashMap<>();

    /**
     * 根据用户ID建立连接
     * @param userId 用户ID
     * @return SseEmitter
     */
    public static SseEmitter connect(String userId) {
        // 设置超时时间为0,即不超时
        SseEmitter sseEmitter = new SseEmitter(0L);

        // 注册回调函数
        sseEmitter.onTimeout(timeoutCallback(userId));
        sseEmitter.onCompletion(completionCallback(userId));
        sseEmitter.onError(errorCallback(userId));

        sseClients.put(userId, sseEmitter);
        log.info("SSE connect, userId: {}", userId);
        return sseEmitter;
    }

    /**
     * 发送消息到指定用户
     * @param userId 用户ID
     * @param message 消息
     * @param msgType SSEMsgType
     */
    public static void sendMsg(String userId, String message, SSEMsgType msgType) {
        if (CollectionUtils.isEmpty(sseClients)) return;

        if (sseClients.containsKey(userId)) {
            SseEmitter sseEmitter = sseClients.get(userId);
            sendEmitterMessage(sseEmitter, userId, message, msgType);
        }
    }

    /**
     * 发送消息到所有用户
     * @param message 消息
     */
    public static void sendMsgToAllUsers(String message) {
        if (CollectionUtils.isEmpty(sseClients)) return;

        sseClients.forEach((userId, sseEmitter) -> {
            sendEmitterMessage(sseEmitter, userId, message, SSEMsgType.MESSAGE);
        });
    }

    /**
     * 前端监听消息方法
     * @param sseEmitter SseEmitter
     * @param userId 用户ID
     * @param message 消息
     * @param msgType SSEMsgType
     */
    private static void sendEmitterMessage(SseEmitter sseEmitter, String userId,
                                           String message, SSEMsgType msgType) {
        // 指定事件名称,前端根据这个名称监听
        SseEmitter.SseEventBuilder msgEvent = SseEmitter.event()
                .id(userId)
                .data(message)
                .name(msgType.type);
        try {
            sseEmitter.send(msgEvent);
        } catch (IOException e) {
            log.error("SSE send message error, userId: {}, error: {}", userId, e.getMessage());
            // 发送异常时,移除该连接
            close(userId);
        }
    }

    /**
     * 关闭连接
     * @param userId 用户ID
     */
    public static void close(String userId) {
        SseEmitter emitter = sseClients.get(userId);
        if (emitter != null) {
            emitter.complete();
            sseClients.remove(userId);
        }
    }

    /**
     * 回调函数实现
     * @param userId 用户ID
     * @return Runnable
     */
    private static Runnable timeoutCallback(String userId) {
        return () -> {
            log.warn("SSE timeout, userId: {}", userId);
            sseClients.remove(userId);
        };
    }

    private static Runnable completionCallback(String userId) {
        return () -> {
            log.info("SSE completion, userId: {}", userId);
            sseClients.remove(userId);
        };
    }

    private static Consumer<Throwable> errorCallback(String userId) {
        return throwable -> {
            log.error("SSE error, userId: {}, error: {}", userId, throwable.getMessage());
            sseClients.remove(userId);
        };
    }
}-
SSEController.java
import org.springframework.http.MediaType;
import org.springframework.web.bind.annotation.GetMapping;
import org.springframework.web.bind.annotation.RequestMapping;
import org.springframework.web.bind.annotation.RequestParam;
import org.springframework.web.bind.annotation.RestController;
import org.springframework.web.servlet.mvc.method.annotation.SseEmitter;

/**
 * 前端需要连接SSE服务器
 * @author thomas
 * @createDate 2026.3.3
 */
@RestController
@RequestMapping("/sse")
public class SSEController {

    @GetMapping(path = "/connect", produces = {MediaType.TEXT_EVENT_STREAM_VALUE})
    public SseEmitter connect(@RequestParam String userId) {
        return SSEServer.connect(userId);
    }
}
ChatService.java
/**
 * 聊天服务
 * @author thomas
 * @createDate 2026.3.3
 */
public interface ChatService {
    void doChat(ChatEntity chatEntity);
}-
ChatServiceImpl.java
import lombok.extern.slf4j.Slf4j;
import org.springframework.ai.chat.client.ChatClient;
import org.springframework.beans.factory.annotation.Autowired;
import org.springframework.stereotype.Service;
import reactor.core.publisher.Flux;

/**
 * 聊天服务实现类
 * @author thomas
 * @createDate 2026.3.3
 */
@Service
@Slf4j
public class ChatServiceImpl implements ChatService {

    private final ChatClient chatClient;

    @Autowired
    public ChatServiceImpl(ChatClient chatClient) {
        this.chatClient = chatClient;
    }

    @Override
    public void doChat(ChatEntity chatEntity) {
        String userId = chatEntity.getUserId();
        String prompt = chatEntity.getPrompt();

        // 获取 ChatClient 的流式响应
        Flux<String> stringFlux = chatClient.prompt(prompt).stream().content();

        // 订阅流并实时推送
        stringFlux.doOnError(throwable -> {
            log.error("AI Stream error: " + throwable.getMessage());
            SSEServer.sendMsg(userId, "AI service error", SSEMsgType.FINISH);
            SSEServer.close(userId);
        }).subscribe(
            content -> SSEServer.sendMsg(userId, content, SSEMsgType.ADD),
            error -> log.error("Error processing stream: " + error.getMessage()),
            () -> {
                SSEServer.sendMsg(userId, "done", SSEMsgType.FINISH);
                SSEServer.close(userId);
            }
        );
    }
}-
SSEChatController.java
package com.thomas.springai.sse;

import jakarta.annotation.Resource;
import org.springframework.ai.chat.client.ChatClient;
import org.springframework.beans.factory.annotation.Autowired;
import org.springframework.web.bind.annotation.PostMapping;
import org.springframework.web.bind.annotation.RequestBody;
import org.springframework.web.bind.annotation.RequestMapping;
import org.springframework.web.bind.annotation.RestController;

/**
 * 聊天控制器
 * @author thomas
 * @createDate 2026.3.3
 */
@RestController
@RequestMapping("/ai")
public class SSEChatController {

    private final ChatClient chatClient;

    @Autowired
    public SSEChatController(ChatClient chatClient) {
        this.chatClient = chatClient;
    }

    @Resource
    private ChatService chatService;

    /**
     * 流式响应接口
     * MediaType.TEXT_EVENT_STREAM 用于 SSE(Server-Sent Events)
     * produces = MediaType.TEXT_EVENT_STREAM_VALUE
     */
    @PostMapping(value = "/stream")
    public void streamChat(@RequestBody ChatEntity chatEntity) {
        chatService.doChat(chatEntity);
    }
}
以上代码复制到自己项目中即可运行!
3.3 常见问题排查
依赖下载失败
-
问题现象:Maven/Gradle 无法拉取 Spring AI 快照版本依赖
-
解决方案:
- 检查仓库配置是否包含 Spring 快照仓库
- 排除镜像对快照仓库的拦截(修改 settings.xml)
<mirror>
<id>aliyunmaven</id>
<name>阿里云中央仓库</name>
<url>https://maven.aliyun.com/repository/public</url>
<mirrorOf>*,!spring-snapshots,!central-portal-snapshots</mirrorOf>
</mirror>
3.清理本地仓库缓存(Maven:mvn clean install -U;Gradle:gradle clean build --refresh-dependencies)
3.4 前端项目创建
3.4.1 创建空项目
npm create vue@3.2
根据提示创建项目名称为 spring-ai-vue 的项目,建议创建空项目
3.4.2 进入项目
cd spring-ai-vue
3.4.3 依次下载依赖
npm install
npm install element-plus
npm install vue3-markdown-it
package.json 配置
{
  "name": "spring-ai-vue",
  "version": "0.0.0",
  "private": true,
  "scripts": {
    "dev": "vite",
    "build": "vite build",
    "preview": "vite preview"
  },
  "dependencies": {
    "@microsoft/fetch-event-source": "^2.0.1",
    "element-plus": "^2.13.3",
    "vue": "^3.2.45",
    "vue-router": "^4.1.6",
    "vue3-markdown-it": "^1.0.10"
  },
  "devDependencies": {
    "@vitejs/plugin-vue": "^3.2.0",
    "vite": "^3.2.4"
  }
}
vite.config.js 配置
import { fileURLToPath, URL } from 'node:url'

import { defineConfig } from 'vite'
import vue from '@vitejs/plugin-vue'

// https://vitejs.dev/config/
export default defineConfig({
  plugins: [vue()],
  resolve: {
    alias: {
      '@': fileURLToPath(new URL('./src', import.meta.url))
    }
  },
  server: {
    port: 5151,
	open: true, // 项目运行时打开外置浏览器
	cors: true, // 允许跨域
	fs: {
		strict: true
	},
	// 代理后端接口
	proxy: {
		'/ai/': {
			target: 'http://localhost:9999',
			changeOrigin: true
		},
		'/sse/': {
			target: 'http://localhost:9999',
			changeOrigin: true
		}
	}
  }
})
main.js
import { createApp } from 'vue'
import ElementPlus from 'element-plus'
import 'element-plus/dist/index.css'
import App from './App.vue'
// import router from './router'

import './assets/main.css'

const app = createApp(App)

// app.use(router)
app.use(ElementPlus)

app.mount('#app')
App.vue
<template>
  <div class="ai-chat-container">
    <div class="chat-display" ref="chatDisplay">
      <div v-if="answerText" class="markdown-body">
        <MarkdownIt :source="answerText"/>
      </div>
      <div v-if="isStreaming" class="streaming-indicator">
        <el-icon :size="16" class="is-loading"><Loading /></el-icon>
        <span style="margin-left: 8px;">AI 正在思考...</span>
      </div>
    </div>

    <div class="input-area">
      <el-input
        v-model="form.prompt"
        type="textarea"
        :rows="2"
        placeholder="请输入您的问题..."
        @keyup.enter="handleSubmit"
      />
    </div>

    <div class="action-bar">
      <el-button
        type="primary"
        @click="handleSubmit"
        :loading="isStreaming"
        :disabled="!form.prompt.trim()"
      >
        问AI
      </el-button>
      <el-button
        v-if="isStreaming"
        @click="stopGenerate"
      >
        停止生成
      </el-button>
      <el-button @click="clearHistory">
        清空
      </el-button>
    </div>
  </div>
</template>

<script setup>
import { ref, reactive, onUnmounted, nextTick } from 'vue';
import MarkdownIt from 'vue3-markdown-it';
import 'element-plus/dist/index.css';
import { ElMessage } from 'element-plus';
import { Loading } from '@element-plus/icons-vue';

// 响应式数据
const uuid = crypto.randomUUID();
const answerText = ref('');
const isStreaming = ref(false);
const chatDisplay = ref(null);
const form = reactive({
  prompt: '',
  userId: uuid
});
const url = "/sse/connect?userId=" + uuid;
// 建立SSE连接
function connectSSE() {
    const eventSource = new EventSource(url);
    // 监听'add'事件接收流式内容
    eventSource.addEventListener('add', (event) => {
		let result = event.data;
        if (result && result.toLowerCase() !== 'null') {
            // 收到文本片段过滤特殊字符并实时追加
			result = result.replace(/^"|"$/g, '');
			result = result.replace('data:', '');
			result = result.replace('data:', '');
			result = result.replace('###', '');
			result = result.replace(/\n/g, '');
            answerText.value += result;
            // 自动滚动到底部
            scrollToBottom();
        }
    });

    // 监听'finish'事件
    eventSource.addEventListener('finish', (event) => {
            // 收到结束信号
            console.log('流式响应结束');
            isStreaming.value = false;
			// 保存对话历史
            saveConversation();
    });

    eventSource.onerror = (error) => {
          isStreaming.value = false;
          //ElMessage.error('请求发生错误:' + JSON.stringify(error));
    };
}

// 提交问题
const handleSubmit = async () => {
  if (!form.prompt.trim()) {
    ElMessage.warning('请输入问题内容');
    return;
  }
  if (isStreaming.value) {
    ElMessage.info('正在生成中,请稍候...');
    return;
  }

  // 清空上一次的回答
  answerText.value = '';
  isStreaming.value = true;

    // 建立SSE连接
  connectSSE();

  // 发送HTTP请求触发AI聊天
  try {
	  await fetch('/ai/stream', {
		  method: 'POST',
		  headers: { 'Content-Type': 'application/json' },
		  body: JSON.stringify(form)
	  });
  } catch (error) {
	isStreaming.value = false;
	console.error('对话请求失败:', err);
  }
};

// 停止生成
const stopGenerate = () => {
  sseClient.abort();
  isStreaming.value = false;
  ElMessage.info('已停止生成');
};

// 清空对话
const clearHistory = () => {
  answerText.value = '';
  form.prompt = '';
};

// 保存对话记录
const saveConversation = async () => {
  // 调用后端接口保存对话历史
  console.log('对话已保存');
};

// 自动滚动到底部
const scrollToBottom = () => {
  nextTick(() => {
    if (chatDisplay.value) {
      chatDisplay.value.scrollTop = chatDisplay.value.scrollHeight;
    }
  });
};

// 组件卸载时中断连接
onUnmounted(() => {
  if (isStreaming.value) {
    sseClient.abort();
  }
});
</script>

<style scoped>
.ai-chat-container {
  padding: 20px;
  width: 800px;
  text-align: center;
  border-radius: 1.3125rem;
  position: fixed;
  top: 10px;
  left: 28%;
}

.chat-display {
  min-height: 60px;
  /* max-height: 500px; */
  overflow-y: auto;
  border: 1px solid #f9f9f9;
  border-radius: 8px;
  padding: 20px;
  margin-bottom: 20px;
  background-color: #f9f9f9;
}

.markdown-body {
  text-align: left;
  line-height: 1.6;
}

.streaming-indicator {
  display: flex;
  align-items: center;
  color: #909399;
  margin-top: 16px;
  font-size: 14px;
}

.input-area {
  margin-top: 20px;
  width: 47.5rem;
  background-color: #f3f3f3;
}
.el-textarea {
	border-radius: 5px;
	background-color: #f3f3f3;
}

.action-bar {
  display: flex;
  justify-content: flex-end;
  margin-top: 16px;
  gap: 12px;
}
</style>
四、课后作业
说明:本作业题围绕Spring AI 快速入门项目展开,覆盖核心认知、环境准备、配置文件、代码实现及常见问题排查,旨在巩固项目相关知识点,贴合实操场景。
4.1 基础认知题
请简述Spring AI 的技术定位,明确其核心价值(至少回答2点),并说明它与AI模型本身的区别。
参考答案:1. 技术定位:Spring AI 并非AI模型本身,而是“Spring生态与AI模型的中间件”。2. 核心价值:① 填补Java生态AI集成解决方案的空白;② 与Spring生态深度整合,让开发者无需切换技术栈即可构建企业级AI应用。3. 与AI模型的区别:Spring AI 不提供AI模型能力,仅负责衔接Spring生态与各类AI模型(如Deepseek、通义千问、LLaMA 3),简化AI模型的集成与调用流程。
4.2 环境准备题
结合项目文档,完成以下2个问题:
-
本项目要求的JDK版本是什么?如何验证自己的JDK版本是否符合要求?
-
若使用通义千问AI服务,需如何获取API密钥?并写出通义千问在application.yml中对应的base-url和model配置值。
参考答案:1. JDK版本:要求JDK 17(Oracle JDK 17或OpenJDK 17);验证方法:执行java -version命令,确认输出包含17.0.x版本号。2. 密钥获取:登录通义千问平台→进入个人中心→密钥管理→创建API密钥;配置值:base-url为https://dashscope.aliyuncs.com/compatible-mode,model为qwen-plus。
4.3 配置文件题
观察项目中pom.xml和application.yml配置,回答以下问题:
-
pom.xml中引入的Spring AI 版本号是多少?核心的Spring AI 依赖有哪些(至少写出2个)?
-
application.yml中配置的Redis服务器地址、端口和密码分别是什么?后端项目的端口号是多少?
参考答案:1. Spring AI版本号:1.1.0;核心依赖:spring-ai-redis-store、spring-ai-starter-model-openai(或spring-ai-advisors-vector-store、spring-ai-starter-vector-store-weaviate,任选2个即可)。2. Redis配置:地址127.0.0.1,端口6379,密码123456;后端项目端口号:9999。
4.4 代码实操题
根据项目中提供的代码,完成以下操作:
-
写出ChatEntity类的核心属性(含属性说明),并说明该类的作用。
-
简述SSEServer类中connect方法的作用,以及该方法中设置SseEmitter超时时间为0的含义。
-
ChatServiceImpl类中doChat方法的核心逻辑是什么?流式响应是如何通过SSE推送到前端的?
参考答案:1. 核心属性:① userId(用户ID,前端生成的UUID);② prompt(查询内容,前端传入);作用:封装前端传入的聊天请求数据,作为前后端及后端服务间的数据传输载体。2. connect方法作用:根据用户ID建立SSE连接,注册超时、完成、异常回调函数,并将连接存入集合管理;超时时间为0的含义:SSE连接不超时,持续保持连接状态,用于接收流式响应。3. 核心逻辑:获取前端传入的用户ID和查询内容,通过ChatClient获取AI模型的流式响应;推送方式:订阅流式响应,每收到一段内容,通过SSEServer的sendMsg方法,以SSEMsgType.ADD类型推送到对应用户,响应结束后发送FINISH类型消息并关闭连接。
4.5 问题排查题
项目开发过程中,若出现Maven依赖下载失败的问题,请结合文档说明至少2种排查和解决方法。
参考答案:方法1:检查仓库配置是否包含Spring快照仓库,排除镜像对快照仓库的拦截(修改Maven的settings.xml文件);方法2:清理本地仓库缓存,Maven项目执行mvn clean install -U命令,Gradle项目执行gradle clean build --refresh-dependencies命令。
五、总结
本项目围绕Spring AI 快速入门展开,核心是帮助AI开发小白快速掌握Spring AI的集成与应用。项目清晰梳理了Spring AI的技术定位与核心价值,完成了从环境准备到前后端开发的全流程实操,涵盖JDK配置、AI服务密钥获取、Maven与YML配置,以及后端SSE流式通信、前端交互的完整实现。通过作业题可巩固核心知识点,重点掌握Spring AI依赖配置、SSE服务搭建、前后端数据交互及常见问题排查。项目兼顾理论与实操,适配新手学习节奏,同时提供了Redis等数据存储方案,为后续企业级AI应用开发奠定了坚实基础,助力开发者无需切换技术栈即可快速构建AI相关项目。
🌟 感谢您耐心阅读到这里!
🚀 技术成长没有捷径,但每一次的阅读、思考和实践,都在默默缩短您与成功的距离。
💡 如果本文对您有所启发,欢迎点赞👍、收藏📌、分享📤给更多需要的伙伴!
🗣️ 期待在评论区看到您的想法、疑问或建议,我会认真回复,让我们共同探讨、一起进步~
🔔 关注我,持续获取更多干货内容!
🤗 我们下篇文章见!


 3万+
3万+

 被折叠的 条评论
为什么被折叠?
被折叠的 条评论
为什么被折叠?
 到【灌水乐园】发言


