


 本文详细介绍微信小程序自定义组件的创建与使用方法,包括组件间的数据传递与事件触发等核心内容。
我们这里说的都是微信小程序的自定义组件的相关内容哦。
最近写了一篇关于 Vue 的 父子组件通信与事件触发 感兴趣的小伙伴欢迎前往查看。
一、组件
1. 创建组件
- 在对应目录下创建
Components文件夹,用来存放我们的自定义组件。 - 在刚刚创建的
Components文件夹中右键 “新建 Component”,创建一组组件。 - 组件类似于页面,一个自定义组件由
jsonwxmlwxssjs4个文件组成,在里面编写对应的内容即可。
2. 使用组件
-
使用已注册的自定义组件前,需要在对应的页面或者组件的
json下引入该组件{ "usingComponents": { "Component": "page/Component/Component", "ChildComponent": "page/ChildComponent/ChildComponent" } } -
引入后,在页面的
wxml中就可以像使用该组件。节点名即自定义组件的标签名,节点属性即传递给组件的属性值。// 页面 index.wxml 引入父组件 Component <view> <Component inner-text="Some text"></Component> </view>// 父组件引入子组件 ChildComponent <view> <ChildComponent></ChildComponent> </view>
二、父组件传递参数给子组件
-
父组件传值:
childValue是子组件用来接收父组件传递的值,ParentValue是父组件传递给子组件的值。// 父组件.wxml <text>这是父组件Component</text> <view> <ChildComponent childValue="{{ParentValue}}"></ChildComponent> </view>// 父组件.js Page({ data: { ParentValue : 'Parent'} }) -
子组件接收:
// 子组件.js
// 在子组件中声明要接收的数据类型
Component({
	properties: {
		childValue: String,  // String代表接收的参数类型
	}
})
使用父组件传递过来的数据:
// 子组件.wxml
<text>我是子组件ChildComponent</text>
<view>父组件传递过来的数据:{{childValue}}</view>
这样子组件就可以接收到父组件传递过来的值。
三、子组件传递参数给父组件
方式1: 通过 triggerEvent() 方法
triggerEvent()方法用法类似于Vue中的$emit()
-
给子组件自定义一个事件,并且传值
// 子组件.wxml
<view class="childContent">
  <text>我是子组件ChildComponent</text>
  <!-- <view>父组件传递过来的数据:{{childValue}}</view> -->
  <button type="primary" bindtap="handleTap">给父组件传值</button>
</view>
// 子组件.js methods: { handleTap() { // 定义要传递的数据 let value = "ChildValue" // 触发绑定事件, myevent为绑定的事件名 this.triggerEvent('myevent', value) }, } -
为父组件中引入的子组件绑定事件
// 父组件.wxml <view class="parentContent"> <text>这是父组件Component</text> <view> // 绑定子组件中`triggerEvent()`对应的事件方法 <ChildComponent bindmyevent="myevent" class="my-component"></ChildComponent> </view> <view>父组件:子组件传递过来的数据 {{ParentValue}}</view> </view> -
接收子组件传递过来的内容
// 父组件.js
methods: {
	myevent(e) {
		// 这里通过 e 就可以接收子组件传过来的内容了
		console.log(e.detail)
      	this.setData({
        	ParentValue: e.detail
		})
	}
}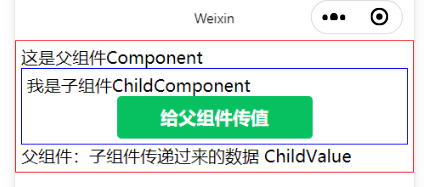
方式2: 通过在父组件里调用 this.selectComponent 获取子组件的实例对象。
为引入的子组件传入一个匹配选择器
selector,如:this.selectComponent(".my-component"),id选择器与class选择器均可。
// 父组件
getChildComponent: function () {
    const child = this.selectComponent('.my-component');
    console.log(child)
}
父组件将会获取 class 为 my-component 的子组件实例对象,即子组件的 this 对象。
四、父组件调用子组件方法
通过给子组件绑定 id 或 class 选择器,在父组件里调用 this.selectComponent 获取子组件的实例对象,就可以调用子组件中的方法。
// 子组件.js
methods: {
    Foo() {
      console.log("子组件的方法");
    }
  }
// 父组件.wxml
<view class="parentContent">
  <text>这是父组件Component</text>
  <view>
    <ChildComponent class="ChildEvent"></ChildComponent>
  </view>
  <button type="primary" bindtap="ChildFoo">父组件的按钮</button>
</view>
// 父组件.js
methods: {
	// 父组件点击事件,调用子组件方法
    ChildFoo() {
    	// 获取子组件的实例,可以提前获取
      	let Child = this.selectComponent('.ChildEvent');
      	// 调用子组件中定义的方法Foo()
      	Child.Foo();
    }
}
五、子组件调用父组件方法
子组件通过 this.triggerEvent() 来调用父组件的方法。
- 在父组件引入的子组件上添加事件与方法名:
ChildFun是子组件中的方法名,ParentFun是父组件中的方法名;
我们通过子组件的ChildFun来调用父组件的ParentFun。// 父组件.wxml <view> <ChildComponent bind:ChildFun="ParentFun"></ChildComponent> </view> - 在父组件中定义方法:
// 父组件.js methods: { ParentFun() { console.log('父组件的方法'); } } - 在子组件中添加了一个点击事件,当用户触发点击事件
clickParent()的时候,会执行子组件调用父组件:// 父组件.js methods: { clickParent() { this.triggerEvent('ChildFun' , ) } } - 点击后,子组件就会执行在父组件中的
ParentFun()。
注意:
this.triggerEvent('父组件中子组件上绑定的事件名' ,  )
# 后面的参数根据父组件的方法进行填写。
# 如果父组件没有接收参数, 则空着不写,如果接收一个参数就写一个,两个参数传入两个值。
# 比如:
# 父组件方法:
	ParentFun(res , res2) {
		console.log('父组件的方法' , res , res2);
	}
# 子组件执行方法:
	clickParent() {
		let res = "第一个参数",
		let data = "第二个参数"
		this.triggerEvent('ChildFun' , res , data )
	}
至此,小程序自定义组件的大部分使用场景都补充到了,在小程序的开发过程中对于该部分内容可以游刃有余了。
希望可以帮助到大家。有任何问题欢迎讨论留言。
各位 加油!


&spm=1001.2101.3001.5002&articleId=111563278&d=1&t=3&u=b12e6a0f57ce4dc3b6d666946f17f40c)
 9824
9824

 被折叠的 条评论
为什么被折叠?
被折叠的 条评论
为什么被折叠?
 到【灌水乐园】发言


