


Creating a Qt Quick Multilingual App
创建Qt Quick多语言应用程序
September 10, 2024 by Indivara Weerasuriya | Comments
2024年9月10日 Indivara Weerasuriya | 评论
This is a translation of the Japanese blog post Qt Quick多言語アプリの作り方 by Solutions Engineer Mikio Hirai.
这是日本博客Qt Quick的翻译多言語アプリの作り方解决方案工程师平井三夫。
This blog post provides step-by-step instructions on how to create a multilingual application with Qt Quick.
这篇博客文章提供了如何使用Qt Quick创建多语言应用程序的分步说明。
Scope
范围
- Learn how to use lupdate, lrelease, and Qt Linguist to make Qt apps available in multiple languages
- 学习如何使用lupdate、lrelease和Qt Linguist使Qt应用程序支持多种语言
- Learn how to use qsTr() and qsTrId()
- 学习如何使用qsTr()和qsTrId()
- Automate the translation workflow with CMake
- 使用CMake自动化翻译工作流程
- Translate string data in arrays and models using QT_TR_NOOP() and QT_TRID_NOOP()
- 使用QT_TR_NOOP()和QT_TID_NOOP()转换数组和模型中的字符串数据
Environment
环境
The following is the environment for the projects shown here.
以下是此处所示项目的环境。
- Windows 11
- Qt 6.7.1 (MSVC 2019) Kit
Create a Project
创建项目
Now, let's get started with creating a project. After you have installed Qt, open Qt Creator and let's do this together. You can install Qt from here.
现在,让我们开始创建一个项目。安装Qt后,打开Qt Creator,让我们一起完成。可以从这里安装Qt。
In Qt Creator, press Create Project from the Welcome screen.
在Qt Creator中,从欢迎屏幕按创建项目。

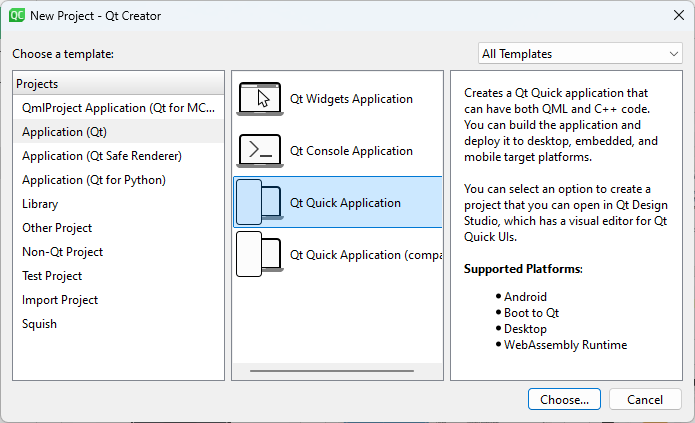
In the New Project dialog, select Application (Qt) > Qt Quick Application > Choose
在“新建项目”对话框中,选择“应用程序(Qt)”>“Qt Quick应用程序”>“选择”
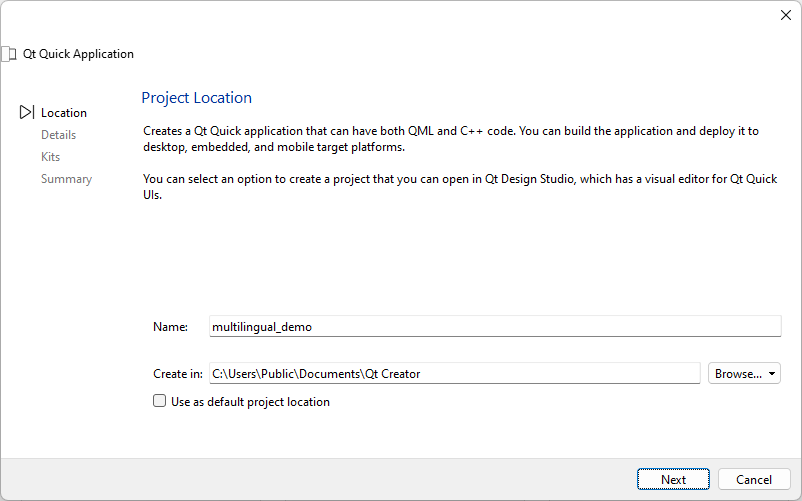
In the Project Location dialog, enter the name of the project in the Name field and the path where the project is to be created in the Create in field and and select Next.
在“项目位置”对话框的“名称”字段中输入项目名称,在“创建位置”字段中键入要创建项目的路径,然后选择“下一步”。
In the Project Details dialog, press Next without changing anything.
在“项目详细信息”对话框中,按“下一步”而不更改任何内容。

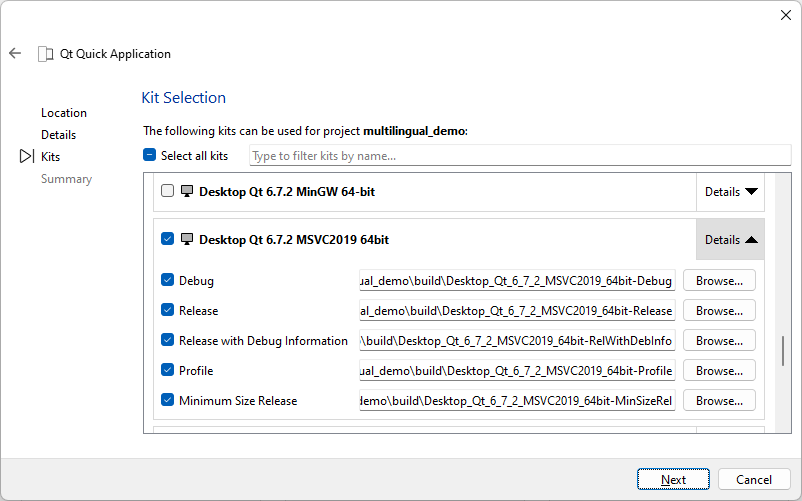
In Kit Selection, select Desktop Qt 6.7.x MSVC2029 64-bit and click Next..
在套件选择中,选择桌面Qt 6.7.x MSVC2029 64位,然后单击下一步。
In Project Management, select the version control Git. This is optional. This creates a local Git repository and a .gitignore file with common exclusion patterns for Qt.
在项目管理中,选择版本控制Git。这是可选的。这将创建一个本地Git存储库和一个.gitignore文件,其中包含Qt的常见排除模式。
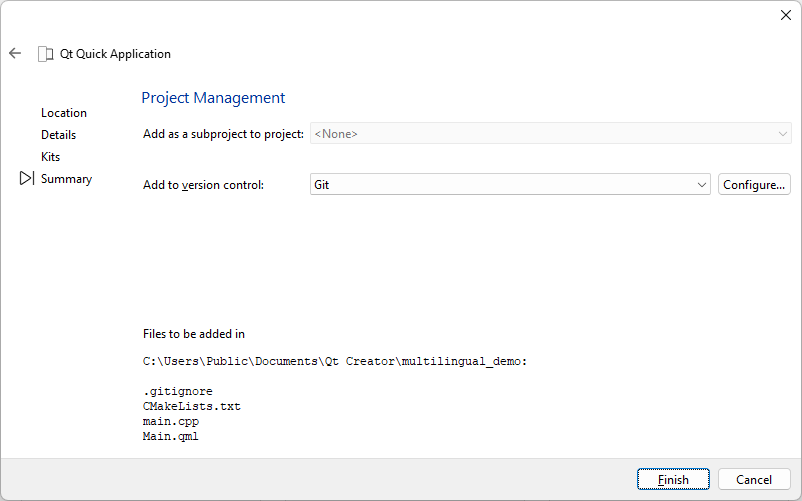
Finally select Finish to create the project.
最后选择Finish以创建项目。
Displaying Strings
显示字符串
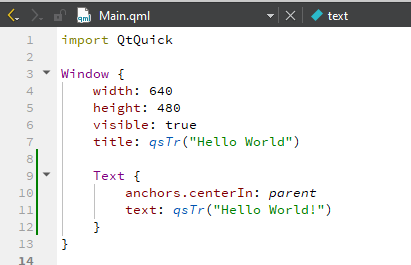
Since we are creating a multilingual application, let's start by displaying some strings. The easiest method to show strings in Qt Quick is by using the QML Text element.
由于我们正在创建一个多语言应用程序,让我们从显示一些字符串开始。在Qt Quick中显示字符串的最简单方法是使用QML Text元素。
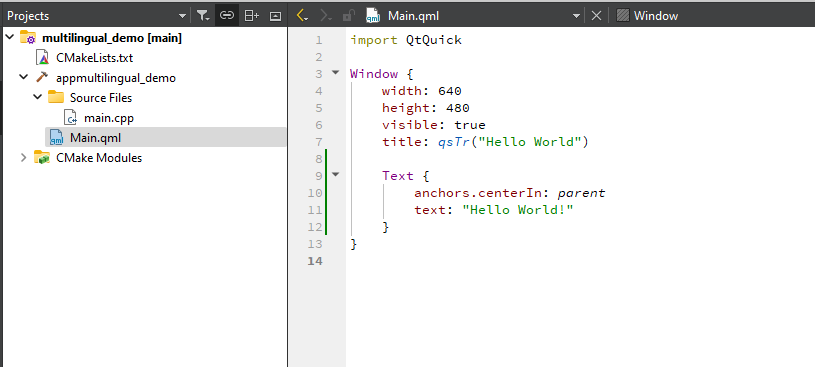
Add Text as a child element of Window in Main.qml as shown above.
在Main.qml中添加Text作为Window的子元素,如上所示。
The text property is set to “Hello World!” as the string to be displayed this time, and anchors.centerIn is set to parent. The latter setting causes the text to be displayed centered in the window.
文本属性设置为“Hello World!”作为这次要显示的字符串,anchors.centerIn设置为parent。后一种设置使文本显示在窗口的中心。
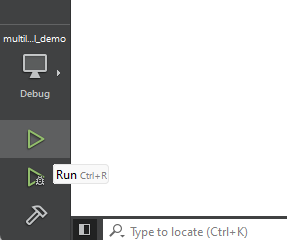
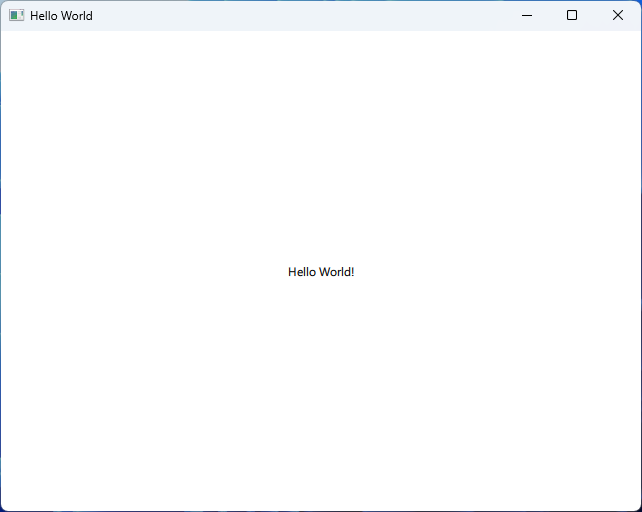
Now build and run the program by pressing the green Run button on the bottom left of Qt Creator.
现在,通过按下Qt Creator左下角的绿色run按钮来构建和运行程序。
We will change the size of the Hello World! text before translating it. Let's find out how to do this.
我们将改变Hello World的大小!在翻译之前先翻译文本。让我们来看看如何做到这一点。
In Qt Creator, pressing F1 after clicking a QML type or property will display the documentation of the selected QML type or property in the IDE.
在Qt Creator中,单击QML类型或属性后按F1将在IDE中显示所选QML类型或者属性的文档。
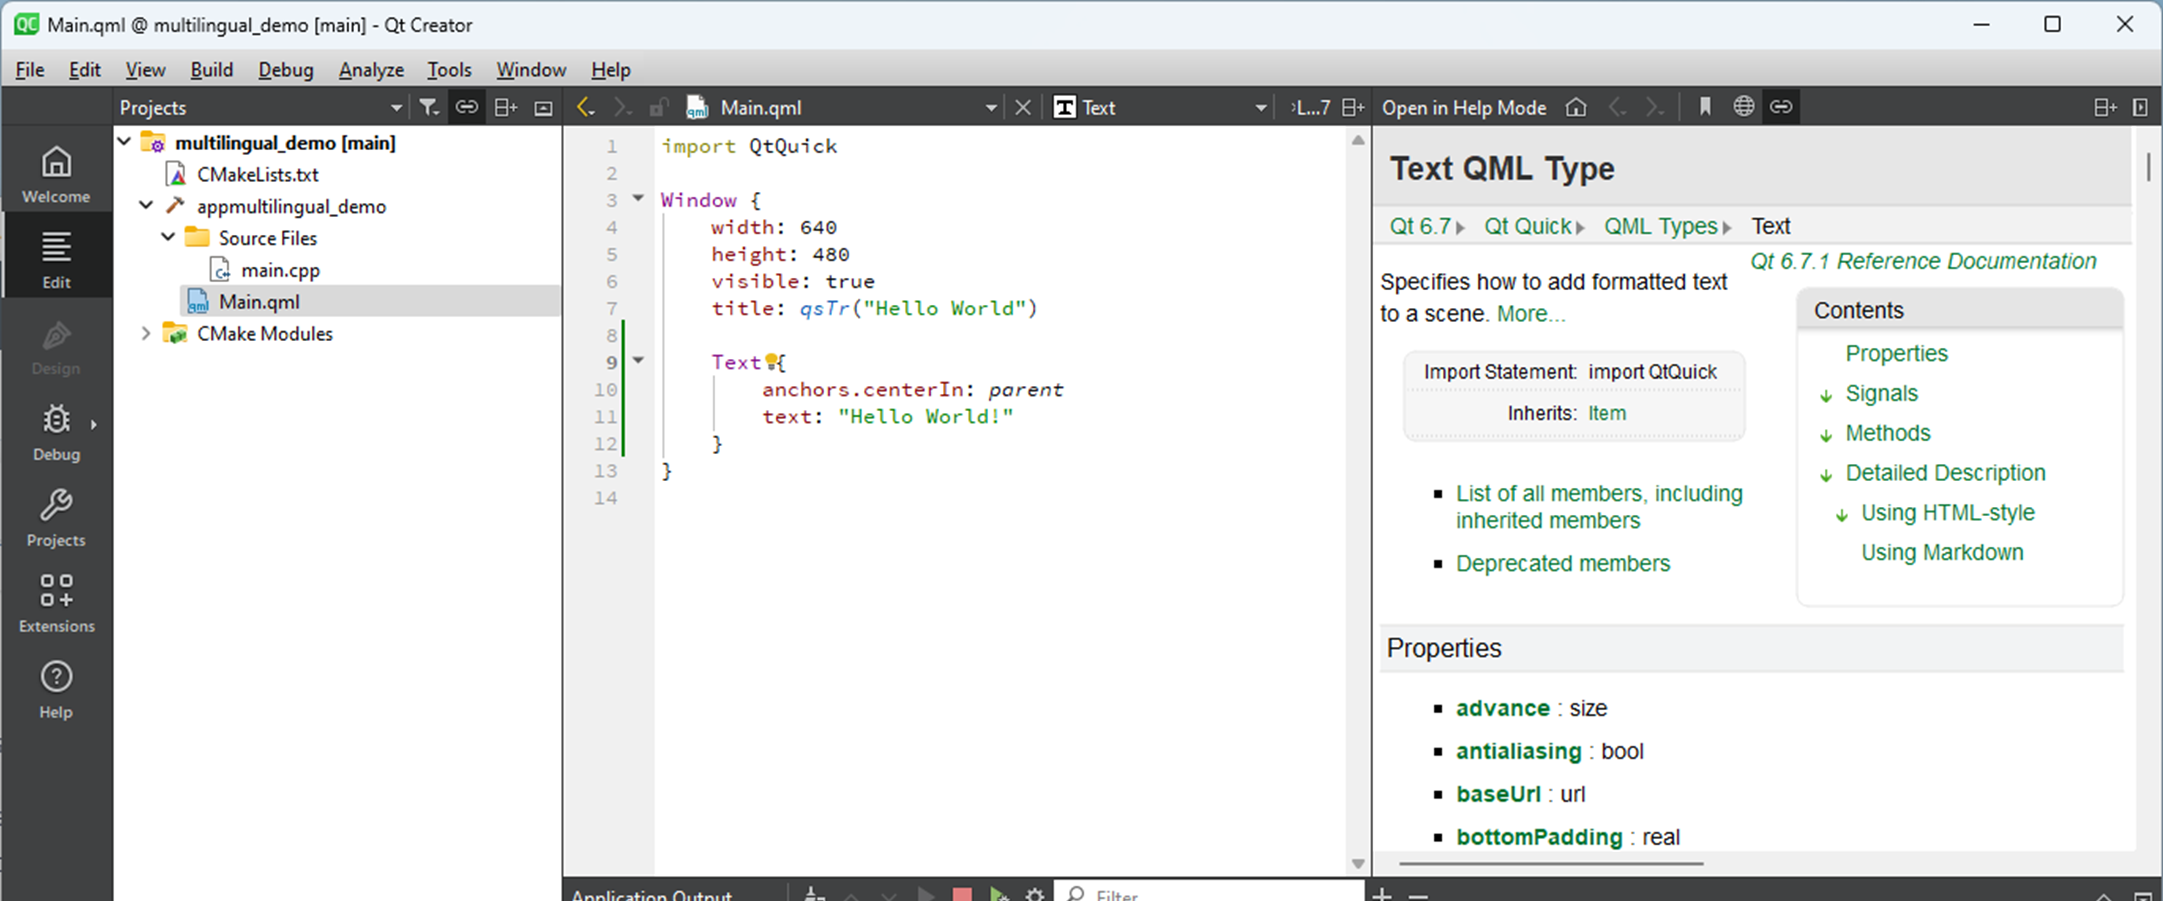
Click inside the help pane and search for "size" by pressing Ctrl + F to bring up the search box. This will find properties that are related to the size of the text. The following setting looks related.
在帮助窗格内单击,然后按Ctrl+F打开搜索框来搜索“大小”。这将查找与文本大小相关的属性。以下设置看起来是相关的。
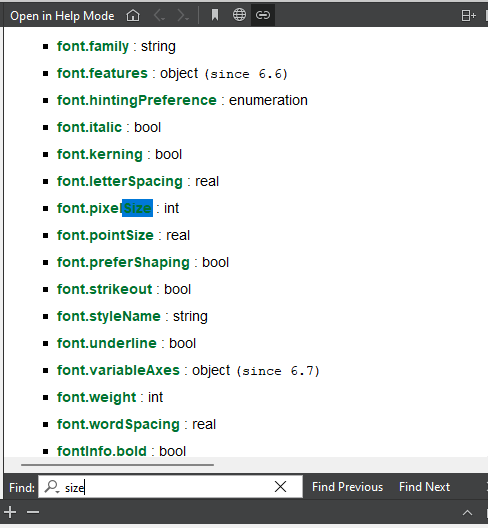
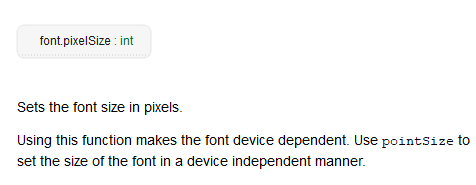
Click on font.pixelSize for more information. This looks like a property that allows you to specify the pixel size of the font in the Text element.
单击font.pixelSize了解更多信息。这看起来像是一个允许在Text元素中指定字体像素大小的属性。
| Text { anchors.centerIn: parent text: qsTr("Hello World!") font.pixelSize: 24 } |
In the QML code, set it to 24 and run the application again. The text "Hello World!" should now be bigger.
在QML代码中,将其设置为24,然后再次运行应用程序。文本“Hello World!”现在应该更大。
Let's try multilingualization
让我们尝试多语言化
Now that we have created one string, let's take a look at the multilingualization workflow. To make a string multilingual, you need to enclose it in a QML API that indicates “this string is to be translated”.
现在我们已经创建了一个字符串,让我们来看看多语言化工作流程。要使字符串成为多语言字符串,需要将其包含在QML API中,该QML指示“此字符串将被翻译”。
qsTr()
qsTr() is the most orthodox multilingual API. To use it, enclose the string to be translated as follows. Here, the argument string is the string written in the original language (in this case, English).
qsTr()是最正统的多语言API。要使用它,请将要翻译的字符串括起来,如下所示。在这里,参数字符串是用原始语言(在本例中为英语)编写的字符串。
If the application is run after this change, the result will still look the same.
如果在更改后运行应用程序,结果仍然相同。
To translate strings, you need to start with a command line tool called lupdate. It is located in the bin folder of the installation directory of the Qt kit, for example, C:\Qt\6.7.2\msvc2019_64\bin.
要翻译字符串,需要从一个名为lupdate的命令行工具开始。它位于Qt工具包安装目录的bin文件夹中,例如C:\Qt\6.7.2\msvc2019_64\bin。
When you scan your project using lupdate, it will generate a file with extension .ts which is an XML file containing the strings enclosed in qsTr() and other multilingual APIs in the QML file.
当使用lupdate扫描项目时,它将生成一个扩展名为.ts的文件,这是一个XML文件,包含QML文件中qsTr()和其他多语言API中包含的字符串。
First create a folder named i18n in your project folder. In this post, we will save our files in this folder (this is optional, you may use a different structure). Now let's generate the .ts file from our Main.qml.
首先在项目文件夹中创建一个名为i18n的文件夹。在这篇文章中,我们将把文件保存在这个文件夹中(这是可选的,可以使用不同的结构)。现在让我们从Main.qml生成.ts文件。
We will run lupdate from Qt Creator's terminal or from a command prompt. A list of command line options can be found in the documentation here. Running the command as follows will generate qml_ja_JP.ts in the i18n folder.
我们将从Qt Creator的终端或命令提示符运行lupdate。命令行选项列表可以在此处的文档中找到。按如下方式运行命令将在i18n文件夹中生成qml_ja_JP.ts。
| C:\Qt\6.7.2\msvc2019_64\bin\lupdate . -extensions qml -ts i18n/qml_ja_JP.ts Scanning directory '.'... Updating 'qml_ja_JP.ts'... Found 2 source text(s) (2 new and 0 already existing) |
This command says, “Recursively scan files with a .qml extension in the current directory and make a file called qml_ja_JP.ts in the i18n folder from the strings enclosed in APIs like qsTr()."
此命令表示,“递归扫描当前目录中扩展名为.qml的文件,并从qsTr()等API中包含的字符串在i18n文件夹中创建一个名为qml_ja_JP.ts的文件。”
Incidentally, the name of the .ts file for a multilingual QML application must start with "qml_".
顺便说一句,多语言QML应用程序的.ts文件的名称必须以“QML_”开头。
The .ts file can end with ISO-639 language code (lower case) and ISO-3166 country code (uppercase), so this time we chose ja_JP because we are creating a Japanese translation for an English source text. A .ts file is created for each language (or language + region) to be translated. In this case, only qml_ja_JP.ts was created for the English source text and Japanese target, but if you want to translate to Korean, for example, qml_ko_KR.ts should be created as well.
.ts文件可以以ISO-639语言代码(小写)和ISO-3166国家代码(大写)结尾,因此这次我们选择了ja_JP,因为我们正在为英语源文本创建日语翻译。为要翻译的每种语言(或语言+地区)创建.ts文件。在这种情况下,只为英语源文本和日语目标创建了qml_ja_JP.ts,但如果想翻译成韩语,例如,也应该创建qml_ko_KR.ts。
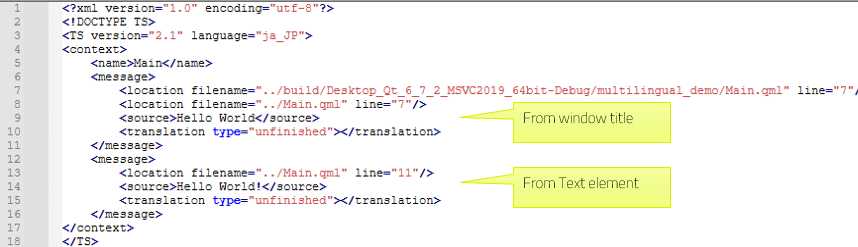
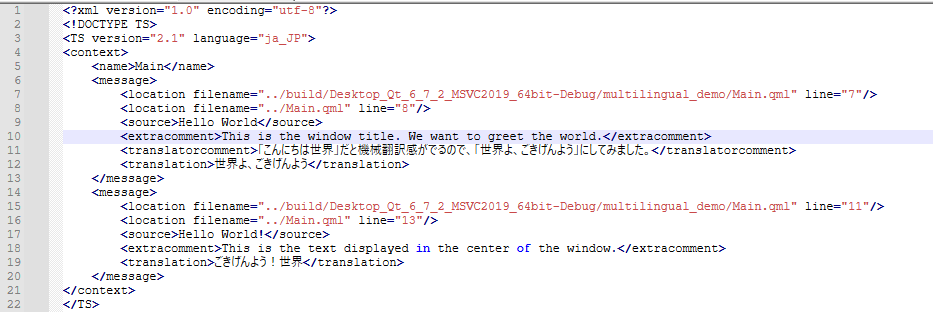
If you open the .ts file with a text editor, you will see that the two strings are included as shown below. (If you look closely, you will notice that the window title, Hello World, is was also enclosed in qsTr().
如果你用文本编辑器打开.ts文件,会看到这两个字符串如下所示。(如果仔细看,会注意到窗口标题Hello World也包含在qsTr()中。
Since it is difficult to read the .ts files when opened in a regular editor, we use a tool called Qt Linguist to edit them. It is located in the bin folder of the Qt installation directory and can be started from the Windows Start menu.
由于在常规编辑器中打开.ts文件时很难读取,因此我们使用名为Qt Linguist的工具来编辑它们。它位于Qt安装目录的bin文件夹中,可以从Windows“开始”菜单启动。
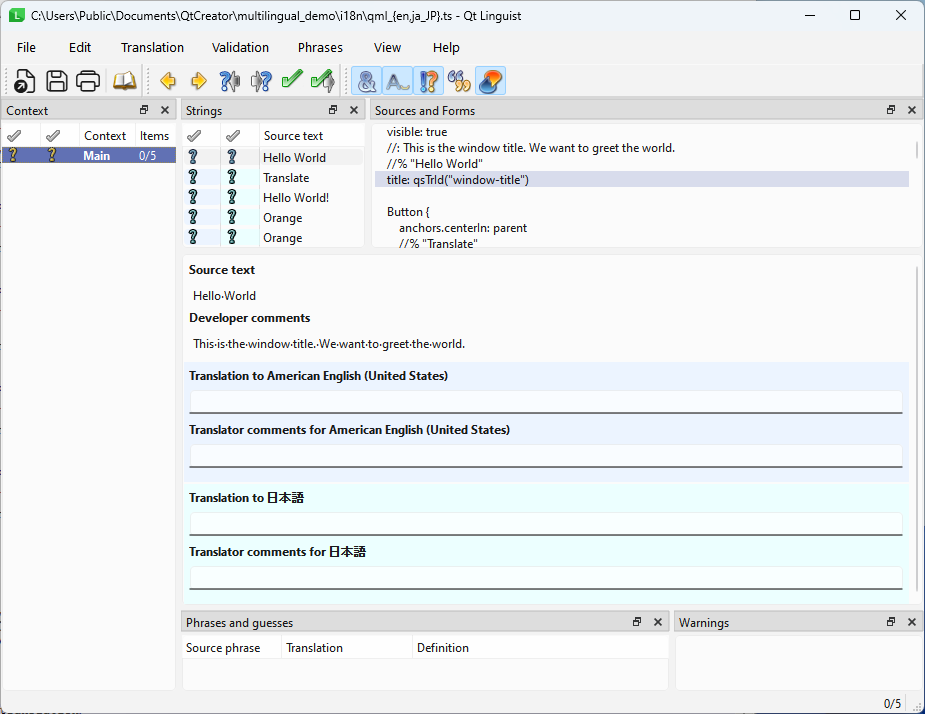
Open the qml_ja_JP.ts file generated earlier (File menu > Open), and you will see the following screen. Reference: Qt Linguist user interface.
打开之前生成的qml_ja_JP.ts文件(“文件”菜单>“打开”),将看到以下屏幕。参考:Qt Linguist用户界面。
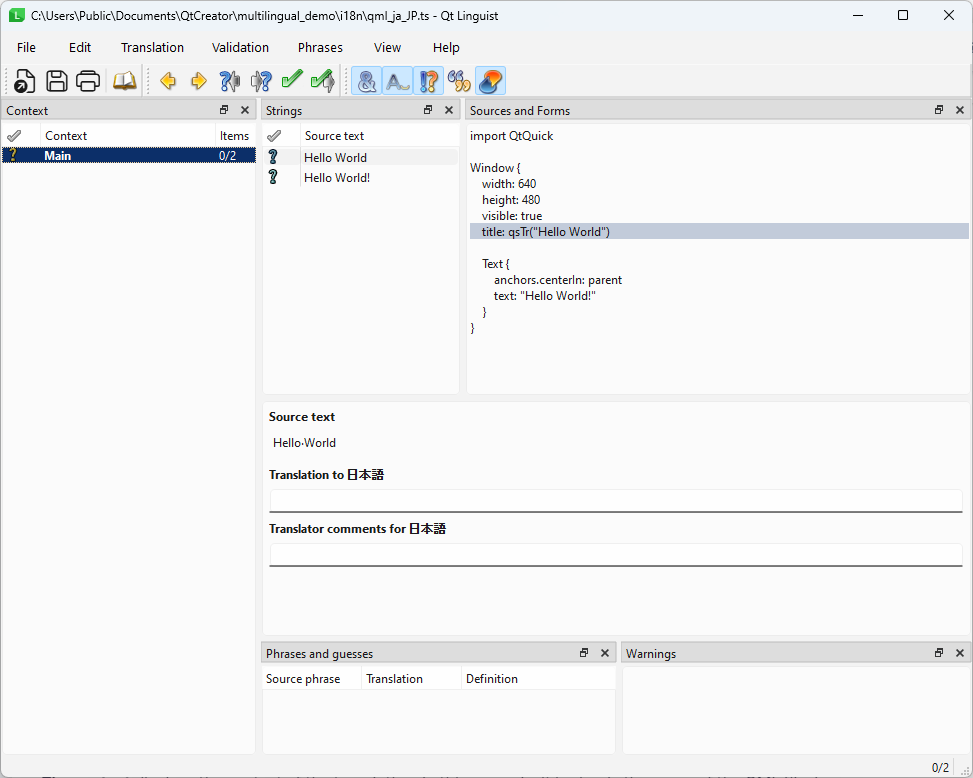
The various parts of the tool are described below.
该工具的各个部分如下所述。
- Context - Displays the context of the translation. In this example it is simply the name of the QML file. The file name is Main.qml, so it is shown as Main.
If multiple .qml files are scanned with lupdate, the name of each file is displayed here, and the strings belonging to the selected QML file are displayed in Strings on the right.
In this case, "Hello World" (from the title) and "Hello World! (from the Text element) are displayed. - 上下文-显示翻译的上下文。在这个例子中,它只是QML文件的名称。文件名为Main.qml,因此显示为Main。
如果使用lupdate扫描多个.qml文件,则每个文件的名称都会显示在此处,属于所选qml文件的字符串会显示在右侧的字符串中。
在这种情况下,将显示“Hello World”(来自标题)和“Hello World!”(来自Text元素)。 - When a Source text item is selected, the line of the QML file corresponding to it is highlighted in Sources and Forms on the right.
- 当选择源文本项时,与之对应的QML文件行将在右侧的源和表单中突出显示。
Let's start with the first translation, the title “Hello World”. Select it as shown below, and fill in "Translation to 日本語 (Japanese)" and "Translator comments for Japanese".
让我们从第一个翻译开始,标题是“Hello World”。如下图所示选择它,并填写“翻译成日语”和“日语翻译评论”。
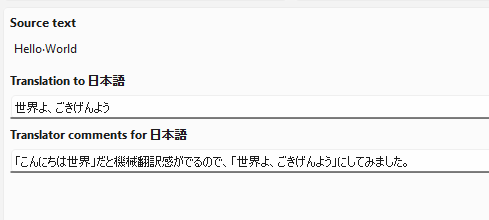
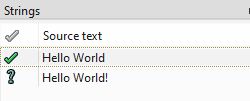
Click the question mark (?) on the left to change it to a green check mark that indicates the translation is complete.
单击左侧的问号(?)将其更改为绿色复选标记,表示翻译已完成。
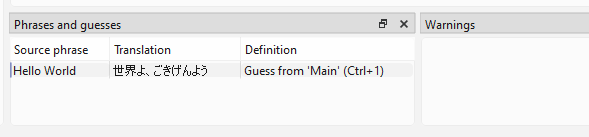
Once the changes made so far are saved with the save toolbar icon in the upper left, the source phrase, translation, and definition will appear in Phrases and guesses. Simply put, you can think of this as a list of source and target texts.
使用左上角的保存工具栏图标保存到目前为止所做的更改后,源短语、翻译和定义将出现在短语和猜测中。简单地说,可以把它看作是源文本和目标文本的列表。
When you save your changes using the Save toolbar icon in the upper left corner, the source phrase, translation, and definition appear in Phrases and guesses. You can think of this as a list of source and target texts.
当使用左上角的“保存”工具栏图标保存更改时,源短语、翻译和定义将显示在短语和猜测中。可以把它看作是源文本和目标文本的列表。
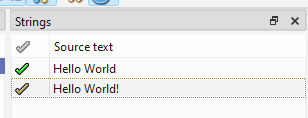
Then select the second text "Hello World" and translate it in the same way.
然后选择第二个文本“Hello World”,并以相同的方式进行翻译。
Now a warning appears saying "The translation does not end with the same punctuation as the source text. In fact, "Hello World!" ends with an exclamation mark (!) in the source, but not in the translation. This has been pointed out.
现在出现了一条警告,说“翻译的标点符号与源文本不同。事实上,”Hello World!“在源代码中以感叹号(!)结尾,但在翻译中没有。这一点已经指出。
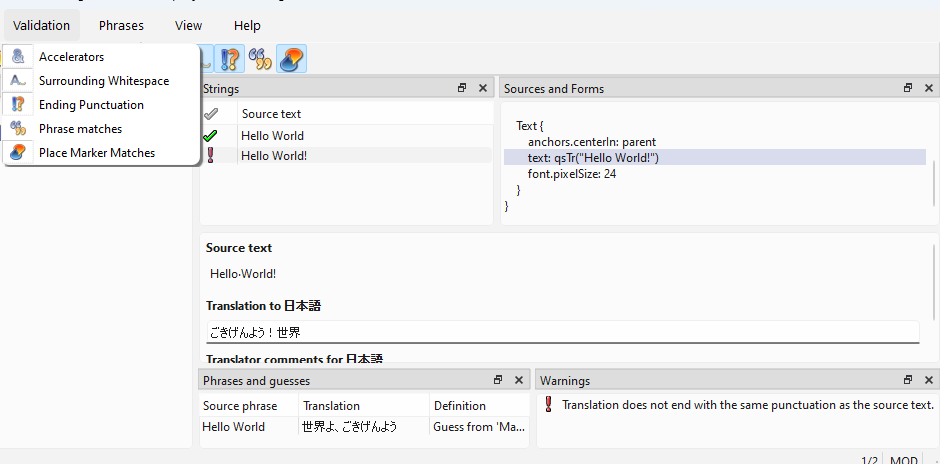
Open Qt Linguist's Validation menu to see what kind of validation is being performed and to enable/disable each validation.
打开Qt Linguist的验证菜单,查看正在执行的验证类型,并启用/禁用每个验证。
The current translation is fine as it is, so we will ignore this warning this time. Click the exclamation mark to the left of "Hello World!" and change it to a yellow checkmark. Then save your changes.
目前的翻译很好,所以这次我们将忽略这一警告。单击“Hello World!”左侧的感叹号,将其更改为黄色复选标记。然后保存更改。
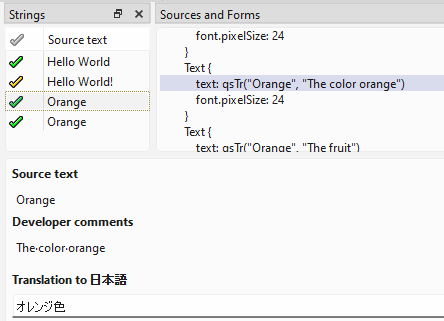
Note that depending on the source language, there are cases where the same word must be translated into a completely different word, and the intent must be clearly communicated to the translator so as not to cause misunderstanding. For example, if the word is "orange," it may not be clear whether it refers to the fruit "orange" or the color "orange" (which are different words in Japanese). To avoid misunderstandings in such cases, QML's qsTr() and other translation APIs provide convenience functions. Let's take a look at them.
请注意,根据源语言的不同,有时必须将同一个单词翻译成完全不同的单词,并且必须将意图清楚地传达给翻译者,以免造成误解。例如,如果单词是“橙色”,可能不清楚它是指水果“橙色”还是颜色“橙色”(这是日语中的不同单词)。为了避免在这种情况下产生误解,QML的qsTr()和其他翻译API提供了便利函数。让我们来看看它们。
Comments for translators allows translators to see comments in Qt Linguist. Main comments can be defined by starting them with //:. Let's add a translator comment to Main.qml like this:
翻译人员注释允许翻译人员在Qt Linguist中查看注释。主要注释可以通过以//:开头来定义。让我们在Main.qml中添加一个翻译器注释,如下所示:
| Window { width: 640 height: 480 visible: true //: This is the window title. We want to greet the world. title: qsTr("Hello World") Text { anchors.centerIn: parent //: This is the text displayed in the center of the window. text: qsTr("Hello World!") font.pixelSize: 24 } } |
Once this is done, run lupdate again to update the qml_ja_JP.ts file.
完成此操作后,再次运行lupdate以更新qml_ja_JP.ts文件。
NOTE: At the time of writing this post, comments added after the .ts file is generated are not added to the existing file. This is a known issue and has been reported in QTBUG-128537. As a workaround, create a new file and manually copy the <extacomment> lines into the existing file that contains translations.
注意:在撰写本文时,在.ts文件生成后添加的评论不会添加到现有文件中。这是一个已知问题,已在QTBUG-128537中报告。作为解决方法,创建一个新文件,并手动将<extacomment>行复制到包含翻译的现有文件中。
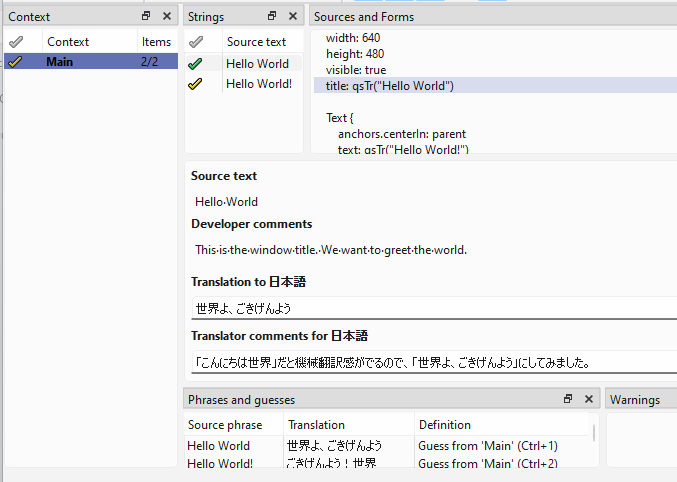
When the file is reopened in Qt Linguist, the comments can be seen as follows under Developer comments. These can be used by the translator to understand the developer's intent.
当文件在Qt Linguist中重新打开时,在开发人员注释下可以看到如下注释。翻译人员可以使用这些信息来理解开发人员的意图。
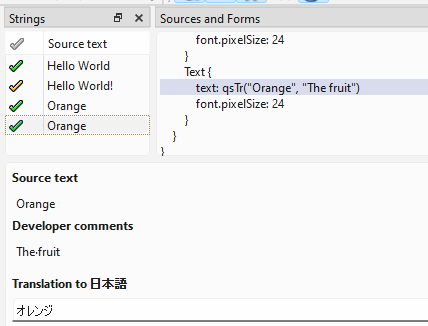
In addition to comments to the translator, there is another way to communicate the developer's intent to the translator. One such method is disambiguation, used when translating words with different meanings. qsTr() can take a second argument, which is a disambiguation comment.
除了对翻译者的评论外,还有另一种方式可以向翻译者传达开发人员的意图。其中一种方法是消歧,用于翻译不同含义的单词。qsTr()可以接受第二个参数,即消歧注释。
| Window { width: 640 height: 480 visible: true //: This is the window title. We want to greet the world. title: qsTr("Hello World") Column { anchors.fill: parent spacing: 10 Text { //: This is the text displayed in the window. text: qsTr("Hello World!") font.pixelSize: 24 } Text { text: qsTr("Orange", "The color orange") font.pixelSize: 24 } Text { text: qsTr("Orange", "The fruit") font.pixelSize: 24 } } } |
The example above uses this second argument. Run lupdate again to update qml_ja_JP.ts.
上面的例子使用了第二个参数。再次运行lupdate以更新qml_ja_JP.ts。
NOTE: At the time of writing, Qt Linguist must be closed before updating the file. Bug reports QTBUG-128603 and QTBUG-128604.
注意:在撰写本文时,必须先关闭Qt Linguist,然后才能更新文件。错误报告QTBUG-128603和QTBUG-128604
The second argument of qsTr() appears as a developer comment. We will translate the strings based on these comments.
qsTr()的第二个参数显示为开发人员注释。我们将根据这些注释翻译字符串。
Displaying the UI in Multiple Languages
以多种语言显示UI
Having completed the translation work up to this point, before introducing the translation APIs other than qsTr(), let's move on to actually checking the translated text on the GUI.
到目前为止,已经完成了翻译工作,在介绍qsTr()以外的翻译API之前,让我们继续在GUI上实际检查翻译后的文本。
When we run the application, we still see only the original English text. We will modify the application so that it automatically displays the text using the operating system's locale settings.
当我们运行应用程序时,我们仍然只能看到原始的英文文本。我们将修改应用程序,使其使用操作系统的区域设置自动显示文本。
First open the top-level CMakeLists.txt file and add LinguistTools to find_package(). This enables a convenient CMake API used to make Qt applications multilingual.
首先打开顶级CMakeLists.txt文件,并将LinguistTools添加到find_package()中。这使得可以使用一个方便的CMake API来使Qt应用程序多语言化。
Next add I18N_TRANSLATED_LANGUAGES ja_JP to the end of qt_standard_project_setup(). In this example, only ja_JP is added because the English source text is translated only to Japanese. If there are multiple target languages, add the corresponding language and country codes delimited by spaces.
接下来,将I18N_TRANSLATED_LANGUAGES ja_JP添加到qt_standard_project_setup()的末尾。在这个例子中,只添加了ja_JP,因为英语源文本只被翻译成日语。如果有多种目标语言,请添加由空格分隔的相应语言和国家代码。
Finally, add the qt_add_translations() lines. The code snippet below shows all these additions.
最后,添加qt_add_translations()行。下面的代码片段显示了所有这些添加。
| project(multilingual_demo VERSION 0.1 LANGUAGES CXX) set(CMAKE_CXX_STANDARD_REQUIRED ON) find_package(Qt6 6.5 REQUIRED COMPONENTS Quick LinguistTools) qt_standard_project_setup(REQUIRES 6.5 I18N_TRANSLATED_LANGUAGES ja_JP) qt_add_executable(appmultilingual_demo main.cpp ) qt_add_qml_module(appmultilingual_demo URI multilingual_demo VERSION 1.0 QML_FILES Main.qml ) qt_add_translations(appmultilingual_demo TS_FILE_BASE qml TS_FILE_DIR i18n RESOURCE_PREFIX qt/qml/multilingual_demo/i18n LRELEASE_OPTIONS -idbased ) |
NOTE: TS_FILE_BASE must be set to "qml" for QML applications and RESOURCE_PREFIX is of the format qt/qml<name of folder with QML files>/i18n, where i18n is the folder where .ts files were placed.
注意:对于qml应用程序,TS_FILE_BASE必须设置为“qml”,RESOURCE_PREFIX的格式为qt/qml<qml文件所在文件夹的名称>/i18n,其中i18n是放置.TS文件的文件夹。
CMake is automatically run when the file is saved. It can also be run manually by right clicking on the project and selecting Run CMake.
CMake在文件保存时自动运行。它也可以通过右键单击项目并选择run CMake来手动运行。
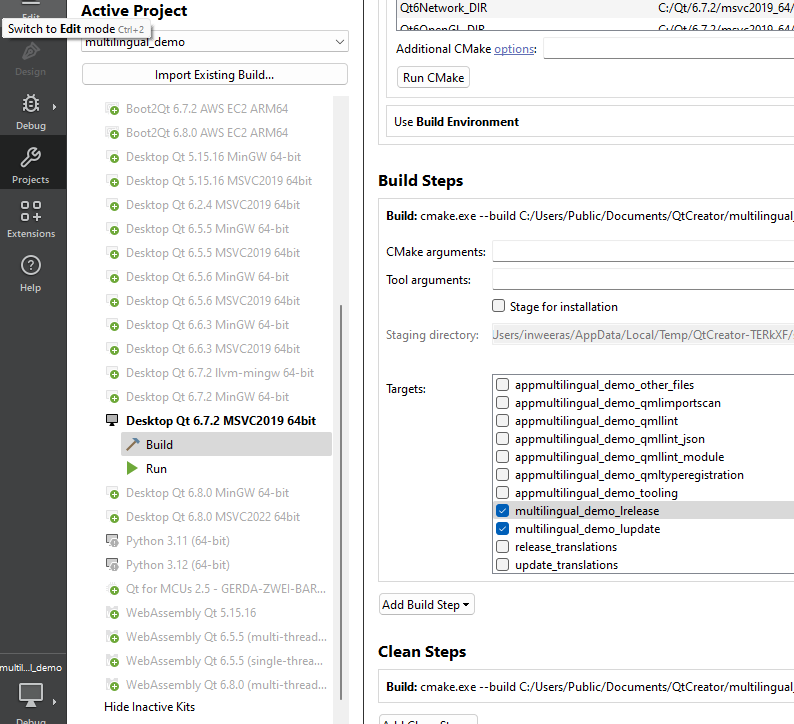
Next select the Projects icon on the toolbar on the left of Qt Creator, select the Build item under the Qt kit in use (for example, Desktop Qt 6.7.2 MSVC2019 64bit), expand Details of Build Steps and scroll down to see <project name>_lrelease and <project name>_lupdate. Select the check boxes to run these operations as a part of the application build, which will make the application multilingual.
接下来,选择Qt Creator左侧工具栏上的项目图标,选择正在使用的Qt工具包下的构建项(例如,桌面Qt 6.7.2 MSVC2019 64bit),展开构建步骤的详细信息,向下滚动查看<project name>_llease和<project name>_lupdate。选中复选框以将这些操作作为应用程序构建的一部分运行,这将使应用程序成为多语言的。
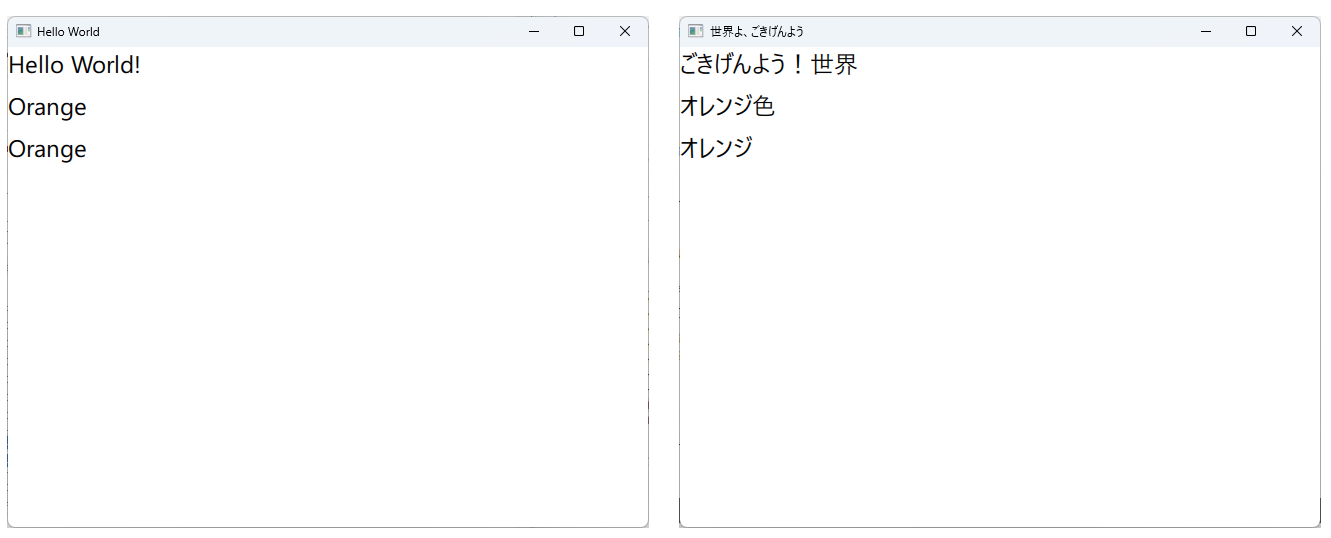
When executed, the text appears in Japanese if the OS locale is Japanese. The screenshot below shows the application in the original language and after translation.
执行时,如果操作系统区域设置为日语,则文本将以日语显示。下面的屏幕截图显示了原始语言和翻译后的应用程序。
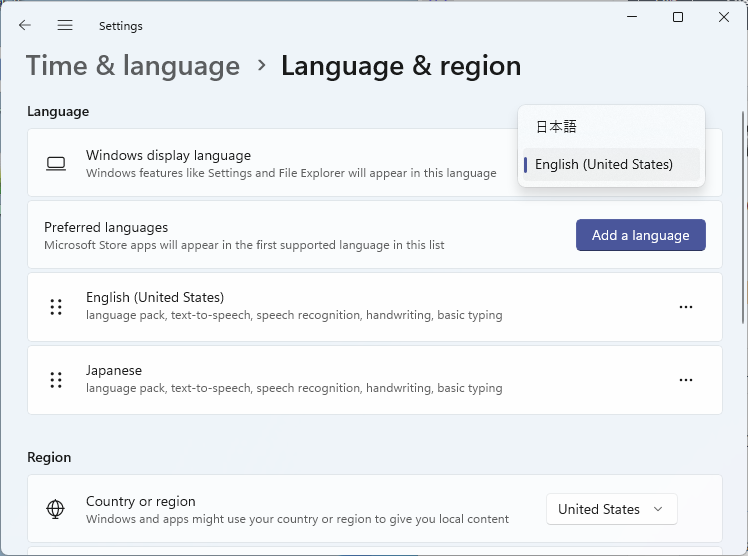
NOTE: You can change the OS language in the Windows Settings app as shown below.
注意:可以在Windows设置应用程序中更改操作系统语言,如下所示。
Dynamically Changing the Display Language
动态更改显示语言
So far, we learned how to translate the application's text based on the system locale at the time of startup. How do we switch the language while the application is running?
到目前为止,我们学习了如何在启动时根据系统区域设置翻译应用程序的文本。在应用程序运行时,我们如何切换语言?
Actually, Qt provides a simple way. By changing the global variable Qt.uiLanguage in QML, you can switch the display language.
事实上,Qt提供了一种简单的方法。通过更改QML中的全局变量Qt.uiLanguage,可以切换显示语言。
As a test, add the following line of code to Main.qml.
作为测试,将以下代码行添加到Main.qml中。
Component.onCompleted: Qt.uiLanguage = "en" |
Component.onCompleted is an event that fires when the enclosing component is created, and the code after the colon is executed. In the example above, the UI will always be in English, regardless of the OS language.
Component.onCompleted是一个事件,在创建封闭组件并执行冒号后的代码时触发。在上面的示例中,无论操作系统语言如何,UI都将始终使用英语。
To make it more obvious that the display language can be changed dynamically, let's have the UI display language switch between Japanese and English when a button is pressed.
为了更清楚地表明显示语言可以动态更改,让我们在按下按钮时让UI显示语言在日语和英语之间切换。
Add a button as shown in the snippet. The Button's onClicked event is used to toggle the language every time it is clicked.
添加一个按钮,如代码片段所示。按钮的onClick事件用于在每次单击时切换语言。
| import QtQuick import QtQuick.Controls Window { width: 640 height: 480 visible: true //: This is the window title. We want to greet the world. title: qsTr("Hello World") Button { anchors.centerIn: parent text: qsTr("Translate") onClicked: { Qt.uiLanguage = Qt.uiLanguage === "en" ? "ja" : "en" } } |
NOTE: If necessary, translate the button text in Qt Linguist using the method described above.
注意:如有必要,请使用上述方法在Qt Linguist中翻译按钮文本。
qsTrId()
You may have written multilingual applications using identifiers instead of directly writing the string in the source language. Qt uses qsTrId() instead of qsTr in such cases.
可能使用标识符编写了多语言应用程序,而不是直接用源语言编写字符串。在这种情况下,Qt使用qsTrId()而不是qsTr。
NOTE: Creating ID-based multilingual applications is described in detail in the the official documentation.
注意:创建基于ID的多语言应用程序在官方文档中有详细描述。
Using the previous application as an example, we will learn the ID-based multilingualization workflow.
以前面的应用程序为例,我们将学习基于ID的多语言工作流程。
First, change all qsTr() in Main.qml to qsTrId().
首先,将Main.qml中的所有qsTr()更改为qsTrId()。
qsTr() and qsTrId() cannot be used together in the same application, be sure to use only one of them consistently!
qsTr()和qsTrId()不能在同一个应用程序中一起使用,请确保只使用其中一个!
Remove the second argument used for disambiguation. It is not needed because qsTrId uses a different ID based on the meaning of the word, even if it is the same in the source language.
删除用于消除歧义的第二个参数。不需要它,因为qsTrId根据单词的含义使用不同的ID,即使它在源语言中是相同的。
| import QtQuick |
Naming conventions for string IDs vary, but here we use all lowercase with hyphens separating words. When run in this state, the string IDs are displayed instead of the actual text.
字符串ID的命名约定各不相同,但在这里我们使用全小写字母,用连字符分隔单词。在此状态下运行时,将显示字符串ID而不是实际文本。
When using qsTrId(), you can write the source text enclosed in double quotes as a comment starting with //%. Qt Linguist will pick them up automatically. This is shown in the code above.
使用qsTrId()时,可以将源文本括在双引号中,作为以//%开头的注释。Qt Linguist将自动提取它们。这在上面的代码中显示出来。
This time we need two .ts files, one for Japanese and the other for English, because the QML contains only string IDs. To generate them, make following additions to CMakeLists.txt.
这次我们需要两个.ts文件,一个用于日语,另一个用于英语,因为QML只包含字符串ID。要生成它们,请在CMakeLists.txt中添加以下内容。
First back up the existing .ts file by renaming it because we will create both files from scratch.
首先通过重命名来备份现有的.ts文件,因为我们将从头开始创建这两个文件。
Add English (en) to qt_standard_project_setup:
在qt_standard_project_setup中添加英语(en):
| qt_standard_project_setup(REQUIRES 6.5 I18N_TRANSLATED_LANGUAGES ja_JP en) |
Add LRELEASE_OPTIONS -idbased to qt_add_translations.
将LRELEASE_OPTIONS-id-based添加到qt_Add_translations中。
| qt_add_translations(appmultilingual_demo TS_FILE_BASE qml # Must be “qml” to make a QML app multilingual TS_FILE_DIR i18n RESOURCE_PREFIX qt/qml/multilingual_demo/i18n # Must be “qt/qml/<folder with qml files>/i18n LRELEASE_OPTIONS -idbased ) |
Run CMake, rebuild the project and open the generated qml_en.ts file. You will notice that there is no context enclosed in <name></name>. This is by design (QTBUG-128617), but manually enter "Main" here so that it will be shown when the file is opened in Qt Linguist. Do the same for qml_ja_JP.ts.
运行CMake,重建项目并打开生成的qml_en.ts文件。会注意到<name></name>中没有上下文。这是设计好的(QTBUG-128617),但在此处手动输入“Main”,以便在Qt Linguist中打开文件时显示。对qml_ja_JP.ts执行相同的操作。

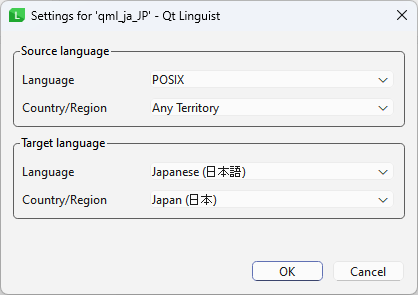
Now open qml_ja_JP.ts in Qt Linguist. Click OK on the source and target language confirmation dialog. The target locale must be correctly identified as Language: Japanese and Country/Region: Japan.
现在在Qt Linguist中打开qml_ja_JP.ts。在源语言和目标语言确认对话框中单击“确定”。目标区域设置必须正确标识为语言:日语和国家/地区:日本。
Without closing qml_ja_JP.ts, open qml_en.ts too. This time select Language: English and Country/Region: Any Territory. Note that if the file had been for a specific country like qml_en_US.ts or qml_en_GB.ts, you would have selected the corresponding country.
在不关闭qml_ja_JP.ts的情况下,也打开qml_en.ts。这次选择语言:英语和国家/地区:任何地区。请注意,如果文件是针对特定国家的,如qml_en_US.ts或qml_en_GB.ts,您将选择相应的国家。

By opening multiple files, Qt Linguist will show fields for each language so that all text can be entered at the same time. (You can also select multiple files in the file open dialog)
通过打开多个文件,Qt Linguist将显示每种语言的字段,以便可以同时输入所有文本。(您也可以在文件打开对话框中选择多个文件)
Qt Linguist will now look like this.
Qt Linguist现在看起来是这样的。
Enter the source text and translations, save the files and rerun the application. The result must be the same as when using qsTr().
输入源文本和翻译,保存文件并重新运行应用程序。结果必须与使用qsTr()时的结果相同。
Translating Strings in Arrays and Models
在数组和模型中转换字符串
Finally, we will discuss the case where the data in a list contains strings that need to be translated.
最后,我们将讨论列表中的数据包含需要翻译的字符串的情况。
In QML, you can use ListModel and ListView to implement a software structure that separates the content of the data from the format in which it is displayed (see Models and Views in Qt Quick).
在QML中,可以使用ListModel和ListView来实现一个软件结构,该结构将数据内容与其显示格式分离(请参阅Qt Quick中的模型和视图)。
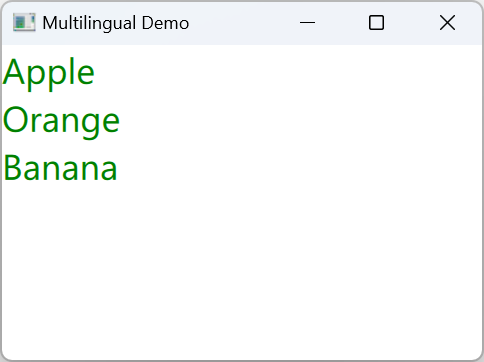
For example, if you write the following QML code, the data defined in each ListElement in the ListModel will be displayed as a list in the format defined in the delegate of ListView.
例如,如果编写以下QML代码,则ListModel中每个ListElement中定义的数据将以ListView委托中定义的格式显示为列表。
| Window { width: 640 height: 480 visible: true ListView { anchors.fill: parent // This defines the data to be displayed in the list // Note that it contains only data and does not define the appearance model: ListModel { ListElement { name: "Apple" } ListElement { name: "Orange" } ListElement { name: "Banana" } } // Defines how each item defined as ListElements in ListModel are shown delegate: Text { required property string name text: name font.pixelSize: 24 color: "green" } } |
How should we translate the text defined in the ListElements? The obvious way would be to wrap the strings in a translation API like qsTr() or qsTrId().
我们应该如何翻译ListElements中定义的文本?显而易见的方法是将字符串包装在转换API中,如qsTr()或qsTrId()。
However, if we look at the Qt documentation, it says that the text in arrays and models may not be updated if the system is not restarted after changing the language. To avoid this, QT_TR_NOOP() and QT_TRID_NOOP() should be used instead of qsTr() and qsTrId().
但是,如果我们查看Qt文档,它会说,如果在更改语言后不重新启动系统,数组和模型中的文本可能不会更新。为了避免这种情况,应该使用QT_TR_NOOP()和QT_TR_NODP()来代替qsTr()和qsTrId()。
NOTE: The API names given in the documentation are a typo and will be fixed in this commit.
注:文档中给出的API名称是打字错误,将在本次提交中修复。
Therefore, we need to write the QML code as shown in the snippet below.
因此,我们需要编写QML代码,如下面的代码片段所示。
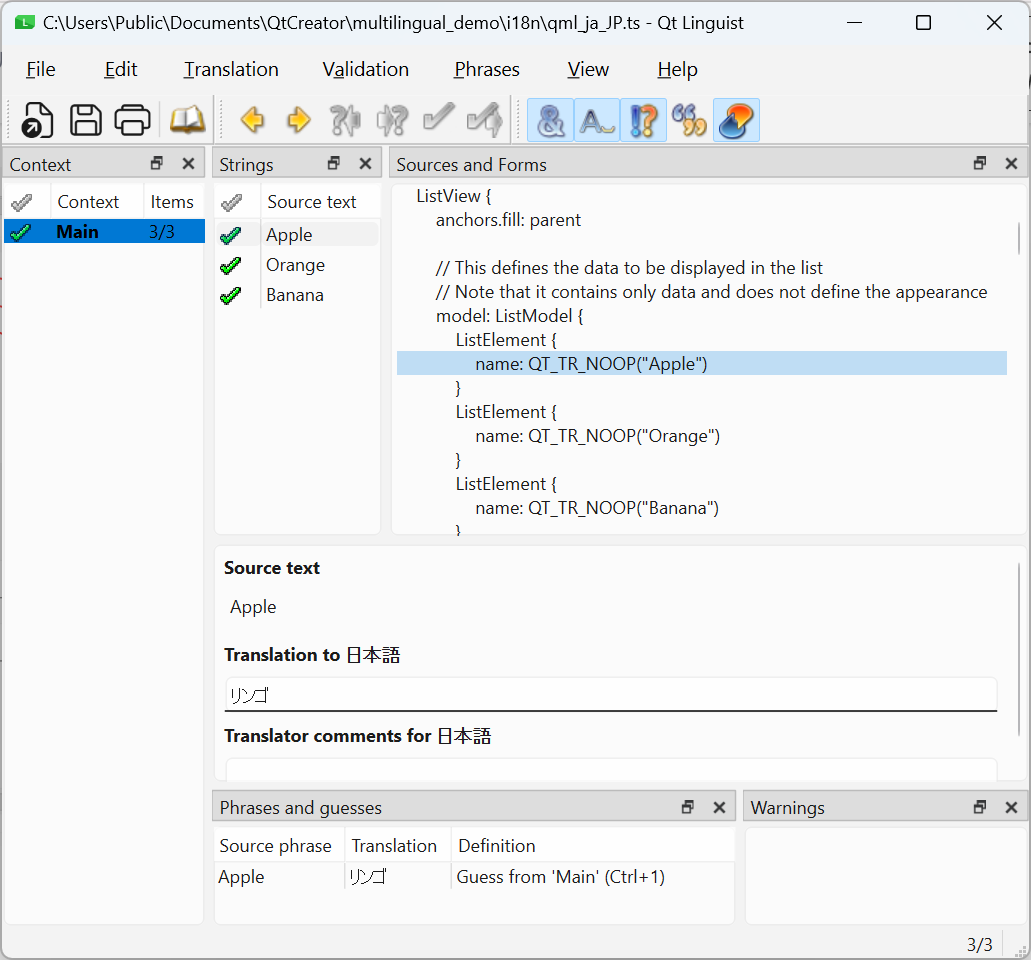
| ListView { anchors.fill: parent model: ListModel { ListElement { name: QT_TR_NOOP("Apple") } ListElement { name: QT_TR_NOOP("Orange") } ListElement { name: QT_TR_NOOP("Banana") } } delegate: Text { required property string name text: qsTr(name) font.pixelSize: 24 color: "green" } } |
Note that the delegate uses qsTr() when the model is translated with QT_TR_NOOP(). For ID based translations using QT_TRID_NOOP(), it uses qsTrId().
请注意,当使用QT_TR_NOOP()转换模型时,委托使用qsTr()。对于使用QT_TRID_NOOP()的基于ID的翻译,它使用qsTrId()。
The strings are translated with Qt Linguist using the same method as described in the previous sections.
使用Qt Linguist使用与前几节中所述相同的方法翻译字符串。
Conclusion
结论
In this article, we have summarized the steps involved in making a Qt Quick application multilingual. For more in-depth topics on internationalizing and localizing applications, such as right-to-left support and automatic string truncation checking, see the following reference articles.
在本文中,我们总结了使Qt Quick应用程序多语言化的步骤。有关应用程序国际化和本地化的更深入主题,如从右向左支持和自动字符串截断检查,请参阅以下参考文章。


 639
639

 被折叠的 条评论
为什么被折叠?
被折叠的 条评论
为什么被折叠?
 到【灌水乐园】发言


