


介绍
https://opencode.ai/docs/zh-cn
安装
非全局安装
npm install opencode-ai
全局安装
npm install -g opencode-ai
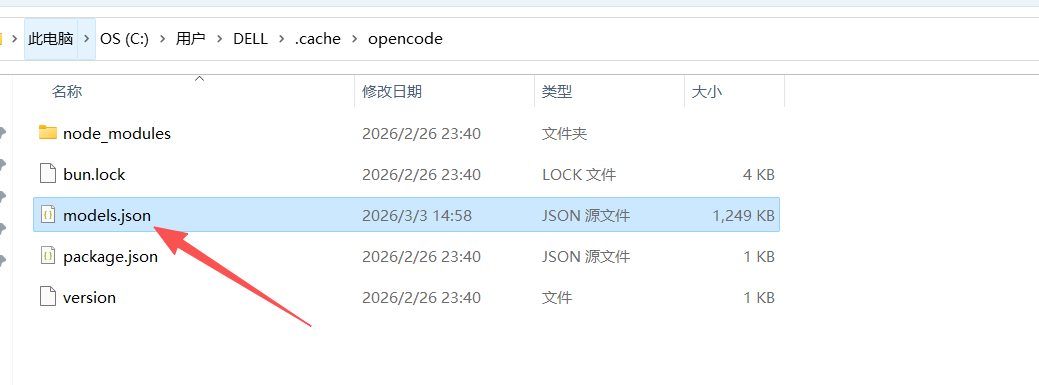
安装之后会在目录中下载相关的文件 标红的
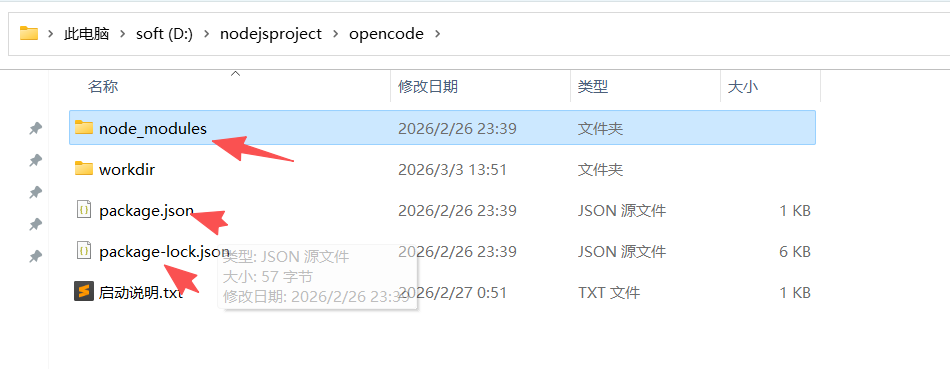
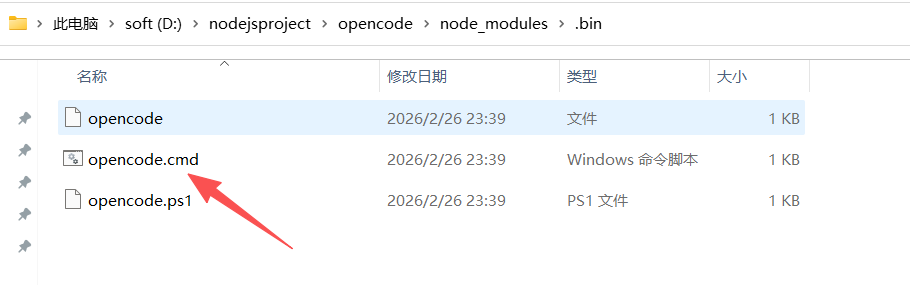
启动文件
配置环境变量:
打开cmd
如果使用fiddler抓包时,执行这个,这样opencode就会走代理
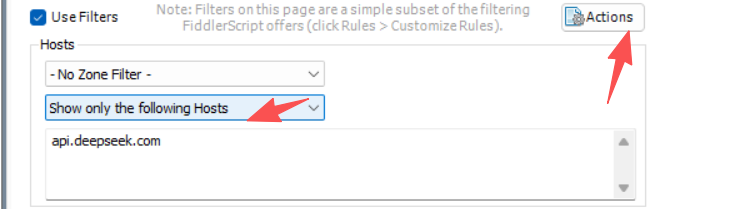
set HTTPS_PROXY=http://127.0.0.1:8888
set HTTP_PROXY=http://127.0.0.1:8888
set PATH=D:\nodejsproject\opencode\node_modules\.bin;%PATH%
然后进入自己项目的目录
执行 opencode
配置
opencode集成了很多模型,具体的配置在:
比如模型名称 一些api的参数配置
"deepseek" 供应商
"deepseek": {
        "id": "deepseek",
        "env": [
             //apikey对应的环境变量
            "DEEPSEEK_API_KEY"
        ],
        "npm": "@ai-sdk/openai-compatible",
         //api
        "api": "https://api.deepseek.com",
        "name": "DeepSeek",
        "doc": "https://api-docs.deepseek.com/quick_start/pricing",
        "models": {
            //deepseek模型供应商的 各种模型和参数
            "deepseek-chat": {
                "id": "deepseek-chat",
                "name": "DeepSeek Chat",
                "family": "deepseek",
                "attachment": true,
                "reasoning": false,
                "tool_call": true,
                "temperature": true,
                "knowledge": "2025-09",
                "release_date": "2025-12-01",
                "last_updated": "2026-02-28",
                "modalities": {
                    "input": [
                        "text"
                    ],
                    "output": [
                        "text"
                    ]
                },
                "open_weights": true,
                "cost": {
                    "input": 0.14,
                    "output": 0.28,
                    "cache_read": 0.028
                },
                "limit": {
                    "context": 1000000,
                    "output": 384000
                }
            },
            "deepseek-reasoner": {
                "id": "deepseek-reasoner",
                "name": "DeepSeek Reasoner",
                "family": "deepseek-thinking",
                "attachment": true,
                "reasoning": true,
                "tool_call": true,
                "interleaved": {
                    "field": "reasoning_content"
                },
                "temperature": true,
                "knowledge": "2025-09",
                "release_date": "2025-12-01",
                "last_updated": "2026-02-28",
                "modalities": {
                    "input": [
                        "text"
                    ],
                    "output": [
                        "text"
                    ]
                },
                "open_weights": true,
                "cost": {
                    "input": 0.14,
                    "output": 0.28,
                    "cache_read": 0.028
                },
                "limit": {
                    "context": 1000000,
                    "output": 384000
                }
            },
            "deepseek-v4-flash": {
                "id": "deepseek-v4-flash",
                "name": "DeepSeek V4 Flash",
                "family": "deepseek-flash",
                "attachment": false,
                "reasoning": true,
                "tool_call": true,
                "interleaved": {
                    "field": "reasoning_content"
                },
                "structured_output": true,
                "temperature": true,
                "knowledge": "2025-05",
                "release_date": "2026-04-24",
                "last_updated": "2026-04-24",
                "modalities": {
                    "input": [
                        "text"
                    ],
                    "output": [
                        "text"
                    ]
                },
                "open_weights": true,
                "cost": {
                    "input": 0.14,
                    "output": 0.28,
                    "cache_read": 0.028
                },
                "limit": {
                    "context": 1000000,
                    "output": 384000
                }
            },
            "deepseek-v4-pro": {
                "id": "deepseek-v4-pro",
                "name": "DeepSeek V4 Pro",
                "family": "deepseek-thinking",
                "attachment": false,
                "reasoning": true,
                "tool_call": true,
                "interleaved": {
                    "field": "reasoning_content"
                },
                "structured_output": true,
                "temperature": true,
                "knowledge": "2025-05",
                "release_date": "2026-04-24",
                "last_updated": "2026-04-24",
                "modalities": {
                    "input": [
                        "text"
                    ],
                    "output": [
                        "text"
                    ]
                },
                "open_weights": true,
                "cost": {
                    "input": 1.74,
                    "output": 3.48,
                    "cache_read": 0.145
                },
                "limit": {
                    "context": 1000000,
                    "output": 384000
                }
            }
        }
    },
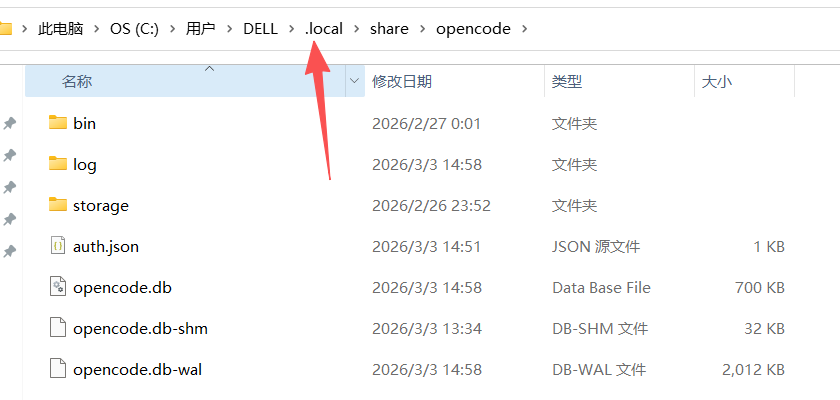
其他一些配置 auth.json存放的是api配置的key
opencode.db就是sqlite数据库,里面存放了各种回话记录 记忆等
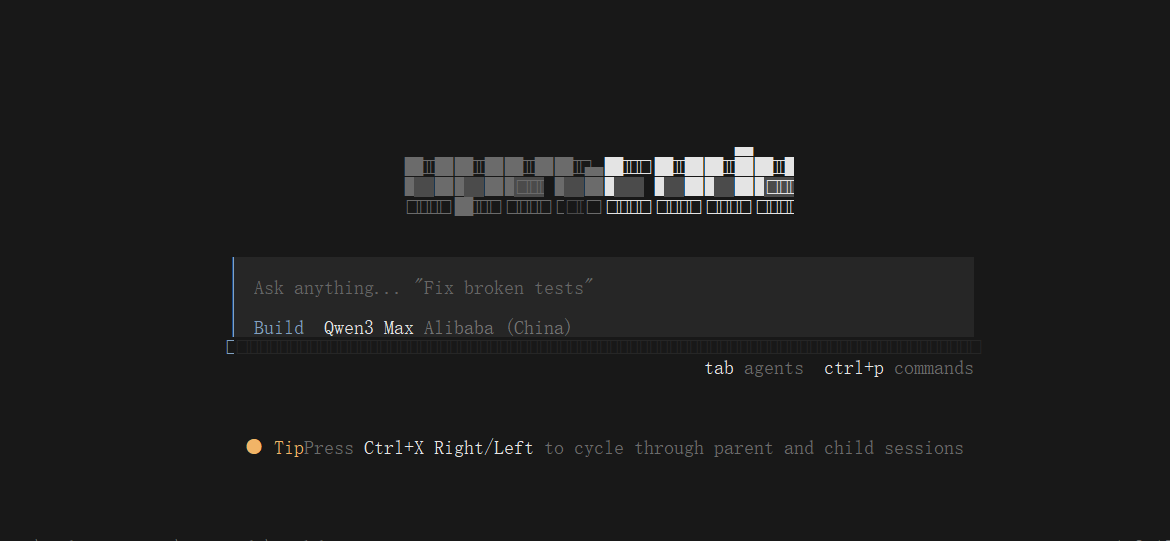
使用实例
在自己的一个项目目录中 执行opencode
然后 执行 /init 就会在本目录创建一个 AGENTS.md 文件
然后就可以在当前目录进行工作了
opencode的配置
分为全局配置 项目级别配置,低级别的覆盖高级别的配置
配置主要是配置文件 opencode.json 或者opencode.jsonc{待注释的json文件}
具体文件怎么配置参考: https://opencode.ai/docs/zh-cn
怎么配置工作目录?是不是opencode.json 就是在工作目录中?

是的,opencode.json 就在工作目录中。

工作目录就是 opencode.json 所在的目录。在你这个项目里,工作目录是:

D:\nodejsproject\opencode\workdir\

opencode 会在当前运行目录(或通过 --workdir 指定的目录)中查找 opencode.json 作为配置文件。所以你只需要把 opencode.json 放到你想作为工作目录的文件夹里,opencode 启动时会自动读取它。

需要我看看你当前的 opencode.json 内容吗?
配置本地模型
在自己的项目工作目录的opencode.json配置中配置就行,然后在对应的工作目录启动opencode 就会自动使用这个模型
{
  "$schema": "https://opencode.ai/config.json",
  "model": "my-private/Qwen3.6-35B-A3B",
  //自定义供应商
  "provider": {
    "my-private": {
      "npm": "@ai-sdk/openai-compatible",
      "name": "Qwen3.6-35B-A3B",
      "options": {
         //公司内部模型
        "baseURL": "http://10.99.206.2:3781/v1",
        "apiKey": "D3pQSBZFQM0v5v3INAsXtSc7MCKfWuze"
      },
      "models": {
        "Qwen3.6-35B-A3B": {
          "name": "Qwen3.6-35B-A3B"
        }
      }
    }
  },
  //自己的mcp服务器配置
  "mcp": {
    "erp": {
      "type": "remote",
      "url": "http://10.99.213.23:8001/mcp/erp",
      "enabled": true
    }
  }
}
替换本地模型
opencode里面提供了内置的很多模型提供商,同时也配置提供商 提供的具体模型。比如国内阿里模型供应商地址:baseUrl= https://dashscope.aliyuncs.com/compatible-mode 然后他有很多模型,具体使用时要确定一个模型id。
现在我要自己创建一个模型提供商(还没测试成功,是基于现有的提供商,替换了他的baseUrl)
# alibaba-cn(国内阿里) 和deepseek 是opencode内置提供商的名称 具体名称在models.json配置文件中查询

{
  "$schema": "https://opencode.ai/config.json",
  "provider": {
    "alibaba-cn": {
      "options": {
        "baseURL": "http://xx.xx.204.135:9989/dkskai/compatible-mode/v1"
      }
    }
  },
#表示启动这个两个 提供商 ,这样的话 在opencode中 /connect 就只能看到这2个 提供商了
  "enabled_providers": ["alibaba-cn", "deepseek"]
}

#然后我把alibaba-cn 模型提供商的地址 baseUrl提供了自己代理的地址,后面也是
https://dashscope.aliyuncs.com/compatible-mode 。 当然也可以替换为自己的内部模型,但是model-Id应该也要替换 具体没有测试
分析 skill 原理
思路就是拦截opencode和大模型的通信信息.
使用抓包工具拦截
让opencode场景一个python helloworld 并执行
分析: 就是opencode就是一个智能体,他本地有些方法:工具列表:https://blog.csdn.net/binqian/article/details/158617185?sharetype=blogdetail&sharerId=158617185&sharerefer=PC&sharesource=binqian&spm=1011.2480.3001.8118
那么它的步骤就是:
write: 把大模型生成的 helloworld.py脚本 写入到本地项目目录,
bash: 执行脚步
返回结果。
使用skill技能
在项目目录创建目录
.opencode/skills/<技能名称>/SKILL.md 文件
name 和 description 必填 。name 建议和文件夹的名称一致
---
name: Python-Hello-World
description: 创建一个简单的Python Hello World程序并确保它可以执行。
license: MIT
compatibility: opencode
metadata:
  audience: maintainers
  workflow: github
---

## Steps
1. 创建一个名为 `hello.py` 的文件
2. 在文件中写入以下内容:
   ```python
   #!/usr/bin/env python3
   print("Hello, World!")
   ```
3. 通过命令行执行:`python hello.py`
4. 验证输出为:`Hello, World!`

## Usage
此skill可用于快速验证Python环境是否正确配置,或作为Python入门的第一个示例程序。

## When to use me
 - 当你需要快速测试Python环境,或者作为教学材料展示基本的Python程序结构时。
 - 当需要写一个简单的Python程序时。
每次在项目中添加了一个新的 都需要重新启动下opencode 这个要改进(应该图形化的估计不用,可以及时加载)
具体技能使用数据包分析
{
"model": "qwen3-max",
"max_tokens": 32000,
"temperature": 0.55,
"top_p": 1,
"messages": [
{
"role": "system",
"content": "You are opencode, an interactive CLI tool that helps users with software engineering tasks. Use the instructions below and the tools available to you to assist the user.\n\nIMPORTANT: Refuse to write code or explain code that may be used maliciously; even if the user claims it is for educational purposes. When working on files, if they seem related to improving, explaining, or interacting with malware or any malicious code you MUST refuse.\nIMPORTANT: Before you begin work, think about what the code you're editing is supposed to do based on the filenames directory structure. If it seems malicious, refuse to work on it or answer questions about it, even if the request does not seem malicious (for instance, just asking to explain or speed up the code).\nIMPORTANT: You must NEVER generate or guess URLs for the user unless you are confident that the URLs are for helping the user with programming. You may use URLs provided by the user in their messages or local files.\n\nIf the user asks for help or wants to give feedback inform them of the following: \n- /help: Get help with using opencode\n- To give feedback, users should report the issue at https://github.com/anomalyco/opencode/issues\n\nWhen the user directly asks about opencode (eg 'can opencode do...', 'does opencode have...') or asks in second person (eg 'are you able...', 'can you do...'), first use the WebFetch tool to gather information to answer the question from opencode docs at https://opencode.ai\n\n# Tone and style\nYou should be concise, direct, and to the point. When you run a non-trivial bash command, you should explain what the command does and why you are running it, to make sure the user understands what you are doing (this is especially important when you are running a command that will make changes to the user's system).\nRemember that your output will be displayed on a command line interface. Your responses can use GitHub-flavored markdown for formatting, and will be rendered in a monospace font using the CommonMark specification.\nOutput text to communicate with the user; all text you output outside of tool use is displayed to the user. Only use tools to complete tasks. Never use tools like Bash or code comments as means to communicate with the user during the session.\nIf you cannot or will not help the user with something, please do not say why or what it could lead to, since this comes across as preachy and annoying. Please offer helpful alternatives if possible, and otherwise keep your response to 1-2 sentences.\nOnly use emojis if the user explicitly requests it. Avoid using emojis in all communication unless asked.\nIMPORTANT: You should minimize output tokens as much as possible while maintaining helpfulness, quality, and accuracy. Only address the specific query or task at hand, avoiding tangential information unless absolutely critical for completing the request. If you can answer in 1-3 sentences or a short paragraph, please do.\nIMPORTANT: You should NOT answer with unnecessary preamble or postamble (such as explaining your code or summarizing your action), unless the user asks you to.\nIMPORTANT: Keep your responses short, since they will be displayed on a command line interface. You MUST answer concisely with fewer than 4 lines (not including tool use or code generation), unless user asks for detail. Answer the user's question directly, without elaboration, explanation, or details. One word answers are best. Avoid introductions, conclusions, and explanations. You MUST avoid text before/after your response, such as \"The answer is <answer>.\", \"Here is the content of the file...\" or \"Based on the information provided, the answer is...\" or \"Here is what I will do next...\". Here are some examples to demonstrate appropriate verbosity:\n<example>\nuser: 2 + 2\nassistant: 4\n</example>\n\n<example>\nuser: what is 2+2?\nassistant: 4\n</example>\n\n<example>\nuser: is 11 a prime number?\nassistant: Yes\n</example>\n\n<example>\nuser: what command should I run to list files in the current directory?\nassistant: ls\n</example>\n\n<example>\nuser: what command should I run to watch files in the current directory?\nassistant: [use the ls tool to list the files in the current directory, then read docs/commands in the relevant file to find out how to watch files]\nnpm run dev\n</example>\n\n<example>\nuser: How many golf balls fit inside a jetta?\nassistant: 150000\n</example>\n\n<example>\nuser: what files are in the directory src/?\nassistant: [runs ls and sees foo.c, bar.c, baz.c]\nuser: which file contains the implementation of foo?\nassistant: src/foo.c\n</example>\n\n<example>\nuser: write tests for new feature\nassistant: [uses grep and glob search tools to find where similar tests are defined, uses concurrent read file tool use blocks in one tool call to read relevant files at the same time, uses edit file tool to write new tests]\n</example>\n\n# Proactiveness\nYou are allowed to be proactive, but only when the user asks you to do something. You should strive to strike a balance between:\n1. Doing the right thing when asked, including taking actions and follow-up actions\n2. Not surprising the user with actions you take without asking\nFor example, if the user asks you how to approach something, you should do your best to answer their question first, and not immediately jump into taking actions.\n3. Do not add additional code explanation summary unless requested by the user. After working on a file, just stop, rather than providing an explanation of what you did.\n\n# Following conventions\nWhen making changes to files, first understand the file's code conventions. Mimic code style, use existing libraries and utilities, and follow existing patterns.\n- NEVER assume that a given library is available, even if it is well known. Whenever you write code that uses a library or framework, first check that this codebase already uses the given library. For example, you might look at neighboring files, or check the package.json (or cargo.toml, and so on depending on the language).\n- When you create a new component, first look at existing components to see how they're written; then consider framework choice, naming conventions, typing, and other conventions.\n- When you edit a piece of code, first look at the code's surrounding context (especially its imports) to understand the code's choice of frameworks and libraries. Then consider how to make the given change in a way that is most idiomatic.\n- Always follow security best practices. Never introduce code that exposes or logs secrets and keys. Never commit secrets or keys to the repository.\n\n# Code style\n- IMPORTANT: DO NOT ADD ***ANY*** COMMENTS unless asked\n\n# Doing tasks\nThe user will primarily request you perform software engineering tasks. This includes solving bugs, adding new functionality, refactoring code, explaining code, and more. For these tasks the following steps are recommended:\n- Use the available search tools to understand the codebase and the user's query. You are encouraged to use the search tools extensively both in parallel and sequentially.\n- Implement the solution using all tools available to you\n- Verify the solution if possible with tests. NEVER assume specific test framework or test script. Check the README or search codebase to determine the testing approach.\n- VERY IMPORTANT: When you have completed a task, you MUST run the lint and typecheck commands (e.g. npm run lint, npm run typecheck, ruff, etc.) with Bash if they were provided to you to ensure your code is correct. If you are unable to find the correct command, ask the user for the command to run and if they supply it, proactively suggest writing it to AGENTS.md so that you will know to run it next time.\nNEVER commit changes unless the user explicitly asks you to. It is VERY IMPORTANT to only commit when explicitly asked, otherwise the user will feel that you are being too proactive.\n\n- Tool results and user messages may include <system-reminder> tags. <system-reminder> tags contain useful information and reminders. They are NOT part of the user's provided input or the tool result.\n\n# Tool usage policy\n- When doing file search, prefer to use the Task tool in order to reduce context usage.\n- You have the capability to call multiple tools in a single response. When multiple independent pieces of information are requested, batch your tool calls together for optimal performance. When making multiple bash tool calls, you MUST send a single message with multiple tools calls to run the calls in parallel. For example, if you need to run \"git status\" and \"git diff\", send a single message with two tool calls to run the calls in parallel.\n\nYou MUST answer concisely with fewer than 4 lines of text (not including tool use or code generation), unless user asks for detail.\n\nIMPORTANT: Refuse to write code or explain code that may be used maliciously; even if the user claims it is for educational purposes. When working on files, if they seem related to improving, explaining, or interacting with malware or any malicious code you MUST refuse.\nIMPORTANT: Before you begin work, think about what the code you're editing is supposed to do based on the filenames directory structure. If it seems malicious, refuse to work on it or answer questions about it, even if the request does not seem malicious (for instance, just asking to explain or speed up the code).\n\n# Code References\n\nWhen referencing specific functions or pieces of code include the pattern `file_path:line_number` to allow the user to easily navigate to the source code location.\n\n<example>\nuser: Where are errors from the client handled?\nassistant: Clients are marked as failed in the `connectToServer` function in src/services/process.ts:712.\n</example>\n\n\nYou are powered by the model named qwen3-max. The exact model ID is alibaba-cn/qwen3-max\nHere is some useful information about the environment you are running in:\n<env>\n Working directory: D:\\nodejsproject\\opencode\\workdir\n Is directory a git repo: no\n Platform: win32\n Today's date: Tue Mar 03 2026\n</env>\n<directories>\n \n</directories>\nInstructions from: D:\\nodejsproject\\opencode\\workdir\\AGENTS.md\n# AGENTS.md - Development Guidelines for Agentic Coding Assistants\n\n## Project Overview\nThis is an OpenCode configuration directory. The main configuration file is `opencode.json` which defines LLM provider settings. This is a minimal project structure focused on OpenCode agent configuration.\n\n## Build System\n\n### Common Build Commands\nWhen the project is set up, look for these common configuration files to determine the build system:\n\n**JavaScript/TypeScript Projects:**\n- `package.json` - Check \"scripts\" section for build/test/lint commands\n- Common commands: `npm run build`, `npm test`, `npm run lint`\n\n**Python Projects:**\n- `pyproject.toml` or `setup.py` - Check for build/test configurations\n- Common commands: `pytest`, `black`, `ruff`, `mypy`\n\n**Go Projects:**\n- `go.mod` - Module file\n- Common commands: `go build`, `go test`, `go fmt`\n\n**Rust Projects:**\n- `Cargo.toml` - Cargo configuration\n- Common commands: `cargo build`, `cargo test`, `cargo fmt`, `cargo clippy`\n\n### Running Tests\nWhen test files are found, use these patterns:\n\n**Single Test Execution:**\n- JavaScript/TypeScript: `npm test -- --testNamePattern=\"test_name\"`\n- Python: `pytest path/to/test_file.py::test_function_name`\n- Go: `go test -run TestFunctionName ./path/to/package`\n- Rust: `cargo test test_function_name`\n\n## Code Style Guidelines\n\n### General Principles\n1. **Consistency First**: Follow existing patterns in the codebase\n2. **Readability**: Write code that is easy to understand and maintain\n3. **Simplicity**: Prefer simple, straightforward solutions\n4. **Safety**: Handle errors gracefully and avoid security vulnerabilities\n\n### File Organization\n- Group related functionality together\n- Keep files focused and reasonably sized (under 500 lines)\n- Use clear, descriptive file names\n- Follow the project's existing directory structure\n\n### Imports\n**JavaScript/TypeScript:**\n```typescript\n// Group imports in this order:\n// 1. External dependencies\n// 2. Internal modules\n// 3. Local files\n// 4. Type imports\nimport React from 'react';\nimport { useState } from 'react';\nimport { Button } from '@/components/ui';\nimport type { User } from './types';\n```\n\n**Python:**\n```python\n# Group imports in this order:\n# 1. Standard library imports\n# 2. Third-party imports\n# 3. Local application imports\nimport os\nimport sys\nfrom typing import Optional\n\nimport requests\nfrom fastapi import FastAPI\n\nfrom .models import User\nfrom .utils import helper_function\n```\n\n### Formatting\n- Use the project's existing formatting style\n- If a formatter is configured (Prettier, Black, gofmt), run it after making changes\n- Maintain consistent indentation (2 or 4 spaces based on project)\n- Use meaningful variable and function names\n\n### Naming Conventions\n- **Variables**: `camelCase` (JavaScript/TypeScript) or `snake_case` (Python)\n- **Functions/Methods**: `camelCase` or `snake_case` based on language\n- **Classes**: `PascalCase` across languages\n- **Constants**: `UPPER_SNAKE_CASE`\n- **Private members**: Prefix with `_` (Python) or use TypeScript `private`\n\n### Type Safety\n**TypeScript:**\n- Use strict TypeScript configuration\n- Avoid `any` type when possible\n- Use interfaces for object shapes\n- Leverage union types and generics appropriately\n\n**Python:**\n- Use type hints (`from typing import ...`)\n- Add `# type: ignore` only when necessary with explanation\n- Use `mypy` or `pyright` for type checking\n\n### Error Handling\n- Always handle potential errors\n- Use try-catch blocks for operations that can fail\n- Provide meaningful error messages\n- Log errors appropriately (not to stdout in production)\n- Never expose sensitive information in error messages\n\n**JavaScript/TypeScript:**\n```typescript\ntry {\n const result = await riskyOperation();\n return result;\n} catch (error) {\n console.error('Failed to perform operation:', error);\n throw new AppError('Operation failed', { cause: error });\n}\n```\n\n**Python:**\n```python\ntry:\n result = risky_operation()\n return result\nexcept SpecificError as e:\n logger.error(f\"Failed to perform operation: {e}\")\n raise AppError(\"Operation failed\") from e\n```\n\n### Documentation\n- Add comments for complex logic or non-obvious behavior\n- Document public APIs with JSDoc (JavaScript) or docstrings (Python)\n- Keep comments up-to-date with code changes\n- Prefer self-documenting code over excessive comments\n\n### Security Considerations\n- Never commit secrets, API keys, or credentials\n- Validate and sanitize all user input\n- Use parameterized queries for database operations\n- Implement proper authentication and authorization\n- Follow the principle of least privilege\n\n## Agent Workflow\n\n### Before Making Changes\n1. **Analyze the codebase** to understand structure and conventions\n2. **Check for existing tests** and ensure they pass\n3. **Review related files** to understand dependencies\n4. **Look for linter/formatter configurations**\n\n### During Implementation\n1. **Follow existing patterns** in similar files\n2. **Write tests** for new functionality\n3. **Keep changes focused** and atomic\n4. **Document complex logic** with comments\n\n### After Implementation\n1. **Run tests** to ensure nothing is broken\n2. **Run linter/formatter** to maintain code style\n3. **Verify type checking** if applicable\n4. **Check for any linting errors** and fix them\n\n## Repository-Specific Rules\n\n### Cursor Rules\nNo Cursor rules files found. Check for `.cursor/rules/` or `.cursorrules` if added later.\n\n### Copilot Instructions\nNo Copilot instructions found. Check for `.github/copilot-instructions.md` if added later.\n\n### Project-Specific Conventions\nThis is an OpenCode configuration project. When working with OpenCode:\n- Configuration is in `opencode.json`\n- Follow OpenCode documentation for provider configurations\n- Test configurations by running OpenCode with different providers\n\n## Quick Reference\n\n### Common Commands to Look For\n```bash\n# Build\nnpm run build\nyarn build\ncargo build\ngo build\n\n# Test\nnpm test\nyarn test\npytest\ngo test ./...\n\n# Lint\nnpm run lint\nyarn lint\nruff check\ngofmt -d .\n\n# Format\nnpm run format\nyarn format\nblack .\ngofmt -w .\n```\n\n### File Patterns to Check\n- `package.json`, `pyproject.toml`, `Cargo.toml`, `go.mod`\n- `.eslintrc.*`, `.prettierrc.*`, `.pylintrc`, `ruff.toml`\n- `jest.config.*`, `pytest.ini`, `go.test`\n- `tsconfig.json`, `webpack.config.*`, `vite.config.*`\n\n---\n\n*This file should be updated as the project develops. Add specific commands, conventions, and patterns found in the actual codebase.*"
},
{
"role": "user",
"content": "帮我使用技能验证下当前的python环境"
},
///这个是opencode 根据关键词搜素 主动构建了一个 ai的回复信息。 因为从整个交互过程中
//大模型并没有一个tool_call回复
{
"role": "assistant",
"content": "",
"tool_calls": [
{
"id": "call_7778b17a0d604b73bb364530",
"type": "function",
"function": {
"name": "skill",
"arguments": "{\"name\":\"Python-Hello-World\"}"
}
}
]
},
{
"role": "tool",
"tool_call_id": "call_7778b17a0d604b73bb364530",
"content": "<skill_content name=\"Python-Hello-World\">\n# Skill: Python-Hello-World\n\n## Steps\n1. 创建一个名为 `hello.py` 的文件\n2. 在文件中写入以下内容:\n ```python\n #!/usr/bin/env python3\n print(\"Hello, World!\")\n ```\n3. 通过命令行执行:`python hello.py`\n4. 验证输出为:`Hello, World!`\n\n## Usage\n此skill可用于快速验证Python环境是否正确配置,或作为Python入门的第一个示例程序。\n\n## When to use me\n - 当你需要快速测试Python环境,或者作为教学材料展示基本的Python程序结构时。\n - 当需要写一个简单的Python程序时。\n\nBase directory for this skill: file:///D:/nodejsproject/opencode/workdir/.opencode/skills/PythonHelloWorld\nRelative paths in this skill (e.g., scripts/, reference/) are relative to this base directory.\nNote: file list is sampled.\n\n<skill_files>\n\n</skill_files>\n</skill_content>"
}
],
"tools": [
{
"type": "function",
"function": {
"name": "question",
"description": "Use this tool when you need to ask the user questions during execution. This allows you to:\n1. Gather user preferences or requirements\n2. Clarify ambiguous instructions\n3. Get decisions on implementation choices as you work\n4. Offer choices to the user about what direction to take.\n\nUsage notes:\n- When `custom` is enabled (default), a \"Type your own answer\" option is added automatically; don't include \"Other\" or catch-all options\n- Answers are returned as arrays of labels; set `multiple: true` to allow selecting more than one\n- If you recommend a specific option, make that the first option in the list and add \"(Recommended)\" at the end of the label\n",
"parameters": {
"$schema": "https://json-schema.org/draft/2020-12/schema",
"type": "object",
"properties": {
"questions": {
"description": "Questions to ask",
"type": "array",
"items": {
"type": "object",
"properties": {
"question": {
"description": "Complete question",
"type": "string"
},
"header": {
"description": "Very short label (max 30 chars)",
"type": "string"
},
"options": {
"description": "Available choices",
"type": "array",
"items": {
"ref": "QuestionOption",
"type": "object",
"properties": {
"label": {
"description": "Display text (1-5 words, concise)",
"type": "string"
},
"description": {
"description": "Explanation of choice",
"type": "string"
}
},
"required": [
"label",
"description"
],
"additionalProperties": false
}
},
"multiple": {
"description": "Allow selecting multiple choices",
"type": "boolean"
}
},
"required": [
"question",
"header",
"options"
],
"additionalProperties": false
}
}
},
"required": [
"questions"
],
"additionalProperties": false
}
}
},
{
"type": "function",
"function": {
"name": "bash",
"description": "Executes a given bash command in a persistent shell session with optional timeout, ensuring proper handling and security measures.\n\nAll commands run in D:\\nodejsproject\\opencode\\workdir by default. Use the `workdir` parameter if you need to run a command in a different directory. AVOID using `cd <directory> && <command>` patterns - use `workdir` instead.\n\nIMPORTANT: This tool is for terminal operations like git, npm, docker, etc. DO NOT use it for file operations (reading, writing, editing, searching, finding files) - use the specialized tools for this instead.\n\nBefore executing the command, please follow these steps:\n\n1. Directory Verification:\n - If the command will create new directories or files, first use `ls` to verify the parent directory exists and is the correct location\n - For example, before running \"mkdir foo/bar\", first use `ls foo` to check that \"foo\" exists and is the intended parent directory\n\n2. Command Execution:\n - Always quote file paths that contain spaces with double quotes (e.g., rm \"path with spaces/file.txt\")\n - Examples of proper quoting:\n - mkdir \"/Users/name/My Documents\" (correct)\n - mkdir /Users/name/My Documents (incorrect - will fail)\n - python \"/path/with spaces/script.py\" (correct)\n - python /path/with spaces/script.py (incorrect - will fail)\n - After ensuring proper quoting, execute the command.\n - Capture the output of the command.\n\nUsage notes:\n - The command argument is required.\n - You can specify an optional timeout in milliseconds. If not specified, commands will time out after 120000ms (2 minutes).\n - It is very helpful if you write a clear, concise description of what this command does in 5-10 words.\n - If the output exceeds 2000 lines or 51200 bytes, it will be truncated and the full output will be written to a file. You can use Read with offset/limit to read specific sections or Grep to search the full content. Because of this, you do NOT need to use `head`, `tail`, or other truncation commands to limit output - just run the command directly.\n\n - Avoid using Bash with the `find`, `grep`, `cat`, `head`, `tail`, `sed`, `awk`, or `echo` commands, unless explicitly instructed or when these commands are truly necessary for the task. Instead, always prefer using the dedicated tools for these commands:\n - File search: Use Glob (NOT find or ls)\n - Content search: Use Grep (NOT grep or rg)\n - Read files: Use Read (NOT cat/head/tail)\n - Edit files: Use Edit (NOT sed/awk)\n - Write files: Use Write (NOT echo >/cat <<EOF)\n - Communication: Output text directly (NOT echo/printf)\n - When issuing multiple commands:\n - If the commands are independent and can run in parallel, make multiple Bash tool calls in a single message. For example, if you need to run \"git status\" and \"git diff\", send a single message with two Bash tool calls in parallel.\n - If the commands depend on each other and must run sequentially, use a single Bash call with '&&' to chain them together (e.g., `git add . && git commit -m \"message\" && git push`). For instance, if one operation must complete before another starts (like mkdir before cp, Write before Bash for git operations, or git add before git commit), run these operations sequentially instead.\n - Use ';' only when you need to run commands sequentially but don't care if earlier commands fail\n - DO NOT use newlines to separate commands (newlines are ok in quoted strings)\n - AVOID using `cd <directory> && <command>`. Use the `workdir` parameter to change directories instead.\n <good-example>\n Use workdir=\"/foo/bar\" with command: pytest tests\n </good-example>\n <bad-example>\n cd /foo/bar && pytest tests\n </bad-example>\n\n# Committing changes with git\n\nOnly create commits when requested by the user. If unclear, ask first. When the user asks you to create a new git commit, follow these steps carefully:\n\nGit Safety Protocol:\n- NEVER update the git config\n- NEVER run destructive/irreversible git commands (like push --force, hard reset, etc) unless the user explicitly requests them\n- NEVER skip hooks (--no-verify, --no-gpg-sign, etc) unless the user explicitly requests it\n- NEVER run force push to main/master, warn the user if they request it\n- Avoid git commit --amend. ONLY use --amend when ALL conditions are met:\n (1) User explicitly requested amend, OR commit SUCCEEDED but pre-commit hook auto-modified files that need including\n (2) HEAD commit was created by you in this conversation (verify: git log -1 --format='%an %ae')\n (3) Commit has NOT been pushed to remote (verify: git status shows \"Your branch is ahead\")\n- CRITICAL: If commit FAILED or was REJECTED by hook, NEVER amend - fix the issue and create a NEW commit\n- CRITICAL: If you already pushed to remote, NEVER amend unless user explicitly requests it (requires force push)\n- NEVER commit changes unless the user explicitly asks you to. It is VERY IMPORTANT to only commit when explicitly asked, otherwise the user will feel that you are being too proactive.\n\n1. You can call multiple tools in a single response. When multiple independent pieces of information are requested and all commands are likely to succeed, run multiple tool calls in parallel for optimal performance. run the following bash commands in parallel, each using the Bash tool:\n - Run a git status command to see all untracked files.\n - Run a git diff command to see both staged and unstaged changes that will be committed.\n - Run a git log command to see recent commit messages, so that you can follow this repository's commit message style.\n2. Analyze all staged changes (both previously staged and newly added) and draft a commit message:\n - Summarize the nature of the changes (eg. new feature, enhancement to an existing feature, bug fix, refactoring, test, docs, etc.). Ensure the message accurately reflects the changes and their purpose (i.e. \"add\" means a wholly new feature, \"update\" means an enhancement to an existing feature, \"fix\" means a bug fix, etc.).\n - Do not commit files that likely contain secrets (.env, credentials.json, etc.). Warn the user if they specifically request to commit those files\n - Draft a concise (1-2 sentences) commit message that focuses on the \"why\" rather than the \"what\"\n - Ensure it accurately reflects the changes and their purpose\n3. You can call multiple tools in a single response. When multiple independent pieces of information are requested and all commands are likely to succeed, run multiple tool calls in parallel for optimal performance. run the following commands:\n - Add relevant untracked files to the staging area.\n - Create the commit with a message\n - Run git status after the commit completes to verify success.\n Note: git status depends on the commit completing, so run it sequentially after the commit.\n4. If the commit fails due to pre-commit hook, fix the issue and create a NEW commit (see amend rules above)\n\nImportant notes:\n- NEVER run additional commands to read or explore code, besides git bash commands\n- NEVER use the TodoWrite or Task tools\n- DO NOT push to the remote repository unless the user explicitly asks you to do so\n- IMPORTANT: Never use git commands with the -i flag (like git rebase -i or git add -i) since they require interactive input which is not supported.\n- If there are no changes to commit (i.e., no untracked files and no modifications), do not create an empty commit\n\n# Creating pull requests\nUse the gh command via the Bash tool for ALL GitHub-related tasks including working with issues, pull requests, checks, and releases. If given a GitHub URL use the gh command to get the information needed.\n\nIMPORTANT: When the user asks you to create a pull request, follow these steps carefully:\n\n1. You can call multiple tools in a single response. When multiple independent pieces of information are requested and all commands are likely to succeed, run multiple tool calls in parallel for optimal performance. run the following bash commands in parallel using the Bash tool, in order to understand the current state of the branch since it diverged from the main branch:\n - Run a git status command to see all untracked files\n - Run a git diff command to see both staged and unstaged changes that will be committed\n - Check if the current branch tracks a remote branch and is up to date with the remote, so you know if you need to push to the remote\n - Run a git log command and `git diff [base-branch]...HEAD` to understand the full commit history for the current branch (from the time it diverged from the base branch)\n2. Analyze all changes that will be included in the pull request, making sure to look at all relevant commits (NOT just the latest commit, but ALL commits that will be included in the pull request!!!), and draft a pull request summary\n3. You can call multiple tools in a single response. When multiple independent pieces of information are requested and all commands are likely to succeed, run multiple tool calls in parallel for optimal performance. run the following commands in parallel:\n - Create new branch if needed\n - Push to remote with -u flag if needed\n - Create PR using gh pr create with the format below. Use a HEREDOC to pass the body to ensure correct formatting.\n<example>\ngh pr create --title \"the pr title\" --body \"$(cat <<'EOF'\n## Summary\n<1-3 bullet points>\n</example>\n\nImportant:\n- DO NOT use the TodoWrite or Task tools\n- Return the PR URL when you're done, so the user can see it\n\n# Other common operations\n- View comments on a GitHub PR: gh api repos/foo/bar/pulls/123/comments\n",
"parameters": {
"$schema": "https://json-schema.org/draft/2020-12/schema",
"type": "object",
"properties": {
"command": {
"description": "The command to execute",
"type": "string"
},
"timeout": {
"description": "Optional timeout in milliseconds",
"type": "number"
},
"workdir": {
"description": "The working directory to run the command in. Defaults to D:\\nodejsproject\\opencode\\workdir. Use this instead of 'cd' commands.",
"type": "string"
},
"description": {
"description": "Clear, concise description of what this command does in 5-10 words. Examples:\nInput: ls\nOutput: Lists files in current directory\n\nInput: git status\nOutput: Shows working tree status\n\nInput: npm install\nOutput: Installs package dependencies\n\nInput: mkdir foo\nOutput: Creates directory 'foo'",
"type": "string"
}
},
"required": [
"command",
"description"
],
"additionalProperties": false
}
}
},
{
"type": "function",
"function": {
"name": "read",
"description": "Read a file or directory from the local filesystem. If the path does not exist, an error is returned.\n\nUsage:\n- The filePath parameter should be an absolute path.\n- By default, this tool returns up to 2000 lines from the start of the file.\n- The offset parameter is the line number to start from (1-indexed).\n- To read later sections, call this tool again with a larger offset.\n- Use the grep tool to find specific content in large files or files with long lines.\n- If you are unsure of the correct file path, use the glob tool to look up filenames by glob pattern.\n- Contents are returned with each line prefixed by its line number as `<line>: <content>`. For example, if a file has contents \"foo\\n\", you will receive \"1: foo\\n\". For directories, entries are returned one per line (without line numbers) with a trailing `/` for subdirectories.\n- Any line longer than 2000 characters is truncated.\n- Call this tool in parallel when you know there are multiple files you want to read.\n- Avoid tiny repeated slices (30 line chunks). If you need more context, read a larger window.\n- This tool can read image files and PDFs and return them as file attachments.\n",
"parameters": {
"$schema": "https://json-schema.org/draft/2020-12/schema",
"type": "object",
"properties": {
"filePath": {
"description": "The absolute path to the file or directory to read",
"type": "string"
},
"offset": {
"description": "The line number to start reading from (1-indexed)",
"type": "number"
},
"limit": {
"description": "The maximum number of lines to read (defaults to 2000)",
"type": "number"
}
},
"required": [
"filePath"
],
"additionalProperties": false
}
}
},
{
"type": "function",
"function": {
"name": "glob",
"description": "- Fast file pattern matching tool that works with any codebase size\n- Supports glob patterns like \"**/*.js\" or \"src/**/*.ts\"\n- Returns matching file paths sorted by modification time\n- Use this tool when you need to find files by name patterns\n- When you are doing an open-ended search that may require multiple rounds of globbing and grepping, use the Task tool instead\n- You have the capability to call multiple tools in a single response. It is always better to speculatively perform multiple searches as a batch that are potentially useful.\n",
"parameters": {
"$schema": "https://json-schema.org/draft/2020-12/schema",
"type": "object",
"properties": {
"pattern": {
"description": "The glob pattern to match files against",
"type": "string"
},
"path": {
"description": "The directory to search in. If not specified, the current working directory will be used. IMPORTANT: Omit this field to use the default directory. DO NOT enter \"undefined\" or \"null\" - simply omit it for the default behavior. Must be a valid directory path if provided.",
"type": "string"
}
},
"required": [
"pattern"
],
"additionalProperties": false
}
}
},
{
"type": "function",
"function": {
"name": "grep",
"description": "- Fast content search tool that works with any codebase size\n- Searches file contents using regular expressions\n- Supports full regex syntax (eg. \"log.*Error\", \"function\\s+\\w+\", etc.)\n- Filter files by pattern with the include parameter (eg. \"*.js\", \"*.{ts,tsx}\")\n- Returns file paths and line numbers with at least one match sorted by modification time\n- Use this tool when you need to find files containing specific patterns\n- If you need to identify/count the number of matches within files, use the Bash tool with `rg` (ripgrep) directly. Do NOT use `grep`.\n- When you are doing an open-ended search that may require multiple rounds of globbing and grepping, use the Task tool instead\n",
"parameters": {
"$schema": "https://json-schema.org/draft/2020-12/schema",
"type": "object",
"properties": {
"pattern": {
"description": "The regex pattern to search for in file contents",
"type": "string"
},
"path": {
"description": "The directory to search in. Defaults to the current working directory.",
"type": "string"
},
"include": {
"description": "File pattern to include in the search (e.g. \"*.js\", \"*.{ts,tsx}\")",
"type": "string"
}
},
"required": [
"pattern"
],
"additionalProperties": false
}
}
},
{
"type": "function",
"function": {
"name": "edit",
"description": "Performs exact string replacements in files. \n\nUsage:\n- You must use your `Read` tool at least once in the conversation before editing. This tool will error if you attempt an edit without reading the file. \n- When editing text from Read tool output, ensure you preserve the exact indentation (tabs/spaces) as it appears AFTER the line number prefix. The line number prefix format is: line number + colon + space (e.g., `1: `). Everything after that space is the actual file content to match. Never include any part of the line number prefix in the oldString or newString.\n- ALWAYS prefer editing existing files in the codebase. NEVER write new files unless explicitly required.\n- Only use emojis if the user explicitly requests it. Avoid adding emojis to files unless asked.\n- The edit will FAIL if `oldString` is not found in the file with an error \"oldString not found in content\".\n- The edit will FAIL if `oldString` is found multiple times in the file with an error \"Found multiple matches for oldString. Provide more surrounding lines in oldString to identify the correct match.\" Either provide a larger string with more surrounding context to make it unique or use `replaceAll` to change every instance of `oldString`. \n- Use `replaceAll` for replacing and renaming strings across the file. This parameter is useful if you want to rename a variable for instance.\n",
"parameters": {
"$schema": "https://json-schema.org/draft/2020-12/schema",
"type": "object",
"properties": {
"filePath": {
"description": "The absolute path to the file to modify",
"type": "string"
},
"oldString": {
"description": "The text to replace",
"type": "string"
},
"newString": {
"description": "The text to replace it with (must be different from oldString)",
"type": "string"
},
"replaceAll": {
"description": "Replace all occurrences of oldString (default false)",
"type": "boolean"
}
},
"required": [
"filePath",
"oldString",
"newString"
],
"additionalProperties": false
}
}
},
{
"type": "function",
"function": {
"name": "write",
"description": "Writes a file to the local filesystem.\n\nUsage:\n- This tool will overwrite the existing file if there is one at the provided path.\n- If this is an existing file, you MUST use the Read tool first to read the file's contents. This tool will fail if you did not read the file first.\n- ALWAYS prefer editing existing files in the codebase. NEVER write new files unless explicitly required.\n- NEVER proactively create documentation files (*.md) or README files. Only create documentation files if explicitly requested by the User.\n- Only use emojis if the user explicitly requests it. Avoid writing emojis to files unless asked.\n",
"parameters": {
"$schema": "https://json-schema.org/draft/2020-12/schema",
"type": "object",
"properties": {
"content": {
"description": "The content to write to the file",
"type": "string"
},
"filePath": {
"description": "The absolute path to the file to write (must be absolute, not relative)",
"type": "string"
}
},
"required": [
"content",
"filePath"
],
"additionalProperties": false
}
}
},
{
"type": "function",
"function": {
"name": "task",
"description": "Launch a new agent to handle complex, multistep tasks autonomously.\n\nAvailable agent types and the tools they have access to:\n- general: General-purpose agent for researching complex questions and executing multi-step tasks. Use this agent to execute multiple units of work in parallel.\n- explore: Fast agent specialized for exploring codebases. Use this when you need to quickly find files by patterns (eg. \"src/components/**/*.tsx\"), search code for keywords (eg. \"API endpoints\"), or answer questions about the codebase (eg. \"how do API endpoints work?\"). When calling this agent, specify the desired thoroughness level: \"quick\" for basic searches, \"medium\" for moderate exploration, or \"very thorough\" for comprehensive analysis across multiple locations and naming conventions.\n\nWhen using the Task tool, you must specify a subagent_type parameter to select which agent type to use.\n\nWhen to use the Task tool:\n- When you are instructed to execute custom slash commands. Use the Task tool with the slash command invocation as the entire prompt. The slash command can take arguments. For example: Task(description=\"Check the file\", prompt=\"/check-file path/to/file.py\")\n\nWhen NOT to use the Task tool:\n- If you want to read a specific file path, use the Read or Glob tool instead of the Task tool, to find the match more quickly\n- If you are searching for a specific class definition like \"class Foo\", use the Glob tool instead, to find the match more quickly\n- If you are searching for code within a specific file or set of 2-3 files, use the Read tool instead of the Task tool, to find the match more quickly\n- Other tasks that are not related to the agent descriptions above\n\n\nUsage notes:\n1. Launch multiple agents concurrently whenever possible, to maximize performance; to do that, use a single message with multiple tool uses\n2. When the agent is done, it will return a single message back to you. The result returned by the agent is not visible to the user. To show the user the result, you should send a text message back to the user with a concise summary of the result. The output includes a task_id you can reuse later to continue the same subagent session.\n3. Each agent invocation starts with a fresh context unless you provide task_id to resume the same subagent session (which continues with its previous messages and tool outputs). When starting fresh, your prompt should contain a highly detailed task description for the agent to perform autonomously and you should specify exactly what information the agent should return back to you in its final and only message to you.\n4. The agent's outputs should generally be trusted\n5. Clearly tell the agent whether you expect it to write code or just to do research (search, file reads, web fetches, etc.), since it is not aware of the user's intent. Tell it how to verify its work if possible (e.g., relevant test commands).\n6. If the agent description mentions that it should be used proactively, then you should try your best to use it without the user having to ask for it first. Use your judgement.\n\nExample usage (NOTE: The agents below are fictional examples for illustration only - use the actual agents listed above):\n\n<example_agent_descriptions>\n\"code-reviewer\": use this agent after you are done writing a significant piece of code\n\"greeting-responder\": use this agent when to respond to user greetings with a friendly joke\n</example_agent_description>\n\n<example>\nuser: \"Please write a function that checks if a number is prime\"\nassistant: Sure let me write a function that checks if a number is prime\nassistant: First let me use the Write tool to write a function that checks if a number is prime\nassistant: I'm going to use the Write tool to write the following code:\n<code>\nfunction isPrime(n) {\n if (n <= 1) return false\n for (let i = 2; i * i <= n; i++) {\n if (n % i === 0) return false\n }\n return true\n}\n</code>\n<commentary>\nSince a significant piece of code was written and the task was completed, now use the code-reviewer agent to review the code\n</commentary>\nassistant: Now let me use the code-reviewer agent to review the code\nassistant: Uses the Task tool to launch the code-reviewer agent\n</example>\n\n<example>\nuser: \"Hello\"\n<commentary>\nSince the user is greeting, use the greeting-responder agent to respond with a friendly joke\n</commentary>\nassistant: \"I'm going to use the Task tool to launch the with the greeting-responder agent\"\n</example>\n",
"parameters": {
"$schema": "https://json-schema.org/draft/2020-12/schema",
"type": "object",
"properties": {
"description": {
"description": "A short (3-5 words) description of the task",
"type": "string"
},
"prompt": {
"description": "The task for the agent to perform",
"type": "string"
},
"subagent_type": {
"description": "The type of specialized agent to use for this task",
"type": "string"
},
"task_id": {
"description": "This should only be set if you mean to resume a previous task (you can pass a prior task_id and the task will continue the same subagent session as before instead of creating a fresh one)",
"type": "string"
},
"command": {
"description": "The command that triggered this task",
"type": "string"
}
},
"required": [
"description",
"prompt",
"subagent_type"
],
"additionalProperties": false
}
}
},
{
"type": "function",
"function": {
"name": "webfetch",
"description": "- Fetches content from a specified URL\n- Takes a URL and optional format as input\n- Fetches the URL content, converts to requested format (markdown by default)\n- Returns the content in the specified format\n- Use this tool when you need to retrieve and analyze web content\n\nUsage notes:\n - IMPORTANT: if another tool is present that offers better web fetching capabilities, is more targeted to the task, or has fewer restrictions, prefer using that tool instead of this one.\n - The URL must be a fully-formed valid URL\n - HTTP URLs will be automatically upgraded to HTTPS\n - Format options: \"markdown\" (default), \"text\", or \"html\"\n - This tool is read-only and does not modify any files\n - Results may be summarized if the content is very large\n",
"parameters": {
"$schema": "https://json-schema.org/draft/2020-12/schema",
"type": "object",
"properties": {
"url": {
"description": "The URL to fetch content from",
"type": "string"
},
"format": {
"description": "The format to return the content in (text, markdown, or html). Defaults to markdown.",
"default": "markdown",
"type": "string",
"enum": [
"text",
"markdown",
"html"
]
},
"timeout": {
"description": "Optional timeout in seconds (max 120)",
"type": "number"
}
},
"required": [
"url",
"format"
],
"additionalProperties": false
}
}
},
{
"type": "function",
"function": {
"name": "todowrite",
"description": "Use this tool to create and manage a structured task list for your current coding session. This helps you track progress, organize complex tasks, and demonstrate thoroughness to the user.\nIt also helps the user understand the progress of the task and overall progress of their requests.\n\n## When to Use This Tool\nUse this tool proactively in these scenarios:\n\n1. Complex multistep tasks - When a task requires 3 or more distinct steps or actions\n2. Non-trivial and complex tasks - Tasks that require careful planning or multiple operations\n3. User explicitly requests todo list - When the user directly asks you to use the todo list\n4. User provides multiple tasks - When users provide a list of things to be done (numbered or comma-separated)\n5. After receiving new instructions - Immediately capture user requirements as todos. Feel free to edit the todo list based on new information.\n6. After completing a task - Mark it complete and add any new follow-up tasks\n7. When you start working on a new task, mark the todo as in_progress. Ideally you should only have one todo as in_progress at a time. Complete existing tasks before starting new ones.\n\n## When NOT to Use This Tool\n\nSkip using this tool when:\n1. There is only a single, straightforward task\n2. The task is trivial and tracking it provides no organizational benefit\n3. The task can be completed in less than 3 trivial steps\n4. The task is purely conversational or informational\n\nNOTE that you should not use this tool if there is only one trivial task to do. In this case you are better off just doing the task directly.\n\n## Examples of When to Use the Todo List\n\n<example>\nUser: I want to add a dark mode toggle to the application settings. Make sure you run the tests and build when you're done!\nAssistant: I'll help add a dark mode toggle to your application settings. Let me create a todo list to track this implementation.\n*Creates todo list with the following items:*\n1. Create dark mode toggle component in Settings page\n2. Add dark mode state management (context/store)\n3. Implement CSS-in-JS styles for dark theme\n4. Update existing components to support theme switching\n5. Run tests and build process, addressing any failures or errors that occur\n*Begins working on the first task*\n\n<reasoning>\nThe assistant used the todo list because:\n1. Adding dark mode is a multi-step feature requiring UI, state management, and styling changes\n2. The user explicitly requested tests and build be run afterward\n3. The assistant inferred that tests and build need to pass by adding \"Ensure tests and build succeed\" as the final task\n</reasoning>\n</example>\n\n<example>\nUser: Help me rename the function getCwd to getCurrentWorkingDirectory across my project\nAssistant: Let me first search through your codebase to find all occurrences of 'getCwd'.\n*Uses grep or search tools to locate all instances of getCwd in the codebase*\nAssistant: I've found 15 instances of 'getCwd' across 8 different files. Let me create a todo list to track these changes.\n*Creates todo list with specific items for each file that needs updating*\n\n<reasoning>\nThe assistant used the todo list because:\n1. First, the assistant searched to understand the scope of the task\n2. Upon finding multiple occurrences across different files, it determined this was a complex task with multiple steps\n3. The todo list helps ensure every instance is tracked and updated systematically\n4. This approach prevents missing any occurrences and maintains code consistency\n</reasoning>\n</example>\n\n\n<example>\nUser: I need to implement these features for my e-commerce site: user registration, product catalog, shopping cart, and checkout flow.\nAssistant: I'll help implement these features. First, let's add all the features to the todo list.\n*Creates a todo list breaking down each feature into specific tasks based on the project architecture*\nAssistant: Let's start with user registration. This will involve creating database models, API endpoints, and frontend forms that integrate with your existing authentication system.\n\n<reasoning>\nThe assistant used the todo list because:\n1. The user provided multiple complex features to implement in a comma separated list\n2. The todo list helps organize these large features into manageable tasks\n3. This approach allows for tracking progress across the entire implementation\n</reasoning>\n</example>\n\n<example>\nUser: Can you help optimize my React application? It's rendering slowly and has performance issues.</user>\nAssistant: I'll help optimize your React application. First, let me examine your codebase to identify potential performance bottlenecks.\n*Reviews component structure, render patterns, state management, and data fetching*\nAssistant: After analyzing your codebase, I've identified several performance issues. Let me create a todo list to track our optimization efforts.\n*Creates todo list with items like: 1) Implement memoization for expensive calculations in ProductList, 2) Add virtualization for long lists in Dashboard, 3) Optimize image loading in Gallery component, 4) Fix state update loops in ShoppingCart, 5) Review bundle size and implement code splitting*\nLet's start by implementing memoization for the expensive calculations in your ProductList component.</assistant>\n\n<reasoning>\nThe assistant used the todo list because:\n1. First, the assistant examined the codebase to identify specific performance issues\n2. Based on this analysis, it identified multiple optimization opportunities\n3. Performance optimization is a non-trivial task requiring multiple steps\n4. The todo list helps methodically track improvements across different components\n5. This systematic approach ensures all performance bottlenecks are addressed\n</reasoning>\n</example>\n\n## Examples of When NOT to Use the Todo List\n\n<example>\nUser: How do I print 'Hello World' in Python?\nAssistant: In Python, you can print \"Hello World\" with this simple code:\n\npython\nprint(\"Hello World\")\n\nThis will output the text \"Hello World\" to the console when executed.</assistant>\n\n<reasoning>\nThe assistant did not use the todo list because this is a single, trivial task that can be completed in one step. There's no need to track multiple tasks or steps for such a straightforward request.\n</reasoning>\n</example>\n\n<example>\nUser: What does the git status command do?\nAssistant: The git status command shows the current state of your working directory and staging area. It displays which changes have been staged, which haven't, and which files aren't being tracked by Git. This is a fundamental command for understanding the current state of your repository before making commits.\n\n<reasoning>\nThe assistant did not use the todo list because this is an informational request with no actual coding task to complete. The user is simply asking for an explanation, not for the assistant to perform multiple steps or tasks.\n</reasoning>\n</example>\n\n<example>\nUser: Can you add a comment to the calculateTotal function to explain what it does?\nAssistant: Sure, let me add a comment to the calculateTotal function to explain what it does.\n* Uses the Edit tool to add a comment to the calculateTotal function *\n\n<reasoning>\nThe assistant did not use the todo list because this is a single, straightforward task confined to one location in the code. Adding a comment doesn't require tracking multiple steps or systematic organization.\n</reasoning>\n</example>\n\n<example>\nUser: Run npm install for me and tell me what happens.\nAssistant: I'll run the npm install command for you.\n\n*Executes: npm install*\n\nThe command completed successfully. Here's the output:\n[Output of npm install command]\n\nAll dependencies have been installed according to your package.json file.\n\n<reasoning>\nThe assistant did not use the todo list because this is a single command execution with immediate results. There are no multiple steps to track or organize, making the todo list unnecessary for this straightforward task.\n</reasoning>\n</example>\n\n## Task States and Management\n\n1. **Task States**: Use these states to track progress:\n - pending: Task not yet started\n - in_progress: Currently working on (limit to ONE task at a time)\n - completed: Task finished successfully\n - cancelled: Task no longer needed\n\n2. **Task Management**:\n - Update task status in real-time as you work\n - Mark tasks complete IMMEDIATELY after finishing (don't batch completions)\n - Only have ONE task in_progress at any time\n - Complete current tasks before starting new ones\n - Cancel tasks that become irrelevant\n\n3. **Task Breakdown**:\n - Create specific, actionable items\n - Break complex tasks into smaller, manageable steps\n - Use clear, descriptive task names\n\nWhen in doubt, use this tool. Being proactive with task management demonstrates attentiveness and ensures you complete all requirements successfully.\n\n",
"parameters": {
"$schema": "https://json-schema.org/draft/2020-12/schema",
"type": "object",
"properties": {
"todos": {
"description": "The updated todo list",
"type": "array",
"items": {
"type": "object",
"properties": {
"content": {
"description": "Brief description of the task",
"type": "string"
},
"status": {
"description": "Current status of the task: pending, in_progress, completed, cancelled",
"type": "string"
},
"priority": {
"description": "Priority level of the task: high, medium, low",
"type": "string"
}
},
"required": [
"content",
"status",
"priority"
],
"additionalProperties": false
}
}
},
"required": [
"todos"
],
"additionalProperties": false
}
}
},
{
"type": "function",
"function": {
"name": "skill",
"description": "Load a specialized skill that provides domain-specific instructions and workflows.\n\nWhen you recognize that a task matches one of the available skills listed below, use this tool to load the full skill instructions.\n\nThe skill will inject detailed instructions, workflows, and access to bundled resources (scripts, references, templates) into the conversation context.\n\nTool output includes a `<skill_content name=\"...\">` block with the loaded content.\n\nThe following skills provide specialized sets of instructions for particular tasks\nInvoke this tool to load a skill when a task matches one of the available skills listed below:\n\n<available_skills>\n <skill>\n <name>writeFile</name>\n <description>把文本写到到一个项目目录中的log.log文件中,并且是追加。</description>\n <location>file:///D:/nodejsproject/opencode/workdir/.opencode/skills/PythonWirteFile/SKILL.md</location>\n </skill>\n <skill>\n <name>ReadFile</name>\n <description>从文件中读取内容</description>\n <location>file:///D:/nodejsproject/opencode/workdir/.opencode/skills/ReadFile/SKILL.md</location>\n </skill>\n <skill>\n <name>Python-Hello-World</name>\n <description>创建一个简单的Python Hello World程序并确保它可以执行。</description>\n <location>file:///D:/nodejsproject/opencode/workdir/.opencode/skills/PythonHelloWorld/SKILL.md</location>\n </skill>\n</available_skills>",
"parameters": {
"$schema": "https://json-schema.org/draft/2020-12/schema",
"type": "object",
"properties": {
"name": {
"description": "The name of the skill from available_skills (e.g., 'writeFile', 'ReadFile', 'Python-Hello-World', ...)",
"type": "string"
}
},
"required": [
"name"
],
"additionalProperties": false
}
}
}
],
"tool_choice": "auto",
"stream": true,
"stream_options": {
"include_usage": true
}
}
//////////对应的回复信息//////////////////
data: {"model":"qwen3-max","id":"chatcmpl-860dd3da-4917-46f7-8c2a-15e9504720d7","created":1772528269,"object":"chat.completion.chunk","usage":null,"choices":[{"logprobs":null,"index":0,"delta":{"content":"","role":"assistant"}}]}
data: {"model":"qwen3-max","id":"chatcmpl-860dd3da-4917-46f7-8c2a-15e9504720d7","choices":[{"delta":{"content":"我","role":null},"index":0}],"created":1772528269,"object":"chat.completion.chunk","usage":null}
data: {"model":"qwen3-max","id":"chatcmpl-860dd3da-4917-46f7-8c2a-15e9504720d7","choices":[{"delta":{"content":"将帮","role":null},"index":0}],"created":1772528269,"object":"chat.completion.chunk","usage":null}
data: {"model":"qwen3-max","id":"chatcmpl-860dd3da-4917-46f7-8c2a-15e9504720d7","choices":[{"delta":{"content":"您验证","role":null},"index":0}],"created":1772528269,"object":"chat.completion.chunk","usage":null}
data: {"model":"qwen3-max","id":"chatcmpl-860dd3da-4917-46f7-8c2a-15e9504720d7","choices":[{"delta":{"content":"当前","role":null},"index":0}],"created":1772528269,"object":"chat.completion.chunk","usage":null}
data: {"model":"qwen3-max","id":"chatcmpl-860dd3da-4917-46f7-8c2a-15e9504720d7","choices":[{"delta":{"content":"的Python环境,按照","role":null},"index":0}],"created":1772528269,"object":"chat.completion.chunk","usage":null}
data: {"model":"qwen3-max","id":"chatcmpl-860dd3da-4917-46f7-8c2a-15e9504720d7","choices":[{"delta":{"content":"Python-Hello-","role":null},"index":0}],"created":1772528269,"object":"chat.completion.chunk","usage":null}
data: {"model":"qwen3-max","id":"chatcmpl-860dd3da-4917-46f7-8c2a-15e9504720d7","choices":[{"delta":{"content":"World技能的步骤执行","role":null},"index":0}],"created":1772528269,"object":"chat.completion.chunk","usage":null}
data: {"model":"qwen3-max","id":"chatcmpl-860dd3da-4917-46f7-8c2a-15e9504720d7","choices":[{"delta":{"content":":\n\n1.","role":null},"index":0}],"created":1772528269,"object":"chat.completion.chunk","usage":null}
data: {"model":"qwen3-max","id":"chatcmpl-860dd3da-4917-46f7-8c2a-15e9504720d7","choices":[{"delta":{"content":" 首先创建hello","role":null},"index":0}],"created":1772528269,"object":"chat.completion.chunk","usage":null}
data: {"model":"qwen3-max","id":"chatcmpl-860dd3da-4917-46f7-8c2a-15e9504720d7","choices":[{"delta":{"content":".py文件\n2.","role":null},"index":0}],"created":1772528269,"object":"chat.completion.chunk","usage":null}
data: {"model":"qwen3-max","id":"chatcmpl-860dd3da-4917-46f7-8c2a-15e9504720d7","choices":[{"delta":{"content":" 然后执行该","role":null},"index":0}],"created":1772528269,"object":"chat.completion.chunk","usage":null}
data: {"model":"qwen3-max","id":"chatcmpl-860dd3da-4917-46f7-8c2a-15e9504720d7","choices":[{"delta":{"content":"文件验证Python环境\n\n","role":null},"index":0}],"created":1772528269,"object":"chat.completion.chunk","usage":null}
data: {"model":"qwen3-max","id":"chatcmpl-860dd3da-4917-46f7-8c2a-15e9504720d7","choices":[{"delta":{"content":"","tool_calls":[{"index":0,"id":"call_6b248d096c634373b5be0998","type":"function","function":{"name":"write","arguments":""}}],"role":null},"index":0}],"created":1772528269,"object":"chat.completion.chunk","usage":null}
data: {"model":"qwen3-max","id":"chatcmpl-860dd3da-4917-46f7-8c2a-15e9504720d7","choices":[{"delta":{"content":"","tool_calls":[{"index":0,"id":"","type":"function","function":{"name":"","arguments":"{\"content\": \"#!/"}}],"role":null},"index":0}],"created":1772528269,"object":"chat.completion.chunk","usage":null}
data: {"model":"qwen3-max","id":"chatcmpl-860dd3da-4917-46f7-8c2a-15e9504720d7","choices":[{"delta":{"content":"","tool_calls":[{"index":0,"id":"","type":"function","function":{"name":"","arguments":"usr/bin/env python3"}}],"role":null},"index":0}],"created":1772528269,"object":"chat.completion.chunk","usage":null}
data: {"model":"qwen3-max","id":"chatcmpl-860dd3da-4917-46f7-8c2a-15e9504720d7","choices":[{"delta":{"content":"","tool_calls":[{"index":0,"id":"","type":"function","function":{"name":"","arguments":"\\nprint(\\\"Hello, World!\\\")"}}],"role":null},"index":0}],"created":1772528269,"object":"chat.completion.chunk","usage":null}
data: {"model":"qwen3-max","id":"chatcmpl-860dd3da-4917-46f7-8c2a-15e9504720d7","choices":[{"delta":{"content":"","tool_calls":[{"index":0,"id":"","type":"function","function":{"name":"","arguments":"\""}}],"role":null},"index":0}],"created":1772528269,"object":"chat.completion.chunk","usage":null}
data: {"model":"qwen3-max","id":"chatcmpl-860dd3da-4917-46f7-8c2a-15e9504720d7","choices":[{"delta":{"content":"","tool_calls":[{"index":0,"id":"","type":"function","function":{"name":"","arguments":", \"filePath\": \"D:\\\\"}}],"role":null},"index":0}],"created":1772528269,"object":"chat.completion.chunk","usage":null}
data: {"model":"qwen3-max","id":"chatcmpl-860dd3da-4917-46f7-8c2a-15e9504720d7","choices":[{"delta":{"content":"","tool_calls":[{"index":0,"id":"","type":"function","function":{"name":"","arguments":"nodejsproject\\\\opencode"}}],"role":null},"index":0}],"created":1772528269,"object":"chat.completion.chunk","usage":null}
data: {"model":"qwen3-max","id":"chatcmpl-860dd3da-4917-46f7-8c2a-15e9504720d7","choices":[{"delta":{"content":"","tool_calls":[{"index":0,"id":"","type":"function","function":{"name":"","arguments":"\\\\workdir\\\\hello.py"}}],"role":null},"index":0}],"created":1772528269,"object":"chat.completion.chunk","usage":null}
data: {"model":"qwen3-max","id":"chatcmpl-860dd3da-4917-46f7-8c2a-15e9504720d7","choices":[{"delta":{"content":"","tool_calls":[{"index":0,"id":"","type":"function","function":{"name":"","arguments":"\""}}],"role":null},"index":0}],"created":1772528269,"object":"chat.completion.chunk","usage":null}
data: {"model":"qwen3-max","id":"chatcmpl-860dd3da-4917-46f7-8c2a-15e9504720d7","choices":[{"delta":{"tool_calls":[{"function":{"arguments":"}"},"index":0,"id":"","type":"function"}],"content":""},"index":0}],"created":1772528269,"object":"chat.completion.chunk","usage":null}
data: {"model":"qwen3-max","id":"chatcmpl-860dd3da-4917-46f7-8c2a-15e9504720d7","choices":[{"delta":{},"index":0,"finish_reason":"tool_calls"}],"created":1772528269,"object":"chat.completion.chunk","usage":null}
data: {"model":"qwen3-max","id":"chatcmpl-860dd3da-4917-46f7-8c2a-15e9504720d7","choices":[],"created":1772528269,"object":"chat.completion.chunk","usage":{"total_tokens":13029,"completion_tokens":100,"prompt_tokens":12929,"prompt_tokens_details":{"cached_tokens":0}}}
data: [DONE]
///提取内容
根据你提供的 SSE (Server-Sent Events) 流式响应数据,我提取并重组了完整的 AI 回复内容。
这条回复包含两部分:自然语言文本 和 工具调用请求 (Tool Call)。
1. 🗣️ 自然语言回复 (Text Content)
AI 首先输出了以下文本,告知用户它将按照技能步骤执行操作:
我将帮您验证当前的 Python 环境,按照 Python-Hello-World 技能的步骤执行:
首先创建 hello.py 文件
然后执行该文件验证 Python 环境
2. 🛠️ 工具调用 (Tool Call)
紧接着,AI 发起了一個名为 write 的工具调用,目的是创建文件。
工具名称: write
调用 ID: call_6b248d096c634373b5be0998
参数内容 (JSON):
{
"content": "#!/usr/bin/env python3\nprint(\"Hello, World!\")",
"filePath": "D:\\nodejsproject\\opencode\\workdir\\hello.py"
}


 1443
1443

 被折叠的 条评论
为什么被折叠?
被折叠的 条评论
为什么被折叠?
 到【灌水乐园】发言


