


 本文详细介绍了适配器模式的概念、适用场景、优缺点,并通过类适配器、对象适配器和接口适配器三种写法进行实例说明,帮助读者理解如何在JAVA中应用适配器模式来解决接口不匹配的问题。
钟表,可以回到起点,但已不是昨天。
生活中处处可见适配现象:手机充电器的充电头,电脑电源适配器,高压变压器,等等都是适配器的案例。
1. 适配器模式
定义
适配器模式又叫做变压器模式,它的功能是将一个类的接口变成客户端所期望的另一种接口,从而使原本因接口不匹配而导致的无法在一起工作的两个类能够在一起工作。
属于结构型设计模式
适用场景
已经存在的类,它的方法和需求不匹配(方法结果相同或者相似)的情况
适配器模式不是软件设计阶段考虑的设计模式,是随着软件维护,由于不同的产品、不同的厂家造成功能类似而接口不同情况下的解决方案。
优点
能提高类的透明性和复用,现有的类复用但不需要改变
目标类和适配器类解耦,提高程序的扩展性
在很多业务场景中符合开闭原则
缺点
适配器编写过程需要全面考虑,可能会增加系统的复杂性
增加代码的阅读难度,降低代码的可读性,过多使用适配器会使系统代码变得凌乱
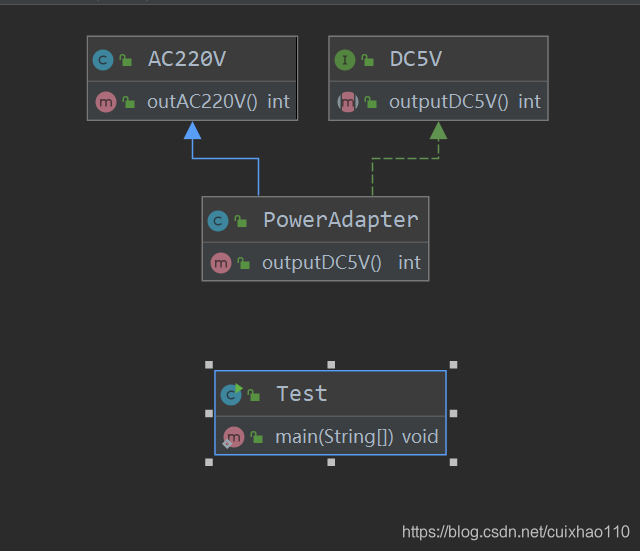
2. 类适配器写法
适配器模式有一个经典案例:我们的电压一般是220V,但是我们的手机等家用电器有些不是220V,需要电源适配器做一个转化,比如说说手机一般是5V的充电器才能工作。
public class AC220V {

    public int outAC220V() {
        int i = 220;
        System.out.println("交流电:" + i + "V");
        return i;
    }
}
public interface DC5V {

    int outputDC5V();
}
public class PowerAdapter extends AC220V implements DC5V {
    public int outputDC5V() {
        int ac = super.outAC220V();
        int dc = ac / 44;
        System.out.println("输入:" + ac + "V,输出: " + dc + "V");
        return dc;
    }
}
public class Test {
    public static void main(String[] args) {
        DC5V dc5V = new PowerAdapter();
        int dc = dc5V.outputDC5V();
        System.out.println("适配器转化电压:" + dc + "V");
    }
}
交流电:220V
输入:220V,输出: 5V
适配器转化电压:5V
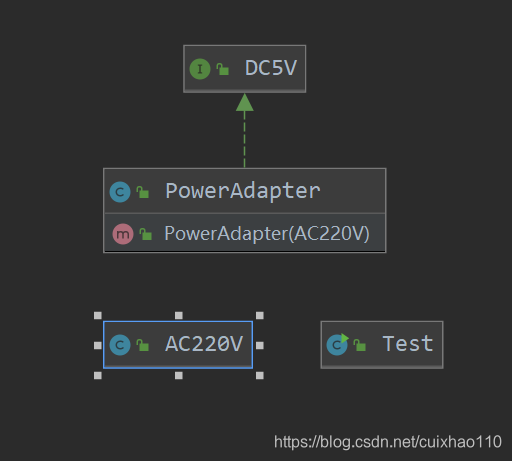
3. 对象适配器写法
类适配器有一个缺点就是违背了最少知道原则,因为是继承了父类,用对象适配器写法就可以回避这个问题,如下:
public class PowerAdapter implements DC5V {

    private AC220V ac220V;

    public PowerAdapter(AC220V ac220V) {
        this.ac220V = ac220V;
    }

    public int outputDC5V() {
        int ac = this.ac220V.outAC220V();
        int dc = ac / 44;
        System.out.println("输入:" + ac + "V,输出: " + dc + "V");
        return dc;
    }
}
public class Test {

    public static void main(String[] args) {
        DC5V dc5V = new PowerAdapter(new AC220V());
        int dc = dc5V.outputDC5V();
        System.out.println("适配器转化电压:" + dc + "V");
    }
}
交流电:220V
输入:220V,输出: 5V
适配器转化电压:5V
4. 接口适配器写法
我们的手机是5V电压,我们的电脑就不是5V了,电视、剃须刀、蓝牙耳机等等,那么按照以上的两种写法,我们要写很多适配器,这样显然不太合理,那么接口适配器写法就能帮我们解决问题。
public interface DC{
    int output5V();

    int output12V();

    int output24V();

    int output36V();
}
public class PowerAdapter implements DC {

    private AC220V ac220V;

    public PowerAdapter(AC220V ac220V) {
        this.ac220V = ac220V;
    }

    public int output5V() {
        int ac = this.ac220V.outAC220V();
        int dc = ac / 44;
        System.out.println("输入:" + ac + "V,输出: " + dc + "V");
        return dc;
    }

    public int output12V() {
        // todo
        return 0;
    }

    public int output24V() {
        // todo
        return 0;
    }

    public int output36V() {
        // todo
        return 0;
    }
}
public class Test {

    public static void main(String[] args) {
        DC dc = new PowerAdapter(new AC220V());
        int dc5v = dc.output5V();
        int dc12v = dc.output5V();
        int dc24v = dc.output5V();
        int dc36v = dc.output5V();
        System.out.println("适配器转化电压:" + dc5v + "V");
    }
}
感谢您阅读本文,如果您觉得文章写的对您有用的话,请您点击上面的“关注”,点个赞,这样您就可以持续收到《JAVA架构师之路》的最新文章了。文章内容属于自己的一点点心得,难免有不对的地方,欢迎在下方评论区探讨,你们的关注是我创作优质文章的动力。


 2万+
2万+

 被折叠的 条评论
为什么被折叠?
被折叠的 条评论
为什么被折叠?
 到【灌水乐园】发言


