


 本文详细介绍了如何验证CUDA工具包是否正确安装并配置,包括检查CUDA版本、运行deviceQuery和bandwidthTest示例程序的方法。同时,针对常见的安装问题提供了具体的解决方案。
按照要求,安装驱动,安装CUDA,更改安装位置也没问题。照着干你可能已经安装成功了,但为什么你觉得不成功呢?
2.5. Verify the Installation
Before continuing, it is important to verify that the CUDA toolkit can find and communicate correctly with the CUDA-capable hardware. To do this, you need to compile and run some of the included sample programs.
2.5.1. Running the Compiled Examples
The version of the CUDA Toolkit can be checked by running nvcc -V in a Command Prompt window. You can display a Command Prompt window by going to:
Start > All Programs > Accessories > Command Prompt
CUDA Samples include sample programs in source form. To verify a correct configuration of the hardware and software, it is highly recommended that you build and run the deviceQuery sample program. The sample can be built using the provided VS solution files, and the compiled executable can be located at:
C:\ProgramData\NVIDIA Corporation\CUDA Samples\v10.1\bin\win64\ReleaseThis assumes that you used the default installation directory structure. If CUDA is installed and configured correctly, the output should look similar to Figure 1.
Figure 1. Valid Results from deviceQuery CUDA Sample
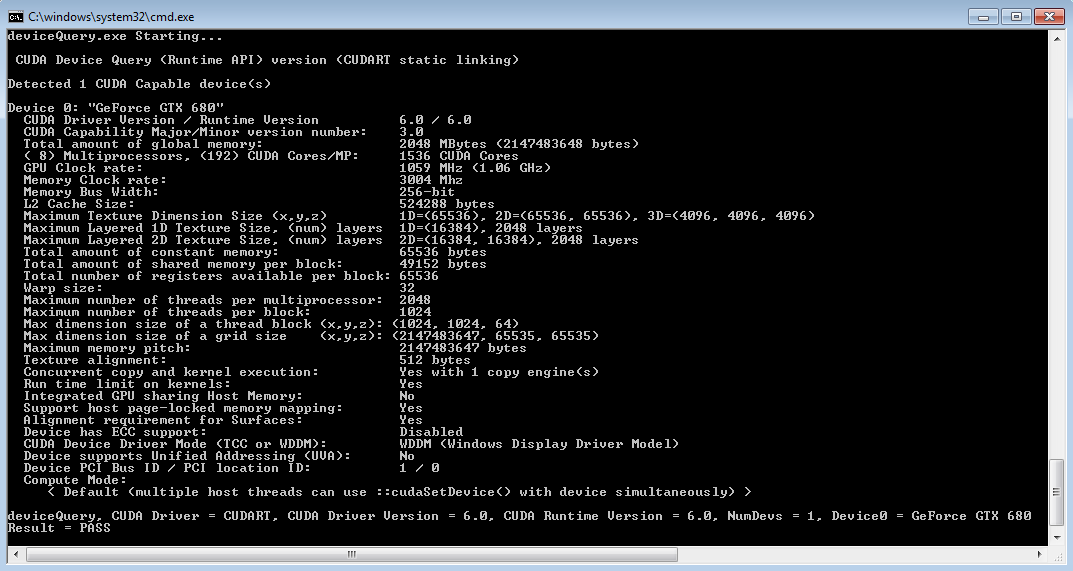
The exact appearance and the output lines might be different on your system. The important outcomes are that a device was found, that the device(s) match what is installed in your system, and that the test passed.
If a CUDA-capable device and the CUDA Driver are installed but deviceQuery reports that no CUDA-capable devices are present, ensure the deivce and driver are properly installed.
Running the bandwidthTest program, located in the same directory as deviceQuery above, ensures that the system and the CUDA-capable device are able to communicate correctly. The output should resemble Figure 2.
Figure 2. Valid Results from bandwidthTest CUDA Sample

The device name (second line) and the bandwidth numbers vary from system to system. The important items are the second line, which confirms a CUDA device was found, and the second-to-last line, which confirms that all necessary tests passed.
If the tests do not pass, make sure you do have a CUDA-capable NVIDIA GPU on your system and make sure it is properly installed.
To see a graphical representation of what CUDA can do, run the sample Particles executable at
C:\ProgramData\NVIDIA Corporation\CUDA Samples\v10.1\bin\win64\Release1.nvcc -V,运行不起来,请看清参数大写的V,小写是不行的。
2.deviceQuery和bandwidthTest,这坑逼文档里根本没说在什么地方,多次提到的这个路径“C:\ProgramData\NVIDIA Corporation\CUDA Samples\v10.1\bin\win64\Release” 简直就是误导!事实上这两个程序都在“D:\Program Files\NVDIA GPU Computing Tookit\CUDA\v10.1\extras\demo_suite”里(具体看你安装在哪个盘),拖到CMD里执行就行了!


 1万+
1万+

 被折叠的 条评论
为什么被折叠?
被折叠的 条评论
为什么被折叠?
 到【灌水乐园】发言


