


目录
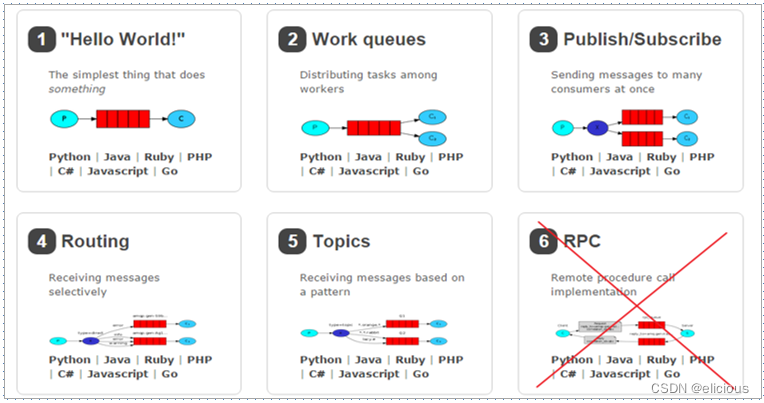
RabbitMQ 提供了 6 种工作模式:简单模式、work queues、Publish/Subscribe 发布与订阅模式、Routing 路由模式、Topics 主题模式、RPC 远程调用模式(远程调用,不太算 MQ;暂不作介绍)。
官网对应模式介绍:RabbitMQ Tutorials — RabbitMQ
1 .simple (简单模式)
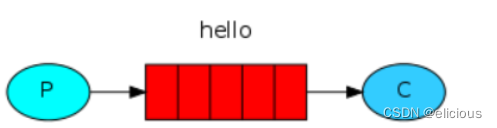
在上图的模型中,有以下概念: P:生产者,也就是要发送消息的程序 C:消费者:消息的接收者,会一直等待消息到来 queue:消息队列,图中红色部分。类似一个邮箱,可以缓存消息;生产者向其中投递消息,消费者从其中取出消息
(1)引入依赖
<dependencies>
<dependency>
<groupId>com.rabbitmq</groupId>
<artifactId>amqp-client</artifactId>
<version>5.14.2</version>
</dependency>
</dependencies>
(2)生产者:
public class HelloProduct {
    public static void main(String[] args) throws Exception {
        //1.创建连接工厂类并设置连接信息
        ConnectionFactory factory = new ConnectionFactory();
            // 设置rabbitmq服务器地址 默认localhost
        factory.setHost("192.168.214.129");
            // 设置rabbitmq的端口号  AMQP端口
        factory.setPort(5672);
             //  设置账号默认 guest
        factory.setUsername("syf");
            //设置密码 默认密码guest
        factory.setPassword("guest");
            //设置虚拟机 默认/
        factory.setVirtualHost("/aaa");
        //2.获取连接对象
        Connection connection = factory.newConnection();
        //3.获取channel对象
        Channel channel = connection.createChannel();
        //创建队列
        /*
         *  String queue, 队列的名称. 如果该名称不存在 则创建  如果存在则不创建
         * boolean durable, 该对象是否持久化  当rabbitmq重启后 队列就会消失
         * boolean exclusive, 该队列是否被一个消费者独占
         * boolean autoDelete,当没有消费者时,该队列是否被自动删除
         * Map<String, Object> arguments: 额外参数的设置
         *
         * */
        channel.queueDeclare("hello_queue",true,false,false,null);
        //发送信息
        /*
        String exchange, 交换机的名称 简单模式没有交换机使用""表示采用默认交换机
         * String routingKey, 路由标识  如果是简单模式起名为队列的名称
         * BasicProperties props, 消息的属性设置。 设置为null
         * byte[] body: 消息的内容
        * */
        String msg = "hello rabbitmq ----------------------------";
        channel.basicPublish("","hello_queue",null,msg.getBytes());
        //关闭资源
        channel.close();
        connection.close();
    }
}
(3)消费者:
public class HelloConsumer {
    public static void main(String[] args) throws Exception {
        //1.创建连接工厂类并设置连接信息
        ConnectionFactory factory = new ConnectionFactory();
        factory.setVirtualHost("/aaa");
        factory.setUsername("syf");
        factory.setPassword("guest");
        factory.setHost("192.168.214.129");
        factory.setPort(5672);

        //2.获取连接对
        Connection connection=factory.newConnection();
        //3.获取channel对象
        Channel channel = connection.createChannel();
        //4.创建队列
       channel.queueDeclare("hello_queue",true,false,false,null);
        //5.接收队列中得到信息
        Consumer consumer = new DefaultConsumer(channel){
            /*
             * @param consumerTag: 消费者的标签
             * @param envelope : 设置 拿到你的交换机 路由key等信息
             * @param properties: 消息的属性对象
             * @param body: 消息的内容
             * @throws IOException
             * */
            @Override
            public void handleDelivery(String consumerTag, Envelope envelope, AMQP.BasicProperties properties, byte[] body) throws IOException {
                System.out.println("接收的内容:"+new String(body));
                System.out.println("消费者的标志:"+consumerTag);
                System.out.println("交换机名称:"+envelope.getExchange());
                System.out.println("路由key标志:"+envelope.getRoutingKey());
                System.out.println("消息属性:"+properties);
            }
        };
        /*
        * * String queue, 队列名
         * boolean autoAck,是否自动确认。 当rabbitmq把消息发送给消费后,消费端自动确认消息。
         * Consumer callback:回调。 当rabbitmq队列中存在消息 则触发该回调
        * */
        channel.basicConsume("hello_queue",true,consumer);

        //是否要关闭connection和channel---不能关闭


    }
}
2. Work queues(工作模式)
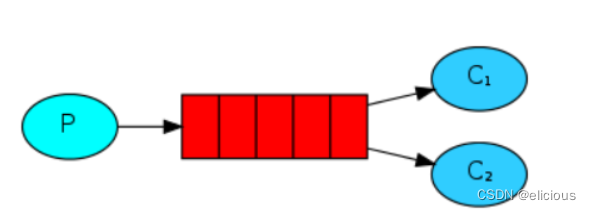
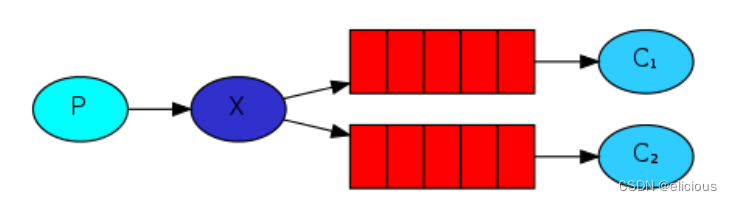
Work Queues:与入门程序的简单模式相比,多了一个或一些消费端,多个消费端共同消费同一个队列中的消息。 应用场景:对于任务过重或任务较多情况使用工作队列可以提高任务处理的速度。
(1)生产者:
public class WorkProduct {
    public static void main(String[] args) throws IOException, TimeoutException {
        ConnectionFactory factory = new ConnectionFactory();
        factory.setHost("192.168.214.129");
        factory.setPort(5672);
        factory.setUsername("syf");
        factory.setPassword("guest");
        factory.setVirtualHost("/aaa");
        Connection connection = factory.newConnection();
        Channel channel = connection.createChannel();
        channel.queueDeclare("work_queue",true,false,false,null);
        for (int i = 0; i <10; i++) {
            String msg = "hell work_queue_rabbitmq~~~~~~~~~~~~~~~~~~~"+i;
            channel.basicPublish("","work_queue",null,msg.getBytes());
        }
        //关闭资源
        channel.close();
        connection.close();
    }
}
(2)消费者1:
public class WorkConsumer01 {
    public static void main(String[] args) throws IOException, TimeoutException {
        ConnectionFactory factory = new ConnectionFactory();
        factory.setHost("192.168.214.129");
        factory.setPort(5672);
        factory.setUsername("syf");
        factory.setPassword("guest");
        factory.setVirtualHost("/aaa");
        Connection connection = factory.newConnection();
        Channel channel = connection.createChannel();
        Consumer consumer = new DefaultConsumer(channel){
            @Override
            public void handleDelivery(String consumerTag, Envelope envelope, AMQP.BasicProperties properties, byte[] body) throws IOException {
                System.out.println("接收的内容:"+new String(body));
            }
        };

        channel.basicConsume("work_queue",true,consumer);
    }
}
(3)消费者2:
public class WorkConsumer02 {
    public static void main(String[] args) throws IOException, TimeoutException {
        ConnectionFactory factory = new ConnectionFactory();
        factory.setHost("192.168.214.129");
        factory.setPort(5672);
        factory.setUsername("syf");
        factory.setPassword("guest");
        factory.setVirtualHost("/aaa");
        Connection connection = factory.newConnection();
        Channel channel = connection.createChannel();
        Consumer consumer = new DefaultConsumer(channel){
            @Override
            public void handleDelivery(String consumerTag, Envelope envelope, AMQP.BasicProperties properties, byte[] body) throws IOException {
                System.out.println("接收的内容:"+new String(body));
            }
        };

        channel.basicConsume("work_queue",true,consumer);
    }
}
总结: 在一个队列中如果有多个消费者,那么消费者之间对于同一个消息的关系是竞争的关系。
Work Queues 对于任务过重或任务较多情况使用工作队列可以提高任务处理的速度。例如:短信服务部署多个,只需要有一个节点成功发送即可。
3. Publish/Subscribe(发布订阅模式)
在订阅模型中,多了一个 Exchange 角色,而且过程略有变化:
P:生产者,也就是要发送消息的程序,但是不再发送到队列中,而是发给X(交换机)
C:消费者,消息的接收者,会一直等待消息到来
Queue:消息队列,接收消息、缓存消息
Exchange:交换机(X)。一方面,接收生产者发送的消息。另一方面,知道如何处理消息,例如递交给某个特别队列、递交给所有队列、或是将消息丢弃。到底如何操作,取决于Exchange的类型。Exchange有常见以下3种类型:
Fanout:广播,将消息交给所有绑定到交换机的队列
Direct:定向,把消息交给符合指定routing key 的队列
Topic:通配符,把消息交给符合routing pattern(路由模式) 的队列
Exchange(交换机)只负责转发消息,不具备存储消息的能力,因此如果没有任何队列与Exchange 绑定,或者没有符合路由规则的队列,那么消息会丢失!
(1)生产者:
public class PublishProduct {
    public static void main(String[] args) throws Exception {
        ConnectionFactory factory = new ConnectionFactory();
        factory.setVirtualHost("/aaa");
        factory.setUsername("syf");
        factory.setPassword("guest");
        factory.setPort(5672);
        factory.setHost("192.168.214.129");
        Connection connection = factory.newConnection();
        Channel channel = connection.createChannel();
        //创建交换机
        /*
        * String exchange, 交换机的名称 如果不存在则创建 存在则不创建
         * BuiltinExchangeType type, 交换机的类型
         * boolean durable: 是否持久化。
        * */
        channel.exchangeDeclare("publish_exchange",BuiltinExchangeType.FANOUT,true);
        //创建队列
        channel.queueDeclare("publish_queue01",true,false,false,null);
        channel.queueDeclare("publish_queue02",true,false,false,null);
        //队列和交换机绑定
        /*
        * String queue,
         * String exchange,
         * String routingKey: 发布订阅模式 没有routingkey 则写为”“
        * */
        channel.queueBind("publish_queue01","publish_exchange","");
        channel.queueBind("publish_queue02","publish_exchange","");

        String msg="天若有情天易老";
        channel.basicPublish("publish_exchange","",null,msg.getBytes());

        channel.close();
        connection.close();
    }
}
(2)消费者1:
public class PublishConsumer01 {
    public static void main(String[] args) throws IOException, TimeoutException {
        ConnectionFactory factory = new ConnectionFactory();
        factory.setHost("192.168.214.129");
        factory.setPort(5672);
        factory.setUsername("syf");
        factory.setPassword("guest");
        factory.setVirtualHost("/aaa");
        Connection connection = factory.newConnection();
        Channel channel = connection.createChannel();
        Consumer consumer = new DefaultConsumer(channel){
            @Override
            public void handleDelivery(String consumerTag, Envelope envelope, AMQP.BasicProperties properties, byte[] body) throws IOException {
                System.out.println("接收的内容:"+new String(body));
            }
        };
        channel.basicConsume("publish_queue01",true,consumer);

    }
}
(3)消费者2:
public class PublishConsumer02 {
    public static void main(String[] args) throws IOException, TimeoutException {
        ConnectionFactory factory = new ConnectionFactory();
        factory.setHost("192.168.214.129");
        factory.setPort(5672);
        factory.setUsername("syf");
        factory.setPassword("guest");
        factory.setVirtualHost("/aaa");
        Connection connection = factory.newConnection();
        Channel channel = connection.createChannel();
        Consumer consumer = new DefaultConsumer(channel){
            @Override
            public void handleDelivery(String consumerTag, Envelope envelope, AMQP.BasicProperties properties, byte[] body) throws IOException {
                System.out.println("接收的内容:"+new String(body));
            }
        };
        channel.basicConsume("publish_queue02",true,consumer);

    }
}
交换机需要与队列进行绑定,绑定之后;一个消息可以被多个消费者都收到。
发布订阅模式与工作队列模式的区别:
工作队列模式不用定义交换机,而发布/订阅模式需要定义交换机
发布/订阅模式的生产方是面向交换机发送消息,工作队列模式的生产方是面向队列发送消息(底层使用默认交换机)
发布/订阅模式需要设置队列和交换机的绑定,工作队列模式不需要设置,实际上工作队列模式会将队列绑 定到默认的交换机
4. Routing(路由模式)
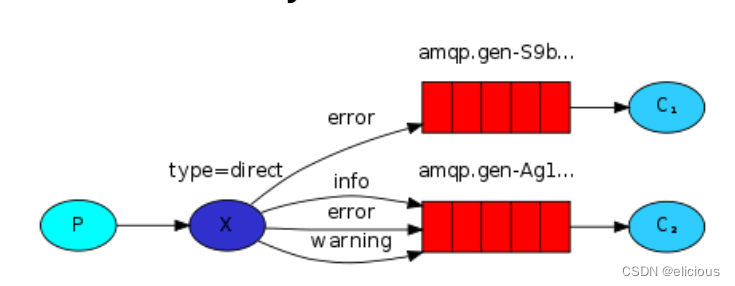
队列与交换机的绑定,不能是任意绑定了,而是要指定一个 RoutingKey(路由key)
消息的发送方在向 Exchange 发送消息时,也必须指定消息的 RoutingKey
Exchange 不再把消息交给每一个绑定的队列,而是根据消息的 Routing Key 进行判断,只有队列的Routingkey 与消息的 Routing key 完全一致,才会接收到消息
P:生产者,向 Exchange 发送消息,发送消息时,会指定一个routing key
X:Exchange(交换机),接收生产者的消息,然后把消息递交给与 routing key 完全匹配的队列
C1:消费者,其所在队列指定了需要 routing key 为 error 的消息
C2:消费者,其所在队列指定了需要 routing key 为 info、error、warning 的消息
(1)生产者:
public class RouterProduct {
    public static void main(String[] args) throws IOException, TimeoutException {
        ConnectionFactory connectionFactory = new ConnectionFactory();
        connectionFactory.setHost("192.168.214.129");
        connectionFactory.setPort(5672);
        connectionFactory.setVirtualHost("/aaa");
        connectionFactory.setUsername("syf");
        connectionFactory.setPassword("guest");
        Connection connection = connectionFactory.newConnection();
        Channel channel = connection.createChannel();
        //创建路由
        channel.exchangeDeclare("router_exchange", BuiltinExchangeType.DIRECT,true);
        //创建队列
        channel.queueDeclare("router_queue01",true,false,false,null);
        channel.queueDeclare("router_queue02",true,false,false,null);
        //队列绑定路由
        channel.queueBind("router_queue01","router_exchange","error");
        channel.queueBind("router_queue02","router_exchange","error");
        channel.queueBind("router_queue02","router_exchange","info");
        channel.queueBind("router_queue02","router_exchange","warning");
        //传输内容
        String msg = "人间正道是沧桑";
        channel.basicPublish("router_exchange","warning",null,msg.getBytes());
        channel.close();
        connection.close();
    }
}
(2)消费者1:
public class RouterConsumer01 {
    public static void main(String[] args) throws IOException, TimeoutException {
        ConnectionFactory connectionFactory = new ConnectionFactory();
        connectionFactory.setUsername("syf");
        connectionFactory.setPassword("guest");
        connectionFactory.setVirtualHost("/aaa");
        connectionFactory.setPort(5672);
        connectionFactory.setHost("192.168.214.129");
        Connection connection = connectionFactory.newConnection();
        Channel channel = connection.createChannel();
        Consumer consumer = new DefaultConsumer(channel){
            @Override
            public void handleDelivery(String consumerTag, Envelope envelope, AMQP.BasicProperties properties, byte[] body) throws IOException {
                System.out.println("接收饿内容:"+new String(body));
            }
        };
        channel.basicConsume("router_queue01",true,consumer);
    }
}
(3)消费者2:
public class RouterConsumer02 {
    public static void main(String[] args) throws IOException, TimeoutException {
        ConnectionFactory connectionFactory = new ConnectionFactory();
        connectionFactory.setUsername("syf");
        connectionFactory.setPassword("guest");
        connectionFactory.setVirtualHost("/aaa");
        connectionFactory.setPort(5672);
        connectionFactory.setHost("192.168.214.129");
        Connection connection = connectionFactory.newConnection();
        Channel channel = connection.createChannel();
        Consumer consumer = new DefaultConsumer(channel){
            @Override
            public void handleDelivery(String consumerTag, Envelope envelope, AMQP.BasicProperties properties, byte[] body) throws IOException {
                System.out.println("接收饿内容:"+new String(body));
            }
        };
        channel.basicConsume("router_queue02",true,consumer);
    }
}
小结:
Routing 模式要求队列在绑定交换机时要指定 routing key,消息会转发到符合 routing key 的队列。
5. Topics(主题模式)
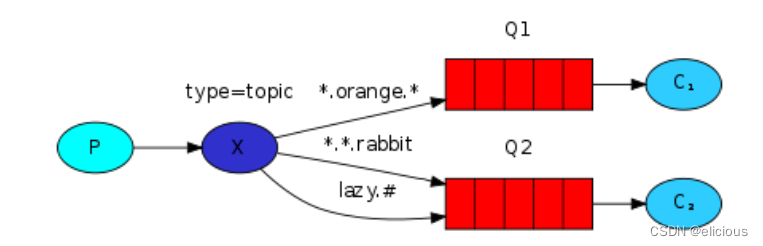
Topic 类型与 Direct 相比,都是可以根据 RoutingKey 把消息路由到不同的队列。只不过 Topic 类型Exchange 可以让队列在绑定 Routing key 的时候使用通配符!
Routingkey 一般都是有一个或多个单词组成,多个单词之间以”.”分割,例如: item.insert
通配符规则:# 匹配一个或多个词,* 匹配不多不少恰好1个词,例如:item.# 能够匹配 item.insert.abc 或者 item.insert,item.* 只能匹配 item.insert
(1)生产者:
public class TopicProduct {
    public static void main(String[] args) throws IOException, TimeoutException {
        ConnectionFactory factory = new ConnectionFactory();
        factory.setHost("192.168.214.129");
        factory.setPort(5672);
        factory.setPassword("guest");
        factory.setUsername("syf");
        factory.setVirtualHost("/aaa");
        Connection connection = factory.newConnection();
        Channel channel = connection.createChannel();
        //创建路由
        channel.exchangeDeclare("topic_exchange", BuiltinExchangeType.TOPIC, true);
        //创建队列
        channel.queueDeclare("topic_queue01", true, false, false, null);
        channel.queueDeclare("topic_queue02", true, false, false, null);
        //绑定路由
        channel.queueBind("topic_queue01", "topic_exchange", "*.love.*");
        channel.queueBind("topic_queue02", "topic_exchange", "*.*.rabbit");
        channel.queueBind("topic_queue02", "topic_exchange", "lazy.#");
        String msg = "长安三万里-----------------------";
        channel.basicPublish("topic_exchange","lazy.love",null,msg.getBytes());
        channel.close();
        connection.close();
    }
}
(2)消费者1:
public class TopicConsumer01 {
    public static void main(String[] args) throws IOException, TimeoutException {
        ConnectionFactory connectionFactory = new ConnectionFactory();
        connectionFactory.setUsername("syf");
        connectionFactory.setPassword("guest");
        connectionFactory.setVirtualHost("/aaa");
        connectionFactory.setPort(5672);
        connectionFactory.setHost("192.168.214.129");
        Connection connection = connectionFactory.newConnection();
        Channel channel = connection.createChannel();
        Consumer consumer = new DefaultConsumer(channel){
            @Override
            public void handleDelivery(String consumerTag, Envelope envelope, AMQP.BasicProperties properties, byte[] body) throws IOException {
                System.out.println("接收饿内容:"+new String(body));
            }
        };
        channel.basicConsume("topic_queue01",true,consumer);
    }
}
(3)消费者2:
public class TopicConsumer02 {
    public static void main(String[] args) throws IOException, TimeoutException {
        ConnectionFactory connectionFactory = new ConnectionFactory();
        connectionFactory.setUsername("syf");
        connectionFactory.setPassword("guest");
        connectionFactory.setVirtualHost("/aaa");
        connectionFactory.setPort(5672);
        connectionFactory.setHost("192.168.214.129");
        Connection connection = connectionFactory.newConnection();
        Channel channel = connection.createChannel();
        Consumer consumer = new DefaultConsumer(channel){
            @Override
            public void handleDelivery(String consumerTag, Envelope envelope, AMQP.BasicProperties properties, byte[] body) throws IOException {
                System.out.println("接收饿内容:"+new String(body));
            }
        };
        channel.basicConsume("topic_queue02",true,consumer);
    }
}
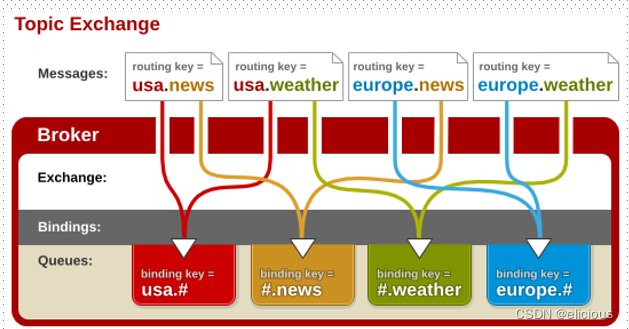
Topic 主题模式可以实现 Pub/Sub 发布与订阅模式和 Routing 路由模式的功能,只是 Topic 在配置routing key 的时候可以使用通配符,显得更加灵活。
6. springboot整合rabbitmq
6.1 生产方
(1)引入依赖
<dependencies>
        <dependency>
            <groupId>com.alibaba</groupId>
            <artifactId>fastjson</artifactId>
            <version>1.2.83</version>
        </dependency>
        <dependency>
            <groupId>org.springframework.boot</groupId>
            <artifactId>spring-boot-starter-amqp</artifactId>
        </dependency>
        <dependency>
            <groupId>org.springframework.boot</groupId>
            <artifactId>spring-boot-starter-web</artifactId>
        </dependency>
        <dependency>
            <groupId>org.springframework.boot</groupId>
            <artifactId>spring-boot-starter-amqp</artifactId>
        </dependency>
        <dependency>
            <groupId>org.projectlombok</groupId>
            <artifactId>lombok</artifactId>
            <optional>true</optional>
        </dependency>
        <dependency>
            <groupId>org.springframework.boot</groupId>
            <artifactId>spring-boot-starter-test</artifactId>
            <scope>test</scope>
        </dependency>
        <dependency>
            <groupId>org.springframework.amqp</groupId>
            <artifactId>spring-rabbit-test</artifactId>
            <scope>test</scope>
        </dependency>
</dependencies>(2)再配置文件中添加rabbit服务的信息
#rabbitmq???
spring.rabbitmq.host=192.168.214.129
spring.rabbitmq.username=syf
spring.rabbitmq.password=guest
spring.rabbitmq.virtual-host=/aaa
(3)封装类RabbitTemplate--发送消息。
(4)调用RabbitTemplate中发送消息的方法。
@SpringBootTest
class SpringBootRabbitmqProductApplicationTests {
    @Autowired
    private RabbitTemplate rabbitTemplate;
    @Test
    void contextLoads() {
        HashMap<String, Object> map = new HashMap<>();
        map.put("orderNo","100");
        map.put("productId",2);
        map.put("num",11);
        //rabbitTemplate.convertAndSend("topic_exchange","lazy.a","卧龙凤雏,幼麟冢虎");
        rabbitTemplate.convertAndSend("topic_exchange02","yx.aaa", JSON.toJSONString(map));
    }

}
6.2 消费方
@Component //交由容器创建并管理
public class MyListener {
    @RabbitListener(queues = {"topic_queue02"})//queues:表示监听的队列名字
   public void hello(Message message){ //把监听的消息封装到Message类对象中
        byte[] body = message.getBody();
        String s = new String(body);
        HashMap hashMap = JSON.parseObject(s, HashMap.class);
        System.out.println("消息的内容:"+hashMap);
        //System.out.println("消息的内容:"+new String(body));
    }
}
6.3 通过代码创建交换机和队列
@Configuration
public class RabbitmqConfig {
    public static final String EXCHANGE_NAME = "topic_exchange02";

    @Bean
    public Exchange exchange() {
        Exchange topic_exchange02 = ExchangeBuilder.topicExchange(EXCHANGE_NAME).durable(true).build();
        return topic_exchange02;
    }

    @Bean
    public Queue queue() {
        Queue topic_queue03 =
                QueueBuilder.durable("topic_queue03").build();
        return topic_queue03;
    }

    @Bean
    public Binding binding() {
        Binding noargs = BindingBuilder.bind(queue()).to(exchange()).with("yx.#").noargs();
        return noargs;
    }

}


 1万+
1万+

 被折叠的 条评论
为什么被折叠?
被折叠的 条评论
为什么被折叠?
 到【灌水乐园】发言


