


视频 https://www.youtube.com/watch?v=c-QsfbznSXI 笔记
在windows 系统上开发此项目,Linux 命令有所不同。先写 Django,后写 React。
此项目实现的功能是,用户可以注册并登录网站,创建或删除 note,note 包含 title和 content。
文章目录
- Django 后端
- React 前端
- 部署数据库
- 部署后端
- 部署前端
- 部署完成
Django 后端
1. 创建虚拟环境
以安装必要的 python 包: python -m venv env, 此命令将生成一个文件夹 env.
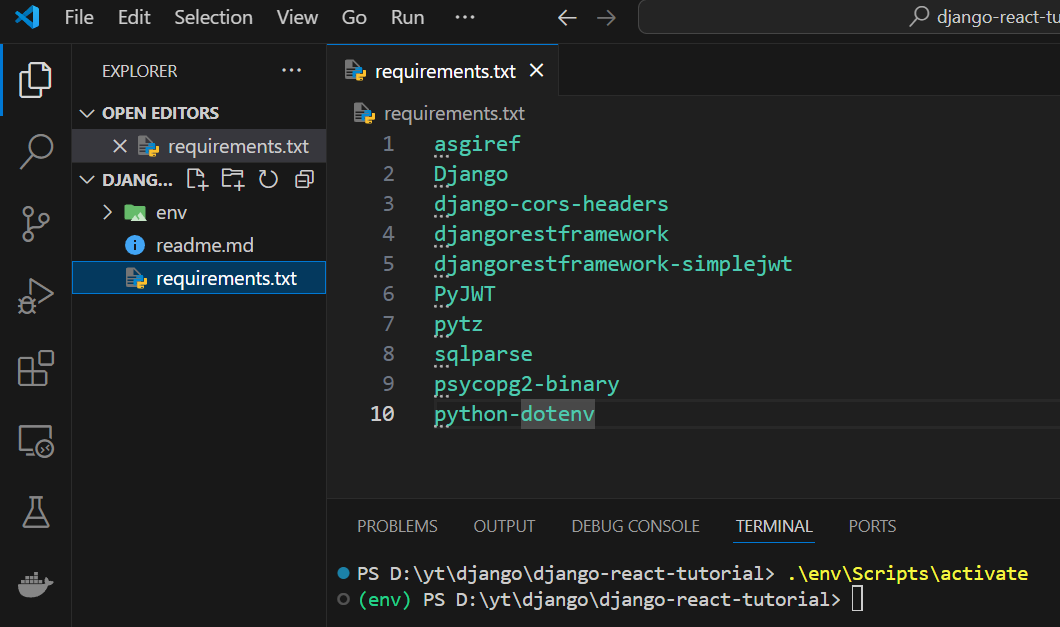
2. 激活虚拟环境: ./env/Scripts/activate 或 activate,
命令运行成功之后,终端行之前将出现 (env) 前缀:
3. 安装项目依赖:
- 首先在项目文件夹中新建文件
requirements.txt,含有项目所需的所有包:
asgiref
Django
django-cors-headers
djangorestframework
djangorestframework-simplejwt
PyJWT
pytz
sqlparse
psycopg2-binary
python-dotenv
其中:
django-cors-headers: 用于解决 cross origin request 问题
psycopg2-binary: postgreSQL(postgres, pg) 相关
python-dotenv: 用于加载环境变量
- 安装以上的包:
pip install -r requirements.txt
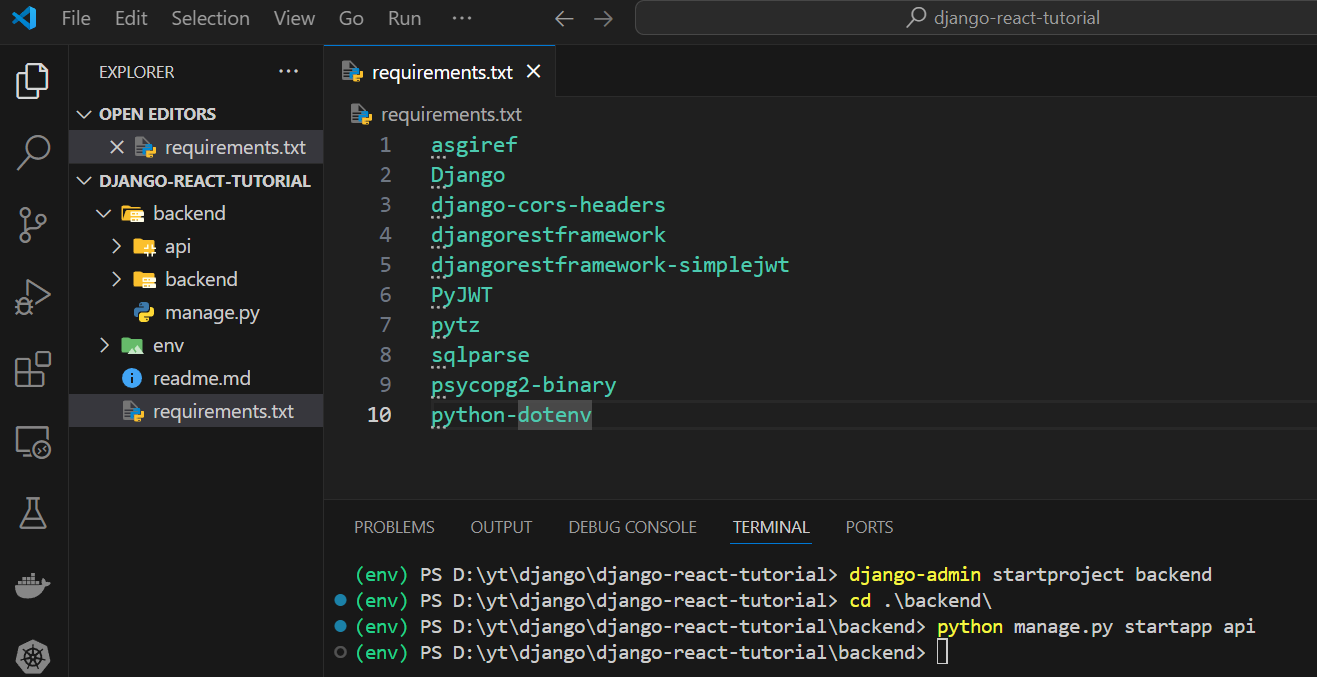
4. 新建 Django 工程
4.1 新建工程 backend
运行命令:django-admin startproject backend ,此命令将生成一个新目录 backend。
然后在此新的backend目录中新建名称为api 的 app:python manage.py startapp api
(env) PS D:\yt\django\django-react-tutorial> django-admin startproject backend
(env) PS D:\yt\django\django-react-tutorial> cd .\backend\
(env) PS D:\yt\django\django-react-tutorial\backend> python manage.py startapp api
Django 中的 app:一个 Django 由若干 app 组成,例如实现 authentication 的 app,一个组件也可以是一个 app, 这些 app 用于组织客制化的 code,对项目的代码实现逻辑上的划分。
工程结构:
4.2 设置 settings.py
这里用#1标记增加的或修改过的代码:
"""
Django settings for backend project.

Generated by 'django-admin startproject' using Django 5.0.6.

For more information on this file, see
https://docs.djangoproject.com/en/5.0/topics/settings/

For the full list of settings and their values, see
https://docs.djangoproject.com/en/5.0/ref/settings/
"""

from pathlib import Path
from datetime import timedelta  # 1
from dotenv import load_dotenv  # 1
import os  # 1

load_dotenv()  # 1


# Build paths inside the project like this: BASE_DIR / 'subdir'.
BASE_DIR = Path(__file__).resolve().parent.parent


# Quick-start development settings - unsuitable for production
# See https://docs.djangoproject.com/en/5.0/howto/deployment/checklist/

# SECURITY WARNING: keep the secret key used in production secret!
SECRET_KEY = "django-insecure-r$)xv6rc71731q(5d)y3!!b*m=78d*fp*m9l0$-_nua(26m5q("

# SECURITY WARNING: don't run with debug turned on in production!
DEBUG = True

ALLOWED_HOSTS = ["*"]  # 1 allow any host to host our django application

# 1 JWT tokens related
REST_FRAMEWORK = {


    "DEFAULT_AUTHENTICATION_CLASSES": (
        "rest_framework_simplejwt.authentication.JWTAuthentication",
    ),
    "DEFAULT_PERMISSION_CLASSES": [
        "rest_framework.permissions.IsAuthenticated",
    ],
}
# 1 JWT tokens related
SIMPLE_JWT = {


    "ACCESS_TOKEN_LIFETIME": timedelta(minutes=30),
    "REFRESH_TOKEN_LIFETIME": timedelta(days=1),
}

# Application definition

INSTALLED_APPS = [
    "django.contrib.admin",
    "django.contrib.auth",
    "django.contrib.contenttypes",
    "django.contrib.sessions",
    "django.contrib.messages",
    "django.contrib.staticfiles",
    "api",  # 1 新增的 app
    "rest_framework",  # 1
    "corsheaders",  # 1
]

MIDDLEWARE = [
    "django.middleware.security.SecurityMiddleware",
    "django.contrib.sessions.middleware.SessionMiddleware",
    "django.middleware.common.CommonMiddleware",
    "django.middleware.csrf.CsrfViewMiddleware",
    "django.contrib.auth.middleware.AuthenticationMiddleware",
    "django.contrib.messages.middleware.MessageMiddleware",
    "django.middleware.clickjacking.XFrameOptionsMiddleware",
    "corsheaders.middleware.CorsMiddleware",  # 1 middleware for cors
]

ROOT_URLCONF = "backend.urls"

TEMPLATES = [
    {


        "BACKEND": "django.template.backends.django.DjangoTemplates",
        "DIRS": [],
        "APP_DIRS": True,
        "OPTIONS": {


            "context_processors": [
                "django.template.context_processors.debug",
                "django.template.context_processors.request",
                "django.contrib.auth.context_processors.auth",
                "django.contrib.messages.context_processors.messages",
            ],
        },
    },
]

WSGI_APPLICATION = "backend.wsgi.application"


# Database
# https://docs.djangoproject.com/en/5.0/ref/settings/#databases

DATABASES = {


    "default": {


        "ENGINE": "django.db.backends.sqlite3",
        "NAME": BASE_DIR / "db.sqlite3",
    }
}


# Password validation
# https://docs.djangoproject.com/en/5.0/ref/settings/#auth-password-validators

AUTH_PASSWORD_VALIDATORS = [
    {


        "NAME": "django.contrib.auth.password_validation.UserAttributeSimilarityValidator",
    },
    {


        "NAME": "django.contrib.auth.password_validation.MinimumLengthValidator",
    },
    {


        "NAME": "django.contrib.auth.password_validation.CommonPasswordValidator",
    },
    {


        "NAME": "django.contrib.auth.password_validation.NumericPasswordValidator",
    },
]


# Internationalization
# https://docs.djangoproject.com/en/5.0/topics/i18n/

LANGUAGE_CODE = "en-us"

TIME_ZONE = "UTC"

USE_I18N = True

USE_TZ = True


# Static files (CSS, JavaScript, Images)
# https://docs.djangoproject.com/en/5.0/howto/static-files/

STATIC_URL = "static/"

# Default primary key field type
# https://docs.djangoproject.com/en/5.0/ref/settings/#default-auto-field

DEFAULT_AUTO_FIELD = "django.db.models.BigAutoField"

CORS_ALLOW_ALL_ORIGINS = True  # 1
CORS_ALLOWS_CREDENTIALS = True  # 1
4.3 JWT 认证
实现认证的步骤:
- 用户使用 username + password 登录前端
- 前端发送请求给后端,此请求包含第1步的 username + password
- 后端生成两个 token:即 jwt access token 和 jwt fresh token,发给前端
- 前端在 local storage 存储这两个token
- 前端之后每次发送请求,首先读取 local storage,
- 如果 access_token 为空,要求前端重新登录
- 如果 access_token 已过期,自动发送 refresh token 给后端某个 api,获得新的 access token 并存储到 local storage,将 access token 附加到请求头。如果由于 refresh token 过期等原因,未能从后端获得 access token,要求前端重新登录
- 如果 access_token 非空且未过期,将 access token 附加到请求头,不需执行其他操作。
4.3.1 新建文件 ./backend/api/serializers.py:
from django.contrib.auth.models import User
from rest_framework import serializers

class UserSerializer(serializers.ModelSerializer):
    class Meta:
        model = User
        fields = ["id", "username", "password"]
        # don't want to return the password when returning the user
        extra_kwargs = {

   "password": {

   "write_only": True}}

    def create(self, validated_data):
        print(validated_data)
        user = User.objects.create_user(**validated_data)
        return user
4.3.2 修改./backend/api/views.py:
from django.shortcuts import render
from django.contrib.auth.models import User
from rest_framework import generics
from .serializers import UserSerializer
from rest_framework.permissions import IsAuthenticated, AllowAny


class CreateUserView(generics.CreateAPIView):
    queryset = User.objects.all()
    serializer_class = UserSerializer
    permission_classes = [AllowAny]
4.3.3 修改 ./backend/backend/urls.py:
from django.contrib import admin
from django.urls import path, include
from api.views import CreateUserView
from rest_framework_simplejwt.views import TokenObtainPairView, TokenRefreshView

urlpatterns = [
    path("admin/", admin.site.urls),
    path("api/user/register/", CreateUserView.as_view(), name="register"),
    path("api/token/", TokenObtainPairView.as_view(), name="get_token"),
    path("api/token/refresh/", TokenRefreshView.as_view(), name="refresh"),
    path("api-auth/", include("rest_framework.urls")),
]
4.3.4 数据库迁移
分两步:
Step 1: make migrations
终端执行命令:python manage.py makemigrations
(env) PS D:\yt\django\django-react-tutorial\backend> python manage.py makemigrations
No changes detected
(env) PS D:\yt\django\django-react-tutorial\backend>
makemigrations 的作用是生成迁移文件,这些文件指定了需要执行的数据库迁移操作。
Step 2: apply migrations
终端执行命令:python manage.py migrate:
PS D:\yt\django\django-react-tutorial\backend> python manage.py migrate
Operations to perform:
  Apply all migrations: admin, auth, contenttypes, sessions
Running migrations:
  Applying contenttypes.0001_initial... OK
  Applying auth.0001_initial... OK
  Applying admin.0001_initial... OK
  ............................
  Applying sessions.0001_initial... OK
PS D:\yt\django\django-react-tutorial\backend>
这两步用于配置数据库,确保正确设置所需的表格等等。
因此,每当连接到新数据库时,都需要再次执行上述相同的步骤来配置新数据库。
4.4 运行程序
运行命令:python manage.py runserver
PS D:\yt\django\django-react-tutorial\backend> python manage.py runserver
Watching for file changes with StatReloader
Performing system checks...

System check identified no issues (0 silenced).
May 10, 2024 - 11:34:36
Django version 5.0.6, using settings 'backend.settings'
Starting development server at http://127.0.0.1:8000/
Quit the server with CTRL-BREAK.
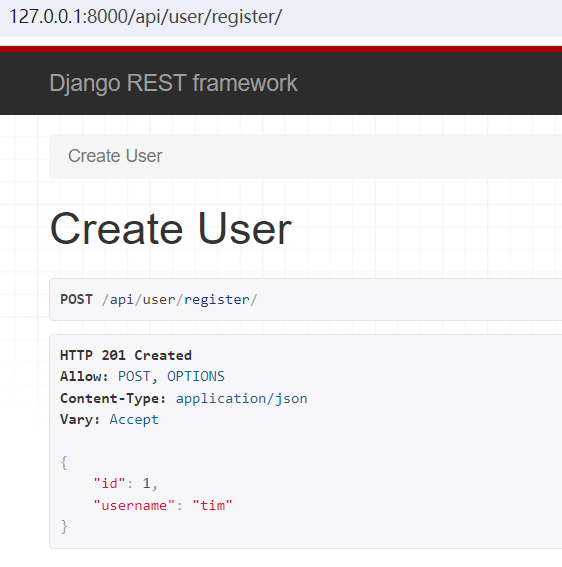
浏览器访问 http://127.0.0.1:8000/api/user/register,

下一步要做的就是传一个 username 和 password 给 server,server 生成新的 user
4.5 实现用户注册
实现 sign in ,并从 server 获取 access token:
- 在
http://127.0.0.1:8000/api/user/register界面创建用户,填写 Username 和 Password 并 post,
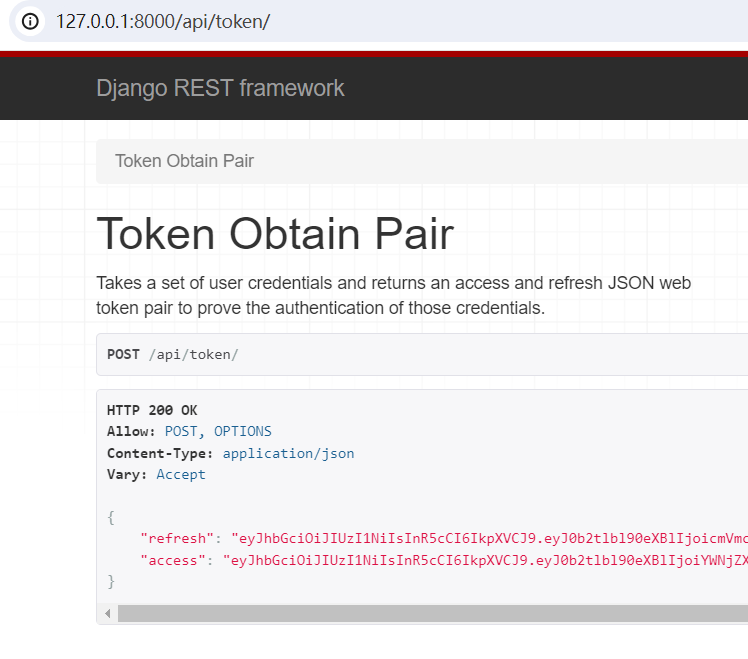
- 在
http://127.0.0.1:8000/api/token/路径输入上述 Username 和 Password,就会生成 access token 和 refresh token:
前端将会存储这两个 token,以后前端每次向后端发送一条请求,请求里都必须附带 access token。(不受保护的路径除外)
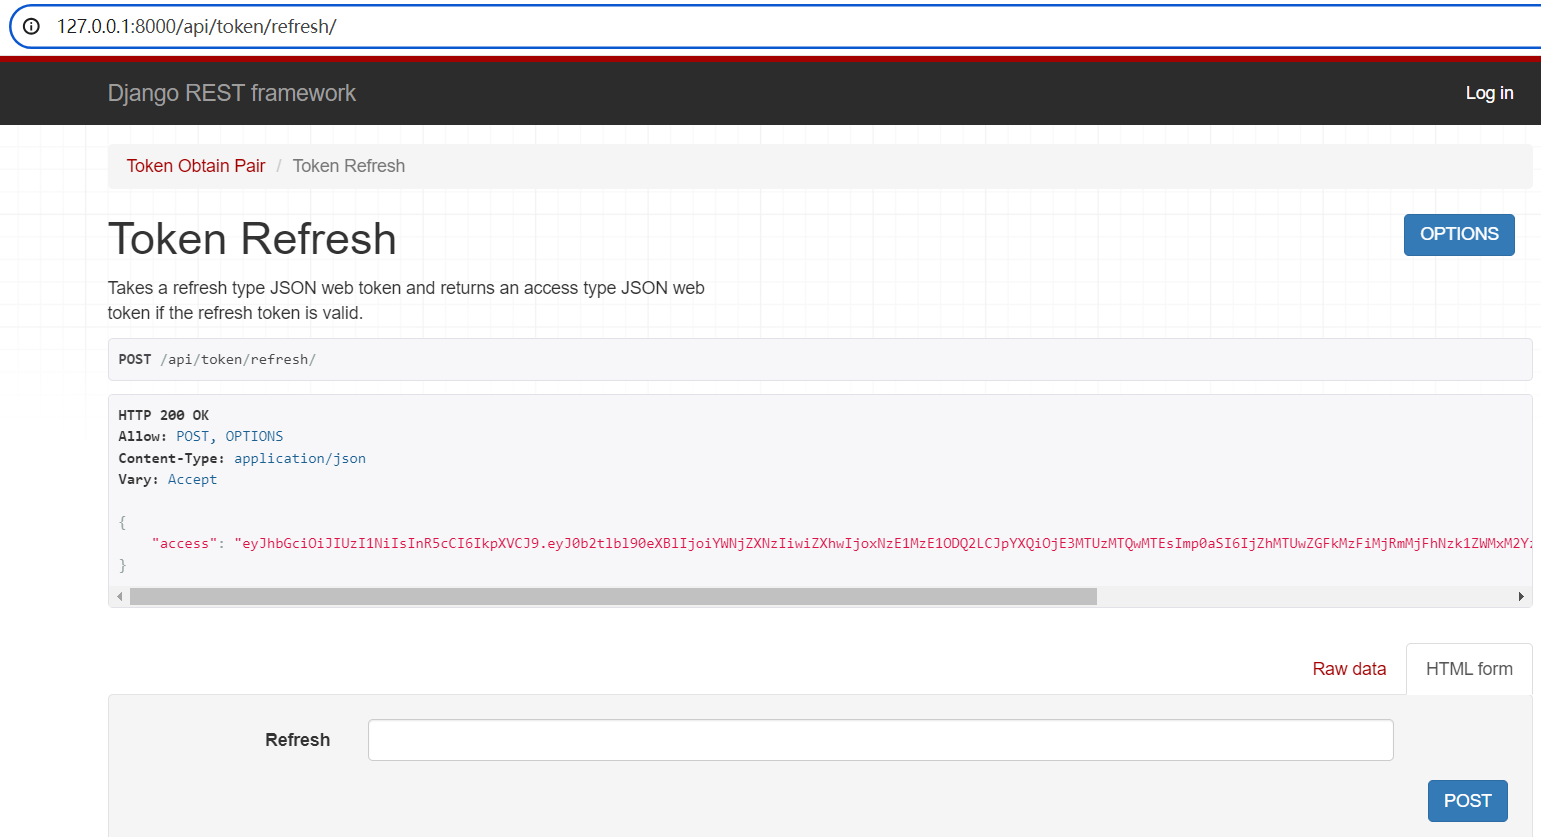
复制上面的 refresh token,打开url:http://127.0.0.1:8000/api/token/refresh/ ,粘贴,提交, 可以得到新的 access token,如下图所示:
至此,用户注册、登录功能已经实现。Ctrl + C 停止服务器,接下来,实现创建 note 以及 删除 note 功能。
4.6 创建或删除 note 实现
4.6.1 修改./backend/api/models.py:
from django.db import models
from django.contrib.auth.models i


 1457
1457

 被折叠的 条评论
为什么被折叠?
被折叠的 条评论
为什么被折叠?
 到【灌水乐园】发言


