


一、总介绍
Canvas(画布)是 HTML5 中最重要的绘图 API 之一,它就像一张空白的画纸,而 JavaScript 则是握在手中的画笔。在这张画纸上,我们可以绘制各种图形、文字、图像,但真正让这些元素变得丰富多彩的,是 Canvas 提供的绘图样式系统。
如果把绘图比作绘画:
-
路径(Path) 就像是铅笔勾勒的轮廓线
-
样式(Style) 就像是给轮廓线上色、加粗、添加阴影的画笔和颜料
Canvas 的绘图样式系统主要包含以下五大类:
| 类别 | 作用 | 类比 |
|---|---|---|
| 色彩与透明度 | 设置图形的颜色和透明程度 | 选择颜料的颜色和浓淡 |
| 线条样式 | 定义线条的粗细、端点、连接方式 | 选择不同粗细的画笔 |
| 阴影效果 | 为图形添加阴影,增强立体感 | 在图形背后添加影子 |
| 渐变与图案 | 使用渐变或图像填充图形 | 使用渐变颜料或图案贴纸 |
| 文本样式 | 控制文字的字体、大小、对齐方式 | 设置文字的排版样式 |
二、色彩与透明度样式
色彩是视觉的基础,Canvas 提供了灵活的色彩设置方式。
1. fillStyle - 填充样式
| 项目 | 内容 |
|---|---|
| 属性/方法 | ctx.fillStyle |
| 含义 | 设置图形内部填充的颜色、渐变或图案 |
| 词源 | fill(填充) + style(样式)- 填充的样式 |
| 参数及说明 | 接受三种类型的值:① 颜色字符串:CSS颜色值 ② 渐变对象:由渐变方法创建 ③ 图案对象:由图案方法创建 |
| 默认值 | #000000(黑色) |
完整示例:
<!DOCTYPE html>
<html>
<head>
    <title>fillStyle 示例</title>
</head>
<body>
    <canvas id="myCanvas" width="400" height="300" style="border:1px solid #ccc;"></canvas>

    <script>
        const canvas = document.getElementById('myCanvas');
        const ctx = canvas.getContext('2d');

        // 红色矩形
        ctx.fillStyle = "red";
        ctx.fillRect(50, 50, 100, 100);

        // 半透明蓝色矩形
        ctx.fillStyle = "rgba(0, 0, 255, 0.3)";
        ctx.fillRect(100, 100, 100, 100);

        // 十六进制颜色矩形
        ctx.fillStyle = "#FFA500";  // 橙色
        ctx.fillRect(200, 50, 80, 80);

        // HSL颜色矩形
        ctx.fillStyle = "hsl(120, 100%, 50%)";  // 绿色
        ctx.fillRect(200, 150, 80, 80);
    </script>
</body>
</html>
绘制效果:
-
左上角(50,50)处绘制一个红色正方形
-
第二个半透明蓝色正方形(100,100)与红色部分重叠,呈现紫色混合效果
-
右上角(200,50)处绘制橙色正方形
-
右下角(200,150)处绘制亮绿色正方形
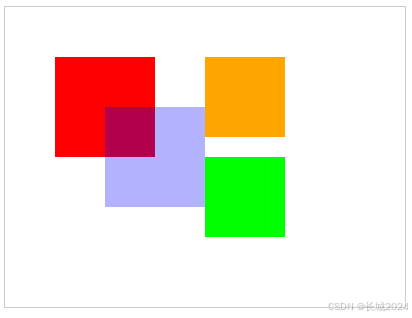
示例分析:这个例子展示了 fillStyle 支持的多种颜色格式:
-
颜色名称("red")直观易读
-
RGBA(rgba(0,0,255,0.3))可以控制透明度
-
十六进制("#FFA500")是 Web 开发常用格式
-
HSL(hsl(120,100%,50%))适合调整色调
2. strokeStyle - 描边样式
| 项目 | 内容 |
|---|---|
| 属性/方法 | ctx.strokeStyle |
| 含义 | 设置图形轮廓的颜色、渐变或图案 |
| 词源 | stroke(一笔/描边) + style(样式)- 描边的样式 |
| 参数及说明 | 同fillStyle,接受颜色、渐变、图案 |
| 默认值 | #000000(黑色) |
完整示例:
<!DOCTYPE html>
<html>
<head>
    <title>strokeStyle 示例</title>
</head>
<body>
    <canvas id="myCanvas" width="500" height="300" style="border:1px solid #ccc;"></canvas>

    <script>
        const canvas = document.getElementById('myCanvas');
        const ctx = canvas.getContext('2d');

        // 设置统一的线条宽度
        ctx.lineWidth = 5;

        // 蓝色描边矩形
        ctx.strokeStyle = "blue";
        ctx.strokeRect(50, 50, 120, 80);

        // 橙色描边矩形
        ctx.strokeStyle = "#FFA500";
        ctx.strokeRect(200, 50, 120, 80);

        // 半透明红色描边矩形
        ctx.strokeStyle = "rgba(255, 0, 0, 0.5)";
        ctx.strokeRect(350, 50, 120, 80);

        // 绘制不同颜色的线条
        ctx.beginPath();
        ctx.moveTo(50, 200);
        ctx.lineTo(200, 200);
        ctx.strokeStyle = "green";
        ctx.stroke();

        ctx.beginPath();
        ctx.moveTo(50, 250);
        ctx.lineTo(200, 250);
        ctx.strokeStyle = "purple";
        ctx.lineWidth = 8;
        ctx.stroke();
    </script>
</body>
</html>
绘制效果:
-
第一行三个描边矩形:蓝色、橙色、半透明红色(轮廓线)
-
第二行两条直线:绿色细线和紫色粗线
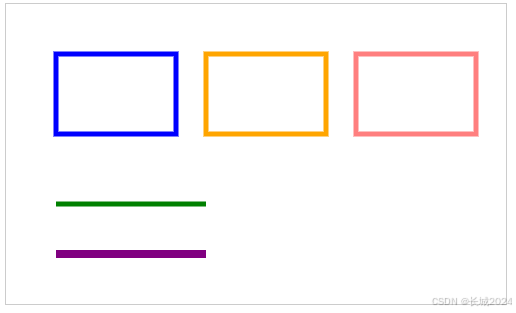
示例分析:strokeStyle 与 fillStyle 的参数完全一致,但作用于图形的轮廓而非内部填充。通过 strokeRect() 方法可以直接绘制带描边的矩形,而不需要先填充再描边。
3. globalAlpha - 全局透明度
| 项目 | 内容 |
|---|---|
| 属性/方法 | ctx.globalAlpha |
| 含义 | 设置后续绘制的所有图形的全局透明度 |
| 词源 | global(全局的) + alpha(Alpha通道/透明度)- 全局透明度 |
| 参数及说明 | 0.0(完全透明)~ 1.0(完全不透明)之间的数值 |
| 默认值 | 1.0 |
完整示例:
<!DOCTYPE html>
<html>
<head>
    <title>globalAlpha 示例</title>
</head>
<body>
    <canvas id="myCanvas" width="500" height="350" style="border:1px solid #ccc;"></canvas>

    <script>
        const canvas = document.getElementById('myCanvas');
        const ctx = canvas.getContext('2d');

        // 1. 完全不透明的红色矩形
        ctx.fillStyle = "red";
        ctx.fillRect(50, 50, 100, 100);

        // 2. 设置50%透明度
        ctx.globalAlpha = 0.5;
        ctx.fillStyle = "blue";
        ctx.fillRect(100, 80, 100, 100);

        // 3. 设置20%透明度
        ctx.globalAlpha = 0.2;
        ctx.fillStyle = "green";
        ctx.fillRect(30, 120, 100, 100);

        // 4. 重置透明度,绘制参考文字
        ctx.globalAlpha = 1.0;
        ctx.fillStyle = "black";
        ctx.font = "14px Arial";
        ctx.fillText("不透明红", 50, 40);
        ctx.fillText("50%透明蓝", 100, 70);
        ctx.fillText("20%透明绿", 30, 110);

        // 5. 演示透明度叠加效果
        ctx.globalAlpha = 0.6;
        ctx.fillStyle = "purple";
        ctx.fillRect(300, 50, 80, 80);

        ctx.globalAlpha = 0.6;
        ctx.fillStyle = "orange";
        ctx.fillRect(340, 70, 80, 80);

        ctx.globalAlpha = 1.0;
        ctx.fillText("透明度叠加效果", 300, 40);
    </script>
</body>
</html>
绘制效果:
-
左侧三个矩形展示不同透明度的叠加效果
-
右侧两个矩形展示相同透明度的颜色混合
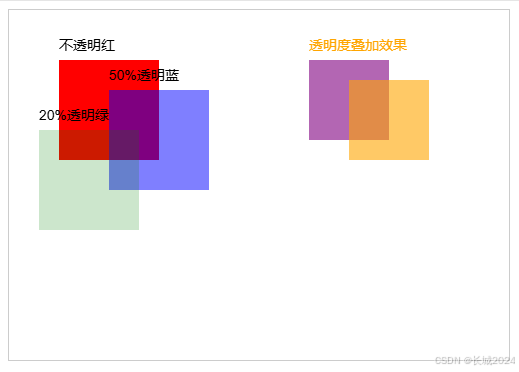
示例分析:globalAlpha 会影响之后所有绘制操作,直到被重新设置。从例子中可以看出:
-
红色完全不透明
-
蓝色半透明,与红色重叠处呈现紫色
-
绿色几乎透明,隐约可见
-
紫色和橙色以相同透明度重叠,形成新的混合色
4. rgba() 与 globalAlpha 对比
完整示例:
<!DOCTYPE html>
<html>
<head>
    <title>rgba vs globalAlpha 对比</title>
</head>
<body>
    <canvas id="myCanvas" width="600" height="300" style="border:1px solid #ccc;"></canvas>

    <script>
        const canvas = document.getElementById('myCanvas');
        const ctx = canvas.getContext('2d');

        // 绘制背景网格
        ctx.strokeStyle = "#eee";
        ctx.lineWidth = 1;
        for (let i = 0; i < 600; i += 20) {
            ctx.beginPath();
            ctx.moveTo(i, 0);
            ctx.lineTo(i, 300);
            ctx.stroke();
        }
        for (let i = 0; i < 300; i += 20) {
            ctx.beginPath();
            ctx.moveTo(0, i);
            ctx.lineTo(600, i);
            ctx.stroke();
        }

        // === 左侧:使用 globalAlpha ===
        ctx.fillStyle = "red";
        ctx.globalAlpha = 0.5;
        ctx.fillRect(50, 50, 120, 120);

        ctx.fillStyle = "blue";
        ctx.fillRect(100, 80, 120, 120);

        // === 右侧:使用 rgba ===
        ctx.globalAlpha = 1.0;  // 重置全局透明度

        // 使用 rgba 单独控制每个颜色
        ctx.fillStyle = "rgba(255, 0, 0, 0.5)";  // 50% 透明红
        ctx.fillRect(350, 50, 120, 120);

        ctx.fillStyle = "rgba(0, 0, 255, 0.2)";  // 20% 透明蓝
        ctx.fillRect(400, 80, 120, 120);

        // 添加说明文字
        ctx.font = "14px Arial";
        ctx.fillStyle = "black";
        ctx.fillText("globalAlpha 方式", 50, 30);
        ctx.fillText("所有图形透明度相同", 50, 190);

        ctx.fillText("rgba 方式", 350, 30);
        ctx.fillText("可单独控制透明度", 350, 190);
    </script>
</body>
</html>
绘制效果:
-
左侧:两个矩形使用相同的透明度(50%),蓝色覆盖红色区域呈现均匀的混合
-
右侧:红色 50% 透明,蓝色 20% 透明,重叠区域透明度不均

示例分析:对比两种透明度控制方式:
-
globalAlpha:统一控制所有后续图形,适合需要整体调整透明度的场景
-
rgba():精确控制每个颜色的透明度,灵活性更高,可以混合不同透明度的图形
三、线条样式
线条是绘制轮廓、路径的基础,Canvas 提供了精细控制线条外观的属性。
1. lineWidth - 线条宽度
| 项目 | 内容 |
|---|---|
| 属性/方法 | ctx.lineWidth |
| 含义 | 设置线条的粗细 |
| 词源 | line(线) + width(宽度)- 线的宽度 |
| 参数及说明 | 正数值(像素单位) |
| 默认值 | 1.0 |
完整示例:
<!DOCTYPE html>
<html>
<head>
    <title>lineWidth 示例</title>
</head>
<body>
    <canvas id="myCanvas" width="500" height="350" style="border:1px solid #ccc;"></canvas>

    <script>
        const canvas = document.getElementById('myCanvas');
        const ctx = canvas.getContext('2d');

        // 绘制背景网格
        ctx.strokeStyle = "#eee";
        ctx.lineWidth = 0.5;
        for (let i = 0; i < 500; i += 20) {
            ctx.beginPath();
            ctx.moveTo(i, 0);
            ctx.lineTo(i, 350);
            ctx.stroke();
        }

        // 1. 线宽 = 1
        ctx.beginPath();
        ctx.moveTo(50, 80);
        ctx.lineTo(450, 80);
        ctx.lineWidth = 1;
        ctx.strokeStyle = "black";
        ctx.stroke();
        ctx.fillText("线宽 1", 50, 70);

        // 2. 线宽 = 3
        ctx.beginPath();
        ctx.moveTo(50, 130);
        ctx.lineTo(450, 130);
        ctx.lineWidth = 3;
        ctx.strokeStyle = "blue";
        ctx.stroke();
        ctx.fillText("线宽 3", 50, 120);

        // 3. 线宽 = 8
        ctx.beginPath();
        ctx.moveTo(50, 180);
        ctx.lineTo(450, 180);
        ctx.lineWidth = 8;
        ctx.strokeStyle = "green";
        ctx.stroke();
        ctx.fillText("线宽 8", 50, 170);

        // 4. 线宽 = 15
        ctx.beginPath();
        ctx.moveTo(50, 240);
        ctx.lineTo(450, 240);
        ctx.lineWidth = 15;
        ctx.strokeStyle = "red";
        ctx.stroke();
        ctx.fillText("线宽 15", 50, 230);

        // 5. 演示线宽与坐标的关系
        ctx.fillStyle = "#666";
        ctx.font = "12px Arial";
        ctx.fillText("线宽从中心向两侧扩展", 50, 290);

        // 绘制精确的像素边界
        ctx.strokeStyle = "orange";
        ctx.lineWidth = 0.5;
        ctx.beginPath();
        ctx.moveTo(300, 260);
        ctx.lineTo(300, 330);
        ctx.stroke();
        ctx.fillText("中心线", 310, 310);
    </script>
</body>
</html>
绘制效果:
-
从上到下五条线,宽度依次增加
-
最下面的说明展示线条是"以路径为中心向两侧扩展"的
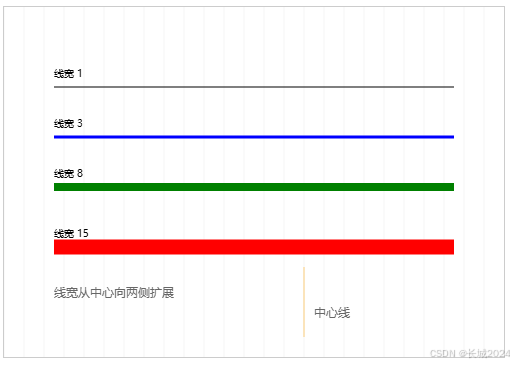
示例分析:lineWidth 决定了线条的粗细,但需要注意:
-
线宽是从路径中心向两侧扩展的
-
宽度为奇数的线(如1,3,5)在像素网格上可能需要微调坐标以获得清晰边缘
-
线宽越大,线条越粗壮醒目
2. lineCap - 线端点样式
| 项目 | 内容 |
|---|---|
| 属性/方法 | ctx.lineCap |
| 含义 | 设置线条端点的形状 |
| 词源 | line(线) + cap(帽子/盖)- 线的帽子(端点) |
| 参数及说明 | butt(平端)、round(圆端)、square(方端) |
| 默认值 | butt |
完整示例:
<!DOCTYPE html>
<html>
<head>
    <title>lineCap 示例</title>
</head>
<body>
    <canvas id="myCanvas" width="600" height="350" style="border:1px solid #ccc;"></canvas>

    <script>
        const canvas = document.getElementById('myCanvas');
        const ctx = canvas.getContext('2d');

        // 设置粗线以便看清效果
        ctx.lineWidth = 20;

        // 绘制三条水平参考线
        ctx.strokeStyle = "#ccc";
        ctx.lineWidth = 1;
        for (let y = 80; y <= 250; y += 85) {
            ctx.beginPath();
            ctx.moveTo(50, y);
            ctx.lineTo(550, y);
            ctx.stroke();
        }

        // 绘制端点标记(红点)
        ctx.fillStyle = "red";
        const markPoints = [
            [150, 80], [300, 80],  // 第一行的起点和终点
            [150, 165], [300, 165], // 第二行的起点和终点
            [150, 250], [300, 250]  // 第三行的起点和终点
        ];
        markPoints.forEach(([x, y]) => {
            ctx.beginPath();
            ctx.arc(x, y, 3, 0, Math.PI * 2);
            ctx.fill();
        });

        // 1. butt - 平端(默认)
        ctx.lineWidth = 20;
        ctx.strokeStyle = "blue";
        ctx.lineCap = "butt";
        ctx.beginPath();
        ctx.moveTo(150, 80);
        ctx.lineTo(300, 80);
        ctx.stroke();

        // 2. round - 圆端
        ctx.lineCap = "round";
        ctx.beginPath();
        ctx.moveTo(150, 165);
        ctx.lineTo(300, 165);
        ctx.stroke();

        // 3. square - 方端
        ctx.lineCap = "square";
        ctx.beginPath();
        ctx.moveTo(150, 250);
        ctx.lineTo(300, 250);
        ctx.stroke();

        // 添加说明文字
        ctx.font = "16px Arial";
        ctx.fillStyle = "black";
        ctx.lineWidth = 1;
        ctx.fillText("butt (平端)", 350, 85);
        ctx.fillText("round (圆端)", 350, 170);
        ctx.fillText("square (方端)", 350, 255);

        ctx.font = "14px Arial";
        ctx.fillText("红点标记理论端点位置", 350, 310);
        ctx.fillText("butt: 正好在红点", 350, 330);
        ctx.fillText("round/square: 超出红点半个线宽", 350, 350);
    </script>
</body>
</html>
绘制效果:
-
三条蓝色粗线,端点样式分别为 butt、round、square
-
红点标记线条的理论起点和终点位置
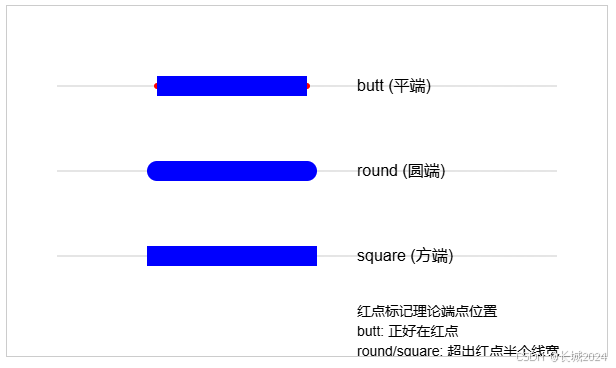
示例分析:lineCap 控制线条端点的外观:
-
butt:线条恰好终止于端点,与红点对齐,呈平直截面
-
round:线条端点呈半圆形,超出红点半个线宽(10px)
-
square:线条端点呈矩形,同样超出红点半个线宽(10px)
3. lineJoin - 线条连接样式
| 项目 | 内容 |
|---|---|
| 属性/方法 | ctx.lineJoin |
| 含义 | 设置两条线相交时拐角的形状 |
| 词源 | line(线) + join(连接)- 线的连接处 |
| 参数及说明 | miter(尖角)、round(圆角)、bevel(斜角) |
| 默认值 | miter |
完整示例:
<!DOCTYPE html>
<html>
<head>
    <title>lineJoin 三种样式对比</title>
    <style>
        body { font-family: Arial; text-align: center; }
        .container { display: flex; justify-content: center; gap: 20px; }
    </style>
</head>
<body>
    <h3>lineJoin 三种样式对比(粗线+小角度)</h3>
    <div class="container">
        <canvas id="canvasMiter" width="200" height="200" style="border:1px solid #ccc;"></canvas>
        <canvas id="canvasRound" width="200" height="200" style="border:1px solid #ccc;"></canvas>
        <canvas id="canvasBevel" width="200" height="200" style="border:1px solid #ccc;"></canvas>
    </div>

    <script>
        // miter 尖角
        const canvas1 = document.getElementById('canvasMiter');
        const ctx1 = canvas1.getContext('2d');
        ctx1.lineWidth = 30;
        ctx1.strokeStyle = "#3498db";
        ctx1.lineJoin = "miter";
        ctx1.beginPath();
        ctx1.moveTo(60, 130);
        ctx1.lineTo(100, 50);  // 陡坡
        ctx1.lineTo(140, 130);
        ctx1.stroke();
        ctx1.font = "16px Arial";
        ctx1.fillText("miter", 70, 170);

        // round 圆角
        const canvas2 = document.getElementById('canvasRound');
        const ctx2 = canvas2.getContext('2d');
        ctx2.lineWidth = 30;
        ctx2.strokeStyle = "#2ecc71";
        ctx2.lineJoin = "round";
        ctx2.beginPath();
        ctx2.moveTo(60, 130);
        ctx2.lineTo(100, 50);
        ctx2.lineTo(140, 130);
        ctx2.stroke();
        ctx2.font = "16px Arial";
        ctx2.fillText("round", 70, 170);

        // bevel 斜角
        const canvas3 = document.getElementById('canvasBevel');
        const ctx3 = canvas3.getContext('2d');
        ctx3.lineWidth = 30;
        ctx3.strokeStyle = "#e74c3c";
        ctx3.lineJoin = "bevel";
        ctx3.beginPath();
        ctx3.moveTo(60, 130);
        ctx3.lineTo(100, 50);
        ctx3.lineTo(140, 130);
        ctx3.stroke();
        ctx3.font = "16px Arial";
        ctx3.fillText("bevel", 70, 170);
    </script>

    <div style="margin-top:20px; text-align:left; display:inline-block;">
        <p><strong style="color:#3498db">miter(尖角)</strong>:尖锐突出,像山峰</p>
        <p><strong style="color:#2ecc71">round(圆角)</strong>:圆润过渡,像圆弧</p>
        <p><strong style="color:#e74c3c">bevel(斜角)</strong>:平直切面,像被切掉</p>
        <p>💡 使用粗线(30px)和陡坡角度,让区别一目了然</p>
    </div>
</body>
</html>
绘制效果:
-
三个并排的图形,分别使用蓝、绿、红三种颜色
-
每个图形都是倒V形,但顶部连接处形状明显不同:
-
蓝色:尖尖的突出
-
绿色:圆圆的弧线
-
红色:平平的切面
-
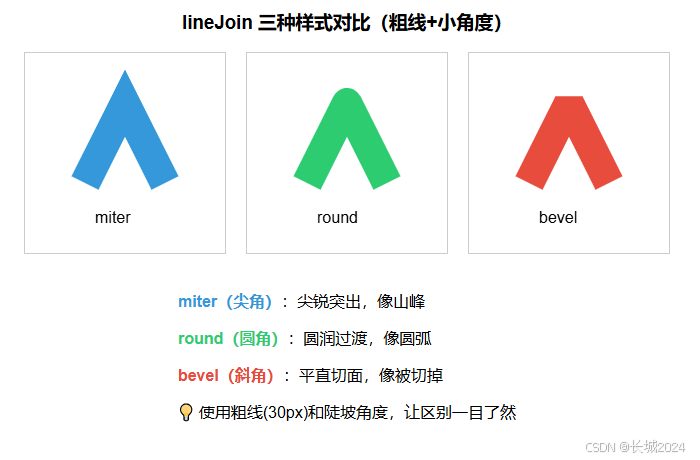
示例分析:
| 样式 | 视觉特征 | 适用场景 |
|---|---|---|
| miter | 尖锐的角,向外延伸 | 闪电、星星、锋利边缘 |
| round | 圆润的弧线,柔和过渡 | 徽标、圆角边框、友好界面 |
| bevel | 平直的斜面,干脆利落 | 3D效果、斜面装饰、科技感设计 |
关键点:
-
线宽越大、角度越小,三种样式的差异越明显
-
miterLimit可以控制尖角的长度,超过限制会自动转为bevel
-
选择哪种样式取决于你想要表达的视觉效果
4. miterLimit - 尖角限制
| 项目 | 内容 |
|---|---|
| 属性/方法 | ctx.miterLimit |
| 含义 | 设置尖角的最大长度比例 |
| 词源 | miter(尖角) + limit(限制)- 尖角限制 |
| 参数及说明 | 正数值(默认10.0) |
| 默认值 | 10.0 |
完整示例:
<!DOCTYPE html>
<html>
<head>
    <title>miterLimit 示例</title>
</head>
<body>
    <canvas id="myCanvas" width="600" height="350" style="border:1px solid #ccc;"></canvas>

    <script>
        const canvas = document.getElementById('myCanvas');
        const ctx = canvas.getContext('2d');

        ctx.lineWidth = 10;

        // 左侧:默认 miterLimit (10) - 未超限
        ctx.strokeStyle = "blue";
        ctx.lineJoin = "miter";
        ctx.miterLimit = 10;  // 默认值

        ctx.beginPath();
        ctx.moveTo(100, 80);
        ctx.lineTo(150, 30);  // 较大的角度
        ctx.lineTo(200, 80);
        ctx.stroke();

        // 中间:减小 miterLimit - 超限转为 bevel
        ctx.strokeStyle = "red";
        ctx.miterLimit = 2;   // 设置较小的限制

        ctx.beginPath();
        ctx.moveTo(250, 80);
        ctx.lineTo(300, 30);  // 相同角度
        ctx.lineTo(350, 80);
        ctx.stroke();

        // 右侧:极小的角度,默认 miterLimit 也会超限
        ctx.strokeStyle = "green";
        ctx.miterLimit = 10;   // 恢复默认

        ctx.beginPath();
        ctx.moveTo(400, 80);
        ctx.lineTo(450, 10);  // 非常小的角度
        ctx.lineTo(500, 80);
        ctx.stroke();

        // 绘制第二行:演示 miterLimit 的临界值
        ctx.strokeStyle = "purple";
        ctx.lineJoin = "miter";

        // 不同 miterLimit 值对比
        const limits = [1.5, 3, 5, 10];
        const angles = [160, 140, 120, 100];  // 角度越小,尖角越长

        for (let i = 0; i < 4; i++) {
            ctx.miterLimit = limits[i];
            ctx.beginPath();
            ctx.moveTo(100 + i * 120, 200);
            ctx.lineTo(150 + i * 120, 250);
            ctx.lineTo(200 + i * 120, 200);
            ctx.stroke();

            ctx.font = "12px Arial";
            ctx.fillText(`limit=${limits[i]}`, 100 + i * 120, 180);
        }

        ctx.font = "14px Arial";
        ctx.fillStyle = "black";
        ctx.fillText("默认miterLimit=10", 100, 50);
        ctx.fillText("miterLimit=2 (转为bevel)", 250, 50);
        ctx.fillText("角度极小 (转为bevel)", 400, 50);
        ctx.fillText("miterLimit对尖角的影响", 100, 280);
    </script>
</body>
</html>
绘制效果:
-
第一行:展示了不同 miterLimit 设置对尖角的影响
-
第二行:对比不同 miterLimit 值的临界情况
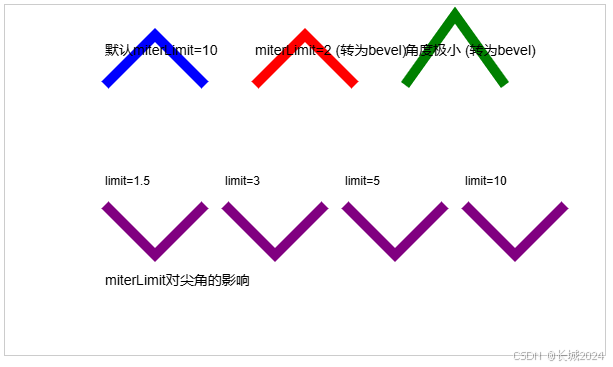
示例分析:miterLimit 控制尖角的最大允许长度(相对于线宽的比例):
-
当实际尖角长度 ≤ miterLimit × 线宽时,保持尖角
-
当实际尖角长度 > miterLimit × 线宽时,自动转为 bevel 斜角
-
线条角度越小,尖角越长,越容易超过限制
5. setLineDash() 和 lineDashOffset - 虚线样式
| 项目 | 内容 |
|---|---|
| 属性/方法 | ctx.setLineDash(segments)ctx.lineDashOffset |
| 含义 | 设置虚线的线段与间隙长度,以及偏移量 |
| 词源 | line(线) + dash(破折号)- 虚线 |
| 参数及说明 | setLineDash:数组,偶数个数值,交替表示线段和间隙的长度 lineDashOffset:数值,表示虚线的起始偏移 |
| 默认值 | setLineDash:空数组(实线) lineDashOffset:0 |
完整示例:
<!DOCTYPE html>
<html>
<head>
    <title>虚线样式示例</title>
    <style>
        canvas { border: 1px solid #ccc; margin: 10px; }
    </style>
</head>
<body>
    <canvas id="myCanvas" width="600" height="450" style="border:1px solid #ccc;"></canvas>

    <script>
        const canvas = document.getElementById('myCanvas');
        const ctx = canvas.getContext('2d');

        ctx.lineWidth = 3;
        ctx.strokeStyle = "#333";

        // 1. 实线(参考)
        ctx.beginPath();
        ctx.moveTo(50, 40);
        ctx.lineTo(550, 40);
        ctx.stroke();
        ctx.fillText("实线", 50, 30);

        // 2. 简单虚线 [10, 5] - 画10px,空5px
        ctx.setLineDash([10, 5]);
        ctx.beginPath();
        ctx.moveTo(50, 80);
        ctx.lineTo(550, 80);
        ctx.stroke();
        ctx.fillText("[10, 5] 虚线", 50, 70);

        // 3. 点线 [2, 5] - 画2px,空5px
        ctx.setLineDash([2, 5]);
        ctx.beginPath();
        ctx.moveTo(50, 120);
        ctx.lineTo(550, 120);
        ctx.stroke();
        ctx.fillText("[2, 5] 点线", 50, 110);

        // 4. 长划线模式 [20, 5, 5, 5] - 20长划,5空,5短划,5空
        ctx.setLineDash([20, 5, 5, 5]);
        ctx.beginPath();
        ctx.moveTo(50, 160);
        ctx.lineTo(550, 160);
        ctx.stroke();
        ctx.fillText("[20,5,5,5] 复合虚线", 50, 150);

        // 5. 虚线偏移演示
        ctx.setLineDash([10, 10]);

        // 偏移0
        ctx.strokeStyle = "blue";
        ctx.lineDashOffset = 0;
        ctx.beginPath();
        ctx.moveTo(50, 200);
        ctx.lineTo(550, 200);
        ctx.stroke();
        ctx.fillText("偏移0", 50, 190);

        // 偏移5
        ctx.strokeStyle = "red";
        ctx.lineDashOffset = 5;
        ctx.beginPath();
        ctx.moveTo(50, 240);
        ctx.lineTo(550, 240);
        ctx.stroke();
        ctx.fillText("偏移5", 50, 230);

        // 偏移10
        ctx.strokeStyle = "green";
        ctx.lineDashOffset = 10;
        ctx.beginPath();
        ctx.moveTo(50, 280);
        ctx.lineTo(550, 280);
        ctx.stroke();
        ctx.fillText("偏移10", 50, 270);

        // 6. 矩形使用虚线
        ctx.setLineDash([15, 8]);
        ctx.strokeStyle = "purple";
        ctx.lineWidth = 4;
        ctx.strokeRect(200, 320, 200, 80);
        ctx.fillText("虚线矩形", 200, 310);

        // 7. 重置为实线
        ctx.setLineDash([]);

        // 添加说明
        ctx.font = "14px Arial";
        ctx.fillStyle = "black";
        ctx.fillText("虚线偏移使图案整体移动", 350, 420);
    </script>
</body>
</html>
绘制效果:
-
前四条线展示不同的虚线模式
-
中间三条蓝色、红色、绿色线展示偏移效果
-
底部紫色虚线矩形
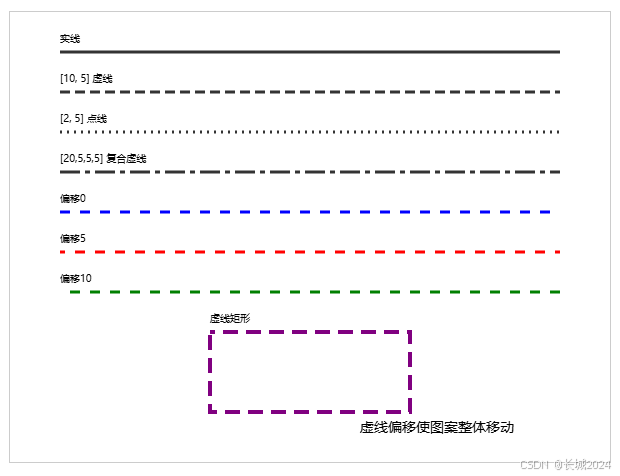
示例分析:
-
setLineDash 数组中的数值交替表示"画线长度"和"空白长度"
-
数组元素个数为偶数,可以组合出丰富的虚线图案
-
lineDashOffset 控制虚线起始位置,可用于动画效果(如蚂蚁线)
-
使用
setLineDash([])可恢复实线
四、阴影效果
阴影能让图形从平面中"站"起来,增强立体感和层次感。
阴影属性综合示例
| 项目 | 内容 |
|---|---|
| 属性/方法 | ctx.shadowColor、ctx.shadowBlur、ctx.shadowOffsetX、ctx.shadowOffsetY |
| 含义 | 设置阴影的颜色、模糊程度、偏移量 |
| 词源 | shadow(阴影) + color/blur/offset - 阴影属性 |
| 参数说明 | shadowColor:CSS颜色值 shadowBlur:非负数值,越大越模糊 shadowOffsetX/Y:数值,正右/下,负左/上 |
| 默认值 | shadowColor:透明黑 shadowBlur:0 shadowOffsetX/Y:0 |
完整示例:
<!DOCTYPE html>
<html>
<head>
    <title>阴影效果示例</title>
</head>
<body>
    <canvas id="myCanvas" width="700" height="500" style="border:1px solid #ccc;"></canvas>

    <script>
        const canvas = document.getElementById('myCanvas');
        const ctx = canvas.getContext('2d');

        // 清除阴影设置函数
        function resetShadow() {
            ctx.shadowColor = "transparent";
            ctx.shadowBlur = 0;
            ctx.shadowOffsetX = 0;
            ctx.shadowOffsetY = 0;
        }

        // 1. 基本阴影
        ctx.shadowColor = "gray";
        ctx.shadowBlur = 5;
        ctx.shadowOffsetX = 5;
        ctx.shadowOffsetY = 5;

        ctx.fillStyle = "blue";
        ctx.fillRect(50, 50, 100, 100);

        // 添加说明
        ctx.shadowColor = "transparent";  // 临时关闭阴影写文字
        ctx.fillStyle = "black";
        ctx.font = "14px Arial";
        ctx.fillText("基本阴影", 50, 40);

        // 2. 彩色阴影
        ctx.shadowColor = "rgba(255, 0, 0, 0.6)";
        ctx.shadowBlur = 10;
        ctx.shadowOffsetX = 8;
        ctx.shadowOffsetY = 8;

        ctx.fillStyle = "green";
        ctx.fillRect(200, 50, 100, 100);

        ctx.shadowColor = "transparent";
        ctx.fillStyle = "black";
        ctx.fillText("彩色阴影", 200, 40);

        // 3. 不同模糊度对比
        const blurValues = [0, 5, 15, 30];
        const colors = ["red", "orange", "purple", "brown"];

        for (let i = 0; i < blurValues.length; i++) {
            ctx.shadowColor = "black";
            ctx.shadowBlur = blurValues[i];
            ctx.shadowOffsetX = 5;
            ctx.shadowOffsetY = 5;

            ctx.fillStyle = colors[i];
            ctx.fillRect(50 + i * 120, 200, 80, 80);

            ctx.shadowColor = "transparent";
            ctx.fillStyle = "black";
            ctx.fillText(`模糊${blurValues[i]}`, 50 + i * 120, 190);
        }

        // 4. 不同偏移量对比
        const offsets = [
            [5, 5],    // 右下
            [-5, 5],   // 左下
            [5, -5],   // 右上
            [-5, -5]   // 左上
        ];

        for (let i = 0; i < offsets.length; i++) {
            ctx.shadowColor = "rgba(0, 0, 0, 0.5)";
            ctx.shadowBlur = 8;
            ctx.shadowOffsetX = offsets[i][0];
            ctx.shadowOffsetY = offsets[i][1];

            ctx.fillStyle = "teal";
            ctx.fillRect(50 + i * 120, 320, 70, 70);

            ctx.shadowColor = "transparent";
            ctx.fillStyle = "black";
            ctx.fillText(`偏移${offsets[i]}`, 50 + i * 120, 310);
        }

        // 5. 文字阴影
        resetShadow();
        ctx.shadowColor = "gray";
        ctx.shadowBlur = 3;
        ctx.shadowOffsetX = 3;
        ctx.shadowOffsetY = 3;

        ctx.font = "bold 30px Arial";
        ctx.fillStyle = "blue";
        ctx.fillText("带阴影的文字", 350, 400);

        // 6. 关闭阴影
        resetShadow();
        ctx.fillStyle = "black";
        ctx.font = "16px Arial";
        ctx.fillText("阴影已关闭", 350, 450);
    </script>
</body>
</html>
绘制效果:
-
左上角:蓝色矩形带灰色阴影
-
右上角:绿色矩形带半透明红色阴影
-
中间行:不同模糊度对比(0,5,15,30)
-
底部行:不同偏移方向对比(右下、左下、右上、左上)
-
底部:带阴影的文字
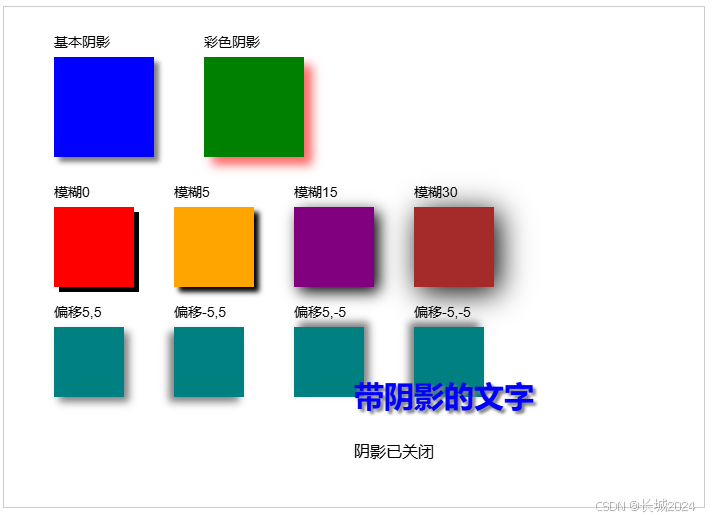
示例分析:
-
阴影颜色:可以是半透明色,产生柔和效果
-
模糊度:值越大,阴影边缘越扩散模糊
-
偏移量:正负值控制阴影方向
-
阴影会影响所有绘制操作,用完需要关闭(设为透明或偏移0)
五、渐变与图案
渐变和图案是 fillStyle 和 strokeStyle 的高级形式,能创造更丰富的视觉效果。
1. createLinearGradient() - 线性渐变
| 项目 | 内容 |
|---|---|
| 属性/方法 | ctx.createLinearGradient(x0, y0, x1, y1) |
| 含义 | 创建线性渐变对象 |
| 词源 | linear(线性的) + gradient(渐变)- 线性渐变 |
| 参数及说明 | (x0,y0):渐变起点坐标 (x1,y1):渐变终点坐标 |
| 返回 | 线性渐变对象 |
完整示例:
<!DOCTYPE html>
<html>
<head>
    <title>线性渐变示例</title>
    <meta charset="UTF-8">
</head>
<body>
    <canvas id="myCanvas" width="700" height="500" style="border:1px solid #ccc;"></canvas>

    <script>
        const canvas = document.getElementById('myCanvas');
        const ctx = canvas.getContext('2d');

        // 1. 水平渐变
        const gradient1 = ctx.createLinearGradient(50, 100, 250, 100);
        gradient1.addColorStop(0, "red");
        gradient1.addColorStop(0.5, "yellow");
        gradient1.addColorStop(1, "blue");

        ctx.fillStyle = gradient1;
        ctx.fillRect(50, 50, 200, 80);
        ctx.fillStyle = "black";
        ctx.fillText("水平渐变", 50, 40);

        // 2. 垂直渐变
        const gradient2 = ctx.createLinearGradient(300, 50, 300, 150);
        gradient2.addColorStop(0, "purple");
        gradient2.addColorStop(0.3, "pink");
        gradient2.addColorStop(0.7, "orange");
        gradient2.addColorStop(1, "yellow");

        ctx.fillStyle = gradient2;
        ctx.fillRect(300, 50, 150, 100);
        ctx.fillStyle = "black";
        ctx.fillText("垂直渐变", 300, 40);

        // 3. 对角线渐变
        const gradient3 = ctx.createLinearGradient(50, 200, 200, 300);
        gradient3.addColorStop(0, "rgba(255,0,0,1)");
        gradient3.addColorStop(0.5, "rgba(0,255,0,0.5)");
        gradient3.addColorStop(1, "rgba(0,0,255,1)");

        ctx.fillStyle = gradient3;
        ctx.fillRect(50, 200, 200, 150);
        ctx.fillStyle = "black";
        ctx.fillText("对角线渐变", 50, 190);

        // 4. 多色渐变
        const gradient4 = ctx.createLinearGradient(300, 200, 500, 350);
        gradient4.addColorStop(0, "red");
        gradient4.addColorStop(0.2, "orange");
        gradient4.addColorStop(0.4, "yellow");
        gradient4.addColorStop(0.6, "green");
        gradient4.addColorStop(0.8, "blue");
        gradient4.addColorStop(1, "purple");

        ctx.fillStyle = gradient4;
        ctx.fillRect(300, 200, 200, 150);
        ctx.fillStyle = "black";
        ctx.fillText("彩虹渐变", 300, 190);

        // 5. 描边渐变
        const gradient5 = ctx.createLinearGradient(50, 400, 300, 400);
        gradient5.addColorStop(0, "gold");
        gradient5.addColorStop(0.5, "white");
        gradient5.addColorStop(1, "gold");

        ctx.lineWidth = 8;
        ctx.strokeStyle = gradient5;
        ctx.strokeRect(50, 380, 250, 80);
        ctx.fillStyle = "black";
        ctx.fillText("描边渐变", 50, 370);

        // 6. 透明渐变
        const gradient6 = ctx.createLinearGradient(350, 380, 600, 380);
        gradient6.addColorStop(0, "rgba(255,0,0,1)");
        gradient6.addColorStop(0.3, "rgba(255,0,0,0.7)");
        gradient6.addColorStop(0.6, "rgba(255,0,0,0.3)");
        gradient6.addColorStop(1, "rgba(255,0,0,0)");

        ctx.fillStyle = gradient6;
        ctx.fillRect(350, 380, 250, 80);
        ctx.fillStyle = "black";
        ctx.fillText("透明渐变", 350, 370);
    </script>
</body>
</html>
绘制效果:
-
第一行:水平渐变(红→黄→蓝)
-
第二行:垂直渐变(紫→粉→橙→黄)
-
第三行:对角线渐变(红→绿→蓝,带透明度)
-
第四行:彩虹渐变(六色)
-
第五行:描边渐变(金色光泽效果)
-
第六行:透明渐变(红色逐渐消失)
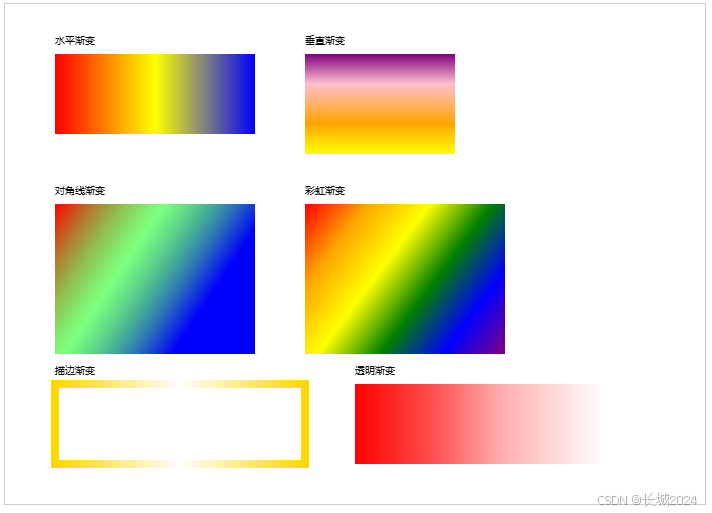
示例分析:
-
addColorStop(offset, color):offset 0~1 表示位置,color 为该位置的颜色
-
渐变方向由起点和终点坐标决定
-
可以设置多个颜色断点,实现复杂渐变
-
渐变可以用于 fillStyle 或 strokeStyle
2. createRadialGradient() - 径向渐变
| 项目 | 内容 |
|---|---|
| 属性/方法 | ctx.createRadialGradient(x0, y0, r0, x1, y1, r1) |
| 含义 | 创建径向(圆形)渐变对象 |
| 词源 | radial(放射状的) + gradient(渐变)- 放射渐变 |
| 参数及说明 | (x0,y0,r0):起始圆的圆心和半径 (x1,y1,r1):结束圆的圆心和半径 |
| 返回 | 径向渐变对象 |
完整示例:
<!DOCTYPE html>
<html>
<head>
    <title>径向渐变示例</title>
</head>
<body>
    <canvas id="myCanvas" width="700" height="500" style="border:1px solid #ccc;"></canvas>

    <script>
        const canvas = document.getElementById('myCanvas');
        const ctx = canvas.getContext('2d');

        // 1. 从中心向外扩散(同心圆)
        const gradient1 = ctx.createRadialGradient(150, 100, 10, 150, 100, 80);
        gradient1.addColorStop(0, "white");
        gradient1.addColorStop(0.5, "yellow");
        gradient1.addColorStop(1, "orange");

        ctx.beginPath();
        ctx.arc(150, 100, 80, 0, Math.PI * 2);
        ctx.fillStyle = gradient1;
        ctx.fill();
        ctx.fillStyle = "black";
        ctx.fillText("中心向外扩散", 100, 30);

        // 2. 立体球效果
        const gradient2 = ctx.createRadialGradient(400, 100, 20, 400, 100, 80);
        gradient2.addColorStop(0, "#FFF");
        gradient2.addColorStop(0.3, "#00F");
        gradient2.addColorStop(0.6, "#00A");
        gradient2.addColorStop(1, "#006");

        ctx.beginPath();
        ctx.arc(400, 100, 80, 0, Math.PI * 2);
        ctx.fillStyle = gradient2;
        ctx.fill();
        ctx.fillStyle = "black";
        ctx.fillText("立体球效果", 350, 30);

        // 3. 偏移光效
        const gradient3 = ctx.createRadialGradient(200, 280, 20, 200, 280, 120);
        gradient3.addColorStop(0, "rgba(255,255,255,1)");
        gradient3.addColorStop(0.4, "rgba(100,150,255,0.8)");
        gradient3.addColorStop(0.8, "rgba(0,0,100,0.5)");
        gradient3.addColorStop(1, "rgba(0,0,0,0)");

        ctx.fillStyle = gradient3;
        ctx.fillRect(100, 200, 200, 150);
        ctx.fillStyle = "black";
        ctx.fillText("光晕效果", 150, 190);

        // 4. 非同心圆渐变
        const gradient4 = ctx.createRadialGradient(450, 280, 20, 420, 260, 100);
        gradient4.addColorStop(0, "red");
        gradient4.addColorStop(0.5, "yellow");
        gradient4.addColorStop(1, "blue");

        ctx.beginPath();
        ctx.arc(450, 280, 100, 0, Math.PI * 2);
        ctx.fillStyle = gradient4;
        ctx.fill();
        ctx.fillStyle = "black";
        ctx.fillText("偏移圆心渐变", 400, 190);

        // 5. 多重径向渐变叠加
        // 第一个圆形
        const gradient5a = ctx.createRadialGradient(200, 400, 10, 200, 400, 60);
        gradient5a.addColorStop(0, "#FF0");
        gradient5a.addColorStop(1, "#F00");

        ctx.beginPath();
        ctx.arc(200, 400, 60, 0, Math.PI * 2);
        ctx.fillStyle = gradient5a;
        ctx.fill();

        // 第二个圆形
        const gradient5b = ctx.createRadialGradient(300, 400, 10, 300, 400, 60);
        gradient5b.addColorStop(0, "#0FF");
        gradient5b.addColorStop(1, "#00F");

        ctx.beginPath();
        ctx.arc(300, 400, 60, 0, Math.PI * 2);
        ctx.fillStyle = gradient5b;
        ctx.fill();

        // 重叠区域
        ctx.fillStyle = "black";
        ctx.fillText("径向渐变叠加", 200, 330);

        // 6. 描边使用径向渐变
        const gradient6 = ctx.createRadialGradient(550, 400, 10, 550, 400, 70);
        gradient6.addColorStop(0, "white");
        gradient6.addColorStop(0.5, "gold");
        gradient6.addColorStop(1, "orange");

        ctx.lineWidth = 8;
        ctx.strokeStyle = gradient6;
        ctx.beginPath();
        ctx.arc(550, 400, 60, 0, Math.PI * 2);
        ctx.stroke();
        ctx.fillText("描边径向渐变", 500, 330);
    </script>
</body>
</html>
绘制效果:
-
左上:同心圆渐变(白→黄→橙)
-
右上:立体球效果(有高光)
-
左中:光晕效果(透明渐变)
-
右中:偏移圆心渐变(颜色分布不均匀)
-
左下:两个径向渐变叠加
-
右下:描边使用径向渐变

示例分析:
-
径向渐变可以创建逼真的立体感(球体)
-
两个圆心可以不同位置,产生不对称效果
-
结合透明度可以制作光晕、发光效果
-
可同时用于填充和描边
3. createPattern() - 图案填充
| 项目 | 内容 |
|---|---|
| 属性/方法 | ctx.createPattern(image, repetition) |
| 含义 | 创建图案对象,用图像填充图形 |
| 词源 | pattern(图案)- 图案 |
| 参数及说明 | image:图像源(Image对象、canvas元素等) repetition:重复模式 |
| 重复模式 | "repeat"(默认)、"repeat-x"、"repeat-y"、"no-repeat" |
完整示例:
<!DOCTYPE html>
<html>
<head>
    <title>createPattern 四种重复模式对比</title>
    <style>
        body { font-family: Arial; text-align: center; }
        .container {
            display: grid;
            grid-template-columns: repeat(2, 1fr);
            gap: 10px;
            max-width: 650px;
            margin: 0 auto;
        }
        canvas { border: 1px solid #ccc; }
    </style>
</head>
<body>
    <h3>createPattern 四种重复模式对比</h3>
    <div class="container">
        <div>
            <canvas id="canvasRepeat" width="250" height="250"></canvas>
            <p><strong>repeat</strong> (双向平铺)</p>
        </div>
        <div>
            <canvas id="canvasRepeatX" width="250" height="250"></canvas>
            <p><strong>repeat-x</strong> (水平平铺)</p>
        </div>
        <div>
            <canvas id="canvasRepeatY" width="250" height="250"></canvas>
            <p><strong>repeat-y</strong> (垂直平铺)</p>
        </div>
        <div>
            <canvas id="canvasNoRepeat" width="250" height="250"></canvas>
            <p><strong>no-repeat</strong> (不重复)</p>
        </div>
    </div>

    <script>
        // 创建统一的图案源
        function createPatternSource() {
            const canvas = document.createElement('canvas');
            canvas.width = 30;
            canvas.height = 30;
            const ctx = canvas.getContext('2d');

            // 绘制一个醒目的笑脸图案(更容易识别)
            ctx.fillStyle = "#FFD700";  // 金色背景
            ctx.fillRect(0, 0, 30, 30);

            // 眼睛
            ctx.fillStyle = "#000";
            ctx.beginPath();
            ctx.arc(8, 10, 3, 0, Math.PI * 2);
            ctx.fill();
            ctx.beginPath();
            ctx.arc(22, 10, 3, 0, Math.PI * 2);
            ctx.fill();

            // 嘴巴
            ctx.beginPath();
            ctx.strokeStyle = "#000";
            ctx.lineWidth = 2;
            ctx.arc(15, 18, 8, 0, Math.PI);
            ctx.stroke();

            // 边框
            ctx.strokeStyle = "#333";
            ctx.lineWidth = 1;
            ctx.strokeRect(0, 0, 30, 30);

            return canvas;
        }

        const patternSource = createPatternSource();

        // repeat - 双向平铺
        const ctx1 = document.getElementById('canvasRepeat').getContext('2d');
        const pattern1 = ctx1.createPattern(patternSource, "repeat");
        ctx1.fillStyle = pattern1;
        ctx1.fillRect(25, 25, 200, 200);
        ctx1.fillStyle = "#333";
        ctx1.font = "14px Arial";
        ctx1.fillText("repeat", 100, 20);

        // repeat-x - 水平平铺
        const ctx2 = document.getElementById('canvasRepeatX').getContext('2d');
        const pattern2 = ctx2.createPattern(patternSource, "repeat-x");
        ctx2.fillStyle = pattern2;
        ctx2.fillRect(25, 25, 200, 200);
        ctx2.fillStyle = "#333";
        ctx2.fillText("repeat-x", 95, 20);

        // repeat-y - 垂直平铺
        const ctx3 = document.getElementById('canvasRepeatY').getContext('2d');
        const pattern3 = ctx3.createPattern(patternSource, "repeat-y");
        ctx3.fillStyle = pattern3;
        ctx3.fillRect(25, 25, 200, 200);
        ctx3.fillStyle = "#333";
        ctx3.fillText("repeat-y", 95, 20);

        // no-repeat - 不重复
        const ctx4 = document.getElementById('canvasNoRepeat').getContext('2d');
        const pattern4 = ctx4.createPattern(patternSource, "no-repeat");
        ctx4.fillStyle = pattern4;
        ctx4.fillRect(25, 25, 200, 200);
        ctx4.fillStyle = "#333";
        ctx4.fillText("no-repeat", 90, 20);

        // 在所有画布底部画出图案源
        [ctx1, ctx2, ctx3, ctx4].forEach((ctx, index) => {
            ctx.fillStyle = "#666";
            ctx.font = "12px Arial";
            ctx.fillText("图案源:", 25, 230);
            ctx.drawImage(patternSource, 80, 215, 25, 25);
        });
    </script>

    <div style="margin-top:20px; text-align:left; max-width:600px; margin:20px auto;">
        <h4>四种模式的区别:</h4>
        <ul>
            <li><strong>repeat(双向平铺)</strong>:图案铺满整个区域,像墙纸一样</li>
            <li><strong>repeat-x(水平平铺)</strong>:只有一行图案水平重复,垂直方向拉伸</li>
            <li><strong>repeat-y(垂直平铺)</strong>:只有一列图案垂直重复,水平方向拉伸</li>
            <li><strong>no-repeat(不重复)</strong>:只在左上角画一次图案,其余空白</li>
        </ul>
        <p>💡 使用醒目的笑脸图案,让重复模式一目了然</p>
    </div>
</body>
</html>
绘制效果:
-
四个画布并排显示,每个200x200区域
-
使用醒目的笑脸图案(30x30)作为图案源
-
repeat:整个区域布满笑脸
-
repeat-x:顶部一行笑脸,下面空白
-
repeat-y:左侧一列笑脸,右边空白
-
no-repeat:左上角一个笑脸,其余空白
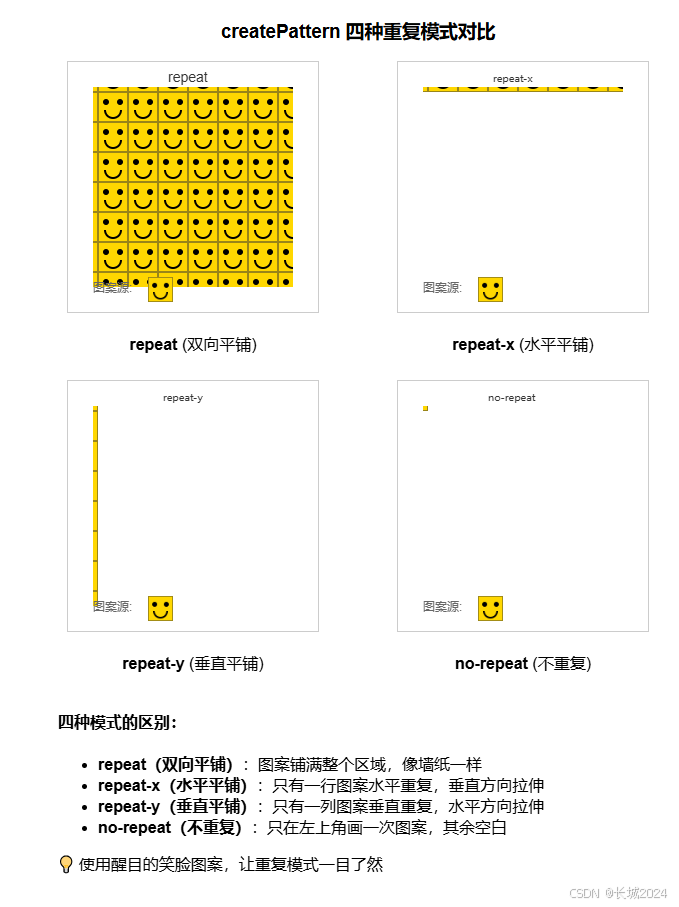
示例分析:
| 模式 | 视觉特征 | 适用场景 |
|---|---|---|
| repeat | 图案铺满整个区域 | 背景纹理、墙纸效果 |
| repeat-x | 只有一行水平重复 | 水平条纹装饰、分隔线 |
| repeat-y | 只有一列垂直重复 | 垂直条纹装饰、边框 |
| no-repeat | 只出现一次 | 徽标、单个图标 |
关键点:
-
图案源可以是canvas、图片、视频等
-
图案大小由源决定,填充区域自动重复
-
使用醒目的图案(如笑脸)更容易看出重复模式
-
四种模式满足不同的纹理需求
六、文本样式
Canvas 提供了丰富的文本渲染和样式控制。
1. font - 字体设置
| 项目 | 内容 |
|---|---|
| 属性/方法 | ctx.font |
| 含义 | 设置文本的字体样式 |
| 词源 | font(字体)- 字体 |
| 参数及说明 | CSS font 属性的简写格式 |
| 默认值 | "10px sans-serif" |
完整示例:
<!DOCTYPE html>
<html>
<head>
    <title>字体样式示例</title>
</head>
<body>
    <canvas id="myCanvas" width="700" height="400" style="border:1px solid #ccc;"></canvas>

    <script>
        const canvas = document.getElementById('myCanvas');
        const ctx = canvas.getContext('2d');

        // 绘制背景网格
        ctx.strokeStyle = "#eee";
        ctx.lineWidth = 0.5;
        for (let i = 0; i < 700; i += 20) {
            ctx.beginPath();
            ctx.moveTo(i, 0);
            ctx.lineTo(i, 400);
            ctx.stroke();
        }

        // 1. 基本字体
        ctx.font = "20px Arial";
        ctx.fillStyle = "#333";
        ctx.fillText("Arial 20px", 50, 50);

        // 2. 粗体
        ctx.font = "bold 24px 'Microsoft YaHei', sans-serif";
        ctx.fillStyle = "blue";
        ctx.fillText("微软雅黑 粗体 24px", 50, 100);

        // 3. 斜体
        ctx.font = "italic 22px Georgia, serif";
        ctx.fillStyle = "green";
        ctx.fillText("Georgia 斜体 22px", 50, 150);

        // 4. 粗斜体
        ctx.font = "bold italic 26px 'Times New Roman', serif";
        ctx.fillStyle = "purple";
        ctx.fillText("Times 粗斜体 26px", 50, 200);

        // 5. 不同字号对比
        const sizes = [12, 16, 20, 24, 28, 32];
        sizes.forEach((size, index) => {
            ctx.font = `${size}px Arial`;
            ctx.fillStyle = "#e67e22";
            ctx.fillText(`字号 ${size}px`, 400, 50 + index * 35);
        });

        // 6. 描边文字
        ctx.font = "bold 40px Arial";
        ctx.strokeStyle = "red";
        ctx.lineWidth = 2;
        ctx.strokeText("描边文字", 400, 280);

        // 7. 填充+描边
        ctx.font = "bold 40px Arial";
        ctx.fillStyle = "yellow";
        ctx.strokeStyle = "black";
        ctx.lineWidth = 3;
        ctx.fillText("双重效果", 400, 350);
        ctx.strokeText("双重效果", 400, 350);

        // 添加说明
        ctx.font = "14px Arial";
        ctx.fillStyle = "black";
        ctx.fillText("字体样式示例", 50, 320);
        ctx.fillText("fillText() 填充文字", 50, 350);
        ctx.fillText("strokeText() 描边文字", 50, 380);
    </script>
</body>
</html>
绘制效果:
-
左侧从上到下展示不同字体组合
-
右侧展示不同字号对比
-
底部展示描边文字和双重效果文字
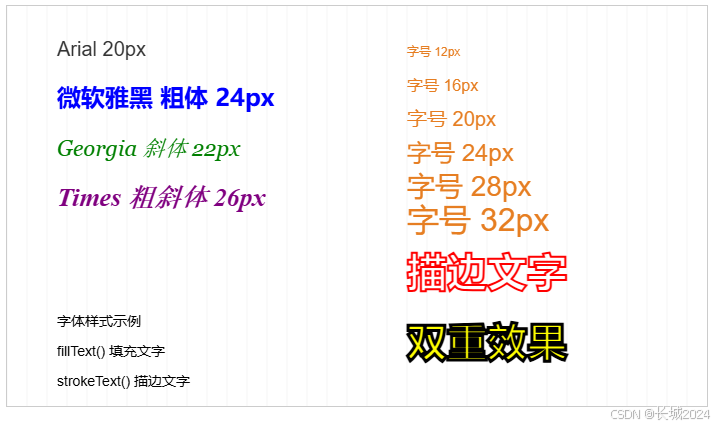
示例分析:
-
font 属性使用 CSS 字体简写格式
-
可以组合 bold、italic 等样式
-
fillText() 填充文字内部
-
strokeText() 只描边文字轮廓
-
两者结合可创建双重效果
2. textAlign - 水平对齐
| 项目 | 内容 |
|---|---|
| 属性/方法 | ctx.textAlign |
| 含义 | 设置文本的水平对齐方式 |
| 词源 | text(文本) + align(对齐)- 文本对齐 |
| 参数及说明 | left、right、center、start(默认)、end |
| 默认值 | start |
完整示例:
<!DOCTYPE html>
<html>
<head>
    <title>文本对齐示例</title>
</head>
<body>
    <canvas id="myCanvas" width="600" height="350" style="border:1px solid #ccc;"></canvas>

    <script>
        const canvas = document.getElementById('myCanvas');
        const ctx = canvas.getContext('2d');

        // 绘制垂直参考线
        ctx.strokeStyle = "red";
        ctx.lineWidth = 1;
        ctx.beginPath();
        ctx.moveTo(300, 30);
        ctx.lineTo(300, 300);
        ctx.stroke();

        // 绘制水平参考线
        ctx.strokeStyle = "#ccc";
        ctx.lineWidth = 0.5;
        for (let y = 80; y <= 280; y += 50) {
            ctx.beginPath();
            ctx.moveTo(50, y);
            ctx.lineTo(550, y);
            ctx.stroke();
        }

        ctx.font = "20px Arial";

        // left对齐
        ctx.textAlign = "left";
        ctx.fillStyle = "blue";
        ctx.fillText("left对齐", 300, 80);

        // center对齐
        ctx.textAlign = "center";
        ctx.fillStyle = "green";
        ctx.fillText("center对齐", 300, 130);

        // right对齐
        ctx.textAlign = "right";
        ctx.fillStyle = "purple";
        ctx.fillText("right对齐", 300, 180);

        // start对齐(从左到右文字环境下=left)
        ctx.textAlign = "start";
        ctx.fillStyle = "orange";
        ctx.fillText("start对齐", 300, 230);

        // end对齐(从左到右文字环境下=right)
        ctx.textAlign = "end";
        ctx.fillStyle = "brown";
        ctx.fillText("end对齐", 300, 280);

        // 添加说明
        ctx.textAlign = "left";
        ctx.font = "14px Arial";
        ctx.fillStyle = "black";
        ctx.fillText("红色垂直线为对齐参考线", 50, 320);
        ctx.fillText("各文本以此线为基准对齐", 50, 340);
    </script>
</body>
</html>
绘制效果:
-
红色垂直线为参考线
-
五条水平线展示不同对齐方式
-
left 在参考线左侧,center 居中,right 在右侧
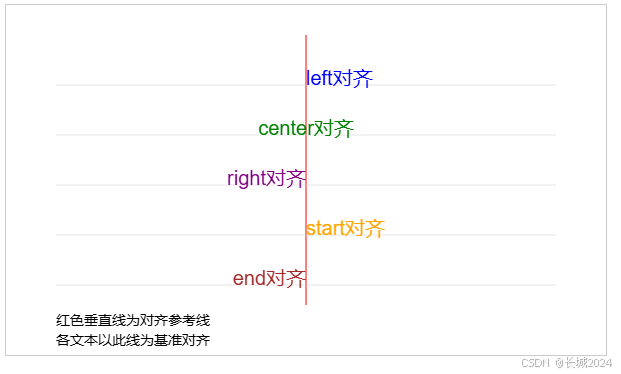
示例分析:
-
left:文本左边缘对齐参考点
-
center:文本中心对齐参考点
-
right:文本右边缘对齐参考点
-
start:在 LTR 语言中同 left
-
end:在 LTR 语言中同 right
3. textBaseline - 垂直对齐
| 项目 | 内容 |
|---|---|
| 属性/方法 | ctx.textBaseline |
| 含义 | 设置文本的垂直基线对齐方式 |
| 词源 | text(文本) + baseline(基线)- 文本基线 |
| 参数及说明 | top、hanging、middle、alphabetic(默认)、ideographic、bottom |
完整示例:
<!DOCTYPE html>
<html>
<head>
    <title>textBaseline 最简单直观的示例</title>
    <style>
        body { font-family: Arial; }
        canvas { border: 1px solid #333; margin: 10px; }
    </style>
</head>
<body>
    <h3>textBaseline 最简单直观的示例</h3>
    <canvas id="myCanvas" width="600" height="400"></canvas>

    <script>
        const canvas = document.getElementById('myCanvas');
        const ctx = canvas.getContext('2d');

        // === 1. 先画一条粗粗的红色横线(参考线)===
        ctx.strokeStyle = "red";
        ctx.lineWidth = 3;
        ctx.beginPath();
        ctx.moveTo(50, 200);
        ctx.lineTo(550, 200);
        ctx.stroke();

        // 在线上画一个红点,强调这个位置
        ctx.fillStyle = "red";
        ctx.beginPath();
        ctx.arc(100, 200, 6, 0, Math.PI * 2);
        ctx.fill();

        // 添加说明文字
        ctx.font = "16px Arial";
        ctx.fillStyle = "red";
        ctx.fillText("← 这条红线就是参考线", 120, 180);
        ctx.fillText("红点位置 = (100, 200)", 120, 210);

        // === 2. 现在用不同的基线来写文字 ===
        ctx.font = "30px Arial";  // 大字号,看得清楚

        // 2.1 top - 顶部对齐
        ctx.textBaseline = "top";
        ctx.fillStyle = "blue";
        ctx.fillText("① top", 100, 200);
        ctx.fillStyle = "black";
        ctx.font = "14px Arial";
        ctx.fillText("文字顶部对齐红线", 100, 160);

        // 2.2 middle - 中部对齐
        ctx.textBaseline = "middle";
        ctx.fillStyle = "green";
        ctx.fillText("② middle", 200, 200);
        ctx.fillStyle = "black";
        ctx.fillText("文字中间对齐红线", 200, 160);

        // 2.3 alphabetic - 字母基线(默认)
        ctx.textBaseline = "alphabetic";
        ctx.fillStyle = "purple";
        ctx.fillText("③ alphabetic", 300, 200);
        ctx.fillStyle = "black";
        ctx.fillText("字母底部对齐红线", 300, 160);

        // 2.4 bottom - 底部对齐
        ctx.textBaseline = "bottom";
        ctx.fillStyle = "orange";
        ctx.fillText("④ bottom", 420, 200);
        ctx.fillStyle = "black";
        ctx.fillText("文字底部对齐红线", 420, 160);

        // === 3. 画几条辅助线,显示每个文字的范围 ===
        ctx.strokeStyle = "#ccc";
        ctx.lineWidth = 0.5;
        ctx.setLineDash([5, 5]);

        // top文字的范围
        ctx.beginPath();
        ctx.moveTo(100, 200);
        ctx.lineTo(100, 200-30);
        ctx.stroke();

        // middle文字的范围
        ctx.beginPath();
        ctx.moveTo(200, 200-15);
        ctx.lineTo(200, 200+15);
        ctx.stroke();

        // alphabetic文字的范围
        ctx.beginPath();
        ctx.moveTo(300, 200-22);
        ctx.lineTo(300, 200+8);
        ctx.stroke();

        // bottom文字的范围
        ctx.beginPath();
        ctx.moveTo(420, 200-30);
        ctx.lineTo(420, 200);
        ctx.stroke();

        ctx.setLineDash([]);

        // === 4. 添加最终解释 ===
        ctx.font = "bold 18px Arial";
        ctx.fillStyle = "#333";
        ctx.fillText("【观察重点】", 50, 300);

        ctx.font = "16px Arial";
        ctx.fillText("① top:文字顶部正好在红线上(文字在线的下面)", 50, 330);
        ctx.fillText("② middle:文字中间正好在红线上(线穿过文字中间)", 50, 355);
        ctx.fillText("③ alphabetic:字母底部正好在红线上(像写英文的本子)", 50, 380);
        ctx.fillText("④ bottom:文字底部正好在红线上(文字在线的上面)", 50, 405);
    </script>
</body>
</html>
绘制效果:
-
红色水平线为参考线,红点为参考点
-
五个文本分别使用 top、hanging、middle、alphabetic、bottom 基线
-
观察每个文本相对于红点的垂直位置
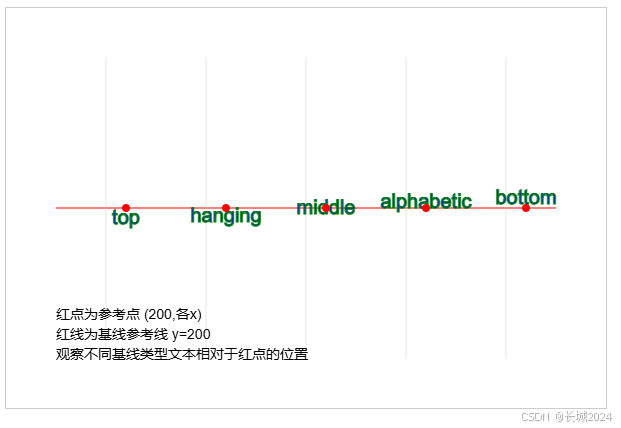
示例分析:
-
top:文本顶部对齐参考点
-
hanging:悬挂基线(用于印度文字等)
-
middle:文本中部对齐参考点
-
alphabetic:默认,字母基线(英文底部对齐)
-
bottom:文本底部对齐参考点
4. 文本度量 - measureText()
| 项目 | 内容 |
|---|---|
| 属性/方法 | ctx.measureText(text) |
| 含义 | 返回文本的宽度信息 |
| 词源 | measure(测量)- 测量文本 |
| 返回 | TextMetrics 对象,包含文本宽度等度量信息 |
完整示例:
<!DOCTYPE html>
<html>
<head>
    <title>文本度量示例</title>
</head>
<body>
    <canvas id="myCanvas" width="600" height="400" style="border:1px solid #ccc;"></canvas>

    <script>
        const canvas = document.getElementById('myCanvas');
        const ctx = canvas.getContext('2d');

        const text = "Canvas 度量示例";
        ctx.font = "30px Arial";

        // 测量文本宽度
        const metrics = ctx.measureText(text);
        const textWidth = metrics.width;

        // 绘制文本
        ctx.fillStyle = "#333";
        ctx.fillText(text, 100, 150);

        // 绘制文本边界框
        ctx.strokeStyle = "red";
        ctx.lineWidth = 2;
        ctx.strokeRect(100, 150 - 30, textWidth, 30);  // 假设字体高度约30px

        // 标记起点
        ctx.fillStyle = "blue";
        ctx.beginPath();
        ctx.arc(100, 150, 5, 0, Math.PI * 2);
        ctx.fill();

        // 显示测量信息
        ctx.font = "16px Arial";
        ctx.fillStyle = "green";
        ctx.fillText(`文本: "${text}"`, 100, 250);
        ctx.fillText(`字体: 30px Arial`, 100, 280);
        ctx.fillText(`测量宽度: ${textWidth.toFixed(2)}px`, 100, 310);

        // 演示不同文本的宽度比较
        const texts = [
            { txt: "iiiiii", color: "blue" },
            { txt: "MMMMMM", color: "red" },
            { txt: "WWWWWW", color: "green" }
        ];

        ctx.font = "24px Arial";
        texts.forEach((item, index) => {
            const w = ctx.measureText(item.txt).width;
            ctx.fillStyle = item.color;
            ctx.fillText(item.txt, 100 + index * 150, 350);

            ctx.fillStyle = "black";
            ctx.font = "12px Arial";
            ctx.fillText(`${w.toFixed(1)}px`, 100 + index * 150, 380);
        });
    </script>
</body>
</html>
绘制效果:
-
主文本显示并绘制边界框
-
显示测量出的宽度数值
-
底部对比不同字符的宽度差异
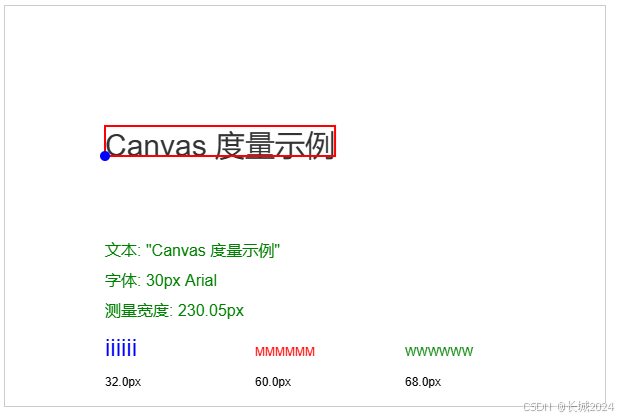
示例分析:
-
measureText() 返回文本精确的像素宽度
-
不同字符宽度不同(如 'i' 和 'W' 差异明显)
-
可用于动态布局、文本居中、边界检测等
-
目前主要返回 width 属性,未来可能扩展更多度量
七、综合示例
结合多种样式,创建一个丰富的综合示例:
<!DOCTYPE html>
<html>
<head>
    <title>Canvas 综合样式示例</title>
    <style>
        canvas { border: 1px solid #333; display: block; margin: 20px auto; }
    </style>
</head>
<body>
    <canvas id="demoCanvas" width="800" height="500"></canvas>

    <script>
        const canvas = document.getElementById('demoCanvas');
        const ctx = canvas.getContext('2d');

        // 1. 背景渐变
        const bgGradient = ctx.createLinearGradient(0, 0, 0, 500);
        bgGradient.addColorStop(0, '#87CEEB');
        bgGradient.addColorStop(0.5, '#B0E0E6');
        bgGradient.addColorStop(1, '#E0F6FF');
        ctx.fillStyle = bgGradient;
        ctx.fillRect(0, 0, 800, 500);

        // 2. 标题(带阴影)
        ctx.shadowColor = 'rgba(0,0,0,0.3)';
        ctx.shadowBlur = 10;
        ctx.shadowOffsetX = 5;
        ctx.shadowOffsetY = 5;
        ctx.font = 'bold 40px "Microsoft YaHei", sans-serif';
        ctx.fillStyle = '#2c3e50';
        ctx.fillText('Canvas 综合样式示例', 200, 80);

        // 3. 绘制带渐变和阴影的圆形
        ctx.shadowBlur = 15;
        ctx.shadowOffsetX = 8;
        ctx.shadowOffsetY = 8;

        const circleGradient = ctx.createRadialGradient(200, 200, 20, 200, 200, 80);
        circleGradient.addColorStop(0, '#FFD700');
        circleGradient.addColorStop(0.7, '#FF8C00');
        circleGradient.addColorStop(1, '#FF4500');

        ctx.beginPath();
        ctx.arc(200, 200, 80, 0, Math.PI * 2);
        ctx.fillStyle = circleGradient;
        ctx.fill();

        // 白色描边
        ctx.shadowBlur = 10;
        ctx.lineWidth = 5;
        ctx.strokeStyle = '#FFF';
        ctx.stroke();

        // 4. 虚线矩形(带不同阴影)
        ctx.shadowColor = 'rgba(0,100,0,0.5)';
        ctx.shadowBlur = 8;
        ctx.shadowOffsetX = 5;
        ctx.shadowOffsetY = 5;

        ctx.setLineDash([10, 5]);
        ctx.lineWidth = 4;
        ctx.strokeStyle = '#2E8B57';
        ctx.strokeRect(350, 150, 150, 100);

        // 5. 文字样式混合
        ctx.shadowColor = 'rgba(0,0,0,0.2)';
        ctx.shadowBlur = 5;
        ctx.shadowOffsetX = 3;
        ctx.shadowOffsetY = 3;

        ctx.font = '24px Arial';
        ctx.fillStyle = '#8B4513';
        ctx.fillText('丰富多彩的', 380, 200);

        ctx.font = 'italic 28px "Times New Roman", serif';
        ctx.fillStyle = '#FF69B4';
        ctx.fillText('Canvas样式', 380, 240);

        // 6. 图案填充
        ctx.shadowColor = 'transparent';  // 关闭阴影避免影响图案

        const patternCanvas = document.createElement('canvas');
        patternCanvas.width = 20;
        patternCanvas.height = 20;
        const pCtx = patternCanvas.getContext('2d');

        // 绘制方格图案
        pCtx.fillStyle = '#FFA07A';
        pCtx.fillRect(0, 0, 10, 10);
        pCtx.fillRect(10, 10, 10, 10);
        pCtx.fillStyle = '#CD5C5C';
        pCtx.fillRect(10, 0, 10, 10);
        pCtx.fillRect(0, 10, 10, 10);

        const pattern = ctx.createPattern(patternCanvas, 'repeat');
        ctx.fillStyle = pattern;
        ctx.fillRect(550, 150, 100, 100);

        // 7. 线条样式演示
        ctx.shadowColor = 'rgba(0,0,0,0.1)';
        ctx.shadowBlur = 5;
        ctx.shadowOffsetX = 2;
        ctx.shadowOffsetY = 2;

        // 不同线宽和端点
        ctx.lineWidth = 8;
        ctx.strokeStyle = '#3498db';

        ctx.lineCap = 'round';
        ctx.beginPath();
        ctx.moveTo(100, 350);
        ctx.lineTo(250, 350);
        ctx.stroke();

        ctx.lineCap = 'square';
        ctx.beginPath();
        ctx.moveTo(100, 380);
        ctx.lineTo(250, 380);
        ctx.stroke();

        ctx.lineCap = 'butt';
        ctx.beginPath();
        ctx.moveTo(100, 410);
        ctx.lineTo(250, 410);
        ctx.stroke();

        // 8. 虚线动画准备(静态示例)
        ctx.setLineDash([8, 8]);
        ctx.lineWidth = 3;
        ctx.strokeStyle = '#e74c3c';
        ctx.strokeRect(300, 350, 150, 80);

        // 9. 文本度量应用 - 居中文本
        const centerText = "居中文本";
        ctx.font = "20px Arial";
        const textWidth = ctx.measureText(centerText).width;

        ctx.shadowColor = 'rgba(0,0,0,0.3)';
        ctx.shadowBlur = 4;
        ctx.fillStyle = '#16a085';
        ctx.fillText(centerText, 550 - textWidth/2, 400);

        // 10. 图例说明
        ctx.shadowColor = 'transparent';
        ctx.font = '14px Arial';
        ctx.fillStyle = '#333';
        ctx.fillText('径向渐变圆', 150, 300);
        ctx.fillText('虚线矩形', 380, 300);
        ctx.fillText('图案填充', 580, 300);
        ctx.fillText('线条端点样式', 120, 440);
        ctx.fillText('虚线矩形', 320, 450);
        ctx.fillText('度量居中', 520, 420);

        // 重置阴影
        ctx.shadowColor = 'transparent';
        ctx.shadowBlur = 0;
        ctx.shadowOffsetX = 0;
        ctx.shadowOffsetY = 0;
        ctx.setLineDash([]);
    </script>
</body>
</html>
绘制效果:
-
渐变背景
-
带阴影的标题
-
径向渐变圆形(橙色渐变)
-
绿色虚线矩形
-
彩色文字混合
-
方格图案填充
-
三种线条端点样式
-
虚线矩形
-
居中文本(使用度量计算)
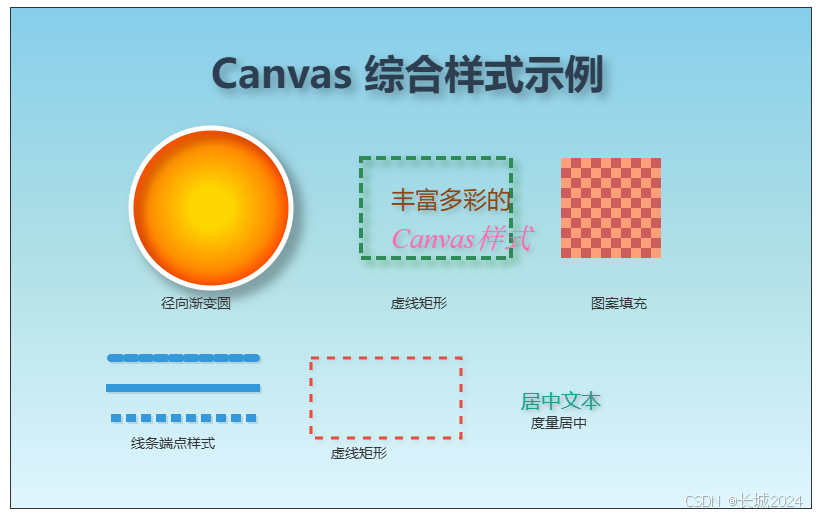
示例分析:这个综合示例展示了如何将多种样式组合使用:
-
阴影增强了立体感
-
渐变创造丰富的色彩过渡
-
图案增加纹理
-
线型样式使线条多样化
-
文本度量实现精确布局
八、样式状态管理
save() 和 restore() - 状态栈
| 项目 | 内容 |
|---|---|
| 属性/方法 | ctx.save()ctx.restore() |
| 含义 | 保存当前绘图状态,恢复之前保存的状态 |
| 词源 | save(保存)、restore(恢复) |
| 保存内容 | 所有样式属性(fillStyle, strokeStyle, lineWidth, shadow等)、变换矩阵、裁剪区域 |
完整示例:
<!DOCTYPE html>
<html>
<head>
    <title>save/restore 状态管理示例</title>
</head>
<body>
    <canvas id="myCanvas" width="700" height="400" style="border:1px solid #ccc;"></canvas>

    <script>
        const canvas = document.getElementById('myCanvas');
        const ctx = canvas.getContext('2d');

        // 初始状态
        ctx.fillStyle = 'red';
        ctx.lineWidth = 5;
        ctx.shadowColor = 'gray';
        ctx.shadowBlur = 5;
        ctx.shadowOffsetX = 3;
        ctx.shadowOffsetY = 3;

        // 保存初始状态 (状态1)
        ctx.save();

        // 修改样式 - 绘制第一个矩形
        ctx.fillStyle = 'blue';
        ctx.lineWidth = 10;
        ctx.shadowColor = 'rgba(0,0,255,0.5)';
        ctx.shadowBlur = 10;

        ctx.fillRect(50, 50, 120, 120);
        ctx.fillStyle = 'black';
        ctx.font = '14px Arial';
        ctx.fillText('蓝色 (修改后)', 50, 30);

        // 保存当前状态 (状态2)
        ctx.save();

        // 再次修改 - 绘制第二个矩形
        ctx.fillStyle = 'green';
        ctx.shadowColor = 'rgba(0,255,0,0.5)';
        ctx.lineWidth = 15;

        ctx.fillRect(200, 50, 120, 120);
        ctx.fillStyle = 'black';
        ctx.fillText('绿色 (再次修改)', 200, 30);

        // 恢复状态2
        ctx.restore();

        // 绘制第三个矩形 - 应该回到蓝色样式
        ctx.fillRect(350, 50, 120, 120);
        ctx.fillStyle = 'black';
        ctx.fillText('恢复后 (蓝色)', 350, 30);

        // 恢复状态1
        ctx.restore();

        // 绘制第四个矩形 - 应该回到红色样式
        ctx.fillRect(500, 50, 120, 120);
        ctx.fillStyle = 'black';
        ctx.fillText('恢复初始 (红色)', 500, 30);

        // 演示嵌套保存的应用场景
        ctx.font = '16px Arial';
        ctx.fillStyle = '#333';
        ctx.fillText('复杂图形中的状态管理:', 50, 220);

        function drawComplexShape(x, y) {
            ctx.save();  // 保存外部状态

            // 设置这个形状特有的样式
            ctx.fillStyle = 'purple';
            ctx.shadowColor = 'purple';
            ctx.shadowBlur = 8;

            // 绘制外框
            ctx.fillRect(x, y, 150, 100);

            ctx.save();  // 保存内部状态

            // 内部元素样式
            ctx.fillStyle = 'yellow';
            ctx.shadowColor = 'orange';
            ctx.shadowBlur = 5;
            ctx.shadowOffsetX = 2;
            ctx.shadowOffsetY = 2;

            // 绘制内部小矩形
            ctx.fillRect(x + 25, y + 25, 40, 40);

            ctx.restore();  // 恢复内部状态

            // 继续使用外部状态(紫色阴影)
            ctx.fillStyle = 'white';
            ctx.fillRect(x + 85, y + 25, 40, 40);

            ctx.restore();  // 恢复外部状态
        }

        // 绘制两个相同的复杂图形
        drawComplexShape(50, 250);
        drawComplexShape(250, 250);
        drawComplexShape(450, 250);

        // 说明
        ctx.font = '14px Arial';
        ctx.fillStyle = 'black';
        ctx.shadowColor = 'transparent';  // 关闭阴影写文字
        ctx.fillText('save/restore 确保每个图形独立', 50, 380);
        ctx.fillText('内部样式不影响外部', 300, 380);
    </script>
</body>
</html>
绘制效果:
-
顶部四个矩形展示状态栈的保存和恢复
-
底部三个复杂图形展示嵌套 save/restore 的应用
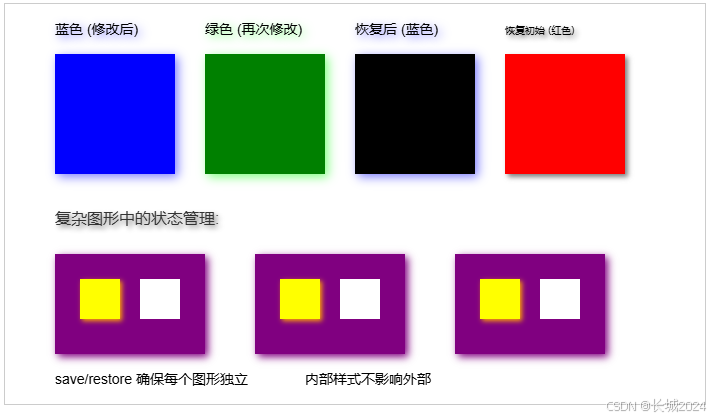
示例分析:
-
save():将当前所有样式属性压入栈中保存
-
restore():弹出栈顶状态,恢复所有样式属性
-
嵌套使用:可以多层嵌套,像栈一样后进先出
-
应用场景:
-
绘制多个独立图形,每个有不同样式
-
临时修改样式,之后恢复
-
在函数中绘制复杂图形,不影响外部环境
-
状态管理的好处:
-
避免手动重置每个属性
-
代码更清晰,减少错误
-
便于封装复用
-
在变换(平移、旋转、缩放)中特别有用
九、性能优化建议
Canvas 性能优化示例:
<!DOCTYPE html>
<html>
<head>
<title>Canvas 性能优化示例</title>
<style>
canvas { border: 1px solid #ccc; margin: 10px; }
.stats { font-family: monospace; }
</style>
</head>
<body>
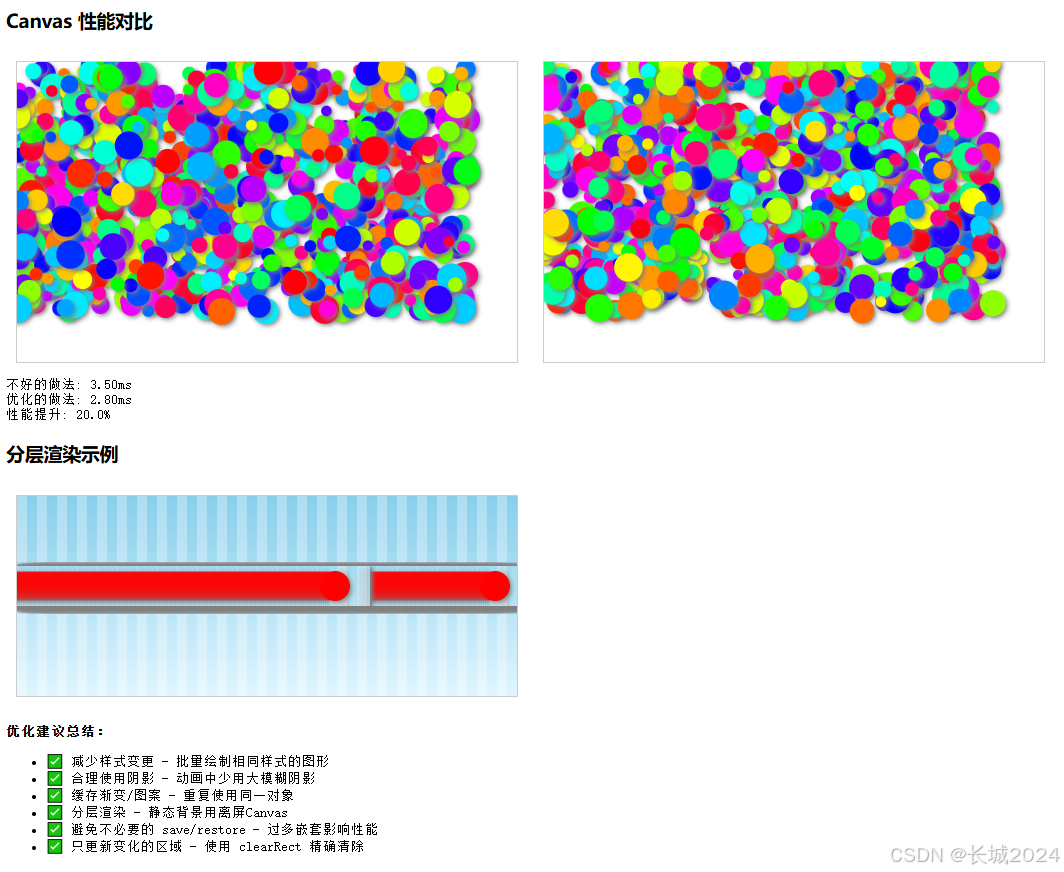
<h3>Canvas 性能对比</h3>
<canvas id="badCanvas" width="500" height="300"></canvas>
<canvas id="goodCanvas" width="500" height="300"></canvas>
<div class="stats" id="stats"></div>
<script>
// 不好的做法:频繁设置样式
function drawBad() {
const canvas = document.getElementById('badCanvas');
const ctx = canvas.getContext('2d');
const startTime = performance.now();
for (let i = 0; i < 1000; i++) {
const x = Math.random() * 450;
const y = Math.random() * 250;
const size = 5 + Math.random() * 10;
// 每次循环都设置样式
ctx.fillStyle = `hsl(${Math.random() * 360}, 100%, 50%)`;
ctx.shadowColor = 'gray';
ctx.shadowBlur = 5;
ctx.shadowOffsetX = 2;
ctx.shadowOffsetY = 2;
ctx.beginPath();
ctx.arc(x, y, size, 0, Math.PI * 2);
ctx.fill();
}
const endTime = performance.now();
return endTime - startTime;
}
// 好的做法:批量设置,减少样式变更
function drawGood() {
const canvas = document.getElementById('goodCanvas');
const ctx = canvas.getContext('2d');
const startTime = performance.now();
// 1. 先设置共用的阴影(只设置一次)
ctx.shadowColor = 'gray';
ctx.shadowBlur = 5;
ctx.shadowOffsetX = 2;
ctx.shadowOffsetY = 2;
// 2. 生成所有点
const points = [];
for (let i = 0; i < 1000; i++) {
points.push({
x: Math.random() * 450,
y: Math.random() * 250,
size: 5 + Math.random() * 10,
color: `hsl(${Math.random() * 360}, 100%, 50%)`
});
}
// 3. 按颜色分组绘制
const colorGroups = {};
points.forEach(p => {
if (!colorGroups[p.color]) {
colorGroups[p.color] = [];
}
colorGroups[p.color].push(p);
});
// 4. 每个颜色只设置一次 fillStyle
for (const color in colorGroups) {
ctx.fillStyle = color;
const group = colorGroups[color];
group.forEach(p => {
ctx.beginPath();
ctx.arc(p.x, p.y, p.size, 0, Math.PI * 2);
ctx.fill();
});
}
const endTime = performance.now();
return endTime - startTime;
}
// 执行并显示结果
setTimeout(() => {
const badTime = drawBad();
const goodTime = drawGood();
document.getElementById('stats').innerHTML = `
不好的做法: ${badTime.toFixed(2)}ms<br>
优化的做法: ${goodTime.toFixed(2)}ms<br>
性能提升: ${((badTime - goodTime) / badTime * 100).toFixed(1)}%
`;
}, 500);
// 分层渲染示例
function layeredRendering() {
const canvas = document.createElement('canvas');
canvas.width = 500;
canvas.height = 200;
const ctx = canvas.getContext('2d');
// 创建背景层(离屏 canvas)
const bgCanvas = document.createElement('canvas');
bgCanvas.width = 500;
bgCanvas.height = 200;
const bgCtx = bgCanvas.getContext('2d');
// 绘制静态背景
const bgGradient = bgCtx.createLinearGradient(0, 0, 0, 200);
bgGradient.addColorStop(0, '#87CEEB');
bgGradient.addColorStop(1, '#E0F6FF');
bgCtx.fillStyle = bgGradient;
bgCtx.fillRect(0, 0, 500, 200);
bgCtx.fillStyle = 'rgba(255,255,255,0.3)';
for (let i = 0; i < 500; i += 20) {
bgCtx.fillRect(i, 0, 10, 200);
}
// 动画循环只更新前景
let frame = 0;
function animate() {
// 清除前景(但保留背景 - 通过绘制背景层实现)
ctx.clearRect(0, 0, 500, 200);
// 绘制背景层
ctx.drawImage(bgCanvas, 0, 0);
// 绘制动态前景
ctx.fillStyle = 'red';
ctx.beginPath();
ctx.arc(100 + frame, 100, 30, 0, Math.PI * 2);
ctx.fill();
frame = (frame + 2) % 300;
// 实际应用中这里会用 requestAnimationFrame 循环
// 这里只是演示概念
}
// 每帧只更新前景,背景不变
setInterval(animate, 30);
return canvas;
}
</script>
<h3>分层渲染示例</h3>
<canvas id="layerCanvas" width="500" height="200" style="border:1px solid #ccc;"></canvas>
<script>
// 简单分层渲染演示
const layerCanvas = document.getElementById('layerCanvas');
const layerCtx = layerCanvas.getContext('2d');
// 绘制静态背景
const bgGradient = layerCtx.createLinearGradient(0, 0, 0, 200);
bgGradient.addColorStop(0, '#87CEEB');
bgGradient.addColorStop(1, '#E0F6FF');
layerCtx.fillStyle = bgGradient;
layerCtx.fillRect(0, 0, 500, 200);
layerCtx.fillStyle = 'rgba(255,255,255,0.3)';
for (let i = 0; i < 500; i += 20) {
layerCtx.fillRect(i, 0, 10, 200);
}
// 动画前景
let frame = 0;
function animateLayer() {
// 清除部分区域(只清除之前小球的位置)
layerCtx.clearRect(frame - 5, 70, 40, 40);
// 恢复背景(绘制背景的局部)
layerCtx.fillStyle = bgGradient;
layerCtx.fillRect(frame - 5, 70, 40, 40);
// 绘制条纹(恢复背景条纹)
for (let i = 0; i < 500; i += 20) {
if (i >= frame - 5 && i <= frame + 35) {
layerCtx.fillStyle = 'rgba(255,255,255,0.3)';
layerCtx.fillRect(i, 70, 10, 40);
}
}
// 绘制新小球
layerCtx.fillStyle = 'red';
layerCtx.shadowColor = 'gray';
layerCtx.shadowBlur = 5;
layerCtx.shadowOffsetX = 2;
layerCtx.shadowOffsetY = 2;
layerCtx.beginPath();
layerCtx.arc(frame, 90, 15, 0, Math.PI * 2);
layerCtx.fill();
frame = (frame + 2) % 480;
requestAnimationFrame(animateLayer);
}
// 启动动画
setTimeout(() => {
animateLayer();
}, 1000);
</script>
<div class="stats">
<p><strong>优化建议总结:</strong></p>
<ul>
<li>✅ 减少样式变更 - 批量绘制相同样式的图形</li>
<li>✅ 合理使用阴影 - 动画中少用大模糊阴影</li>
<li>✅ 缓存渐变/图案 - 重复使用同一对象</li>
<li>✅ 分层渲染 - 静态背景用离屏Canvas</li>
<li>✅ 避免不必要的 save/restore - 过多嵌套影响性能</li>
<li>✅ 只更新变化的区域 - 使用 clearRect 精确清除</li>
</ul>
</div>
</body>
</html>
效果图:
十、总结
Canvas 的绘图样式系统为开发者提供了丰富而灵活的视觉表现手段:
| 类别 | 核心要点 | 主要应用 |
|---|---|---|
| 色彩与透明度 | 颜色值、全局/局部透明 | 基本着色、透明效果 |
| 线条样式 | 粗细、端点、连接、虚线 | 轮廓绘制、边框装饰 |
| 阴影效果 | 颜色、模糊、偏移 | 立体感、光效 |
| 渐变与图案 | 线性/径向渐变、图像填充 | 丰富表面、材质表现 |
| 文本样式 | 字体、对齐、度量 | 文字渲染、排版 |
| 状态管理 | save/restore | 样式隔离、代码简化 |
掌握这些样式,配合路径绘制,你就能在 Canvas 上创造出无限可能的视觉作品。从简单的统计图表到复杂的游戏画面,从数据可视化到艺术创作,Canvas 样式都是你表达创意的重要工具。
学习建议:
-
从基础颜色和线条开始练习
-
逐步尝试渐变和阴影效果
-
用 save/restore 管理复杂图形的样式
-
注意性能优化,特别是在动画中
-
多动手实践,组合使用不同样式


 被折叠的 条评论
为什么被折叠?
被折叠的 条评论
为什么被折叠?
 到【灌水乐园】发言


