


背景:
经常大家做系统性能优化时候,会使用抓取perfetto的trace来进行分析,主要就是分析perfetto上的各个执行块耗时长短,或者说count计数块等。
具体如下图所示:
 这些perfetto上展示的执行块slice,其实一般都是在aosp的原生代码中进行的埋点,简单说看到每个slice其实都是有对应的埋点代码,当然这个代码可能是java,c++等,而且哪怕都是java和c++这种也分为是基于源码编译的java,c++代码还是说基于sdk和ndk的java、c++代码,这些都是有差异的,所以针对这些不同的代码和编译情况今天都进行汇总,给大家展示应该如何在自己程序埋入perfetto的slice。
主要会汇总以下4个部分的代码:
原生开发的两个
Java(platform private)
c/c++(platform private)
SDK和NDK开发的两个
Java(SDK)
c/c++(NDK)
perfetto中trace设置的方法汇总
普通线程执行的同步块
Thread-scoped synchronous slices
最为常见的一种slice设置方法,主要就是在要执行体的前后加trace埋点接口方法既可以
Java(platform private)
比如framework开发可以修改原生的java源码情况,就可以使用该方法
代码参考:
frameworks/base/core/java/android/os/Trace.java
案例
import android.os.Trace;
import static android.os.Trace.TRACE_TAG_AUDIO;

public void playSound(String path) {
  Trace.traceBegin(TRACE_TAG_AUDIO, "PlaySound");
  try {
    // Measure the time it takes to open the sound sevice.
    Trace.traceBegin(TRACE_TAG_AUDIO, "OpenAudioDevice");
    try {
      SoundDevice dev = openAudioDevice();
    } finally {
      Trace.traceEnd();
    }

    for(...) {
      Trace.traceBegin(TRACE_TAG_AUDIO, "SendBuffer");
      try {
        sendAudioBuffer(dev, ...)
      } finally {
        Trace.traceEnd();
      }
      // Log buffer usage statistics in the trace.
      Trace.setCounter(TRACE_TAG_AUDIO, "SndBufferUsage", dev->buffer)
      ...
    }
  } finally {
    Trace.traceEnd();  // End of the root PlaySound slice
  }
}
c++(platform private)
比如framework开发可以修改原生的c++源码情况,就可以使用该方法
案例
// ATRACE_TAG is the category that will be used in this translation unit.
// Pick one of the categories defined in Android's
// system/core/libcutils/include/cutils/trace.h
#define ATRACE_TAG ATRACE_TAG_AUDIO

#include <cutils/trace.h>

void PlaySound(const char* path) {
  ATRACE_BEGIN("PlaySound");

  // Measure the time it takes to open the sound sevice.
  ATRACE_BEGIN("OpenAudioDevice");
  struct snd_dev* dev = OpenAudioDevice();
  ATRACE_END();

  for(...) {
    ATRACE_BEGIN("SendBuffer");
    SendAudioBuffer(dev, ...)
    ATRACE_END();

    // Log buffer usage statistics in the trace.
    ATRACE_INT("SndBufferUsage", dev->buffer);
    ...
  }

  ATRACE_END();  // End of the root PlaySound slice
}
Java(SDK)
比如普通的app开发就需要使用该方法
参考: https://developer.android.com/reference/android/os/Trace
案例
// You cannot choose a tag/category when using the SDK API.
// Implicitly all calls use the ATRACE_TAG_APP tag.
import android.os.Trace;

public void playSound(String path) {
  try {
    Trace.beginSection("PlaySound");

    // Measure the time it takes to open the sound sevice.
    Trace.beginSection("OpenAudioDevice");
    try {
      SoundDevice dev = openAudioDevice();
    } finally {
      Trace.endSection();
    }

    for(...) {
      Trace.beginSection("SendBuffer");
      try {
        sendAudioBuffer(dev, ...)
      } finally {
        Trace.endSection();
      }

      // Log buffer usage statistics in the trace.
      Trace.setCounter("SndBufferUsage", dev->buffer)
      ...
    }
  } finally {
    Trace.endSection();  // End of the root PlaySound slice
  }
}
c/c++(NDK)
比如普通的app的NDK开发,就需要使用该方法
参考:https://developer.android.com/ndk/reference/group/tracing
案例
// You cannot choose a tag/category when using the NDK API.
// Implicitly all calls use the ATRACE_TAG_APP tag.
#include <android/trace.h>

void PlaySound(const char* path) {
  ATrace_beginSection("PlaySound");

  // Measure the time it takes to open the sound sevice.
  ATRACE_BEGIN("OpenAudioDevice");
  struct snd_dev* dev = OpenAudioDevice();
  ATrace_endSection();

  for(...) {
    ATrace_beginSection("SendBuffer");
    SendAudioBuffer(dev, ...)
    ATrace_endSection();

    // Log buffer usage statistics in the trace.
    ATrace_setCounter("SndBufferUsage", dev->buffer)
    ...
  }

  ATrace_endSection();  // End of the root PlaySound slice
}
计数块
Counters
主要用于一些计数相关的统计,比如Input分析时候需要IQ,OQ,WQ这些值。
数值的改变可以任何线程调用触发对Counter值的改变
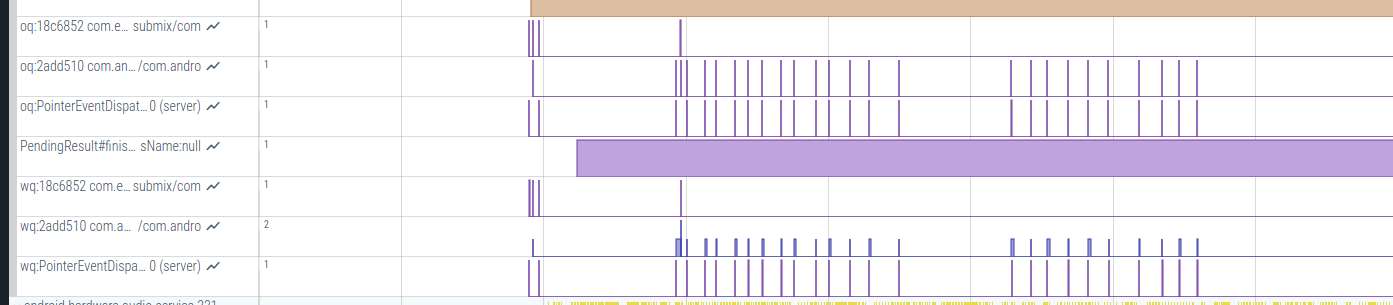
那么这些计数块如何在程序中进行埋点设置呢?
Java(platform private)
使用案例
import android.os.Trace;
import static android.os.Trace.TRACE_TAG_AUDIO;

public void playSound(String path) {
  SoundDevice dev = openAudioDevice();
  for(...) {
    sendAudioBuffer(dev, ...)
    ...
    // Log buffer usage statistics in the trace.
    Trace.setCounter(TRACE_TAG_AUDIO, "SndBufferUsage", dev->buffer.used_bytes)
  }
}
c++(platform private)
使用案例
// ATRACE_TAG is the category that will be used in this translation unit.
// Pick one of the categories defined in Android's
// system/core/libcutils/include/cutils/trace.h
#define ATRACE_TAG ATRACE_TAG_AUDIO

#include <cutils/trace.h>

void PlaySound(const char* path) {
  struct snd_dev* dev = OpenAudioDevice();

  for(...) {
    SendAudioBuffer(dev, ...)

    // Log buffer usage statistics in the trace.
    ATRACE_INT("SndBufferUsage", dev->buffer.used_bytes);
  }
}
Java(SDK)
使用案例
// You cannot choose a tag/category when using the SDK API.
// Implicitly all calls use the ATRACE_TAG_APP tag.
import android.os.Trace;

public void playSound(String path) {
  SoundDevice dev = openAudioDevice();

  for(...) {
    sendAudioBuffer(dev, ...)

    // Log buffer usage statistics in the trace.
    Trace.setCounter("SndBufferUsage", dev->buffer.used_bytes)
  }
}
c/c++(NDK)
使用案例
// You cannot choose a tag/category when using the NDK API.
// Implicitly all calls use the ATRACE_TAG_APP tag.
#include <android/trace.h>

void PlaySound(const char* path) {
  struct snd_dev* dev = OpenAudioDevice();

  for(...) {
    SendAudioBuffer(dev, ...)

    // Log buffer usage statistics in the trace.
    ATrace_setCounter("SndBufferUsage", dev->buffer.used_bytes)
  }
}
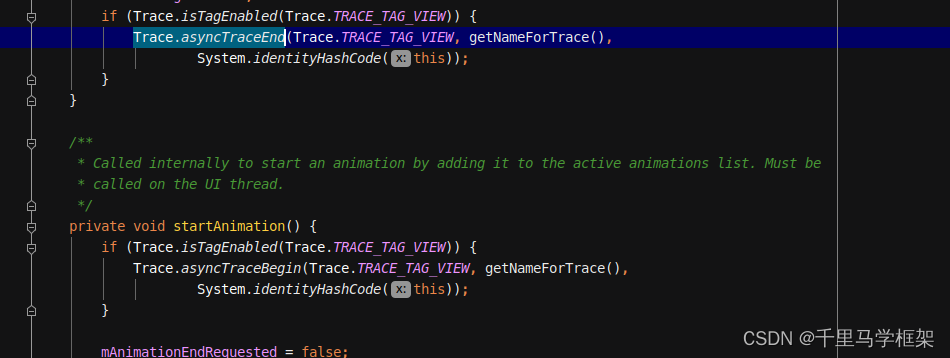
异步块
上面最开始有介绍同步块,也就是必须在一个线程中执行,Android其实是支持异步trace的,源码中应用的比较多,在代码中打上异步trace就不需要保证在一个线程之中,也不要求一定要把一段代码包起来,这种可能平时自己开发时候使用较少,下面以一个案例说明。
跟踪一个动画的开始与结束,可以看出它的执行时长,和同步执行那种单线程完全不一样。
 对应的代码:
Java(platform private)
使用案例
import android.os.Trace;
import static android.os.Trace.TRACE_TAG_NETWORK;

public class AudioRecordActivity extends Activity {
  private AtomicInteger lastJobId = new AtomicInteger(0);
  private static final String TRACK_NAME = "User Journeys";

    ...
    button.setOnClickListener(v -> {
        int jobId = lastJobId.incrementAndGet();
        Trace.asyncTraceForTrackBegin(TRACE_TAG_NETWORK, TRACK_NAME, "Load profile", jobId);

        // Simulate async work (e.g., a network request)
        new Thread(() -> {
            Thread.sleep(800); // emulate latency
            Trace.asyncTraceForTrackEnd(TRACE_TAG_NETWORK, TRACK_NAME, jobId);
        }).start();
    });
    ...
}
c++(platform private)
使用案例
// ATRACE_TAG is the category that will be used in this translation unit.
// Pick one of the categories defined in Android's
// system/core/libcutils/include/cutils/trace.h
#define ATRACE_TAG ATRACE_TAG_NETWORK

#include <cutils/trace.h>
#include <thread>
#include <chrono>
#include <atomic>

static constexpr const char* kTrackName = "User Journeys";

void onButtonClicked() {
  static std::atomic<int> lastJobId{0};

  int jobId = ++lastJobId;
  ATRACE_ASYNC_FOR_TRACK_BEGIN(kTrackName, "Load profile", jobId);

  std::thread([jobId]() {
      std::this_thread::sleep_for(std::chrono::milliseconds(800));
      ATRACE_ASYNC_FOR_TRACK_END(kTrackName, jobId);
  }).detach();
}
Java(SDK)
使用案例
// You cannot choose a tag/category when using the SDK API.
// Implicitly all calls use the ATRACE_TAG_APP tag.
import android.os.Trace;

public class AudioRecordActivity extends Activity {
  private AtomicInteger lastJobId = new AtomicInteger(0);

    ...
    button.setOnClickListener(v -> {
        int jobId = lastJobId.incrementAndGet();
        Trace.beginAsyncSection("Load profile", jobId);

        // Simulate async work (e.g., a network request)
        new Thread(() -> {
            Thread.sleep(800); // emulate latency
             Trace.endAsyncSection("Load profile", jobId);
        }).start();
    });
    ...
}
c/c++(NDK)
使用案例
// You cannot choose a tag/category when using the NDK API.
// Implicitly all calls use the ATRACE_TAG_APP tag.
#include <android/trace.h>
#include <thread>
#include <chrono>
#include <atomic>

void onButtonClicked() {
  static std::atomic<int> lastJobId{0};

  int jobId = ++lastJobId;
  ATrace_beginAsyncSection("Load profile", jobId);

  std::thread([jobId]() {
      std::this_thread::sleep_for(std::chrono::milliseconds(800));
      ATrace_endAsyncSection("Load profile", jobId);
  }).detach();
}
上面就是针对perfetto/systrace进行埋点相关slice的详细介绍,更多framework实战开发,可以关注下面“千里马学框架”


 436
436

 被折叠的 条评论
为什么被折叠?
被折叠的 条评论
为什么被折叠?
 到【灌水乐园】发言


