


 本文介绍了如何使用Spring Security实现同一账号只能在一个地方登录的功能。通过四个关键类的配置和交互,实现了登录时踢出其他已登录的相同账号,并探讨了如何进行登录验证和个性化提示的扩展可能性。
Date: 2016-09-14
Author: Kagula
Envronment:
[1]JDK 1.7.0_79
[2]apache-tomcat-7.0.68
[3]Eclipse Mars2
Introduction:
据《spring security的原理及教程》能实现
[a]踢出其它地方登录的这个帐号。
[b]或者已经登录了,就不允许再登录。
理论部份参考资料[1]《spring security的原理及教程》
这里只贴代码
Content:
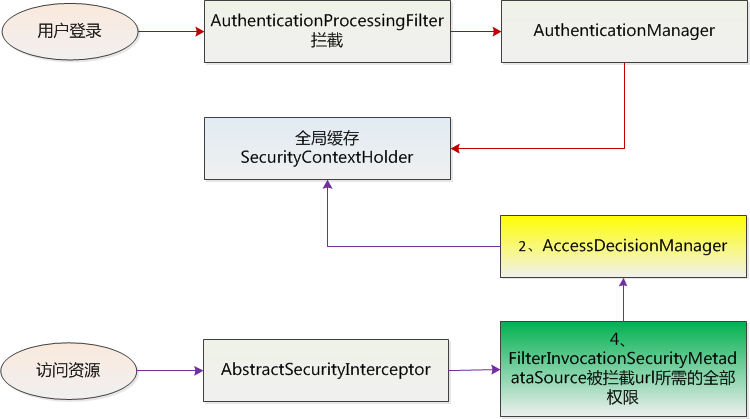
控制流
四个类之间的相互依赖
示例由6个class、6个jsp、三个配置文件组成
web.xml
<?xml version="1.0" encoding="UTF-8"?>
<web-app xmlns:xsi="http://www.w3.org/2001/XMLSchema-instance"
    xmlns="http://java.sun.com/xml/ns/javaee"
    xsi:schemaLocation="http://java.sun.com/xml/ns/javaee http://java.sun.com/xml/ns/javaee/web-app_3_0.xsd"
    id="schedule-console" version="3.0">

  <display-name>Archetype Created Web Application</display-name>

  <!--加载Spring XML配置文件 -->
  <context-param>
  	<param-name>contextConfigLocation</param-name>
    <param-value> classpath:securityConfig.xml</param-value>
  </context-param>

  <!-- Spring Secutiry3.1的过滤器链配置 -->
  <filter>
    <filter-name>springSecurityFilterChain</filter-name>
    <filter-class>org.springframework.web.filter.DelegatingFilterProxy</filter-class>
  </filter>

  <filter-mapping>
  	<filter-name>springSecurityFilterChain</filter-name>
    <url-pattern>/*</url-pattern>
  </filter-mapping>

  <!-- Spring 容器启动监听器 -->
  <listener>
    <listener-class>org.springframework.web.context.ContextLoaderListener</listener-class>
  </listener>

  <!--系统欢迎页面 -->
  <welcome-file-list>
    <welcome-file>index.jsp</welcome-file>
  </welcome-file-list>

</web-app>
pom.xml
<project xmlns="http://maven.apache.org/POM/4.0.0" xmlns:xsi="http://www.w3.org/2001/XMLSchema-instance"
  xsi:schemaLocation="http://maven.apache.org/POM/4.0.0 http://maven.apache.org/maven-v4_0_0.xsd">
  <modelVersion>4.0.0</modelVersion>
  <groupId>com.nuoke</groupId>
  <artifactId>testSpringSecurity</artifactId>
  <packaging>war</packaging>
  <version>0.0.1-SNAPSHOT</version>
  <name>testSpringSecurity Maven Webapp</name>
  <url>http://maven.apache.org</url>

  <properties>
	<project.build.sourceEncoding>UTF-8</project.build.sourceEncoding>
	<project.reporting.outputEncoding>UTF-8</project.reporting.outputEncoding>
	<spring.version>3.1.2.RELEASE</spring.version>
  </properties>

  <dependencies>
    <dependency>
		<groupId>org.springframework</groupId>
		<artifactId>spring-core</artifactId>
		<version>${spring.version}</version>
		<!-- <exclusions> <exclusion> <groupId>commons-logging</groupId> <artifactId>commons-logging</artifactId>
			</exclusion> </exclusions> -->
	</dependency>

	<dependency>
		<groupId>org.springframework</groupId>
		<artifactId>spring-beans</artifactId>
		<version>${spring.version}</version>
	</dependency>

	<dependency>
		<groupId>org.springframework</groupId>
		<artifactId>spring-webmvc</artifactId>
		<version>${spring.version}</version>
	</dependency>

	<dependency>
      <groupId>org.springframework.security</groupId>
      <artifactId>spring-security-core</artifactId>
      <version>${spring.version}</version>
    </dependency>

    <dependency>
      <groupId>org.springframework.security</groupId>
      <artifactId>spring-security-web</artifactId>
      <version>${spring.version}</version>
	</dependency>

	<dependency>
      <groupId>org.springframework.security</groupId>
      <artifactId>spring-security-config</artifactId>
      <version>${spring.version}</version>
    </dependency>

    <dependency>
      <groupId>org.springframework.security</groupId>
      <artifactId>spring-security-taglibs</artifactId>
      <version>${spring.version}</version>
    </dependency>
  </dependencies>

  <build>
    <finalName>testSpringSecurity</finalName>
     <plugins>
       <!--  为了解决“Dynamic Web Module 3.0 requires Java 1.6 or newer.”错误需要下面的plugin -->
        <plugin>
          <groupId>org.apache.maven.plugins</groupId>
          <artifactId>maven-compiler-plugin</artifactId>
          <version>3.0</version>
          <configuration>
              <source>1.7</source>
              <target>1.7</target>
          </configuration>
        </plugin>
    </plugins>
  </build>
</project>
securityConfig.xml
这个文件新建的时候放在“src/main/resouces”节点下
<?xml version="1.0" encoding="UTF-8"?>
<b:beans xmlns="http://www.springframework.org/schema/security"
    xmlns:b="http://www.springframework.org/schema/beans"
    xmlns:xsi="http://www.w3.org/2001/XMLSchema-instance"
    xsi:schemaLocation="http://www.springframework.org/schema/beans http://www.springframework.org/schema/beans/spring-beans-3.0.xsd
                        http://www.springframework.org/schema/security http://www.springframework.org/schema/security/spring-security-3.1.xsd">

  <!--登录页面不过滤 -->
    <http pattern="/login.jsp" security="none" />
    <http access-denied-page="/accessDenied.jsp">
        <form-login login-page="/login.jsp" />
        <!--访问/admin.jsp资源的用户必须具有ROLE_ADMIN的权限 -->
        <!-- <intercept-url pattern="/admin.jsp" access="ROLE_ADMIN" /> -->
        <!--访问/**资源的用户必须具有ROLE_USER的权限 -->
        <!-- <intercept-url pattern="/**" access="ROLE_USER" /> -->
        <session-management invalid-session-url="/sessionexpired.jsp">
            <!-- 必须要有invalid-session-url属性,否则不会踢掉原来的登录  -->
            <!-- 被踢掉的用户再发出请求会转到/sessionexpired.jsp页面  -->
            <concurrency-control max-sessions="1"
                error-if-maximum-exceeded="false"/>
                <!-- error-if-maximum-exceeded属性为false的话,踢掉原来的登录, max-sessions默认为1 -->
                  <!-- expired-url="/kickout.jsp" 不设置的话会提示This session has been expired (possibly due to multiple concurrent logins being attempted as the same user). -->
                    <!-- 然后再刷新的话,转到/sessionexpired.jsp -->
                  <!-- expired-url="/kickout.jsp" 设置的话会转到/sessionexpired.jsp-->
                <!-- error-if-maximum-exceeded属性为true的话,如果帐号已经登录,在其它地方这个帐号就登录不了了 -->
        </session-management>
        <!--增加一个filter,这点与 Acegi是不一样的,不能修改默认的filter了, 这个filter位于FILTER_SECURITY_INTERCEPTOR之前 -->
        <custom-filter ref="myFilter" before="FILTER_SECURITY_INTERCEPTOR" />
    </http>
    <!--一个自定义的filter,必须包含 authenticationManager,accessDecisionManager,securityMetadataSource三个属性,
        我们的所有控制将在这三个类中实现,解释详见具体配置 -->
    <b:bean id="myFilter"
        class="com.nuoke.MyFilterSecurityInterceptor">
        <b:property name="authenticationManager" ref="authenticationManager" />
        <b:property name="accessDecisionManager" ref="myAccessDecisionManagerBean" />
        <b:property name="securityMetadataSource" ref="securityMetadataSource" />
    </b:bean>

    <!--验证配置,认证管理器,实现用户认证的入口,主要实现UserDetailsService接口即可 -->
    <authentication-manager alias="authenticationManager">
        <authentication-provider user-service-ref="myUserDetailService">
        <!--如果用户的密码采用加密的话 <password-encoder hash="md5" /> -->
        </authentication-provider>
    </authentication-manager>

    <!--在这个类中,你就可以从数据库中读入用户的密码,角色信息,是否锁定,账号是否过期等 -->
    <b:bean id="myUserDetailService" class="com.nuoke.MyUserDetailService" />

    <!--访问决策器,决定某个用户具有的角色,是否有足够的权限去访问某个资源 -->
    <b:bean id="myAccessDecisionManagerBean"
        class="com.nuoke.MyAccessDecisionManager">
    </b:bean>

    <!--资源数据定义,将所有的资源和权限对应关系建立起来,即定义某一资源可以被哪些角色访问 -->
    <b:bean id="securityMetadataSource"
        class="com.nuoke.MyInvocationSecurityMetadataSource" />

 </b:beans>
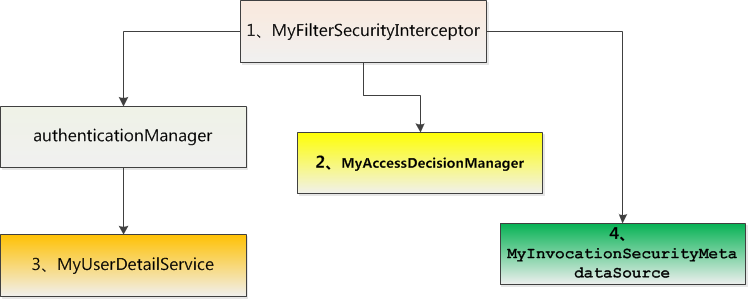
java文件有6个,其中前面四个是关键。
MyAccessDecisionManager.java
package com.nuoke;

import java.util.Collection;
import java.util.Iterator;

import org.springframework.security.access.AccessDecisionManager;
import org.springframework.security.access.AccessDeniedException;
import org.springframework.security.access.ConfigAttribute;
import org.springframework.security.access.SecurityConfig;
import org.springframework.security.authentication.InsufficientAuthenticationException;
import org.springframework.security.core.Authentication;
import org.springframework.security.core.GrantedAuthority;

public class MyAccessDecisionManager implements AccessDecisionManager {
    //检查用户是否够权限访问资源
    //参数authentication是从spring的全局缓存SecurityContextHolder中拿到的,里面是用户的权限信息
    //参数object是url
    //参数configAttributes所需的权限
	@Override
	public void decide(Authentication authentication,
			Object object,
			Collection<ConfigAttribute> configAttributes)
			throws AccessDeniedException, InsufficientAuthenticationException
	{
        if(configAttributes == null){
            return;
        }

        Iterator<ConfigAttribute> ite = configAttributes.iterator();
        while(ite.hasNext()){
            ConfigAttribute ca = ite.next();
            String needRole=((SecurityConfig)ca).getAttribute();
            for(GrantedAuthority ga : authentication.getAuthorities()){
                if(needRole.equals(ga.getAuthority())){
                    return;
                }
            }
        }

        //注意:执行这里,后台是会抛异常的,但是界面会跳转到所配的access-denied-page页面
        throw new AccessDeniedException("no right");
	}

    public boolean supports(ConfigAttribute attribute) {
        return true;
    }

	@Override
	public boolean supports(Class<?> arg0) {
		return true;
	}
}
MyFilterSecurityInterceptor.java
package com.nuoke;

import java.io.IOException;

import javax.servlet.Filter;
import javax.servlet.FilterChain;
import javax.servlet.FilterConfig;
import javax.servlet.ServletException;
import javax.servlet.ServletRequest;
import javax.servlet.ServletResponse;

import org.springframework.security.access.SecurityMetadataSource;
import org.springframework.security.access.intercept.AbstractSecurityInterceptor;
import org.springframework.security.access.intercept.InterceptorStatusToken;
import org.springframework.security.web.FilterInvocation;
import org.springframework.security.web.access.intercept.FilterInvocationSecurityMetadataSource;

/*
 * 继承AbstractSecurityInterceptor、实现Filter是必须的。
      首先,登陆后,每次访问资源都会被这个拦截器拦截,会执行doFilter这个方法,
      这个方法调用了invoke方法,其中fi断点显示是一个url(可能重写了toString方法吧,但是里面还有一些方法的),最重要的是beforeInvocation这个方法,
      它首先会调用MyInvocationSecurityMetadataSource类的getAttributes方法获取被拦截url所需的权限,
  then调用MyAccessDecisionManager类decide方法判断用户是否够权限。弄完这一切就会执行下一个拦截器.
 */
public class MyFilterSecurityInterceptor extends AbstractSecurityInterceptor  implements Filter {
    //配置文件注入
    private FilterInvocationSecurityMetadataSource securityMetadataSource;

    //登陆后,每次访问资源都通过这个拦截器拦截
    public void doFilter(ServletRequest request, ServletResponse response, FilterChain chain)
    		throws IOException, ServletException {
        FilterInvocation fi = new FilterInvocation(request, response, chain);
        invoke(fi);
    }

    public FilterInvocationSecurityMetadataSource getSecurityMetadataSource() {
        return this.securityMetadataSource;
    }

	@Override
	public Class<? extends Object> getSecureObjectClass() {
		return FilterInvocation.class;
	}

    public void invoke(FilterInvocation fi) throws IOException, ServletException {
        //fi里面有一个被拦截的url
        //里面调用MyInvocationSecurityMetadataSource的getAttributes(Object object)这个方法获取fi对应的所有权限
        //再调用MyAccessDecisionManager的decide方法来校验用户的权限是否足够
        InterceptorStatusToken token = super.beforeInvocation(fi);
        try {
            //执行下一个拦截器
            fi.getChain().doFilter(fi.getRequest(), fi.getResponse());
        } finally {
            super.afterInvocation(token, null);
        }
    }

    public SecurityMetadataSource obtainSecurityMetadataSource() {
        return this.securityMetadataSource;
    }

    public void setSecurityMetadataSource(
            FilterInvocationSecurityMetadataSource newSource)
    {
        this.securityMetadataSource = newSource;
    }

    public void destroy() {

    }

    public void init(FilterConfig arg0) throws ServletException {
    }
}
MyInvocationSecurityMetadataSource.java
package com.nuoke;

import java.util.ArrayList;
import java.util.Collection;
import java.util.HashMap;
import java.util.Iterator;
import java.util.Map;

import org.springframework.security.access.ConfigAttribute;
import org.springframework.security.access.SecurityConfig;
import org.springframework.security.web.FilterInvocation;
import org.springframework.security.web.access.intercept.FilterInvocationSecurityMetadataSource;

public class MyInvocationSecurityMetadataSource
	implements FilterInvocationSecurityMetadataSource {
	private UrlMatcher urlMatcher = new AntUrlPathMatcher();
    private static Map<String, Collection<ConfigAttribute>> resourceMap = null;

    //tomcat启动时实例化一次
    public MyInvocationSecurityMetadataSource() {
    	//这个类的实例化只在web服务器启动时调用一次,那就是说loadResourceDefine方法只会调用一次
    	//所以只适合页面的权限不再更改的情况。
        loadResourceDefine();
    }

    //tomcat开启时加载一次,加载所有url和权限(或角色)的对应关系
    private void loadResourceDefine() {
        resourceMap = new HashMap<String, Collection<ConfigAttribute>>();

        //需要ROLE_USER角色登录后才能访问的页面。
        Collection<ConfigAttribute> atts = new ArrayList<ConfigAttribute>();
        ConfigAttribute ca = new SecurityConfig("ROLE_USER");
        atts.add(ca);
        resourceMap.put("/index.jsp", atts);
        resourceMap.put("/admin.jsp", atts);

        //任何用户都没有进入/other.jsp权限
        Collection<ConfigAttribute> attsno =new ArrayList<ConfigAttribute>();
        ConfigAttribute cano = new SecurityConfig("ROLE_NO");
        attsno.add(cano);
        resourceMap.put("/accessDenied.jsp", attsno);

        //当url有交集时,就有可能漏掉一些角色
    }

    //参数是要访问的url,返回这个url对于的所有权限(或角色)
    public Collection<ConfigAttribute> getAttributes(Object object)
    		throws IllegalArgumentException {
        // 将参数转为url
        String url = ((FilterInvocation)object).getRequestUrl();
        Iterator<String> ite = resourceMap.keySet().iterator();
        while (ite.hasNext()) {
            String resURL = ite.next();
            if (urlMatcher.pathMatchesUrl(resURL, url)) {
                return resourceMap.get(resURL);
            }
        }
        return null;
    }

	@Override
	public boolean supports(Class<?> arg0) {
		return true;
	}

	public Collection<ConfigAttribute> getAllConfigAttributes() {
        return null;
    }
}
MyUserDetailService.java
package com.nuoke;

import java.util.ArrayList;
import java.util.Collection;

import org.springframework.dao.DataAccessException;
import org.springframework.security.core.GrantedAuthority;
import org.springframework.security.core.authority.GrantedAuthorityImpl;
import org.springframework.security.core.authority.SimpleGrantedAuthority;
import org.springframework.security.core.userdetails.User;
import org.springframework.security.core.userdetails.UserDetails;
import org.springframework.security.core.userdetails.UserDetailsService;
import org.springframework.security.core.userdetails.UsernameNotFoundException;

public class MyUserDetailService implements UserDetailsService {
    //登陆验证时,通过username获取用户的所有权限信息,
    //并返回User放到spring的全局缓存SecurityContextHolder中,以供授权器使用
    public UserDetails loadUserByUsername(String username)
            throws UsernameNotFoundException, DataAccessException {
        Collection<GrantedAuthority> auths=new ArrayList<GrantedAuthority>();

        SimpleGrantedAuthority auth2=new SimpleGrantedAuthority("ROLE_ADMIN");
        SimpleGrantedAuthority auth1=new SimpleGrantedAuthority("ROLE_USER");

        if(username.equals("admin")){
            auths=new ArrayList<GrantedAuthority>();
            auths.add(auth1);
            auths.add(auth2);
        }

        //第二个参数是密码。
        User user = new User(username, "123", true, true, true, true, auths);
        return user;
   }
}
UrlMatcher.java
package com.nuoke;

public interface UrlMatcher{
    Object compile(String paramString);
    boolean pathMatchesUrl(Object paramObject, String paramString);
    String getUniversalMatchPattern();
    boolean requiresLowerCaseUrl();
}
AntUrlPathMatcher.java
package com.nuoke;

import org.springframework.util.AntPathMatcher;
import org.springframework.util.PathMatcher;

public class AntUrlPathMatcher implements UrlMatcher {
	private boolean requiresLowerCaseUrl;
	private PathMatcher pathMatcher;

	public AntUrlPathMatcher()   {
		this(true);
	}

    public AntUrlPathMatcher(boolean requiresLowerCaseUrl)
    {
    	this.requiresLowerCaseUrl = true;
    	this.pathMatcher = new AntPathMatcher();
    	this.requiresLowerCaseUrl = requiresLowerCaseUrl;
    }

    public Object compile(String path) {
    	if (this.requiresLowerCaseUrl) {
    		return path.toLowerCase();
    	}
    	return path;
    }

    public void setRequiresLowerCaseUrl(boolean requiresLowerCaseUrl){
    	this.requiresLowerCaseUrl = requiresLowerCaseUrl;
    }

    public boolean pathMatchesUrl(Object path, String url) {
    	if (("/**".equals(path)) || ("**".equals(path))) {
    		return true;
    	}
    	return this.pathMatcher.match((String)path, url);
    }

    public String getUniversalMatchPattern() {
    	return"/**";
    }

    public boolean requiresLowerCaseUrl() {
    	return this.requiresLowerCaseUrl;
    }

    public String toString() {
    	return super.getClass().getName() + "[requiresLowerCase='"+ this.requiresLowerCaseUrl + "']";
    }
}
jsp文件共有6个。
accessDenied.jsp
<%@page language="java" import="java.util.*" pageEncoding="utf-8"%>
<!DOCTYPEHTMLPUBLIC"-//W3C//DTD HTML 4.01 Transitional//EN">
<html>
<head>
<title>My JSP 'accessDenied.jsp' starting page</title>
</head>
<body>
    accessDenied.
    <br>
</body>
</html>
admin.jsp
<%@page language="java" import="java.util.*,java.text.*" pageEncoding="utf-8"%>
<!DOCTYPEHTMLPUBLIC"-//W3C//DTD HTML 4.01 Transitional//EN">
<html>
<head>
<title>My JSP 'admin.jsp' starting page</title>
</head>
<body>
    欢迎来到管理员页面.
    <br>
        <%
    Date date = new Date();
 	SimpleDateFormat t = new SimpleDateFormat("yyyy-MM-dd HH:mm:ss");
 	String time = t.format(date);
	%>
	<br/>
	当前时间:<%= time %>
</body>
</html>
index.jsp
<%@page language="java" import="java.util.*,java.text.*" pageEncoding="UTF-8"%>
<%@ page contentType="text/html; charset=utf-8"%>
<%@taglib prefix="sec" uri="http://www.springframework.org/security/tags"%>
<!DOCTYPEHTMLPUBLIC"-//W3C//DTD HTML 4.01 Transitional//EN">

<html>

<head>

<title>My JSP 'index.jsp' starting page</title>
</head>

<body>
      <h3>这是首页</h3>欢迎
    <sec:authentication property ="name"/> !

    <br>
    <a href="admin.jsp">进入admin页面</a>
    <a href="other.jsp">进入其它页面</a>

    <%
    Date date = new Date();
 	SimpleDateFormat t = new SimpleDateFormat("yyyy-MM-dd HH:mm:ss");
 	String time = t.format(date);
	%>
	<br/>
	当前时间:<%= time %>
</body>


</html>
login.jsp
<%@page language="java" import="java.util.*" pageEncoding="UTF-8"%>
<!DOCTYPEhtmlPUBLIC"-//W3C//DTD HTML 4.01 Transitional//EN">
<html>
<head>
<title>登录</title>
</head>
<body>
    <form action ="j_spring_security_check" method="POST">
    <table>
        <tr>
            <td>用户:</td>
            <td><input type ='text' name='j_username'></td>
        </tr>
        <tr>
            <td>密码:</td>
            <td><input type ='password' name='j_password'></td>
        </tr>
        <tr>
            <td><input name ="reset" type="reset"></td>
            <td><input name ="submit" type="submit"></td>
        </tr>
    </table>
    </form>
</body>
</html>
other.jsp
<%@ page language="java" import="java.util.*" pageEncoding="UTF-8"%>
<%
String path = request.getContextPath();
String basePath = request.getScheme()+"://"+request.getServerName()+":"+request.getServerPort()+path+"/";
%>

<!DOCTYPE HTML PUBLIC "-//W3C//DTD HTML 4.01 Transitional//EN">
<html>
  <head>
    <base href="<%=basePath%>">

    <title>My JSP 'other.jsp' starting page</title>

    <meta http-equiv="pragma" content="no-cache">
    <meta http-equiv="cache-control" content="no-cache">
    <meta http-equiv="expires" content="0">
    <meta http-equiv="keywords" content="keyword1,keyword2,keyword3">
    <meta http-equiv="description" content="This is my page">
    <!--
    <link rel="stylesheet" type="text/css" href="styles.css">
    -->

  </head>

  <body>
    <h3>这里是Other页面,不需要任何权限就可以访问</h3>
  </body>
</html>
sessionexpired.jsp
<%@ page language="java" import="java.util.*" pageEncoding="UTF-8"%>
<%
String path = request.getContextPath();
String basePath = request.getScheme()+"://"+request.getServerName()+":"+request.getServerPort()+path+"/";
%>

<!DOCTYPE HTML PUBLIC "-//W3C//DTD HTML 4.01 Transitional//EN">
<html>
  <head>
    <base href="<%=basePath%>">

    <title>session过期</title>
  </head>

  <body>
    <h3>session过期</h3>
  </body>
</html>
备注:
Q 如何在页面上判断是否登录?spring security3.1
spring security登录成功后,会把用户名信息保存在保存在session里面,
其中key为:SPRING_SECURITY_LAST_USERNAME,那么你只需要判断session中这个key是否有值即可
遗留问题
[a]但是当前登录如何知道把别人踢出了?
[b]被踢出的提示信息,如何个性化?
[c]如何实现自己的login验证?
这三个问题准备下次解决。
参考资料:
[1]spring security的原理及教程
http://blog.csdn.net/u012367513/article/details/38866465
[2]SpringSecurity3.1.2控制一个账户同时只能登录一次
http://aokunsang.iteye.com/blog/1944111
[3]自定义验证方法
http://www.cnblogs.com/huangjiandong2012/p/4040030.html


 被折叠的 条评论
为什么被折叠?
被折叠的 条评论
为什么被折叠?
 到【灌水乐园】发言


