


做Java开发的,性能测试一般想到的就是JMeter。但说实话,很多场景用JMeter太重了——你得单独安装、配环境、设计测试计划、调试脚本。我就想快速测一下某个接口的吞吐量和延迟,搞那么复杂干嘛?今天给大家介绍一个轻量级的性能测试框架 ContiPerf,基于JUnit 4,在单元测试上加几个注解就能跑性能测试,直接在IDE里运行,零额外部署。
一、ContiPerf 是什么?
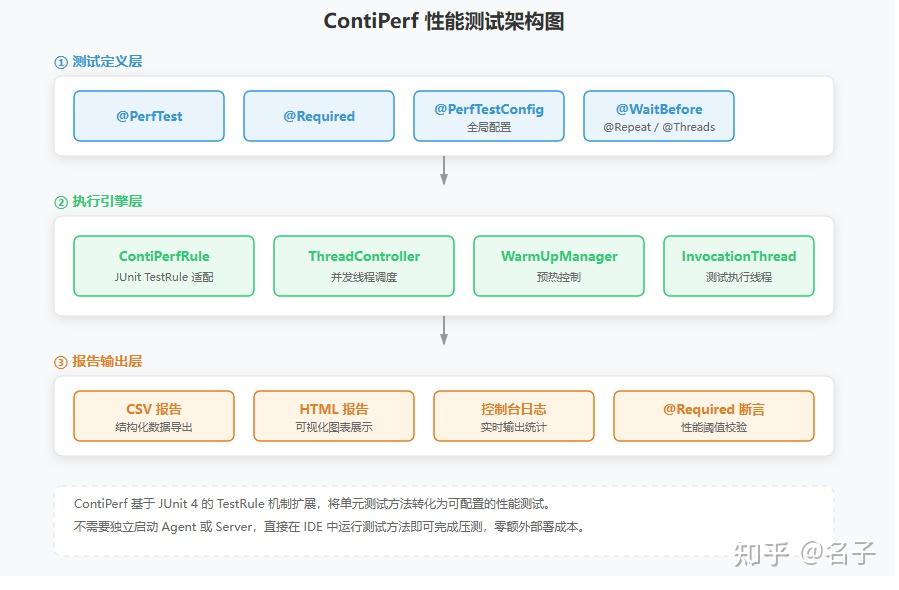
ContiPerf 是一个基于 JUnit 4 的轻量级性能测试框架。它通过 TestRule 机制,把普通的 @Test 方法转化为可配置的多线程性能测试。不需要启动独立的压测工具,不需要额外的Agent进程,跑个单元测试的功夫就把性能数据拿到了。
核心特性:
| 特性 | 说明 |
|---|---|
| 注解驱动 | @PerfTest、@Required 等注解定义测试参数,零XML配置 |
| 并发控制 | 支持配置线程数、总调用次数、执行时长 |
| 预热支持 | @WarmUp 注解实现JIT预热,避免冷启动偏差 |
| 阈值校验 | @Required 定义吞吐量、延迟等性能基线,不达标自动失败 |
| 分位值统计 | 自动计算 Min/Max/Avg/Median/P90/P95/P99 |
| 多种报告 | 控制台输出 + CSV文件 + HTML报告 |
| SpringBoot集成 | 配合SpringBootTest直接测试Spring Bean |
| 灵活调度 | 支持渐增线程(rampUp)、虚拟时钟、超时控制 |
开源地址:https://github.com/literarni/contiperf 环境要求:JDK 1.8+、JUnit 4 开源协议:Apache 2.0
Maven坐标:
<dependency>
    <groupId>org.databene</groupId>
    <artifactId>contiperf</artifactId>
    <version>2.3.4</version>
    <scope>test</scope>
</dependency>
二、核心概念
2.1 注解体系
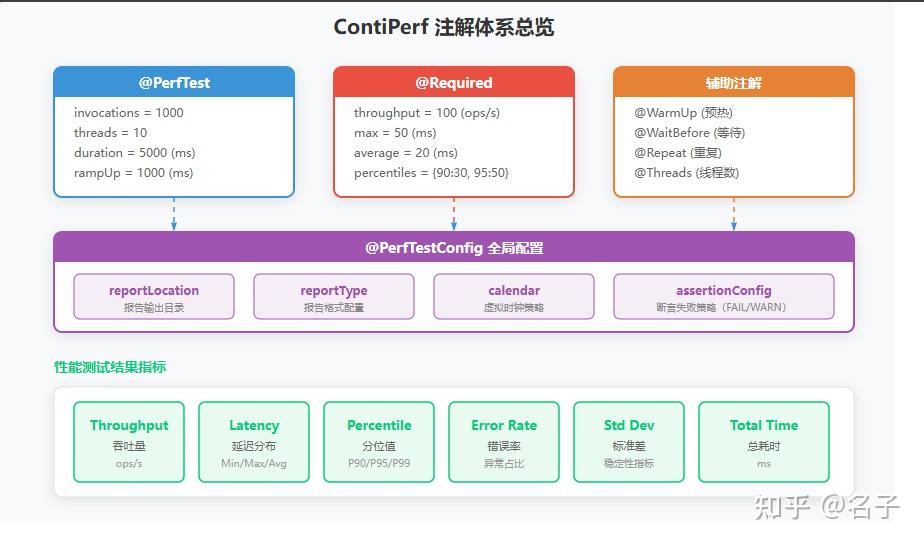
ContiPerf 的核心是注解驱动,几个关键注解搞清楚就够了:
| 注解 | 作用 | 关键参数 |
|---|---|---|
| @PerfTest | 定义性能测试参数 | invocations、threads、duration |
| @Required | 定义性能阈值 | throughput、max、average、percentiles |
| @PerfTestConfig | 全局测试配置 | reportLocation、reportType、assertionConfig |
| @WarmUp | 预热配置 | invocations |
| @WaitBefore | 执行前等待 | ms |
2.2 执行流程
ContiPerf 把一个普通的测试方法包装成性能测试,内部执行流程如下:
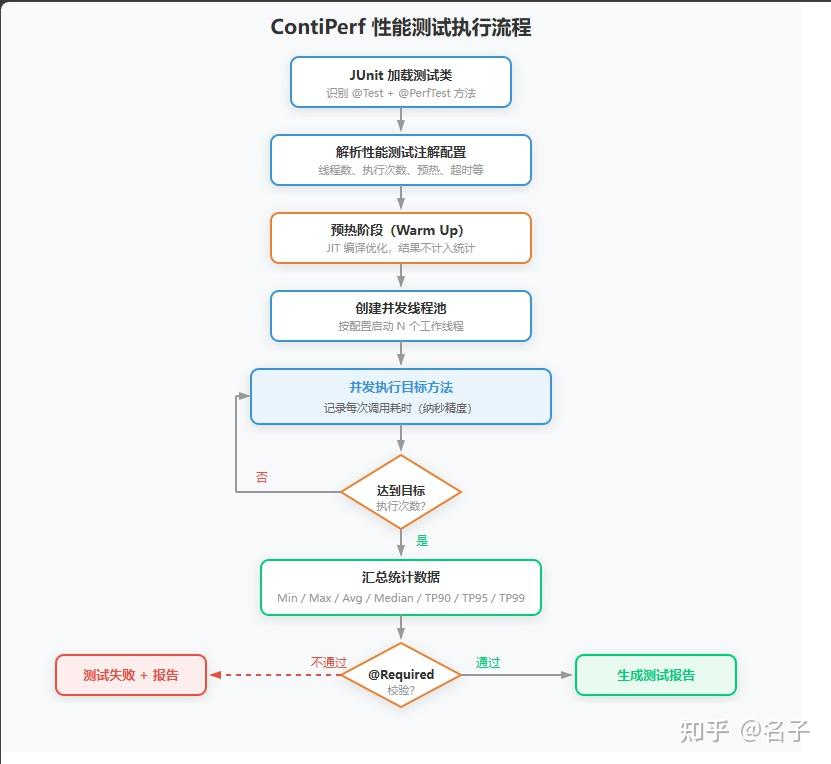
关键点:预热阶段的执行结果不会计入最终统计,这是为了避免JIT编译冷启动导致的延迟偏差。生产环境中我一般设置 20-50 次预热。
三、SpringBoot 集成
3.1 环境准备
本文使用以下技术栈:
- SpringBoot:2.7.18
- ContiPerf:2.3.4
- JUnit:4.13.2(SpringBoot 2.x 默认支持)
- JDK:1.8+
3.2 项目依赖
<!-- pom.xml -->
<dependencies>
    <!-- SpringBoot Starter -->
    <dependency>
        <groupId>org.springframework.boot</groupId>
        <artifactId>spring-boot-starter-web</artifactId>
        <version>2.7.18</version>
    </dependency>

    <!-- ContiPerf -->
    <dependency>
        <groupId>org.databene</groupId>
        <artifactId>contiperf</artifactId>
        <version>2.3.4</version>
        <scope>test</scope>
    </dependency>

    <!-- SpringBoot Test(自带 JUnit 4) -->
    <dependency>
        <groupId>org.springframework.boot</groupId>
        <artifactId>spring-boot-starter-test</artifactId>
        <version>2.7.18</version>
        <scope>test</scope>
    </dependency>
</dependencies>
SpringBoot 2.x 同时支持 JUnit 4 和 JUnit 5,但 ContiPerf 只认 JUnit 4。测试类用@RunWith(SpringRunner.class),别用 JUnit 5 的@ExtendWith。
3.3 ContiPerfRule 基本用法
ContiPerf 的核心入口是 ContiPerfRule,一个 JUnit TestRule,加到测试类里就行:
import org.databene.contiperf.PerfTest;
import org.databene.contiperf.junit.ContiPerfRule;
import org.junit.Rule;
import org.junit.Test;
import org.junit.runner.RunWith;
import org.springframework.beans.factory.annotation.Autowired;
import org.springframework.boot.test.context.SpringBootTest;
import org.springframework.test.context.junit4.SpringRunner;

@RunWith(SpringRunner.class)
@SpringBootTest
public class UserServicePerfTest {

    @Rule
    public ContiPerfRule contiPerfRule = new ContiPerfRule();

    @Autowired
    private UserService userService;

    @Test
    @PerfTest(invocations = 1000, threads = 10)
    public void testGetUserById() {
        userService.getUserById(1L);
    }
}
跑完后控制台直接输出结果:
[ContiPerf] UserServicePerfTest.testGetUserById
  samples:               1000
  max:                     45 ms
  average:                  8 ms
  median:                   5 ms
  min:                      1 ms
  throughput:          125.3/s
  90%:                      12 ms
  95%:                      18 ms
  99%:                      35 ms
同时会在 target/contiperf-report 目录下生成 HTML 报告。
四、实战案例
4.1 固定调用次数
1000 次调用、10 个并发线程:
@Test
@PerfTest(invocations = 1000, threads = 10)
public void testListUsers() {
    userService.listUsers(1, 20);
}
4.2 持续压测
不确定调用次数,就按时间压,持续跑 30 秒:
@Test
@PerfTest(duration = 30000, threads = 20)
public void testCreateOrder() {
    OrderDTO order = new OrderDTO();
    order.setProductId(1L);
    order.setQuantity(2);
    orderService.createOrder(order);
}
invocations 和 duration 二选一,不能同时用。
4.3 加预热
JVM 刚启动时性能不稳定,JIT 编译还没生效。加个预热:
@Test
@PerfTest(invocations = 1000, threads = 10)
@WarmUp(invocations = 50)
public void testGetProductDetail() {
    productService.getProductDetail(100L);
}
@WarmUp(invocations = 50) 表示先跑 50 次不计入统计,让 JIT 编译完成后再正式采集数据。这个在生产压测中很有用,我之前遇到过不加预热测出来平均 50ms,加了预热变成 5ms 的情况,差距 10 倍。
4.4 性能阈值校验
光看数据没用,得有标准。@Required 可以设定阈值,不达标测试直接失败:
@Test
@PerfTest(invocations = 1000, threads = 10)
@Required(throughput = 100)
@Required(max = 200)
@Required(average = 50)
public void testQueryOrder() {
    orderService.queryOrder("ORD202401010001");
}
吞吐量不低于 100 ops/s,最大延迟不超过 200ms,平均延迟不超过 50ms。任一指标不达标,测试直接挂。
4.5 分位值校验
光看平均值不够,线上一般用 P99 来衡量用户体验:
@Test
@PerfTest(invocations = 2000, threads = 20)
@Required(percentiles = "90:50,95:100,99:200")
public void testSearchProducts() {
    productService.search("手机", 1, 10);
}
90% 的请求要在 50ms 内、95% 在 100ms 内、99% 在 200ms 内。实际项目用得最多,SLA 一般也是按 P99 来定的。
4.6 渐增并发(Ramp Up)
一上来就满并发容易把服务打挂,特别是有限流、熔断的场景。用 rampUp 逐步拉起线程:
@Test
@PerfTest(invocations = 5000, threads = 50, rampUp = 5000)
public void testFlashSale() {
    flashSaleService.purchase(1L, "user_" + ThreadLocalRandom.current().nextLong(10000));
}
rampUp = 5000 表示在 5 秒内把 50 个线程逐步拉起来,而不是一上来就全部启动。这个对秒杀、抢购场景的压测特别有用。
4.7 完整的综合案例
一个实际项目中的订单服务测试类,覆盖创建、查询、取消三个接口:
@RunWith(SpringRunner.class)
@SpringBootTest
@PerfTestConfig(reportLocation = "target/contiperf-report",
                reportType = ReportType.HTML_CSV)
public class OrderServicePerfTest {

    @Rule
    public ContiPerfRule contiPerfRule = new ContiPerfRule();

    @Autowired
    private OrderService orderService;

    @Test
    @PerfTest(invocations = 1000, threads = 10)
    @WarmUp(invocations = 20)
    @Required(throughput = 200)
    @Required(max = 500)
    @Required(percentiles = "90:50,95:100,99:300")
    public void testCreateOrder() {
        OrderDTO dto = new OrderDTO();
        dto.setUserId(ThreadLocalRandom.current().nextLong(1, 10000));
        dto.setProductId(ThreadLocalRandom.current().nextLong(1, 1000));
        dto.setQuantity(1);
        orderService.createOrder(dto);
    }

    @Test
    @PerfTest(invocations = 2000, threads = 20)
    @WarmUp(invocations = 30)
    @Required(throughput = 500)
    @Required(average = 20)
    @Required(percentiles = "99:100")
    public void testQueryOrder() {
        orderService.queryById(ThreadLocalRandom.current().nextLong(1, 100000));
    }

    @Test
    @PerfTest(duration = 10000, threads = 5)
    @WarmUp(invocations = 10)
    @Required(throughput = 100)
    public void testCancelOrder() {
        orderService.cancelOrder(ThreadLocalRandom.current().nextLong(1, 50000));
    }
}几个细节:@PerfTestConfig 放类上统一配报告输出;@WarmUp 每个方法单独配;用 ThreadLocalRandom 生成随机参数避免缓存命中率过高导致数据失真;testCancelOrder 用 duration 模式持续压 10 秒。
五、核心注解详解
5.1 @PerfTest 参数全解
| 参数 | 类型 | 默认值 | 说明 |
|---|---|---|---|
| invocations | int | 1 | 总调用次数 |
| threads | int | 1 | 并发线程数 |
| duration | long | 0 | 持续时长(毫秒),和invocations二选一 |
| rampUp | long | 0 | 渐增时间(毫秒),线程逐步启动 |
| timeout | long | 0 | 单次调用超时(毫秒),0=不限制 |
| maxTime | long | 0 | 整个测试最大执行时间(毫秒) |
5.2 @Required 参数全解
| 参数 | 类型 | 说明 |
|---|---|---|
| throughput | double | 最小吞吐量(ops/s) |
| max | long | 最大延迟(毫秒) |
| average | long | 平均延迟上限(毫秒) |
| median | long | 中位数延迟上限(毫秒) |
| totalTime | long | 总执行时间上限(毫秒) |
| percentiles | String | 分位值要求,格式 “分位:毫秒” |
| pageSize | int | 报告中的分页大小 |
percentiles 的格式是逗号分隔的键值对:"90:30,95:50,99:100"。多个 @Required 可以叠加使用。
5.3 @WarmUp 参数
| 参数 | 类型 | 默认值 | 说明 |
|---|---|---|---|
| invocations | int | 1 | 预热调用次数 |
5.4 @PerfTestConfig 参数
| 参数 | 类型 | 默认Value | 说明 |
|---|---|---|---|
| reportLocation | String | “target/contiperf-report” | 报告输出路径 |
| reportTypes | ReportType[] | {HTML} | 报告格式,支持 HTML、CSV |
| assertionConfig | AssertionConfig | WARN | 断言失败策略:FAIL 或 WARN |
| calendar | String | “system” | 虚拟时钟配置 |
六、进阶用法
6.1 自定义报告输出
ContiPerf 默认在 target/contiperf-report 下生成报告,可以自定义:
@Rule
public ContiPerfRule contiPerfRule = new ContiPerfRule(
    new FileReportModule.Builder()
        .outputFolder("custom-report-dir")
        .reportTypes(ReportType.HTML, ReportType.CSV)
        .build()
);
或者在类级别配置:
@PerfTestConfig(
    reportLocation = "build/reports/contiperf",
    reportType = {ReportType.HTML, ReportType.CSV}
)
6.2 断言失败策略
ContiPerf 支持两种断言失败策略:
// 策略一:不达标就测试失败(推荐,用于CI/CD)
@PerfTestConfig(assertionConfig = AssertionConfig.FAIL)

// 策略二:不达标只警告,测试仍然通过
@PerfTestConfig(assertionConfig = AssertionConfig.WARN)
CI/CD 流水线中用 FAIL,开发阶段调试用 WARN,这是比较务实的做法。
6.3 测试带事务的Service
在 SpringBoot 中测试写操作,有时候需要回滚数据:
@RunWith(SpringRunner.class)
@SpringBootTest
@Transactional
public class OrderWritePerfTest {

    @Rule
    public ContiPerfRule contiPerfRule = new ContiPerfRule();

    @Autowired
    private OrderService orderService;

    @Test
    @PerfTest(invocations = 500, threads = 5)
    @Rollback
    public void testBatchInsert() {
        Order order = new Order();
        order.setOrderNo("PERF_" + System.nanoTime());
        orderService.insert(order);
    }
}
加了 @Transactional + @Rollback,每次测试完数据自动回滚,不会污染数据库。
6.4 参数化性能测试
ContiPerf 和 JUnit 4 的参数化测试可以配合使用,测不同参数下的性能表现:
@RunWith(Parameterized.class)
@SpringBootTest
@PerfTestConfig(assertionConfig = AssertionConfig.WARN)
public class ParamPerfTest {

    @Rule
    public ContiPerfRule contiPerfRule = new ContiPerfRule();

    @Autowired
    private ProductService productService;

    @Parameter(value = 0)
    public int pageSize;

    @Parameters(name = "pageSize={0}")
    public static Collection<Object[]> data() {
        return Arrays.asList(new Object[][] {
            { 10 }, { 20 }, { 50 }, { 100 }
        });
    }

    @Test
    @PerfTest(invocations = 500, threads = 10)
    public void testSearch() {
        productService.search("手机", 1, pageSize);
    }
}
这样能看到不同分页大小对接口性能的影响。
6.5 直接用API方式(非注解)
如果不习惯注解方式,ContiPerf 也提供了编程式API:
@Test
public void testApiStyle() {
    PerformanceTest test = new PerformanceTest();
    test.setInvocations(1000);
    test.setThreadCount(10);
    test.setRampUp(2000);

    TestDescriptor descriptor = new TestDescriptor(
        getClass(), "testApiStyle"
    );

    PerformanceTestResult result = new PerformanceTestRunner()
        .setTest(test)
        .setTestDescriptor(descriptor)
        .run(() -> userService.getUserById(1L));

    System.out.println("吞吐量: " + result.getThroughput());
    System.out.println("平均延迟: " + result.getAverageLatency() + "ms");
    System.out.println("P99: " + result.getPercentileLatency(99) + "ms");
}
不过说实话,注解方式代码量少太多,除非有动态配置的需求,一般用注解就够了。
七、ContiPerf vs JMeter vs Gatling
| 对比项 | ContiPerf | JMeter | Gatling |
|---|---|---|---|
| 部署方式 | 依赖引入即可 | 独立安装GUI应用 | SBT插件/独立包 |
| 使用方式 | 注解 + 单元测试 | GUI拖拽/脚本 | Scala DSL |
| 学习成本 | 低(会JUnit就会用) | 中(得学GUI操作) | 高(需要会Scala) |
| CI/CD集成 | 天然集成(就是JUnit) | 需要额外配置 | 需要额外配置 |
| 适用场景 | 单接口压测、回归测试 | 全链路压测 | 高并发场景压测 |
| 分布式 | 不支持 | 支持 | 支持 |
| 协议支持 | Java方法调用 | HTTP/JDBC/JMS等 | HTTP/WebSocket |
| 报告 | HTML/CSV | HTML/图表 | HTML交互式报告 |
我的建议:
- 单接口、Service 层性能回归 → ContiPerf,简单省事
- HTTP 接口全链路压测 → JMeter,功能全面
- 高并发、大数据量场景 → Gatling,性能更好
ContiPerf 的优势在于它就是个 JUnit 测试,能跑单元测试的地方就能跑性能测试。CI/CD 流水线里加个阶段就行,不需要额外维护压测脚本和环境。
八、踩坑记录
8.1 JUnit 5 兼容问题
ContiPerf 只支持 JUnit 4,SpringBoot 2.2+ 默认用 JUnit 5。需要在 pom.xml 里排除 JUnit 5:
<dependency>
    <groupId>org.springframework.boot</groupId>
    <artifactId>spring-boot-starter-test</artifactId>
    <version>2.7.18</version>
    <scope>test</scope>
    <exclusions>
        <!-- 排除 JUnit 5,使用 JUnit 4 -->
        <exclusion>
            <groupId>org.junit.jupiter</groupId>
            <artifactId>junit-jupiter</artifactId>
        </exclusion>
        <exclusion>
            <groupId>org.junit.vintage</groupId>
            <artifactId>junit-vintage-engine</artifactId>
        </exclusion>
    </exclusions>
</dependency>

<!-- 手动引入 JUnit 4 -->
<dependency>
    <groupId>junit</groupId>
    <artifactId>junit</artifactId>
    <version>4.13.2</version>
    <scope>test</scope>
</dependency>
测试类用 @RunWith(SpringRunner.class),别用 @ExtendWith。
8.2 数据库连接池不够
ContiPerf 默认线程数是 1,很多人一上来就设 threads = 100,结果数据库连接池爆了。线程数要和数据库连接池大小匹配。比如 HikariCP 默认最大连接数 10,你测 threads = 50 的写操作,一大半线程都在等连接。
经验值:读操作线程数可以大于连接池(查询快释放快),写操作线程数别超过连接池的 1.5 倍。
8.3 多线程下 @Transactional 失效
前面说了用 @Transactional + @Rollback 回滚数据。但多线程下这玩意会失效——Spring 事务绑定在 ThreadLocal 上,只有主线程有事务,子线程没有。这个坑我在线上跑了一周才发现。
解决办法:如果需要在并发测试中保证事务,用编程式事务替代注解:
@Autowired
private TransactionTemplate transactionTemplate;

@Test
@PerfTest(invocations = 500, threads = 10)
public void testTransactionalWrite() {
    transactionTemplate.execute(status -> {
        orderService.insert(buildOrder());
        return null;
    });
}
8.4 Spring 上下文缓存
@SpringBootTest 启动一次 Spring 上下文慢得要命。多个性能测试类的话,抽个基类避免重复启动:
@RunWith(SpringRunner.class)
@SpringBootTest
@PerfTestConfig(reportLocation = "target/contiperf-report")
public abstract class BasePerfTest {

    @Rule
    public ContiPerfRule contiPerfRule = new ContiPerfRule();
}
然后所有测试类继承这个基类就行,Spring 上下文只启动一次。
九、最佳实践
- 预热不能省:至少 20 次,让 JIT 编译完成。不用预热测出来的数据基本不准。
- 用随机参数:别每次都查 id=1 的数据,Redis 缓存/数据库缓存会严重影响结果。
- 线程数要合理:不是越大越好,先看目标环境的实际并发量。
- 分位值比平均值有用:平均值 10ms 但 P99 是 500ms,用户体验还是很差。重点关注 P95 和 P99。
- CI/CD 中加性能回归:用
@Required设定阈值,断言策略用FAIL,性能退化能立即发现。 - 报告归档:把
target/contiperf-report配到 CI 的 artifacts 中,方便对比不同版本的数据。
十、什么时候用 ContiPerf
适合:Service 层方法性能基准测试、接口吞吐量和延迟回归、CI/CD 性能门禁、优化前后对比。
不适合:大规模分布式压测(用 JMeter)、HTTP 全链路压测(用 JMeter 或 Gatling)、复杂场景编排(用 JMeter)。
ContiPerf 做不到分布式压测,也不支持 HTTP 协议以外的场景。但它胜在简单——一个注解定义参数,一个注解校验阈值,IDE 里跑一下就有报告。对 SpringBoot 项目来说,想在开发阶段快速拿到接口性能数据,ContiPerf 是投入产出比最高的选择。


 285
285

 被折叠的 条评论
为什么被折叠?
被折叠的 条评论
为什么被折叠?
 到【灌水乐园】发言


