


 本文介绍了如何在Linux Centos7系统中使用rclone工具同步国际版和世纪互联版的Onedrive文件。详细步骤包括获取access_token,安装rclone,配置和挂载Onedrive,以及世纪互联版的特殊配置。同时,提供了相关下载链接和命令行操作指南。
国际版登录:Office 365 Login | Microsoft Office
国际版管理:Microsoft Azure
注意国际版的
首先看国际版 onedrive 的:client_id>和client_secret> 填写为空。
国际版的比较简单,详细步骤如下:
1:首先我们需要先获取到onedrive的access_token
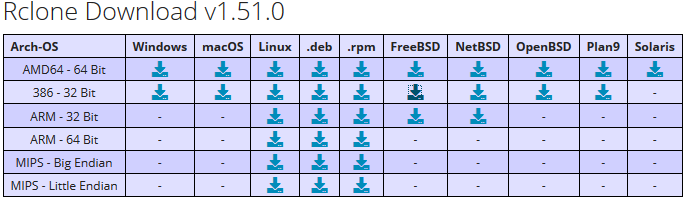
下载地址:https://rclone.org/downloads/下载win版本的Rclone,请下载自己的对应版本:
下载后解压,然后在解压的目录里按 Shif + 鼠标右键,选择 “在此处打开命令窗口”,然后在里面执行:
rclone authorize "onedrive"接下来会打开默认浏览器,如果默认打开的为低版本 IE 浏览器,你也可以复制链接到新的浏览器当中,打开后会提示输入账号,然后输入密码,然后同意授权
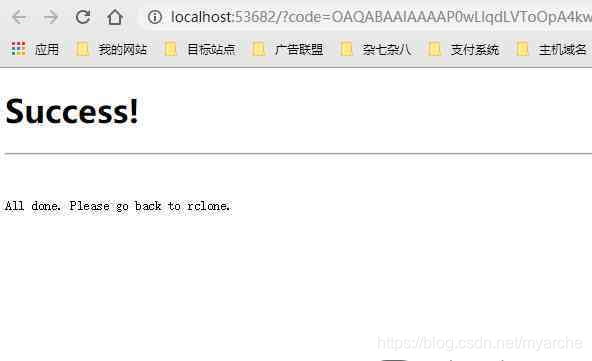
出现以上表示成功,这时候你刚才打开的命令窗口中会出现如下:
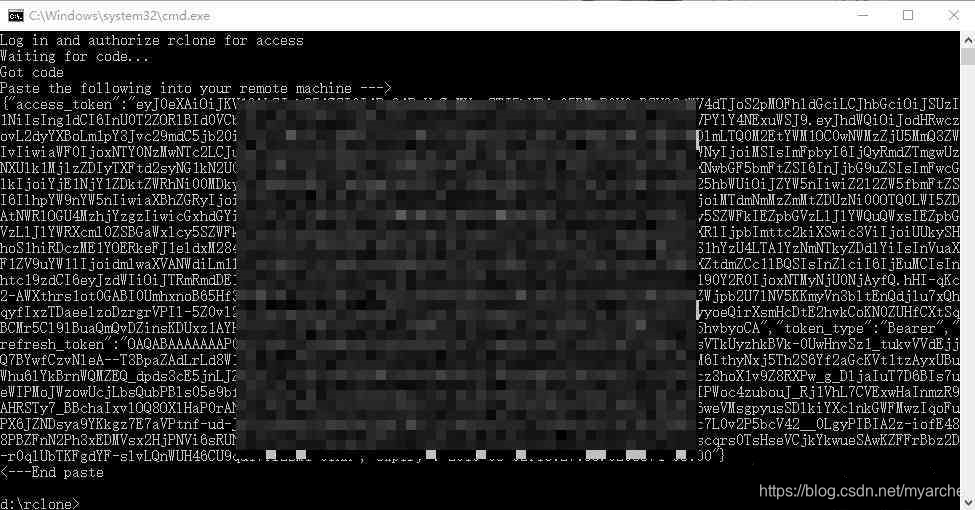
你需要将以上连花括号在内的内容全部复制,然后利用任意编辑器合并为一行,因为接下来我们要放到 ssh 的命令窗口中,如过不换成一行,ssh 窗口会默认将换行作为执行命令。
接下来我们 ssh 模式登录服务器,首选需要安装依赖:
yum -y install wget unzip screen fuse fuse-devel然后我们安装 rclone,官方教程:Rclone downloads
curl https://rclone.org/install.sh | sudo bash成功安装后,我们开始执行命令配置:
rclone config这里我们选择新建
No remotes found - make a new one
n) New remote
s) Set configuration password
q) Quit config
n/s/q> n
名字可随意输入,最后挂载要用,请记下
name> onedrive选择要挂载的名称,因为是挂载 onedrive ,这里我们依照列表选择 23
Type of storage to configure.
Enter a string value. Press Enter for the default ("").
Choose a number from below, or type in your own value
 1 / 1Fichier
   \ "fichier"
 2 / Alias for an existing remote
   \ "alias"
 3 / Amazon Drive
   \ "amazon cloud drive"
 4 / Amazon S3 Compliant Storage Provider (AWS, Alibaba, Ceph, Digital Ocean, Dreamhost, IBM COS, Minio, etc)
   \ "s3"
 5 / Backblaze B2
   \ "b2"
 6 / Box
   \ "box"
 7 / Cache a remote
   \ "cache"
 8 / Citrix Sharefile
   \ "sharefile"
 9 / Dropbox
   \ "dropbox"
10 / Encrypt/Decrypt a remote
   \ "crypt"
11 / FTP Connection
   \ "ftp"
12 / Google Cloud Storage (this is not Google Drive)
   \ "google cloud storage"
13 / Google Drive
   \ "drive"
14 / Google Photos
   \ "google photos"
15 / Hubic
   \ "hubic"
16 / In memory object storage system.
   \ "memory"
17 / JottaCloud
   \ "jottacloud"
18 / Koofr
   \ "koofr"
19 / Local Disk
   \ "local"
20 / Mail.ru Cloud
   \ "mailru"
21 / Mega
   \ "mega"
22 / Microsoft Azure Blob Storage
   \ "azureblob"
23 / Microsoft OneDrive
   \ "onedrive"
24 / OpenDrive
   \ "opendrive"
25 / Openstack Swift (Rackspace Cloud Files, Memset Memstore, OVH)
   \ "swift"
26 / Pcloud
   \ "pcloud"
27 / Put.io
   \ "putio"
28 / QingCloud Object Storage
   \ "qingstor"
29 / SSH/SFTP Connection
   \ "sftp"
30 / Sugarsync
   \ "sugarsync"
31 / Transparently chunk/split large files
   \ "chunker"
32 / Union merges the contents of several remotes
   \ "union"
33 / Webdav
   \ "webdav"
34 / Yandex Disk
   \ "yandex"
35 / http Connection
   \ "http"
36 / premiumize.me
   \ "premiumizeme"

Storage> 23
下面就是client_id>和client_secret> ,这两项直接回车,不管
Microsoft App Client Id
Leave blank normally.
Enter a string value. Press Enter for the default ("").
client_id>
Microsoft App Client Secret
Leave blank normally.
Enter a string value. Press Enter for the default ("").
client_secret>
解下来的高级设置和自动设置,我们一律选择为 n
Edit advanced config? (y/n)
y) Yes
n) No (default)
y/n>
Remote config
Use auto config?
 * Say Y if not sure
 * Say N if you are working on a remote or headless machine
y) Yes (default)
n) No
y/n> n
这一步就需要用到我们刚才在win获取到的access_token,就是最开始我们授权生成,切记要变为一行粘贴:
For this to work, you will need rclone available on a machine that has a web browser available.
Execute the following on your machine (same rclone version recommended) :
rclone authorize "onedrive"
Then paste the result below:
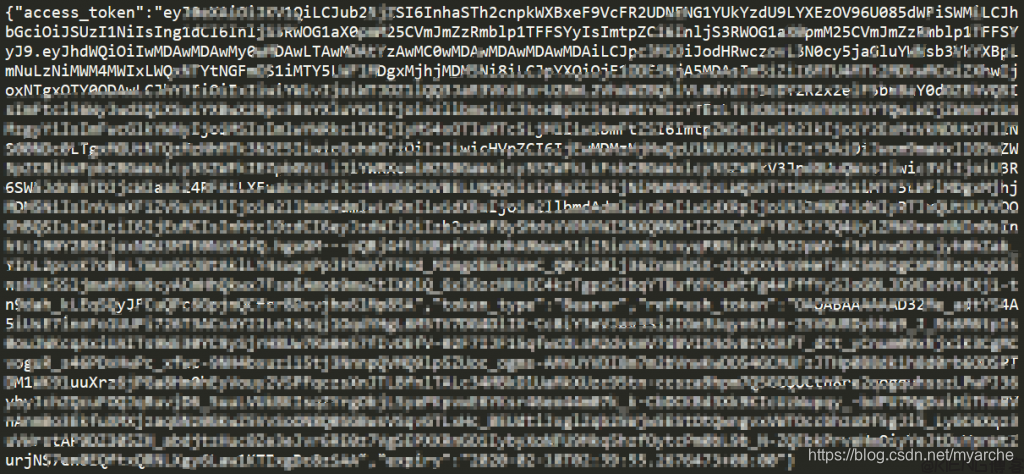
result> {"access_token":"eyJ0eXAiOiJKV1QiLCJub25jZSI6InJ4S2ZLc2g5QkluMTJxdjAySUJSMFVjNUtJMW1IUl9FIjoiM2IxYzgxYjEtZDE1Ni00YWY5LWIxNjktYWUwODEyOGMwMzk2IiwidW5pcXVlX25hbWUiOiJteWhvc3RAdmlwLnRnIiwidXBuIjoibXlob3N0QHZpcC50ZyIsInV0aSI6IlRqXzJwNDBiZkV5YTZUTDFxSHRBQUEiLCJ2ZXIiOiIxLjAiLCJ4bXNfc3QiOnsic3ViIjoiNXM2YXpyVDI3eHZYUTIwWGxBZW5YdUlfV1FGZG9Pa3NBRjdqWE9BRnFKQSJ9LCJ4bXNfdGNkdCI6MTQ1NzExNDczOH0.tupqekXwg-tAUVvhd9Jabp1SZC2pzXrfM9-c2rpA3tGGHaJcvYBw5WlDKlNhBnt6DJ87ZlBAShsFEZs1oK4Ca0BrhFpGbmiVQHO1E8GgfjgUnc0DRZQ7st-z1aswzy2nF2tt44Y9hQO-he8f5LUFKGU6Bkh0iJMeuIfOphwmLAMIeqOEoaEX5sNoxuSPX_sMMFz--Y3Elxvd9Y1hwwvJY_EEmJLtr52wE7nZ3a6_YEjKZ84YK5iWR-od-zUKHZo5BQfhPH26AQUnLmr1rozsEtM83DxTYHaJpwCvENzCVfgtHdsfreMQgtgGkc2GFRiq7GZOLCECUOjIeL8PkcBK-g","token_type":"Bearer","refresh_token":"OAQABAAAAAAD32Me_adtYS4A5iUsE7inoTqUW_DWSnkyQAWn-MtVsEgKKHt1-YIHoIJhNo_hWgPFnHtrLszbhlLARO2KC2lMvcfGt6cTeOgADD15kECDbdeRnO9vWUmF6sVH9_7MBNazObr8Zq5RMWaO8TilHFjcSZvJR9meMJqNV613etm3RiFgvCTB2u10PBr1rneTLaC5sTfToeqipSXNmmeR6skRo6xykw2MSv7Cbq22TofeLXxF7RP0-sGHF9g-NQAwvIwdagawEreFetI1DdhRUy7AgQJXaguKlCLy4nli3gj3f-G5XxhEowwrqvtgCe-WX9rQm5JYs5KnkGUG1Zdo08j7G1Hrlh1DMzwNyOPkzFmTuhHYxupAYGSKyElG9wrJxENa3xn7r8GYnjKQeAY3sM29bP6HDx_ReBBnkWxLquIxOHQvht4qjEYSNz_KAPiI15DR3ZTVkK-5vw7brXHAlHQk3t7FQBDP6thXzk1Cw_ptKuD1aSzZvBvLlaQSAA","expiry":"2020-02-21T23:31:44.4520449+08:00"}
接下来选择1,onedrive个人版或是商业版
    Choose a number from below, or type in an existing value
     1 / OneDrive Personal or Business
       \ "onedrive"
     2 / Root Sharepoint site
       \ "sharepoint"
     3 / Type in driveID
       \ "driveid"
     4 / Type in SiteID
       \ "siteid"
     5 / Search a Sharepoint site
       \ "search"
    Your choice> 1
然后会提示找到一个驱动器,我们直接输入前面开始的数字序号即可
    Found 1 drives, please select the one you want to use:
    0: OneDrive (business) id=b!tjyPr9WccUytxb9q4bgCz1Z8pnMGbxJCmV651K4oHDgyUnggpbbeTYTa
    Chose drive to use:> 0
提示找到驱动器,并连续确认
    Found drive 'root' of type 'business', URL: https://dddd290-my.sharepoint.com/personal/info_vipiu_net/Documents
    Is that okay?
    y) Yes
    n) No
    y/n> y

    y) Yes this is OK
    e) Edit this remote
    d) Delete this remote
    y/e/d> y
最后没有特殊配置,我们可以选择退出
    e) Edit existing remote
    n) New remote
    d) Delete remote
    r) Rename remote
    c) Copy remote
    s) Set configuration password
    q) Quit config
    e/n/d/r/c/s/q>
配置完成,接下来我们开始挂载,以使文件同步:
你可以新建一个目录,或者选择目前已有的文件目录
#比如新建一个同步目录
mkdir /home/onedrive
我们开始挂载指定的同步目录,onedrive 为刚开始我们新建 remove 后的 name,后面的 sync 为网盘文件夹名称,再后面的 /home/onedrive 为要同步的本地文件夹名称,后面的参数可参考官网:rclone mount
rclone mount onedrive:/sync /home/onedrive--copy-links --no-gzip-encoding --no-check-certificate --allow-other --allow-non-empty --umask 000执行以上命令后,ssh 终端窗口会卡死,我们可以关闭并重新连接,然后执行磁盘查看命令确认挂载是否成功
df -h以下显示,已经挂载成功
文件系统        容量  已用  可用 已用% 挂载点
devtmpfs        885M     0  885M    0% /dev
tmpfs           895M  1.6M  894M    1% /dev/shm
tmpfs           895M   97M  799M   11% /run
tmpfs           895M     0  895M    0% /sys/fs/cgroup
/dev/sda1        20G   13G  6.7G   65% /
tmpfs           179M     0  179M    0% /run/user/1003
tmpfs           179M     0  179M    0% /run/user/0
myluckdown:     5.0T     0  5.0T    0% /home/onedrive
一切 ok ,然后我们可以在指定的本地文件夹随意放置一个文件,然后我们登录 onedirve 网页,马上我们就能查看到文件被被同步了。
总所周知 onedrive 国际版在国内的速度稍微欠佳,虽然有香港的账号很快,但是很多人还是想使用国内版,所以微软和国内世纪互联合作开通有国内版 onedrive ,存储服务器在北京和上海。
但是众所周知的原因,世纪互联版却丢失了很多功能,比如同步客户端,所以在这里分享世纪互联版在 linux 下的文件同步。
和国际版不同,这里我们首先要对世纪互联账号进行系列配置
开始:
获取应用 ID 和密匙
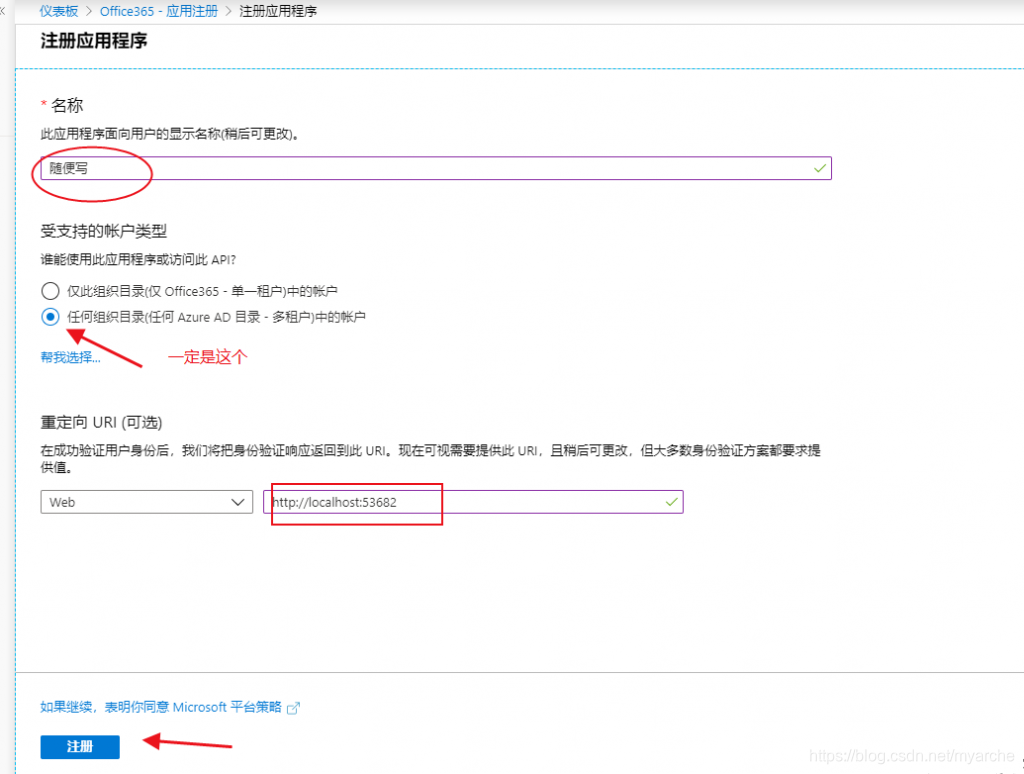
地址:https://portal.azure.cn/,登录完成后按下面步骤进行 1.左侧Azure Active Directory->应用注册->新注册

2.名称部分:随便写->受支持的账户类型:任何组织目录(任何 Azure AD 目录 - 多租户)中的帐户
—重定向 URI (可选):http://localhost:53682—注册 https://scfonedrive.github.io/
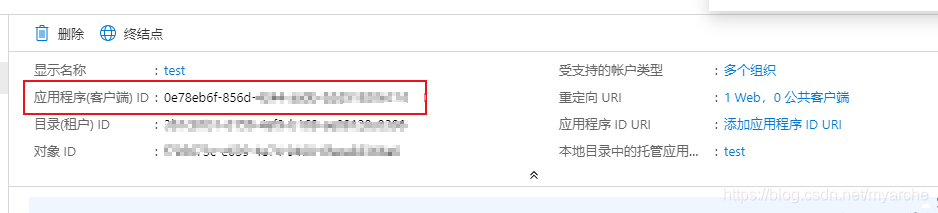
3.应用程序(客户端) ID
4.获取密匙:左侧证书和密码—
右侧客户端密码部分:+新客户端密码
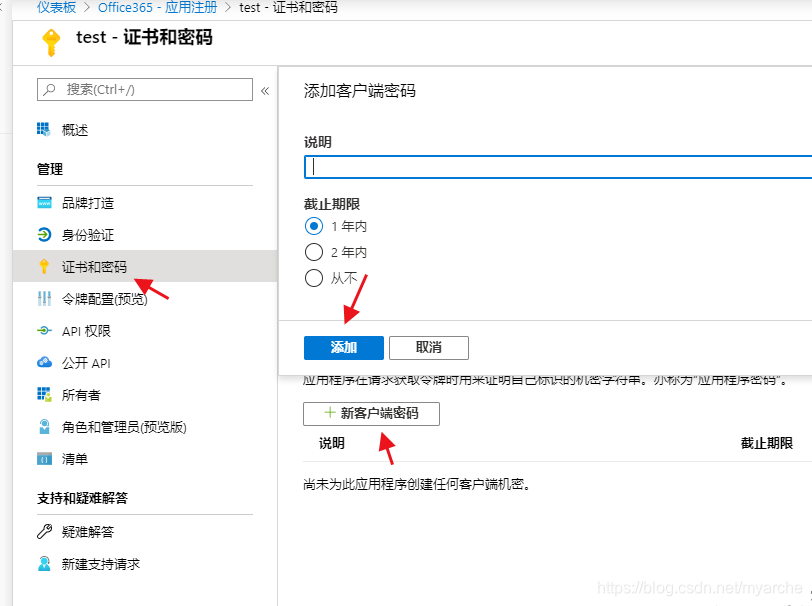
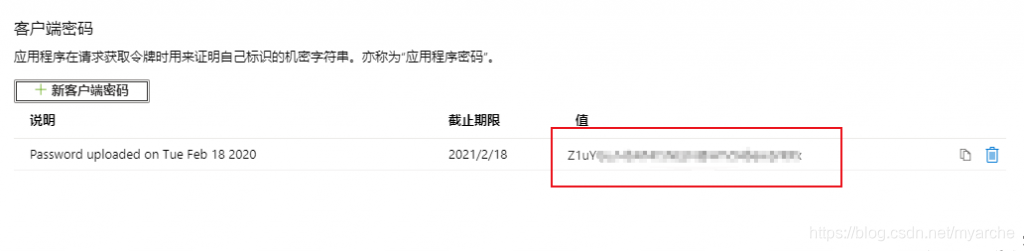
注意,在将以上红框所标记的应用程序ID 和 值保存好,配置时要用。
同样接下来开始授权,很重要,下载修改版 windows rclone
win-64-rclone-v1.50.2-windows-amd64-21vianet.zip:
蓝奏云:https://www.lanzous.com/i9k8jta
百度云:链接: https://pan.baidu.com/s/1B8l9q0oNE_-bZ-3voKwQQw 提取码: qa67
下载后解压,然后同上在解压后的文件夹里使用 shift + 鼠标右键,选择在此处打开命令窗口,然后执行以下命令
rclone authorize onedrive "应用程序(客户端) ID" "客户端密码值" --onedrive-is-21vianet-version=true同样会打开新浏览器窗口,输入世纪互联的账号和密码进行授权,完成后终端会出现 token,然后将包括花括号在的内容全部复制并改为一行
然后在 linux 下安装 rclone ,我们先下载 rclone-current-linux-amd64.zip
蓝奏云:https://www.lanzous.com/i9k8jne
百度云:链接: https://pan.baidu.com/s/1TWJ9BbZFaFUQWT5ZZToZRw 提取码: f7q4
我们利用 ssh 登录到服务器,并上传以上下载的 rclone
上传后首先解压:
unzip rclone-v1.50.2-linux-amd64-21vianet.zip改变目录并增加执行权限
cp rclone /usr/bin/rclone

chmod +x /usr/bin/rclone
然后我们开始配置
rclone config
选择新增远程 n
No remotes found - make a new one
n) New remote
s) Set configuration password
q) Quit config
n/s/q> n
name> test
自定义名称,要记好,挂载是要用
name> test
选择使用网盘名称,对应我们选择 22
Type of storage to configure.
Enter a string value. Press Enter for the default ("").
Choose a number from below, or type in your own value
 1 / 1Fichier
   \ "fichier"
 2 / Alias for an existing remote
   \ "alias"
 3 / Amazon Drive
   \ "amazon cloud drive"
 4 / Amazon S3 Compliant Storage Provider (AWS, Alibaba, Ceph, Digital Ocean, Dreamhost, IBM COS, Minio, etc)
   \ "s3"
 5 / Backblaze B2
   \ "b2"
 6 / Box
   \ "box"
 7 / Cache a remote
   \ "cache"
 8 / Citrix Sharefile
   \ "sharefile"
 9 / Dropbox
   \ "dropbox"
10 / Encrypt/Decrypt a remote
   \ "crypt"
11 / FTP Connection
   \ "ftp"
12 / Google Cloud Storage (this is not Google Drive)
   \ "google cloud storage"
13 / Google Drive
   \ "drive"
14 / Google Photos
   \ "google photos"
15 / Hubic
   \ "hubic"
16 / JottaCloud
   \ "jottacloud"
17 / Koofr
   \ "koofr"
18 / Local Disk
   \ "local"
19 / Mail.ru Cloud
   \ "mailru"
20 / Mega
   \ "mega"
21 / Microsoft Azure Blob Storage
   \ "azureblob"
22 / Microsoft OneDrive
   \ "onedrive"
23 / OpenDrive
   \ "opendrive"
24 / Openstack Swift (Rackspace Cloud Files, Memset Memstore, OVH)
   \ "swift"
25 / Pcloud
   \ "pcloud"
26 / Put.io
   \ "putio"
27 / QingCloud Object Storage
   \ "qingstor"
28 / SSH/SFTP Connection
   \ "sftp"
29 / Transparently chunk/split large files
   \ "chunker"
30 / Union merges the contents of several remotes
   \ "union"
31 / Webdav
   \ "webdav"
32 / Yandex Disk
   \ "yandex"
33 / http Connection
   \ "http"
34 / premiumize.me
   \ "premiumizeme"
Storage> 22
然后我们输入 client_id 和 client_secret,在刚开始账号配置截图中已用红线框标记
** See help for onedrive backend at: https://rclone.org/onedrive/ **

Microsoft App Client Id
Leave blank normally.
Enter a string value. Press Enter for the default ("").
client_id> bb6sfs2-f8sfs8-4sfs1-8sfd-ffbsfsf9da
Microsoft App Client Secret
Leave blank normally.
Enter a string value. Press Enter for the default ("").
client_secret> lh8sf3sfssdsdsXq?=ddFId=nu2sdsIrE2
选择 onedrive 类型,也就是世纪互联,要选 true
OneDrive operated by 21Vianet (世纪互联).
Enter a boolean value (true or false). Press Enter for the default ("false").
is_21vianet_version> true
接下来的专业配置和远程配置我们一律设置为 n
Edit advanced config? (y/n)
y) Yes
n) No
y/n> n
Remote config
Make sure your Redirect URL is set to "http://localhost:53682/" in your custom config.
Use auto config?
 * Say Y if not sure
 * Say N if you are working on a remote or headless machine
y) Yes
n) No
y/n> n
接下里开始输入网页授权的代码
For this to work, you will need rclone available on a machine that has a web browser available.
Execute the following on your machine (same rclone version recommended) :
        rclone authorize "onedrive" "bb6c41f2-f8d8-4bb1-83ad-ffbe723109da" "lh8hRL6faXq?=kiFId=nu2tTluP]IrE2"
Then paste the result below:
result> {"access_tdfdf4Ca0BrhFpGbmiVQHO1E8GgfjgUnc0DRZQ7st-z1aswzy2nF2tt44Y9hQO-he8f5LUFKGU6Bkh0iJMeuIfOphwmLAMIeqOEoaEX5sNoxuSPX_sMMFz--Y3Elxvd9Y1hwwvJY_EEmJLtr52wE7nZ3a6_YEjKZ84YK5iWR-od-zUKHZo5BQfhPH26AQUnLmr1rozsEtM83DxTYHaJpwCvENzCVfgtHdsfreMQgtgGkc2GFRiq7GZOLCECUOjIeL8PkcBK-g","token_type":"Bearer","refresh_token":"OAQABAAAAAAD32Me_adtYS4A5iUsE7inoTqUW_DWSnkyQAWn-MtVsEgKKHt1-YIHoIJhNo_hWgPFnHtrLszbhlLARO2KC2lMvcfGt6cTeOgADD15kECDbdeRnO9vWUmF6sVH9_7MBNazObr8Zq5RMWaO8TilHFjcSZvdf6HDx_ReBBnkWxLquIxOHQvht4qjEYSNz_KAPiI15DR3ZTVkK-5vw7brXHAlHQk3t7FQBDP6thXzk1Cw_ptKuD1aSzZvBvLlaQSAA","expiry":"2020-02-21T23:31:44.4520449+08:00"}
接下来选择用户类型,这里我们选择 1
Choose a number from below, or type in an existing value
 1 / OneDrive Personal or Business
   \ "onedrive"
 2 / Root Sharepoint site
   \ "sharepoint"
 3 / Type in driveID
   \ "driveid"
 4 / Type in SiteID
   \ "siteid"
 5 / Search a Sharepoint site
   \ "search"
Your choice> 1
最后我们确认发现的驱动器,选择 开头的数字标识 0
然后连续确认输入 y,我们可以看到配置信息
然后我们在选择 y 确认
最后选择 q 退出
Found 1 drives, please select the one you want to use:
0: OneDrive (business) id=b!Tt6E3naAZkWLnLhk_HmVxfBlcVHbKBtGpFrddxr9TP9ncfZeQQMQSagjbbGEchqD
Chose drive to use:> 0
Found drive 'root' of type 'business', URL: https://alphaone-my.sharepoint.cn/personal/myhost_vip_tg/Documents
Is that okay?
y) Yes
n) No
y/n> y
2020/02/21 09:35:42 ERROR : Failed saving config "drive_id" = "b!Tt6E3naAZkWLnLhk_HmVxfBlcVHbKBtGpFrddxr9TP9ncfZeQQMQSagjbbGEchqD" in section "test" of the config file: section 'test' not found
2020/02/21 09:35:42 ERROR : Failed saving config "drive_type" = "business" in section "test" of the config file: section 'test' not found
--------------------
[test]
type = onedrive
client_id = bb6c4xxxxx09da
client_secret = lh8hRxxxxtTluP]IrE2
is_21vianet_version = true
token = {"access_token":"eyJ0eXAiOiJKV1QiLCJub25jZSI6InJ4S2ZLc2g5QkluMTJxdjAySUJSMFVjNUtJMW1IUl9FNjN1cE5RcmZ4ZXciLCJhbGciOiJSUzI1NiIsIng1dCI6InljS3RWOG1aX0pmM25CVmJmZzRmblp1TFFSYyIsImtpZCI6InljsdsdmVhZC5BbGwgRmlsZXMuUsfsfzUKHZo5BQfhPH26AQUnLmr1rozsEtM83DxTYHaJpwCvENzCVfgtHdsfreMQgtgGkc2GFRiq7GZOLCECUOjIeL8PkcBK-g","token_type":"Bearer","refresh_token":"OAQABAAAAAAD32Me_adtYS4A5iUsE7inoTqUW_DWSnkyQAWn-MtVsEgKKHt1-YIHoIJhNo_hWgPFnHsfsfsfCCFdPpcf2rxgE0E7x955XHmKGkrGIsAsa0gL681bmmBRMd4bEXuVsJUrZCLPEKLAV88FBAbWDj2HttaCggkTodMI1UGHWQCAyqvgxq9a2w27MICTatC1nPQ3jh3kgFOyDNztdqtezNXVF5RM78Mb3s3uQPgbPy-60Vt1icF-gQzMTWfSsAEq_KWypj_RwKP4YjT5D4hoSv7Cbq22TofeLXxF7RP0-sGHF9g-NQAwvIwdagawEreFetI1DdhRUy7AgQJXaguKlCLy4nli3gj3f-G5XxhEowwrqvtgCe-WX9rQm5JYs5KnkGUG1Zdo08j7G1Hrlh1DMzwNyOPkzFmTuhHYxupAYGSKyElG9wrJxENa3xn7r8GYnjKQeAY3sM29bP6HDx_ReBBnkWxLquIxOHQvht4qjEYSNz_KAPiI15DR3ZTVkK-5vw7brXHAlHQk3t7FQBDP6thXzk1Cw_ptKuD1aSzZvBvLlaQSAA","expiry":"2020-02-21T23:31:44.4520449+08:00"}
drive_id = b!Tt6E3naAZkWLnLhk_HmVxfBlcVHbKBtGpFrddxr9TP9ncfZeQQMQSagjbbGEchqD
drive_type = business
--------------------
y) Yes this is OK
e) Edit this remote
d) Delete this remote
y/e/d> y
Current remotes:

Name                 Type
====                 ====
test                 onedrive

e) Edit existing remote
n) New remote
d) Delete remote
r) Rename remote
c) Copy remote
s) Set configuration password
q) Quit config
e/n/d/r/c/s/q> q
安装配置完成,最后执行挂载,和国际版一样,你可以选择已有的文件夹或者新建文件夹
挂载官方配置:rclone mount
rclone mount test:test/ /home/test --allow-other --allow-non-empty --vfs-cache-mode writes &
查看磁盘情况
df -h
[root@thinkvo ~]# df -h
文件系统        容量  已用  可用 已用% 挂载点
devtmpfs        849M     0  849M    0% /dev
tmpfs           859M     0  859M    0% /dev/shm
tmpfs           859M   97M  763M   12% /run
tmpfs           859M     0  859M    0% /sys/fs/cgroup
/dev/vda1        23G  2.6G   19G   12% /
tmpfs           172M     0  172M    0% /run/user/0
test:test       5.0T     0  5.0T    0% /home/test
显示已经挂载成功,然后我们可以在指定的同步文件夹中放置文件,马上我们就可以在网盘中看到了同步了。
取消挂载命令
fusermount -qzu /home/test
挂在的磁盘目录会自动同步,当然我们也可以不执行挂载,可采用如下模式手动或者定时任务执行
#加上 -P 表示可实时显示上传文件信息,包括速度和状态等等
#test: 为最初添加的名称
rclone copy test.txt test:test -P
如果我们要同步目录下的内容
rclone copy test_dir/ test:test -P注意,使用 rclone copy 命令会将指定的本地文件或者文件夹中的文件复制到指定的远程目录,跳过已经复制过的文件。
需要注意的是以上命令只会上传 test_dir 下边的文件和子目录,而 test_dir 本身文件夹则不会被上传
官方文档:rclone copy
2020/03/26 更新,因为 copy 只会将当前目录的新增文件复制到目标,但是删除的文件目标却不会删除。
所以更改命令使用 sync,该命令本地文件删除新增,目标也会执行相关新增删除,会和本地保持一致:
#可以在使用任意命令加上 --dry-run 来查看要执行的文件列表信息,比如为复制文件,要删除的文件,而不会执行操作
#比如:


rclone sync /home/file/ drive:file --dry-run

#所以我们更改命令如下,参数 -P 为现实执行信息

rclone sync /home/file/ drive:file -P
sync 文档:rclone sync


 2873
2873

 被折叠的 条评论
为什么被折叠?
被折叠的 条评论
为什么被折叠?
 到【灌水乐园】发言


