


 本文详细介绍了在Windows环境下安装JDK、配置系统变量、安装与配置Cygwin SSH服务,以及Hadoop安装与配置的过程。通过遵循步骤,用户能够成功在Windows系统上部署Hadoop和SSH服务。
转;http://www.cnblogs.com/tonychanleader/archive/2012/09/22/2697930.html
第一步:安装JDK
略。
第二步:安装Cygwin
官方网址:http://www.cygwin.com/ 下载setup.exe
安装时选择相应的安装包:
Base-->sed
Editors-->vim
Libs-->
Net-->OpenSSH
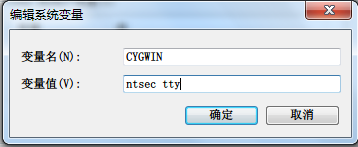
第三步:配置Windows系统变量
jdk安装:
JAVA_HOME=E:\Program Files\Java\jdk1.6.0_22
path中添加 jdk,jre:
%JAVA_HOME%\bin;%JAVA_HOME%\jre\bin;
path中添加cygwin bin路径:
E:\Program Files\cygwin\bin;E:\Program Files\cygwin\usr\sbin;
环境变量中-->新建变量-->CYGWIN-->对应的值为:ntsec tty
第四步:安装并配置sshd服务
键入命令:
ssh-host-config
本人第一次配置的时候没有成功,然后又卸载Cgywin(卸载cygwin,也不是一件容易的事情),卸载sshd服务,网上有的方法几乎都试过,总算迷迷糊糊就给设置好了。
可参考一下文章:http://pwcrab.blog.163.com/blog/static/16990382220107267443810/ (Cygwin上安装、启动ssh服务失败、ssh localhost失败的解决方案)
http://blog.csdn.net/souichiro/article/details/6284172 (如何在Cygwin中安装并配置SSH)
http://blog.csdn.net/cybercode/article/details/7080729 (cygwin使用总结)
http://blog.csdn.net/woshizy/article/details/4139868 (在windows下安装SSH)
注意:在安装ssh服务的时候仔细阅读,cygwin上的Info信息。

*** Info: On Windows Server 2003, Windows Vista, and above, the
*** Info: SYSTEM account cannot setuid to other users -- a capability
*** Info: sshd requires.  You need to have or to create a privileged
*** Info: account.  This script will help you do so.

*** Info: You appear to be running Windows XP 64bit, Windows 2003 Server,
*** Info: or later.  On these systems, it's not possible to use the LocalSystem
*** Info: account for services that can change the user id without an
*** Info: explicit password (such as passwordless logins [e.g. public key
*** Info: authentication] via sshd).

*** Info: If you want to enable that functionality, it's required to create
*** Info: a new account with special privileges (unless a similar account
*** Info: already exists). This account is then used to run these special
*** Info: servers.

*** Info: Note that creating a new user requires that the current account
*** Info: have Administrator privileges itself.

*** Info: No privileged account could be found.

*** Info: This script plans to use 'cyg_server'.
*** Info: 'cyg_server' will only be used by registered services.
win7下安装ssh服务,不是一路顺风的。
我的win7安装ssh服务后的变化如下:
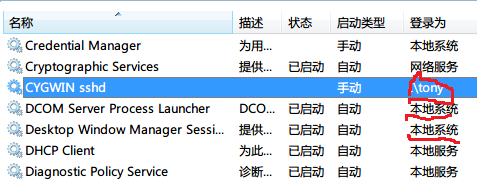
具体什么原因,我也不是很清楚。
最后记得,测试你的ssh服务是否安装成功。
第五步:配置Hadoop安装包
下载Hadoop安装包
修改配置文件:
hadoop-env.sh
export JAVA_HOME=/cygdrive/E/Progra~1/Java/jdk1.6.0_22

注意:Program Files改为Progra~1  否则 启动Hadoop的时候会报错。
core-site.xml
<configuration>
<property>
<name>fs.default.name</name>
<value>hdfs://localhost:9000</value>
</property>
</configuration>
hdfs-site.xml
<configuration>
<property>
<name>dfs.replication</name>
<value>1</value>
</property>
</configuration>
mapred-site.xml
<configuration>
<property>
<name>mapred.job.tracker</name>
<value>localhost:9001</value>
</property>
</configuration>
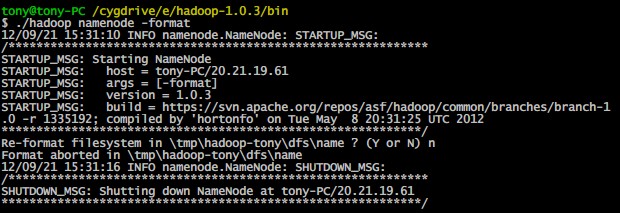
启动Hadoop
格式化HDFS文件系统:(执行此命令,必须进入hadoop的bin目录,而且hadoop的路径不能有空格,所以建议将hadoop安装在根目录)
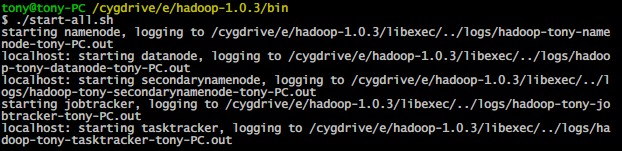
启动Hadoop守护进程:
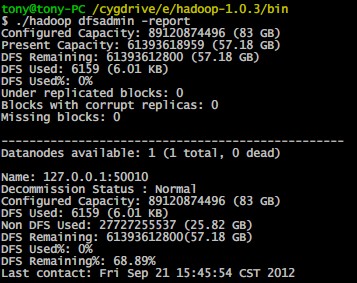
验证Hadoop是否启动:
历经千辛万苦,多少个不眠的日夜,多少人都劝我还是去Linux下,也曾经想放弃了,终于还是凭着坚强毅力,成功了。当然,这仅仅是第一步。


&spm=1001.2101.3001.5002&articleId=50686904&d=1&t=3&u=423036bdd3224a6d979e82232a01be6f)
 5115
5115

 被折叠的 条评论
为什么被折叠?
被折叠的 条评论
为什么被折叠?
 到【灌水乐园】发言


