


这里主要是根据NVIDIA中文社区教程,学习该教程总结。
0.参考
CUDA 入门教程:更简单的介绍 (更新版) - NVIDIA 技术博客
官方英文文档(求准) + 中文社区教程(求易) + 实际编码练习(求实)
(1)官方英文文档
https://docs.nvidia.com/search/index.html?q=CUDA%20C%2B%2B%20Programming%20Guide&page=1
https://docs.nvidia.com/cuda/pdf/CUDA_C_Programming_Guide.pdf
早些年的中文文档:https://www.nvidia.cn/docs/IO/51635/NVIDIA_CUDA_Programming_Guide_1.1_chs.pdf
(2)CUDA 中文社区与系统教程(用于理论学习)deepseek
这些资源通常以文章或文档的形式,系统性地介绍 CUDA 的核心概念和编程模型。
-
NVIDIA 官方开发者博客 - 中文版 (最强推荐)
-
简介: 这是由 NVIDIA 工程师和技术专家撰写的官方博客,权威且深入浅出。内容覆盖从入门到精通的各个方面,包括新特性介绍、性能优化技巧和最佳实践。是寻找中文高质量教程的首选之地。
-
CUDA 编程入门 - 知乎专栏 (经典入门系列)
-
链接: https://zhuanlan.zhihu.com/p/34587739 (这是系列开篇,可顺着作者主页找到后续文章)
-
简介: 知乎上非常经典的 CUDA 入门系列教程,作者“落痕微寒”写得非常详细和系统,对初学者极其友好,涵盖了环境配置、核心概念、内存管理、流和事件等。
-
-
CUDA 专家手册 (GitHub项目)
-
简介: 由 NVIDIA 工程师维护的 GitHub 项目,包含了 PPT 和代码。内容更偏向于对 CUDA 有基本了解后的深入学习和性能优化,是进阶学习的宝库。
-
CSDN 专栏:CUDA编程指南中文版
-
链接: https://blog.csdn.net/chenzhoujianying/category_8913675.html
-
简介: 这是社区开发者对官方英文《Programming Guide》的部分翻译和解读。可以作为阅读英文原版时的辅助参考,但请注意其可能不是最新版本。
-
(3)CUDA 实际编程与代码学习(用于动手实践)deepseek
这些资源提供了大量的代码示例、项目和对实际问题的解决方案,是“边做边学”的关键。
-
官方CUDA样例 (Official Samples) - 最好的实践材料
-
简介: 安装 CUDA Toolkit 后,本地自带了大量示例代码。这是最权威、最全面的学习资源。
-
如何找到: 默认安装路径通常在
C:\ProgramData\NVIDIA Corporation\CUDA Samples\vX.X(Windows) 或/usr/local/cuda/samples(Linux)。你可以使用 Visual Studio 或 Makefile 来编译和运行它们。 -
内容: 从最简单的
vectorAdd(向量加法)到复杂的matrixMul(矩阵乘法)、simpleCUFFT(傅里叶变换)、simpleDPPK(双精度性能测试)等,覆盖了所有核心API和概念。
-
-
GitHub 上的 CUDA 学习项目
-
awesome-cuda 项目
-
简介: 一个精心整理的 CUDA 资源列表,包含了大量的库、教程、博客和代码项目。你可以在这里找到几乎所有方向的 CUDA 实践资源。
-
搜索关键词: 在 GitHub 直接搜索以下关键词,可以找到大量个人学习项目和代码:
-
CUDA tutorial -
CUDA learning -
CUDA example -
学习CUDA(中文项目)
-
-
-
视频教程(B站 - 非常直观)
-
链接: 直接在 Bilibili 搜索
-
搜索关键词:
-
CUDA编程:会有很多完整的入门课程。 -
CUDA教程:通常是更短小精悍的特定主题视频。 -
CUDA安装:如果你在环境配置上遇到问题,视频演示是最直观的。
-
-
特点: 视频教程的优势在于可以看到完整的操作流程和代码编写过程,对于环境配置和调试入门非常有帮助。
-
1.实例
(1)简单总结
① 是什么样的例子?
是一个一百万数据赋值、并做加法的一个运算,百万数据互相不依赖,所以是可以进行并行操作的。
② 做了哪些操作?
CPU ---> GPU CUDA单SM单线程加速 ---> GPU CUDA单SM多线程加速 --->
GPU CUDA多SM多线程加速 ---> GPU CUDA多SM多线程加速、数据拷贝到GPU上
③ c++cpu编译与gpu nvcc编译
// cpu
g++ add.cpp -o add
./add

// gpu
nvcc add.cu -o add_cuda
./add_cuda
cpu通过g++进行编译,gpu cuda通过nvcc进行编译;cpu版本的文件后缀命名为".cpp",gpu cuda文件后缀名为".cu"。执行的时候都是对编译好的二进制可执行文件进行执行。
④ gpu cuda分析工具
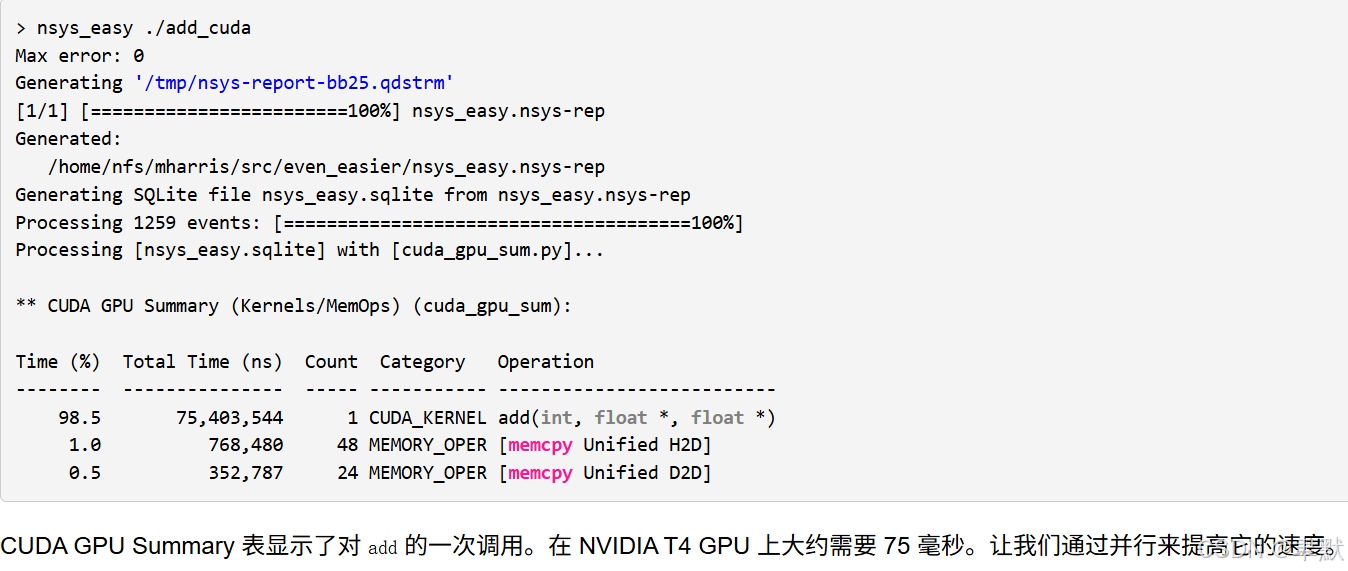
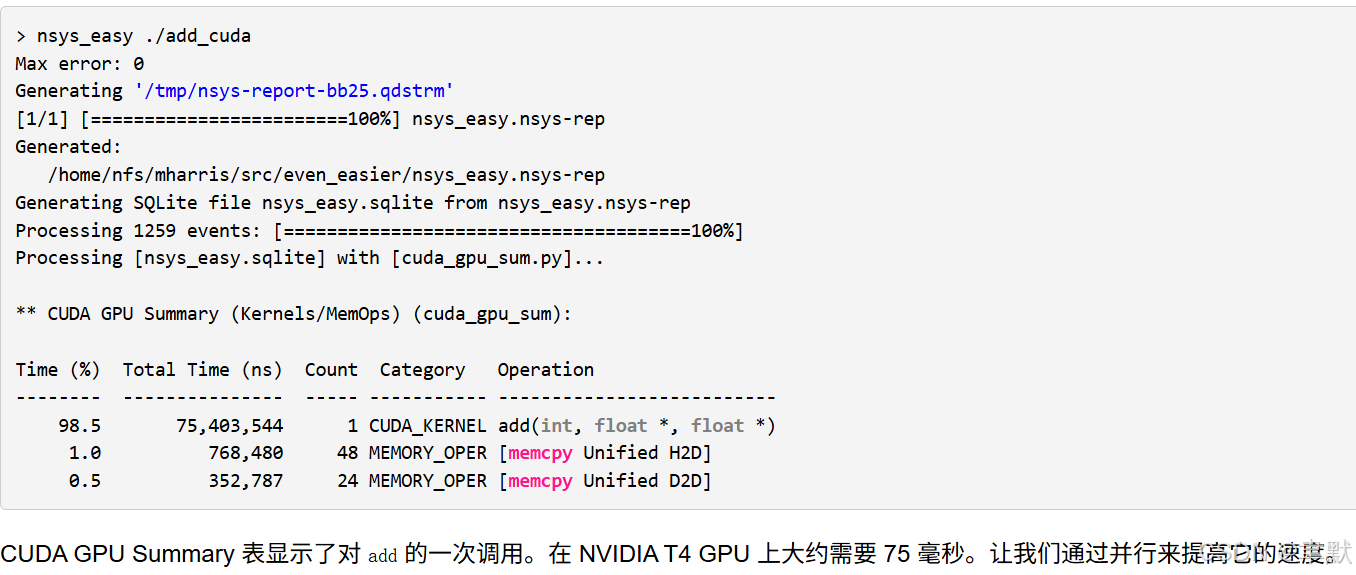
// 使用 NSight Systems CLI `nsys` 运行内核
nsys profile -t cuda --stats=true ./add_cuda

// https://github.com/harrism/nsys_easy 需下载 nsys_easy,并将其放在 PATH (甚至当前目录) 中的某个位置即可
nsys_easy ./add_cuda
可以得到执行时间等,用于分析哪个操作耗时
(2)例子
① CPU 1s
#include <iostream>
#include <math.h>

// function to add the elements of two arrays
void add(int n, float *x, float *y)
{
 for (int i = 0; i < n; i++)
     y[i] = x[i] + y[i];
}

int main(void)
{
 int N = 1<<20; // 1M elements

 float *x = new float[N];
 float *y = new float[N];

 // initialize x and y arrays on the host
 for (int i = 0; i < N; i++) {
   x[i] = 1.0f;
   y[i] = 2.0f;
 }

 // Run kernel on 1M elements on the CPU
 add(N, x, y);

 // Check for errors (all values should be 3.0f)
 float maxError = 0.0f;
 for (int i = 0; i < N; i++)
   maxError = fmax(maxError, fabs(y[i]-3.0f));
 std::cout << "Max error: " << maxError << std::endl;

 // Free memory
 delete [] x;
 delete [] y;

 return 0;
}
② GPU CUDA单SM单线程加速 75ms
#include <iostream>
#include <math.h>

// Kernel function to add the elements of two arrays
__global__
void add(int n, float *x, float *y)
{
 for (int i = 0; i < n; i++)
   y[i] = x[i] + y[i];
}

int main(void)
{
 int N = 1<<20;
 float *x, *y;

 // Allocate Unified Memory – accessible from CPU or GPU
 cudaMallocManaged(&x, N*sizeof(float));
 cudaMallocManaged(&y, N*sizeof(float));

 // initialize x and y arrays on the host
 for (int i = 0; i < N; i++) {
   x[i] = 1.0f;
   y[i] = 2.0f;
 }

 // Run kernel on 1M elements on the GPU
 add<<<1, 1>>>(N, x, y);

 // Wait for GPU to finish before accessing on host
 cudaDeviceSynchronize();

 // Check for errors (all values should be 3.0f)
 float maxError = 0.0f;
 for (int i = 0; i < N; i++) {
   maxError = fmax(maxError, fabs(y[i]-3.0f));
 }
 std::cout << "Max error: " << maxError << std::endl;

 // Free memory
 cudaFree(x);
 cudaFree(y);
  return 0;
}
③ GPU CUDA单SM多线程加速 4.2ms
#include <iostream>
#include <math.h>

// Kernel function to add the elements of two arrays
__global__
void add(int n, float *x, float *y)
{
  int index = threadIdx.x;
  int stride = blockDim.x;
  for (int i = index; i < n; i += stride)
      y[i] = x[i] + y[i];
}

int main(void)
{
 int N = 1<<20;
 float *x, *y;

 // Allocate Unified Memory – accessible from CPU or GPU
 cudaMallocManaged(&x, N*sizeof(float));
 cudaMallocManaged(&y, N*sizeof(float));

 // initialize x and y arrays on the host
 for (int i = 0; i < N; i++) {
   x[i] = 1.0f;
   y[i] = 2.0f;
 }

 // Run kernel on 1M elements on the GPU, 256 threads
 add<<<1, 256>>>(N, x, y);

 // Wait for GPU to finish before accessing on host
 cudaDeviceSynchronize();

 // Check for errors (all values should be 3.0f)
 float maxError = 0.0f;
 for (int i = 0; i < N; i++) {
   maxError = fmax(maxError, fabs(y[i]-3.0f));
 }
 std::cout << "Max error: " << maxError << std::endl;

 // Free memory
 cudaFree(x);
 cudaFree(y);
  return 0;
}
④ GPU CUDA多SM多线程加速 4.5ms
#include <iostream>
#include <math.h>
// Kernel function to add the elements of two arrays
__global__
void add(int n, float *x, float *y)
{
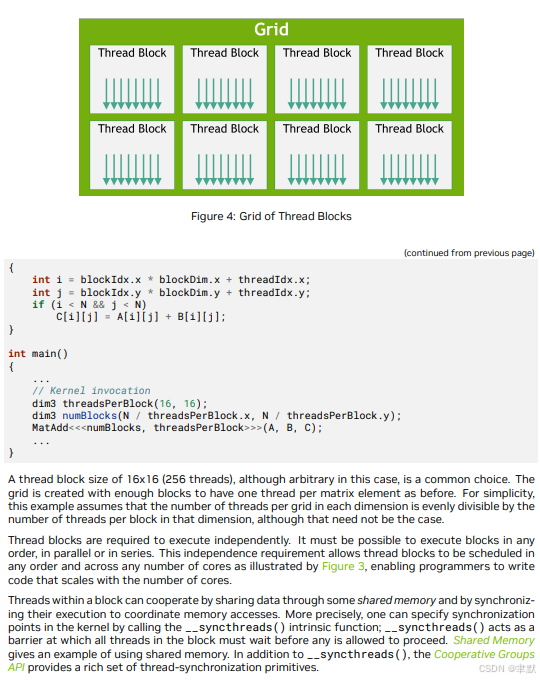
int index = blockIdx.x * blockDim.x + threadIdx.x;
int stride = blockDim.x * gridDim.x;
for (int i = index; i < n; i += stride)
y[i] = x[i] + y[i];
}
int main(void)
{
int N = 1<<20;
float *x, *y;
// Allocate Unified Memory – accessible from CPU or GPU
cudaMallocManaged(&x, N*sizeof(float));
cudaMallocManaged(&y, N*sizeof(float));
// initialize x and y arrays on the host
for (int i = 0; i < N; i++) {
x[i] = 1.0f;
y[i] = 2.0f;
}
// Run kernel on 1M elements on the GPU, numBlocks blocks, blockSize threads
int blockSize = 256;
int numBlocks = (N + blockSize - 1) / blockSize;
add<<<numBlocks, blockSize>>>(N, x, y);
// Wait for GPU to finish before accessing on host
cudaDeviceSynchronize();
// Check for errors (all values should be 3.0f)
float maxError = 0.0f;
for (int i = 0; i < N; i++) {
maxError = fmax(maxError, fabs(y[i]-3.0f));
}
std::cout << "Max error: " << maxError << std::endl;
// Free memory
cudaFree(x);
cudaFree(y);
return 0;
}
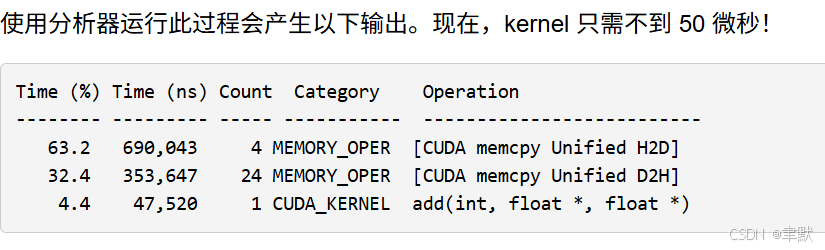
⑤GPU CUDA多SM多线程加速、数据拷贝到GPU上 50微秒
#include <iostream>
#include <math.h>

// Kernel function to add the elements of two arrays
__global__
void add(int n, float *x, float *y)
{
  int index = blockIdx.x * blockDim.x + threadIdx.x;
  int stride = blockDim.x * gridDim.x;
  for (int i = index; i < n; i += stride)
    y[i] = x[i] + y[i];
}

int main(void)
{
 int N = 1<<20;
 float *x, *y;

 // Allocate Unified Memory – accessible from CPU or GPU
 cudaMallocManaged(&x, N*sizeof(float));
 cudaMallocManaged(&y, N*sizeof(float));

 // initialize x and y arrays on the host
 for (int i = 0; i < N; i++) {
   x[i] = 1.0f;
   y[i] = 2.0f;
 }

// Prefetch the x and y arrays to the GPU
cudaMemPrefetchAsync(x, N*sizeof(float), 0, 0);
cudaMemPrefetchAsync(y, N*sizeof(float), 0, 0);

 // Run kernel on 1M elements on the GPU, numBlocks blocks, blockSize threads
int blockSize = 256;
int numBlocks = (N + blockSize - 1) / blockSize;
add<<<numBlocks, blockSize>>>(N, x, y);

 // Wait for GPU to finish before accessing on host
 cudaDeviceSynchronize();

 // Check for errors (all values should be 3.0f)
 float maxError = 0.0f;
 for (int i = 0; i < N; i++) {
   maxError = fmax(maxError, fabs(y[i]-3.0f));
 }
 std::cout << "Max error: " << maxError << std::endl;

 // Free memory
 cudaFree(x);
 cudaFree(y);
  return 0;
}
(3)CUDA编程解析
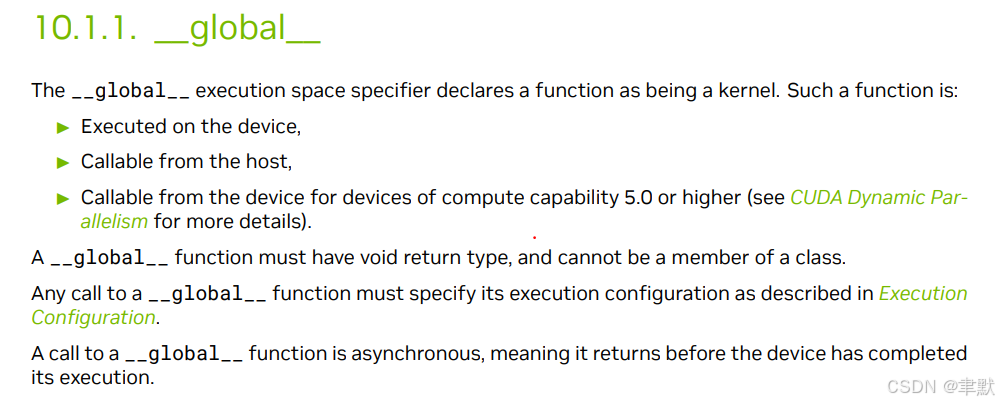
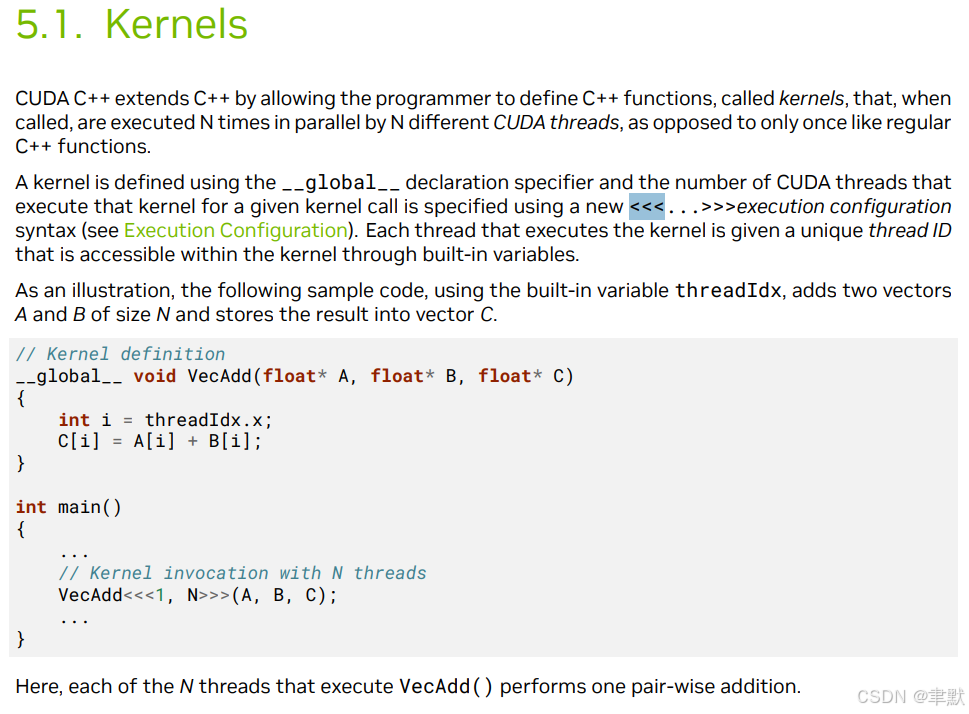
① __global__ 函数类型限定词
此 __global__ function 称为 CUDA 内核 ,在 GPU 上运行。 在 GPU 上运行的代码通常称为设备代码 ,而 在 CPU 上运行的代码则是主机代码 。
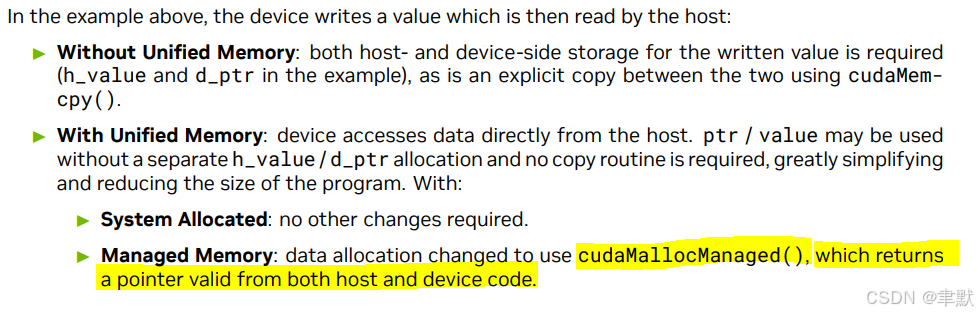
②cudaMallocManaged
调用 cudaMallocManaged(),它会返回可从主机 (CPU) 代码或设备 (GPU) 代码访问的指针。
③add<<<numBlocks, blockSize>>>(N, x, y)
需要启动 add() 内核,以在 GPU 上调用它。CUDA 核函数启动使用三重角度括号语法 <<< >>> 指定。我只需将其添加到参数列表之前的 add 调用中。
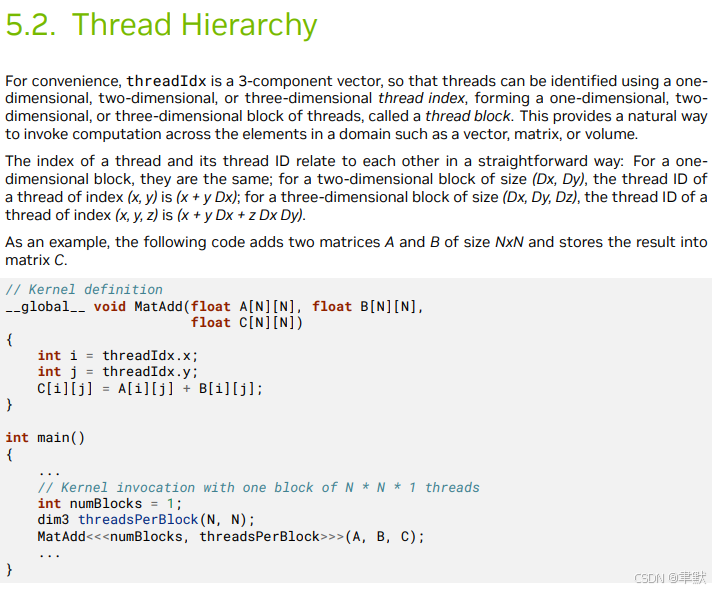
单block,多线程的使用方法,会有一个内置参数threadIdx。在编程中,threadIdx 通常是在 CUDA 编程中遇到的,特别是在使用 NVIDIA 的 CUDA 平台进行 GPU 编程时。threadIdx 是一个内置变量,它代表了当前正在执行的线程在某个维度上的索引。在 CUDA 中,每个线程都可以访问 threadIdx 变量,以确定其在网格(grid)中的位置。
例如,在一个简单的 CUDA kernel 中,如果你有一个二维的线程块(block),threadIdx.x 和 threadIdx.y 可以用来分别获取当前线程在 x 和 y 方向上的索引。
-
threadIdx.x返回当前线程在 x 方向上的索引。 -
blockDim.x返回当前线程块在 x 方向上的大小。 -
blockIdx.x返回当前线程块在 x 方向上的索引。
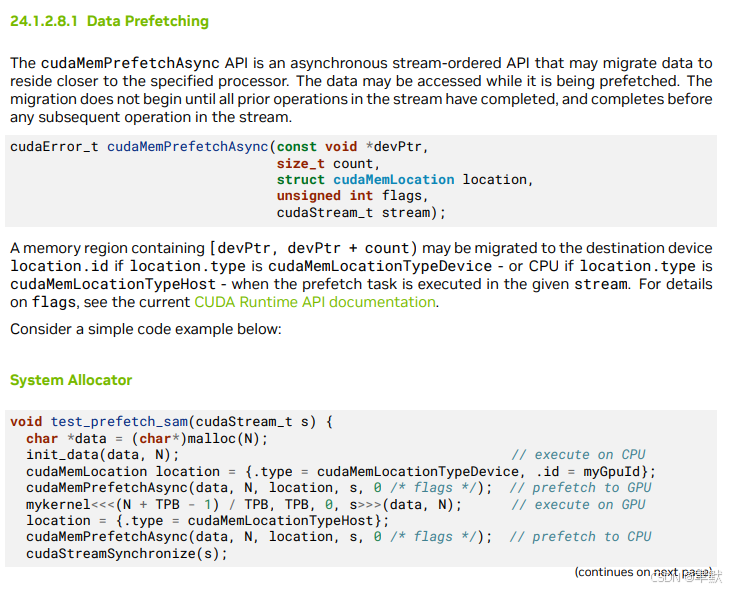
④cudaMemPrefetchAsync(x, N*sizeof(float), 0, 0)
知道内核需要哪些内存 (x 和 y 数组),所以我可以使用 prefetching 来确保数据在内核需要之前位于 GPU 上。我在启动 kernel 之前使用 cudaMemPrefetchAsync() 函数来执行此操作
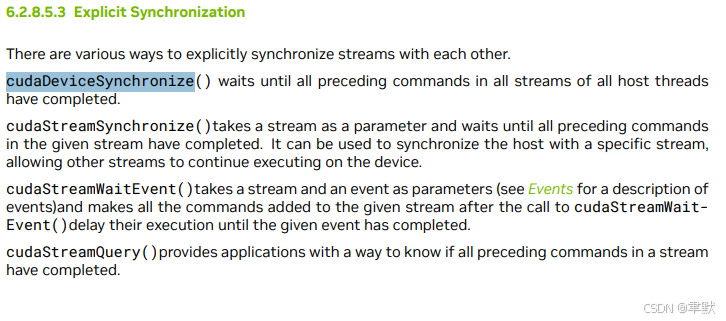
⑤cudaDeviceSynchronize
需要 CPU 等到 kernel 完成后再访问结果 (因为 CUDA kernel 启动不会阻塞调用 CPU 线程) 。为此,我只需调用 cudaDeviceSynchronize() ,然后再在 CPU 上进行最后一次错误检查。
⑥cudaFree
要释放数据,只需将指针传递给 cudaFree() 即可。


 3924
3924

 被折叠的 条评论
为什么被折叠?
被折叠的 条评论
为什么被折叠?
 到【灌水乐园】发言


