


 本文档介绍了使用Oracle Enterprise Manager Database Control管理数据库存储结构,包括控制文件、在线重做日志文件、归档重做日志文件和数据文件的管理。讨论了数据库存储结构的逻辑与物理组件,以及如何在数据库故障时进行恢复。此外,还提到了撤销数据的管理,推荐使用undo表空间。
文章目录
6 Managing Database Storage Structures
This chapter discusses using Oracle Enterprise Manager Database Control (Database Control) to view and manage the storage structures of your database. This chapter contains the following sections:
这一章讨论使用EM查看和管理你的数据库存储结构,这一章包含一下内容
•About Database Storage Structures
关于数据库存储结构
•Viewing Database Storage Structure Information
查看数据库存储结构信息
•Performing Common Database Storage Tasks
执行通用数据库存储任务
•Managing the Online Redo Log
管理在线redo日志
•Managing Undo Data
管理undo数据
•Storage: Oracle By Example Series
About Database Storage Structures
关于数据库存储结构
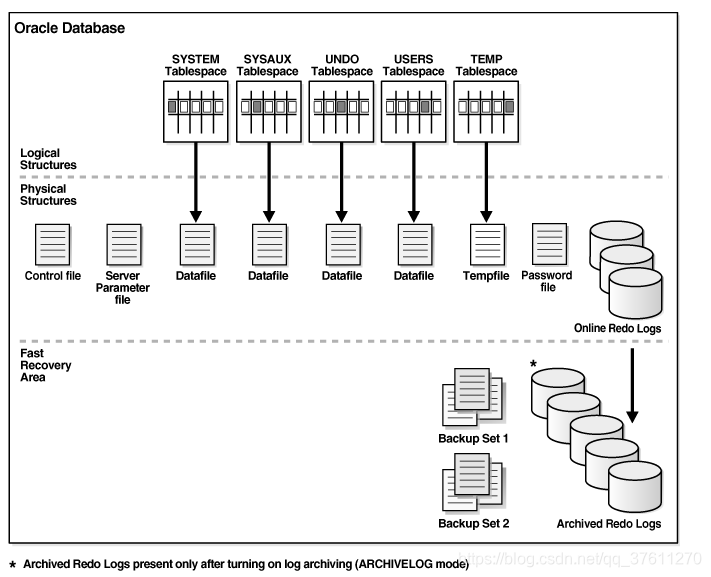
An Oracle database is made up of physical and logical structures. Physical structures can be seen and operated on from the operating system, such as the physical files that store data on a disk.
oracle数据库是由物理结构和逻辑结构组成的,物理结构可以从操作中看到,比如物理文件存储数据
Logical structures are created and recognized by Oracle Database and are not known to the operating system. The primary logical structure in a database, a tablespace, contains physical files. The applications developer or user may be aware of the logical structure, but is not usually aware of this physical structure. The database administrator (DBA) must understand the relationship between the physical and logical structures of a database.
逻辑结构是被oracle 创建和管理的,而且在操作系统并不能看到,最基础的逻辑结构是表空间,包含物理文件。应用程序开发人员或用户可能知道逻辑结构,但通常不知道这种物理结构。DBA必须清楚逻辑结构和物理结构直接的关系
Figure 6-1 shows the relationships between logical and physical structures. This figure also shows recovery-related structures that are optionally kept in the fast recovery area. See “Fast Recovery Area” for more information.
Figure 6-1 Oracle Database Storage Structures
Oracle Database can automate much of the management of its structure. Oracle Enterprise Manager Database Control (Database Control) provides a Web-based graphical user interface (GUI) to enable easier management and monitoring of your database.
数据库可以自动的管理结构,EM提供了一个web页面更容易的管理和监控你的数据库
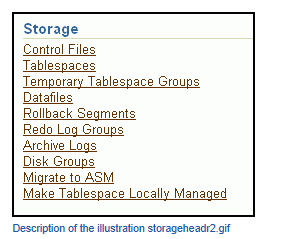
To view a database storage structure, go to the Storage section of the Server subpage and click on any of the links to access the storage pages.
This section provides background information about the various database storage structures. It contains the following topics:
•About Control Files
•About Online Redo Log Files
•About Archived Redo Log Files
•About Rollback Segments
•About Data Files
•About Tablespaces
•About Other Storage Structures
About Control Files
关于控制文件
A control file tracks the physical components of the database. It is the root file that the database uses to find all the other files used by the database. Because of the importance of the control file, Oracle recommends that the control file be multiplexed, or have multiple identical copies. For databases created with Oracle Database Configuration Assistant (DBCA), three copies of the control file are automatically created and kept synchronized with each other.
控制文件跟踪数据库的物理组件。它是数据库用来查找数据库使用的所有其他文件的根文件。由于控制文件的重要性,Oracle建议对控制文件进行多路复用,或具有多个相同的副本。对于使用Oracle数据库配置助手(DBCA)创建的数据库,将自动创建控制文件的三个副本,并保持相互同步。
If any control file fails, then your database becomes unavailable. If you have a control file copy, however, you can shut down your database and re-create the failed control file from the copy, then restart your database. Another option is to delete the failed control file from the CONTROL_FILES initialization parameter and restart your database using the remaining control files.
如果任何控制文件失败,则数据库将不可用。但是,如果有控制文件副本,则可以关闭数据库并从副本中重新创建失败的控制文件,然后重新启动数据库。另一个选项是从控制文件初始化参数中删除失败的控制文件,然后使用其余的控制文件重新启动数据库。
About Online Redo Log Files
关于在线redo日志文件
Every Oracle database has a set of two or more online redo log files. The set of online redo log files is collectively known as the redo log for the database. A redo log is made up of redo entries, which are also called redo records.
每个Oracle数据库都有一组两个或多个联机重做日志文件。联机重做日志文件集合称为数据库的重做日志。重做日志由重做条目组成,这些条目也称为重做记录。
The online redo log stores a copy of the changes made to data. If a failure requires a data file to be restored from backup, then the recent data changes that are missing from the restored data file can be obtained from the online redo log files, so work is never lost. The online redo log files are used to recover a database after hardware, software, or media failure. To protect against a failure involving the online redo log file itself, Oracle Database can multiplex the online redo log file so that two or more identical copies of the online redo log file can be maintained on different disks.
联机重做日志存储对数据所做更改的副本。如果失败需要从备份中还原数据文件,则可以从联机重做日志文件中获取从已还原数据文件中丢失的最近数据更改,因此不会丢失工作。联机重做日志文件用于在硬件、软件或媒体故障后恢复数据库。为了防止在线重做日志文件本身出现故障,Oracle数据库可以多路复用在线重做日志文件,以便在不同的磁盘上维护两个或多个相同的在线重做日志文件副本。
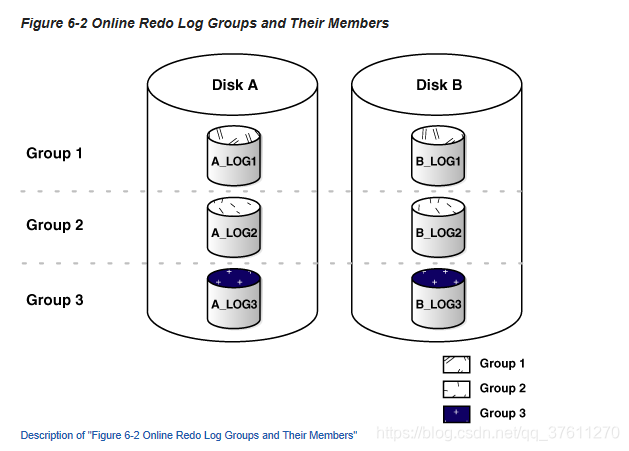
The online redo log for a database consists of groups of online redo log files. A group consists of an online redo log file and its multiplexed copies. Each identical copy is considered to be a member of that group. Each group is defined by a number, such as Group 1.
数据库的联机重做日志由联机重做日志文件组组成。一个组由一个在线重做日志文件及其多路复用副本组成。每个相同的副本都被视为该组的成员。每个组由一个数字定义,如组1
Figure 6-2 shows the configuration of a database that has three online redo log groups and two members in each group. For each group, the members are stored on separate disks for maximum availability. For example, the members of Group 1 are the redo log files A_LOG1 and B_LOG1.
图6-2显示了一个数据库的配置,该数据库有三个在线重做日志组,每个组中有两个成员。对于每个组,成员存储在单独的磁盘上以获得最大的可用性。例如,组1的成员是重做日志文件a_log1和b_log1。
The database log writer process (LGWR) writes redo records from the memory buffer to a redo log group until the log files in that group reach their storage size limit, or until you request a log switch operation. The LGWR process then writes to the next log group. The LGWR process performs this action in a circular fashion so that the oldest group is overwritten by the most recent redo records.
数据库日志编写器进程(lgwr)将重做记录从内存缓冲区写入重做日志组,直到该组中的日志文件达到其存储大小限制,或者直到请求日志切换操作。然后lgwr进程写入下一个日志组。lgwr进程以循环方式执行此操作,以便最旧的组被最新的重做记录覆盖。
About Archived Redo Log Files
关于归档重做日志文件
When you enable archiving of the online redo logs, Oracle Database copies the online redo log files to another location before they are overwritten. These copied files are referred to as archived redo log files. You can archive to multiple locations.
当启用联机重做日志的存档时,Oracle数据库会将联机重做日志文件复制到另一个位置,然后再覆盖它们。这些复制的文件称为存档的重做日志文件。您可以存档到多个位置
These archived redo log files extend the amount of redo data that can be saved and are used for recovery. Archived redo log files are required to recover a backup of the database from the time of the backup to the current time. Archiving can be either enabled or disabled for the database, but Oracle strongly recommends that you enable archiving. Oracle also recommends that you configure the database to write archived redo log files to the fast recovery area.
这些存档的重做日志文件扩展了可以保存并用于恢复的重做数据量。需要存档的重做日志文件才能将数据库的备份从备份时间恢复到当前时间。可以为数据库启用或禁用存档,但Oracle强烈建议您启用存档。Oracle还建议您将数据库配置为将存档的重做日志文件写入快速恢复区域。
About Rollback Segments
关于回滚段
Rollback segments were database structures used to track undo information for the database in earlier releases of Oracle Database. Now, the preferred way of managing undo information is with the undo tablespace. For more information, see “Managing Undo Data”.
回滚段是数据库结构,用于跟踪Oracle数据库早期版本中数据库的撤消信息。现在,管理撤消信息的首选方法是使用撤消表空间。有关详细信息,请参见“管理撤消数据”。
About Data Files
Data files are the operating system files that store the data within the database. The data is written to these files in an Oracle proprietary format that cannot be read by other programs. Tempfiles are a special class of data files that are associated only with temporary tablespaces.
数据文件是在数据库中存储数据的操作系统文件。数据以Oracle专有格式写入这些文件,其他程序无法读取这些文件。tempfiles是一类特殊的数据文件,只与临时表空间相关联。
Data files can be broken down into the following components:
数据文件可以分解为以下组件:
•Segment
段
A segment contains a specific type of database object. For example, a table is stored in a table segment, and an index is stored in an index segment. A data file can contain many segments.
段包含特定类型的数据库对象。例如,表存储在表段中,索引存储在索引段中。数据文件可以包含多个段
•Extent区
An extent is a contiguous set of data blocks within a segment. Oracle Database allocates space for segments in units of one extent. When the existing extents of a segment are full, the database allocates another extent for that segment.
数据块是一个段内的一组连续数据块。Oracle数据库以一个区段为单位为区段分配空间。当一个段的现有扩展数据块已满时,数据库将为该段分配另一个扩展数据块。
•Data block
A data block, also called a database block, is the smallest unit of I/O to database storage. An extent consists of several contiguous data blocks. The database uses a default block size at database creation.
数据块,也称为数据库块,是数据库存储I/O的最小单位。一个数据块由几个连续的数据块组成。数据库在创建数据库时使用默认块大小
After the database has been created, it is not possible to change the default block size without re-creating the database. It is possible, however, to create a tablespace with a block size different than the default block size.
创建数据库后,如果不重新创建数据库,就无法更改默认块大小。但是,可以创建块大小与默认块大小不同的表空间。
Segments, extents, and data blocks are all logical structures. Only Oracle Database can determine how many data blocks are in a file. The operating system recognizes only files and operating system blocks, not the number of data blocks in an Oracle Database file. Each data block maps to one or more operating system blocks.
段、扩展数据块和数据块都是逻辑结构。只有Oracle数据库才能确定文件中有多少数据块。操作系统只识别文件和操作系统块,而不识别Oracle数据库文件中的数据块数量。每个数据块映射到一个或多个操作系统块
About Tablespaces
A database is divided into logical storage units called tablespaces, which group related logical structures (such as tables, views, and other database objects). For example, all application objects can be grouped into a single tablespace to simplify maintenance operations.
数据库分为称为表空间的逻辑存储单元,表空间对相关逻辑结构(如表、视图和其他数据库对象)进行分组。例如,可以将所有应用程序对象分组到一个表空间中,以简化维护操作。
A tablespace consists of one or more physical data files. Database objects assigned to a tablespace are stored in the physical data files of that tablespace.
表空间由一个或多个物理数据文件组成。分配给表空间的数据库对象存储在该表空间的物理数据文件中。
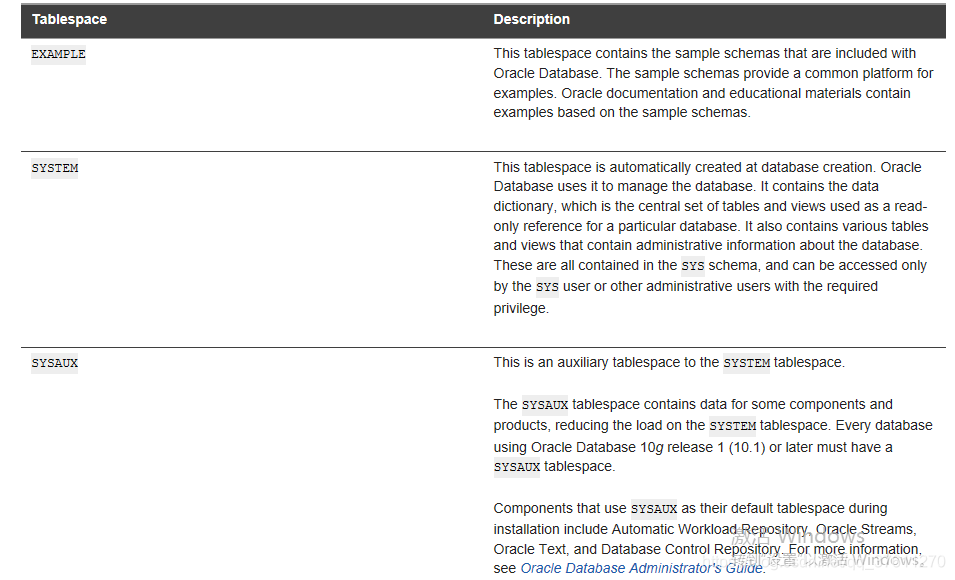
When you create an Oracle database, some tablespaces already exist, such as SYSTEM and SYSAUX.
创建Oracle数据库时,某些表空间已经存在,例如System和SysAux
Tablespaces provide a means to physically locate data on storage. When you define the data files that comprise a tablespace, you specify a storage location for these files. For example, you might specify a data file location for a certain tablespace as a designated host directory (implying a certain disk volume) or designated Oracle Automatic Storage Management disk group. Any schema objects assigned to that tablespace then get located in the specified storage location. Tablespaces also provide a unit of backup and recovery. The backup and recovery features of Oracle Database enable you to back up or recover at the tablespace level.
表空间提供了一种在存储中物理定位数据的方法。定义组成表空间的数据文件时,可以为这些文件指定存储位置。例如,可以将某个表空间的数据文件位置指定为指定的主机目录(表示某个磁盘卷)或指定的Oracle自动存储管理磁盘组。然后将分配给该表空间的任何模式对象定位到指定的存储位置。表空间还提供一个备份和恢复单元。Oracle数据库的备份和恢复功能使您能够在表空间级别进行备份或恢复。
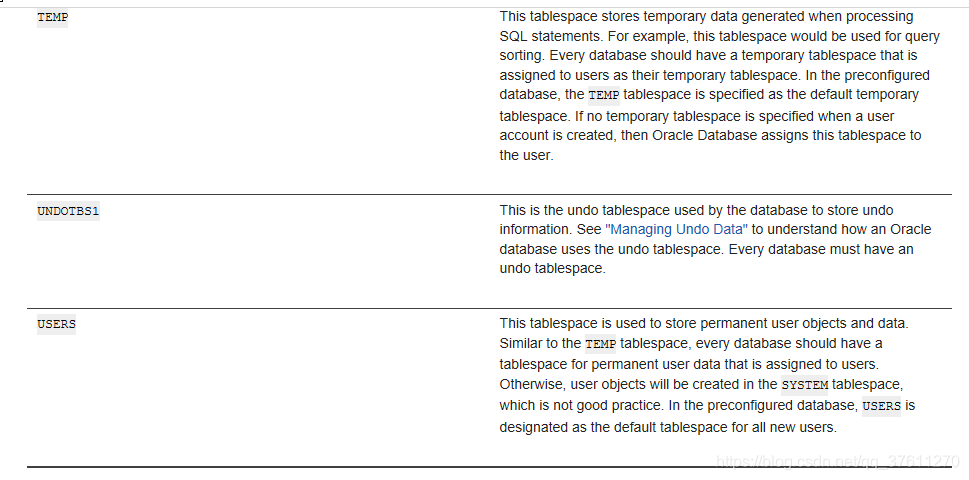
Table 6-1 describes some tablespaces included in the database.
Table 6-1 Tablespaces and Descriptions
You can create new tablespaces to support your user and application data requirements. During tablespace creation, you set the following parameters:
•Locally Managed Tablespaces
本地化管理的表空间
•Tablespace Types
表空间类型
•Tablespace Status
表空间状态
•Autoextend Tablespace
自动扩展表空间
•Encrypted Tablespaces
表空间的加密
Locally Managed Tablespaces
本地化管理的表空间
Space management within a tablespace involves keeping track of available (free) and used space, so that space is allocated efficiently during data insertion and deletion. Locally managed tablespaces keep the space allocation information within the tablespace, not in the data dictionary, thus offering better performance. By default, Oracle Database sets all newly created tablespaces to be locally managed with automatic segment management, a feature that further improves performance.
表空间中的空间管理包括跟踪可用(空闲)和已用空间,以便在数据插入和删除期间有效地分配空间。本地管理的表空间将空间分配信息保存在表空间中,而不是数据字典中,从而提供更好的性能。默认情况下,Oracle数据库将所有新创建的表空间设置为使用自动段管理进行本地管理,这一功能进一步提高了性能
Tablespace Types
表空间类型
There are three types of tablespaces:
以下是三类表空间
•Permanent永久的
You use permanent tablespaces to store your user and application data. Oracle Database uses permanent tablespaces to store permanent data, such as system data. Each user is assigned a default permanent tablespace.
使用永久表空间存储用户和应用程序数据。Oracle数据库使用永久表空间存储永久数据,如系统数据。每个用户都被分配了一个默认的永久表空间。
•Undo
A database running in automatic undo management mode transparently creates and manages undo data in the undo tablespace. Oracle Database uses undo data to roll back transactions, to provide read consistency, to help with database recovery, and to enable features such as Oracle Flashback Query. A database instance can have only one active undo tablespace.
以自动撤消管理模式运行的数据库在撤消表空间中透明地创建和管理撤消数据。Oracle数据库使用撤消数据回滚事务、提供读取一致性、帮助数据库恢复以及启用诸如Oracle Flashback查询之类的功能。一个数据库实例只能有一个活动的撤消表空间
•Temporary
Temporary tablespaces are used for storing temporary data, as would be created when SQL statements perform sort operations. An Oracle database gets a temporary tablespace when the database is created. You would create another temporary tablespace if you were creating a temporary tablespace group. Under typical circumstances, you do not have to create additional temporary tablespaces. If you have an extremely large database, then you might configure additional temporary tablespaces.
临时表空间用于存储临时数据,就像SQL语句执行排序操作时创建的那样。Oracle数据库在创建数据库时会得到一个临时表空间。如果要创建临时表空间组,您将创建另一个临时表空间。在典型情况下,您不必创建额外的临时表空间。如果您有一个非常大的数据库,那么您可以配置额外的临时表空间。
The physical files that comprise a temporary tablespace are called tempfiles, as opposed to data files.
组成临时表空间的物理文件称为tempfiles,而不是数据文件。
The TEMP tablespace is typically used as the default temporary tablespace for users who are not explicitly assigned a temporary tablespace.
临时表空间通常用作未显式分配临时表空间的用户的默认临时表空间。
Tablespace Status
表空间状态
You can set tablespace status as follows:
可以按如下方式设置表空间状态:
•Read Write
Users can read and write to the tablespace after it is created. This is the default.
创建表空间后,用户可以对其进行读写操作。这是默认设置
•Read Only
If the tablespace is created Read Only, then the tablespace cannot be written to until its status is changed to Read Write. It is unlikely that you would create a Read Only tablespace, but you might change it to that status after you have written data to it that you do not want modified.
如果表空间是以只读方式创建的,那么在将其状态更改为读写之前,不能将表空间写入。您不太可能创建只读表空间,但在向其写入不希望修改的数据后,您可能会将其更改为该状态。
•Offline
If the tablespace has a status of Offline, then no users can access it. You might change the status of a tablespace to Offline before performing maintenance or recovery on the data files associated with that tablespace.
如果表空间的状态为“脱机”,则没有用户可以访问它。在对与该表空间关联的数据文件执行维护或恢复之前,可以将该表空间的状态更改为脱机。
Autoextend Tablespace
You can set a tablespace to automatically extend itself by a specified amount when it reaches its size limit. If you do not enable autoextend, then you are alerted when the tablespace reaches its critical or warning threshold size. The critical and warning threshold parameters have default values that you can change at any time. These parameters also cause alerts to be generated for autoextending tablespaces that are approaching their specified size limit. You can respond to size alerts by manually increasing the tablespace size. You do so by increasing the size of one or more of the tablespace data files or by adding another data file to the tablespace.
您可以设置一个表空间,使其在达到其大小限制时自动扩展指定的数量。如果不启用自动扩展,那么当表空间达到其临界值或警告阈值大小时,就会收到警报。临界值和警告阈值参数具有可以随时更改的默认值。这些参数还导致为接近其指定大小限制的自动扩展表空间生成警报。您可以通过手动增加表空间大小来响应大小警报。您可以通过增加一个或多个表空间数据文件的大小或向表空间添加另一个数据文件来实现这一点。
Encrypted Tablespaces
Encrypted tablespaces primarily protect your data from unauthorized access by means other than through the database. For example, when encrypted tablespaces are written to backup media for travel from one Oracle database to another or for travel to an off-site facility for storage, they remain encrypted. Also, encrypted tablespaces protect data from users who try to circumvent the security features of the database and access database files directly through the operating system file system.
加密表空间主要通过数据库以外的其他方式保护数据不受未经授权的访问。例如,当将加密的表空间写入备份介质,以便从一个Oracle数据库传输到另一个Oracle数据库,或者传输到一个非现场设施进行存储时,这些表空间仍然是加密的。此外,加密的表空间还可以保护数据不受试图绕过数据库安全功能的用户的影响,并通过操作系统文件系统直接访问数据库文件。
You can encrypt any permanent tablespace to protect sensitive data. When you encrypt a tablespace, all tablespace blocks are encrypted. All segment types are supported for encryption, including tables, clusters, indexes, LOBs, table and index partitions, and so on.Tablespace encryption is completely transparent to your applications, so no application modification is necessary.
您可以加密任何永久表空间以保护敏感数据。当您加密一个表空间时,所有的表空间块都会被加密。加密支持所有段类型,包括表、群集、索引、LOB、表和索引分区等。表空间加密对应用程序完全透明,因此不需要修改应用程序。
About Other Storage Structures
Other storage structures that can exist in an Oracle database include the initialization parameter file, the password file, and backup files.
Oracle数据库中可能存在的其他存储结构包括初始化参数文件、密码文件和备份文件。
Initialization Parameter File
初始化参数文件
Initialization parameters are used by the Oracle instance at startup to determine the run-time properties and resources for the database. Some parameters can be set or modified while the database is running. Other initialization parameters require the database to be restarted for the changes to take effect. See “Viewing and Modifying Initialization Parameters”.
Oracle实例在启动时使用初始化参数来确定数据库的运行时属性和资源。在数据库运行时,可以设置或修改某些参数。其他初始化参数要求重新启动数据库以使更改生效。请参见“查看和修改初始化参数”。
Password File
A database can use a password file to authenticate administrative users with SYSDBA or SYSOPER connection privileges. A password file is required for remote connections to the database as SYSDBA or SYSOPER. These privileges enable a DBA to start and shut down the database and perform other high-level administrative tasks. This password file is outside of the database itself, thereby enabling the authentication of a DBA when the database is not yet started. (A DBA must authenticate before starting the database.)
数据库可以使用密码文件对具有sysdba或sysoper连接特权的管理用户进行身份验证。以sysdba或sysoper身份远程连接到数据库需要密码文件。这些特权使DBA能够启动和关闭数据库,并执行其他高级管理任务。此密码文件在数据库本身之外,因此在数据库尚未启动时启用DBA的身份验证。(DBA必须在启动数据库之前进行身份验证。)
When you invoke DBCA as part of the Oracle Database installation process, DBCA creates a password file with one entry: the SYS user. Granting SYSDBA to a user adds that user to the password file automatically.
当您调用dbca作为Oracle数据库安装过程的一部分时,dbca将创建一个密码文件,其中有一个条目:sys user。向用户授予sysdba会自动将该用户添加到密码文件中
Backup Files
Backup files are not technically database files, but are copies of the database in some form that can be used to recover the database if a failure causes loss of data.
备份文件不是技术上的数据库文件,而是某种形式的数据库副本,如果失败导致数据丢失,可以使用这些副本来恢复数据库。
Viewing Database Storage Structure Information
查看数据库存储结构信息
To assist you in managing the storage structures within your database, this section provides instructions for viewing information about the various database storage structures using Oracle Enterprise Manager Database Control (Database Control).
为了帮助您管理数据库中的存储结构,本节提供了使用Oracle Enterprise Manager数据库控制(数据库控制)查看各种数据库存储结构信息的说明。
This section contains the following topics:
•Viewing Control File Information
查看控制文件信息
•Viewing Online Redo Log File Information
查看在线redo 日志文件信息
•Viewing Archived Redo Log File Information
查看归档redo日志文件信息
•Viewing Data File Information
查看数据文件信息
•Viewing Tablespace Information
查看表空间信息
Viewing Control File Information
查看控制文件信息
You can use Database Control to view location and status information about control files.
你可以用数据库控制端去查看关于控制文件的本地路径和状态信息
To view control file information:
查看控制文件信息
1.Go to the Database Home page.
前往数据库主页
See “Accessing the Database Home Page”.
查看访问数据库主页
2.At the top of the page, click Server to view the Server subpage.
在主页的顶部,点击sever查看server子页面
3.In the Storage section, click Control Files.
在存储章节,点击控制文件
The Control Files page appears, showing the General subpage.
控制文件出现,显示常用的子页面
This page shows whether your database has a multiplexed control file. The Advanced and Record Section subpages give you more detailed information about your control files.
这个页面显示了你的数据库有多个控制文件,“高级”和“记录”部分的子页提供了有关控制文件的详细信息
Viewing Online Redo Log File Information
查看在线redo日志文件信息
You use Database Control to view status and multiplexing information about online redo log files.
你可以用数据库控制端去查看关于在线redo日志文件状态和多个路径信息
To view online redo log file information:
查看在线redo日志文件
1.Go to the Database Home page.
前往数据库主页面
See “Accessing the Database Home Page”.
查看访问数据库主页面
2.At the top of the page, click Server to view the Server subpage.
在主页面的顶部,点击server去查看server的子页面
3.In the Storage section, click Redo Log Groups.
在存储章节,点击redo日志组
The Redo Log Groups page appears. This page shows the attributes of the online redo log groups for your database.
redo日志组出现,这个页面显示了在线redo日志组的相关的属性
When an online redo log group contains only one member, it is not multiplexed. Note the Status attribute for the online redo log groups. The online redo log group with status Current is the one currently being written to disk by the log writer.
当一个在线日志组仅仅只有一个成员的时候,他是多路复用的。请注意联机重做日志组的状态属性。状态为当前的联机重做日志组是日志编写器当前正在写入磁盘的组。
4.(Optional) In the Group column, click a group number to view information about online redo log group members.
在组一行的位置,点击组数量来查看关于redo日志组成员的信息
Viewing Archived Redo Log File Information
查看归档redo日志文件信息
You use Database Control to view status information about archived redo log files.
你可以用数据库控制端去查看关于归档redo日志文件的信息
To view archived redo log file information:
查看归档redo日志文件信息
1.Go to the Database Home page.
前往数据库主页
See “Accessing the Database Home Page”.
查看访问数据库主页
2.At the top of the page, click Server to view the Server subpage.
在数据库主页,点击server去查看server子页面
3.In the Storage section, click Archive Logs.
在存储章节,点击归档日志
The Archive Logs page appears.
归档日志也出现
Viewing Data File Information
查看数据文件信息
You use Database Control to view status and location information about data files.
你可用数据库控制端去查看数据文件的状态和本地路径
To view data file information:
查看数据文件信息
1.Go to the Database Home page.
前往数据库主页
See “Accessing the Database Home Page”.
查看访问访问数据库主页
2.At the top of the page, click Server to view the Server subpage.
在页面的顶部,点击server去查看server的子页面
3.In the Storage section, click Datafiles.
在存储章节,点击数据文件
The Datafiles page appears.
在数据文件页面出现
4.(Optional) Select a data file, and then click View to display more attributes for the data file.
选择一个数据文件然后点击查看和显示数据文件更多信息
5.(Optional) Click the name of a tablespace in the Tablespace column to display the attributes of the tablespace associated with the data file.
点击表空间名称显示表空间相关联的数据文件信息
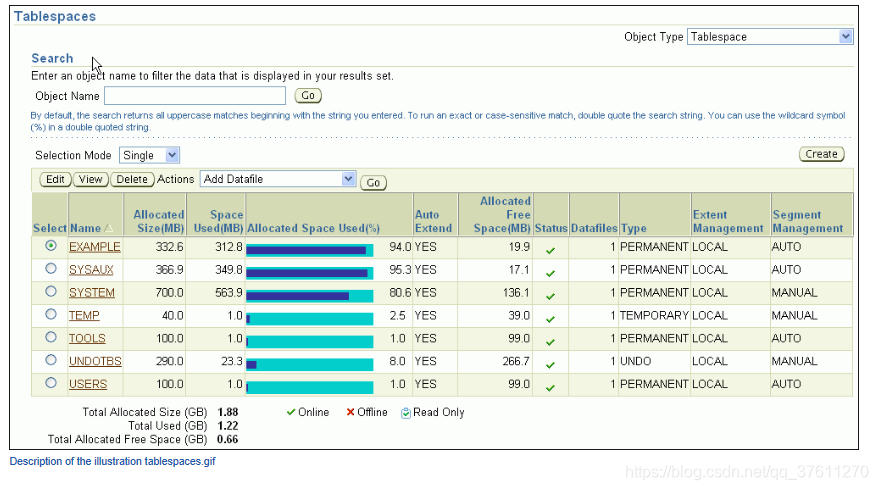
Viewing Tablespace Information
查看表空间信息
You use Database Control to view configuration, size, and status information about tablespaces.
你可以用数据库控制端查看表空间的配置、大小和状态信息
To view tablespace information:
查看表空间信息
1.Go to the Database Home page.
前往数据库主页
See “Accessing the Database Home Page”.
查看访问数据主页
2.At the top of the page, click Server to view the Server subpage.
在主页的顶部,点击server来查看server子页面
3.In the Storage section, click Tablespaces.
在存储章节,点击表空间
The Tablespaces page appears.
表空间页面显示
Performing Common Database Storage Tasks
执行日常数据库存储任务
As data is added to your database, the tablespace requirements for your database change. As a database administrator (DBA), you can use Oracle Enterprise Manager Database Control (Database Control) to perform the following tasks to effectively manage the tablespaces and database storage:
作为一个数据被添加到表空间,数据库是要求表空间做相应的改变,作为一个DBA,你可以使用EM执行一下任务来管理表空间和数据库存储
•Creating a Tablespace
创建表空间
•Modifying a Tablespace
修改表空间
•Dropping a Tablespace
删除表空间
•Reclaiming Unused Space
收回未使用的表空间
Creating a Tablespace
创建一个表空间
You can create additional tablespaces to store user data, so that not all data is stored in the USERS tablespace. The following are some reasons to create additional tablespaces:
您可以创建额外的表空间来存储用户数据,这样并非所有数据都存储在用户表空间中。以下是创建其他表空间的一些原因:
•For certain users, groups of users, or applications, it may be convenient to keep all application data in a separate tablespace or set of tablespaces for backup and recovery or maintenance reasons. For example, suppose you must recover all application data from backup due to a hardware or software failure, and you want to perform an offline recovery. If the application data is kept in a separate tablespace, then you can take just that tablespace offline and recover it, without affecting the operation of other database applications.
对于某些用户、用户组或应用程序,为了备份和恢复或维护的原因,将所有应用程序数据保存在单独的表空间或一组表空间中可能比较方便。例如,假设由于硬件或软件故障,您必须从备份中恢复所有应用程序数据,并且您希望执行脱机恢复。如果应用程序数据保存在单独的表空间中,那么可以将该表空间脱机并恢复,而不会影响其他数据库应用程序的操作
•Some applications, such as those with large partitioned tables, may benefit from distributing data across multiple tablespaces. This approach allows the optimal use of the available storage because frequently accessed data can be placed on high performance disks, and infrequently retrieved data can be placed on less expensive storage.
一些应用程序,例如那些具有大型分区表的应用程序,可能会从跨多个表空间分布数据中获益。这种方法允许对可用存储的最佳利用,因为频繁访问的数据可以放在高性能磁盘上,而不频繁检索的数据可以放在较便宜的存储上。
To create a tablespace:
去创建一个表空间
1.Go to the Database Home page.
前往数据库主页
See “Accessing the Database Home Page”.
查看访问数据库主页
2.At the top of the page, click Server to view the Server subpage.
在主页的顶部在,点击server查看server的子页面
3.In the Storage section, click Tablespaces.
The Tablespaces page appears.
4.Do one of the following:
a.To create a new tablespace, click Create.
b.To create a tablespace that is similar to an existing tablespace, in the Select column, select the tablespace whose attributes you want to reproduce. In the Actions list, select Create Like and then click Go.
The Create Tablespace page appears, showing the General subpage.

5.In the Name field, enter a name for the tablespace.
6.In the Extent Management section, select Locally Managed.
See “Locally Managed Tablespaces”.
7.In the Type section, select Permanent.
See “Tablespace Types”.
8.In the Status section, select Read Write.
See “Tablespace Status”.
9.In the Datafiles section, click Add to add one or more data files to the tablespace.
The Add Datafile page appears.
dynamically extensible logical volumes.
10.If the Storage Type is File System, then in the File Name field, enter a file name. In the File Directory and File Size fields, enter appropriate values for your data file location and initial size.
11.In the Storage section, complete the following steps:
a.Select Automatically extend data file when full (AUTOEXTEND).
当表空间满了以后选择自动扩展数据文件
b.Set a suitable increment, such as 10 MB.
设置适当的增量,例如10 MB
This is the amount of disk space that is added to the data file when it needs more storage space.
这是在数据文件需要更多存储空间时添加到该文件中的磁盘空间量。
c.For Maximum File Size, do one of the following, depending on available storage:
◾Select Unlimited to permit the file to increase without limits.
◾Select Value, and then enter a value in KB, MB, GB, or TB.
12.Click Continue.
The Create Tablespace page returns.
13.(Optional) Toward the top of the page, click Storage to view the Storage subpage. Examine all of the default settings on this subpage.
14.Click OK to add the tablespace.
The Tablespaces page returns, showing the newly created tablespace.
Modifying a Tablespace
修改表空间
You can use Database Control to modify a tablespace. For example, you can extend it by increasing data file sizes or adding another data file, set it to automatically extend, change its space usage alert thresholds, or change its status to Offline. When you get a critical or warning alert, you might have to extend a tablespace if the alert is related to a space limitation or you might have to take the tablespace offline for recovery if the alert is related to corrupted data or other serious errors.
This section contains the following topics:
•Setting a Tablespace to Automatically Extend
•Changing Space Usage Alert Thresholds for a Tablespace
•Taking a Tablespace Offline
Setting a Tablespace to Automatically Extend
This section explains how to set a tablespace to automatically extend when it reaches its size limit. The following instructions assume that the tablespace was previously not an autoextending tablespace.
To set a tablespace to automatically extend:
1.Go to the Database Home page.
See “Accessing the Database Home Page”.
2.At the top of the page, click Server to view the Server subpage.
3.In the Storage section, click Tablespaces.
The Tablespaces page appears.
4.Select the tablespace for which you want to enable autoextend, and then click Edit.
The Edit Tablespace page appears.
5.Select the first data file associated with the tablespace, and then click Edit.
The Edit Datafile page appears.
6.In the Storage section, complete the following steps:
a.Select Automatically extend data file when full (AUTOEXTEND).
b.Set a suitable increment, such as 10 MB.
This is the amount of disk space that is added to the data file when it needs more storage space.
c.For Maximum File Size, do one of the following, depending on available storage:
◾Select Unlimited to permit the file to increase without limits.
◾Select Value, and then enter a value in KB, MB, GB, or TB.
7.Click Continue.
The Edit Tablespace page returns.
8.Repeat Step 5 through Step 7 for each additional data file associated with the tablespace.
9.Click Apply.
A confirmation message appears.
Changing Space Usage Alert Thresholds for a Tablespace
You receive an alert in Database Control when a space usage threshold for a tablespace is reached. There are two types of space usage alerts that you can enable: warning, for when tablespace space is somewhat low, and critical, for when the tablespace is almost completely full and action must be taken immediately.
For both warning and critical alerts, you can specify alert thresholds in the following ways:
•By space used (%)
When space used becomes greater than or equal to a percentage of total space, an alert is issued.
•By free space (MB)
When remaining space falls below an amount (in MB), an alert is issued.
Free-space thresholds are more useful for large tablespaces. For example, for a 10 TB tablespace, setting the percentage full critical alert to as high as 99 percent means that the database would issue an alert when there is still 100 GB of free space remaining. Usually, 100 GB remaining would not be a critical situation, and the alert would not be useful. For this tablespace, it might be better to use a free-space threshold, which you could set to issue a critical alert when 5 GB of free space remains.
For both warning and critical alerts for a tablespace, you can enable either the space used threshold or the free-space threshold, or you can enable both thresholds.
To change space usage alert thresholds for tablespaces:
1.Go to the Database Home page.
See “Accessing the Database Home Page”.
2.At the top of the page, click Server to view the Server subpage.
3.In the Storage section, click Tablespaces.
The Tablespaces page appears.
4.Select the tablespace whose threshold you want to change, and then click Edit.
The Edit Tablespace page appears, showing the General subpage.
5.Click the Thresholds link at the top of the page to display the Thresholds subpage.
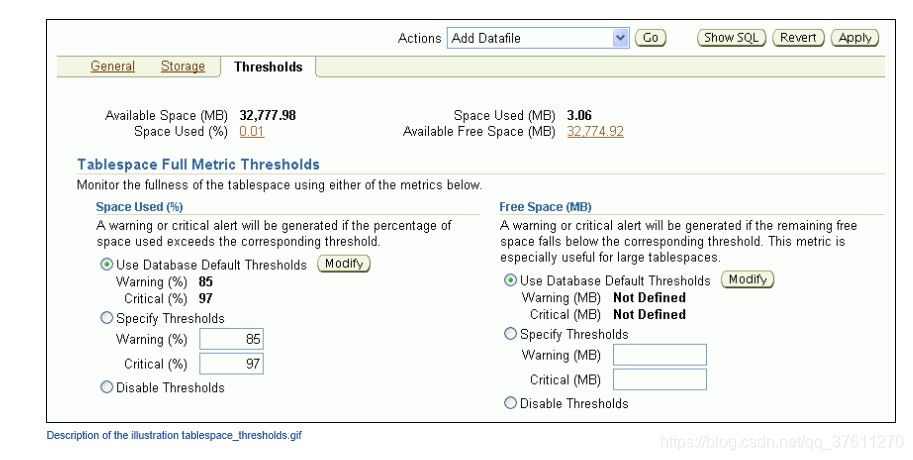
6.In the Space Used (%) section, do one of the following:
◦Accept the default thresholds.
◦Select Specify Thresholds, and then enter a Warning (%) threshold and a Critical (%) threshold.
◦Select Disable Thresholds to disable the percentage full thresholds.
7.In the Free Space (MB) section, do one of the following:
◦Accept the default thresholds.
◦Select Specify Thresholds, and then enter a Warning (MB) threshold and a Critical (MB) threshold.
◦Select Disable Thresholds to disable the threshold for free space remaining.
8.Click Apply.
A confirmation message appears.
Taking a Tablespace Offline
You may want to take a tablespace offline for any of the following reasons:
•To make a portion of the database unavailable while still allowing access to the remainder of the database
•To make an application and its group of tables temporarily unavailable while updating or maintaining the application
•To perform an offline tablespace backup (even though a tablespace can be backed up while online and in use)
•To recover a tablespace after a hardware or software failure
•To rename or relocate tablespace data files
To take a tablespace offline:
1.Go to the Database Home page.
See “Accessing the Database Home Page”.
2.At the top of the page, click Server to view the Server subpage.
3.In the Storage section, click Tablespaces.
The Tablespaces page appears.
4.Select the tablespace to take offline, and then click Edit.
The Edit Tablespace page appears.
5.In the Status section, select Offline.
For more information about the selections on this page, click Help.
6.Make a selection from the Offline Mode list, and then click Apply.
A confirmation message appears.
Dropping a Tablespace
After a tablespace has been dropped (deleted), the objects and data in it are no longer available. To recover them can be a time-consuming process. Oracle recommends performing a backup before and after dropping a tablespace.
To drop a tablespace:
1.Go to the Database Home page.
See “Accessing the Database Home Page”.
2.At the top of the page, click Server to view the Server subpage.
3.In the Storage section, click Tablespaces.
The Tablespaces page appears.
4.Select the tablespace to drop, and then click Delete.
Database Control asks for confirmation to delete the tablespace and gives you the option to also delete the associated data files from the disk.
5.Click Yes to remove the tablespace.
A confirmation is displayed and the deleted tablespace no longer appears on the Tablespaces page.
Reclaiming Unused Space
This section provides background information about reclaimable unused space in the database, and provides instructions about how to reclaim this space. It contains the following topics:
•About Reclaimable Unused Space
•About the Segment Advisor
•Viewing Segment Advisor Recommendations and Reclaiming Space
•Running the Segment Advisor Manually
About Reclaimable Unused Space
Over time, performing insert, update, and delete operations (also referred to as DML operations) on objects within a tablespace can create pockets of empty space that individually are not big enough to be reused. Collectively, these pockets can waste large amounts of space. The sparsely populated objects that result can degrade performance during queries and DML operations.
Oracle Database enables you reclaim this empty space with the following online operations—that is, operations that do not block queries or DML against affected objects while the operations are proceeding:
•Online segment shrink
Online segment shrink operates on table segments and on the segments of the dependent objects of the table, such as indexes and partitions. For each segment, data is compacted to the front of the segment. Free space can either be returned to the tablespace or kept in the segment for future insert operations.
Online segment shrink is permitted only on segments in a locally managed tablespace with automatic segment space management. Online segment shrink is an in-place operation; no additional free space in the tablespace is required.
•Online table redefinition (also known as reorganization)
Reorganization relocates the table and its dependent objects in a different part of the tablespace. This operation has the desirable side effect of compacting the data for those objects. For this operation to succeed, however, the tablespace must have free space equal to the size of the table and its dependent objects. Reorganization is the only permitted operation for dictionary-managed tablespaces or for locally managed tablespaces with manual segment space management.
The Segment Advisor generates recommendations for shrinking or reorganizing segments that have a significant amount of reclaimable unused space.
About the Segment Advisor
The Segment Advisor identifies database objects that have unused space that you can reclaim. It performs its analysis by examining usage and growth statistics and by sampling the data in the object. By default, it is configured to run automatically at regular intervals, during all maintenance windows (time periods). You can also run the Segment Advisor manually.
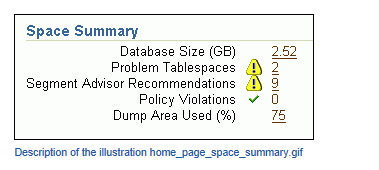
The regularly scheduled Segment Advisor task is known as the Automatic Segment Advisor. Results from the advisor are summarized on the Space Summary section of the Database Home page as Segment Advisor Recommendations.
During each run of the Automatic Segment Advisor, only a subset of the segments in the database are analyzed. If you suspect that segments have reclaimable space, but these segments do not appear among the Segment Advisor recommendations, then the Automatic Segment Advisor may not have chosen them for analysis. You can run the Segment Advisor manually on those segments at any time. See Oracle Database Administrator’s Guide for information about how the Automatic Segment Advisor selects tablespaces and segments for analysis.
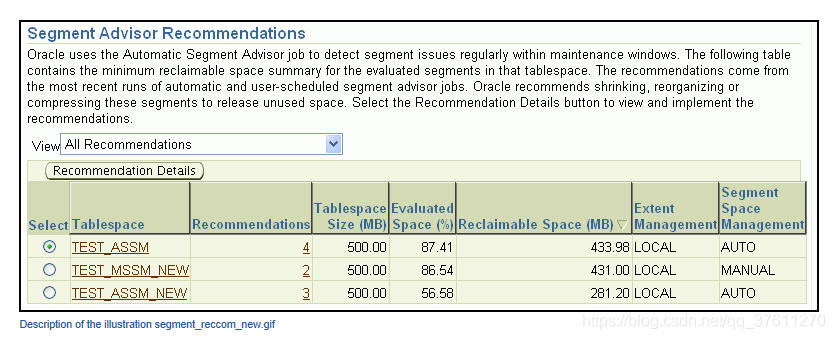
Segment Advisor Recommendations
Segment Advisor recommendations are grouped by tablespace. Only tablespace names appear on the Segment Advisor Recommendations page in Database Control.
If a tablespace contains any segments for which a shrink operation or reorganization is recommended, then the tablespace appears on the Segment Advisor Recommendations page. This page estimates the amount of reclaimable space for each tablespace. If you request recommendation details for a tablespace, then Database Control displays the segments in that tablespace for which recommendations were generated.
The recommendations provided by the Segment Adviser depend on the characteristics of the tablespace in which the segment is located. If the tablespace was created with default options, then the Segment Advisor typically recommends shrinking. If the segment is not eligible for online segment shrinking, or if it is in a dictionary-managed tablespace or a tablespace created with manual segment space management, then the Segment Advisor recommends reorganization instead.
In addition, the Automatic Segment Advisor evaluates tables that are 10MB or larger and have at least three indexes to determine the amount of space that could be saved if the tables are compressed with the OLTP compression method.
Viewing Segment Advisor Recommendations and Reclaiming Space
Each Segment Advisor recommendation includes a button that you can click to begin the space reclamation process. Although space reclamation is an online process, it can consume significant resources, so you should reclaim space during off-peak hours.
To view Segment Advisor recommendations and reclaim space:
1.Go to the Database Home page.
See “Accessing the Database Home Page”.
2.In the Space Summary section, click the numeric link adjacent to Segment Advisor Recommendations.
The Segment Advisor Recommendations page appears, showing recommendations from the most recent automatic and manual runs of the Segment Advisor.
3.(Optional) In the View list, select Recommendations for Last Automatic Run to view recommendations from only the most recent automatic run of the Segment Advisor.
4.Select a tablespace, and then click Recommendation Details.
The Recommendation Details for Tablespace page appears.
This page lists the tablespace segments for which online segment shrink or reorganization is recommended.

5.(Optional) Reduce the number of segments displayed in the segment list by entering search criteria in the Schema, Segment, Partition, or Minimum Reclaimable Space fields, and then clicking Search.
6.Examine the recommendation for each segment, and then proceed as follows:
◦If the recommendation for any segments is to reorganize, then start reorganization for those segments by clicking the Reorganize button, or select multiple segments and then click the Reorganize button above the table. Follow the directions in the succeeding pages to generate a reorganization script for the selected segments.
◦If the recommendation for any segments is to shrink, then proceed with Step 7 through Step 13 for those segments.
7.Do one of the following to select one or more segments to shrink:
◦To reclaim space in a single segment, click Shrink under the Recommendation column for that segment.
◦To shrink one or more segments, select the segments, and then click the Shrink button above the table.
8.On the Shrink Segment: Options page, accept Compact Segments and Release Space.
This option returns freed space to the tablespace. If you do not want to release the freed space to the tablespace, then choose Compact Segments. You can rerun the shrink process later to release the freed space.
9.Click Implement.
The Shrink Segment: Schedule page appears.
10.Note your job name, or replace it with a job name of your choosing.
11.Under the heading Start, select Immediately.
Because the shrink operation can be resource intensive, you can also select Later and schedule the operation for an off-peak period.
12.Click Submit.
The Scheduler Jobs page appears, and shows the shrink job in the Running subpage.
13.Click Refresh to update the page until the job disappears from the Running subpage.
You can then switch to the History or All subpage to view the completed status of the job.
Running the Segment Advisor Manually
You can run the Segment Advisor manually. You do so when you want to analyze objects not selected for analysis by the Automatic Segment Advisor, or when you want more up-to-date recommendations on a tablespace.
See Oracle Database Administrator’s Guide for information about running the Segment Advisor manually.
Managing the Online Redo Log
The online redo log files are a critical component in database recovery. Every transaction in the database updates the redo logs, regardless of whether archiving is enabled. During crash, instance, or media recovery, the database properly applies redo log files in ascending order by using the log sequence number of the necessary archived and redo log files.
If properly configured, the online redo logs require little maintenance. This section describes the more common redo log management tasks. It contains the following topics:
•Multiplexing the Online Redo Log
•Switching a Log File
Multiplexing the Online Redo Log
Oracle recommends that you multiplex the online redo log. Multiplexing provides better protection for data if an instance or media failure occurs.
To multiplex your online redo log, you must add members to each online redo log group. It is not required that online redo log groups be symmetrical, but Oracle recommends that your groups all have the same number of members. A database must have a minimum of two online redo log groups.
To multiplex the online redo log:
1.Go to the Database Home page.
See “Accessing the Database Home Page”.
2.At the top of the page, click Server to view the Server subpage.
3.In the Storage section, click Redo Log Groups.
The Redo Log Groups page appears.
4.Select a group and click Edit.
The Edit Redo Log Group page appears.
5.Click Add.
The Add Redo Log Member page appears.
6.If the Storage Type is set to File System, then in the File Name field, enter a file name for the new redo log member.
For example, if your existing member file name is REDO01.log, then you might name this member REDO01a.log.
7.In the File Directory field, enter the directory where you want the data file to be stored on disk.
You can create this file in the same directory as the other member of the redo log file group, but it is recommended that you store members on separate disk drives. That way, if there is a drive failure, then you still have access to one member.
8.Click Continue, and then click Apply to accept your changes.
A confirmation message appears.
9.At the top of the page, click the Redo Log Groups link to return to the Redo Log Groups page.
10.Repeat Step 4 through Step 9 for every existing log group.
Switching a Log File
When a log switch occurs, the log writer (LGWR) process stops writing to the current online redo log group and starts writing to the next available redo log group. After a log switch, the current online redo log group becomes inactive, and the next available online redo log group becomes the current online redo log group.
You can force a log switch to make the current redo group inactive and available for redo log maintenance operations. Forcing a log switch is useful in configurations with large redo log files that take a long time to fill. For example, you might want to:
•Drop the current redo group, but are not able to do so until the group is inactive
•Archive the current online redo log group members immediately, even though they are not yet completely filled
To switch a log file:
1.Go to the Database Home page.
See “Accessing the Database Home Page”.
2.At the top of the page, click Server to view the Server subpage.
3.In the Storage section, click Redo Log Groups.
The Redo Log Groups page appears.
4.In the Actions list, select Switch logfile, and then click Go.
A confirmation message appears. The status of the group that had been Current changes to Active, and the status of the next group in the list changes from Inactive to Current.
Managing Undo Data
Beginning with Oracle Database 11g, for a default installation, Oracle Database automatically manages the undo data. There is typically no need for database administrator (DBA) intervention. However, if your installation uses Oracle Flashback operations, then you may have to perform some undo management tasks to ensure the success of these operations.
This section provides background information and instructions for managing undo data. It contains the following topics:
•About Undo Data
•About Managing Undo Data
•Viewing Undo Information
•Computing the Minimum Undo Tablespace Size Using the Undo Advisor
•Changing the Undo Tablespace to a Fixed Size
About Undo Data
When a transaction modifies data, Oracle Database copies the original data before modifying it. The original copy of the modified data is called undo data. Saving this information is necessary for the following reasons:
•To undo any uncommitted changes made to the database if a rollback is necessary. A rollback can be needed because a user wants to undo the changes of a misguided or unintentional transaction, or it can be part of a recovery operation.
•To provide read consistency, which means that each user can get a consistent view of data, even while other changes may be occurring against the data. With read consistency, a user session does not see uncommitted changes made in other user sessions (sometimes referred to as dirty reads). For example, if a user issues a query at 10:00 a.m. and the query lasts for 15 minutes, then the query results reflect the entire state of the data at 10:00 a.m., regardless of update or insert operations performed by other users after the query started.
•To enable certain Oracle Flashback features, such as Oracle Flashback Query and Oracle Flashback Table, which enable you to view or recover data to a previous point in time.
Undo Tablespace
With automatic undo management, undo data is stored in an undo tablespace. Undo tablespaces have additional properties beyond those of permanent tablespaces. There can be multiple undo tablespaces, but only one can be active for an Oracle instance.
When you create the database using Database Configuration Assistant (DBCA), it creates an autoextending undo tablespace named UNDOTBS1, with a maximum extension size of 32,767 MB.
Undo Retention
Oracle Database automatically ensures that undo data that is in use by an active transaction is never overwritten until that transaction has been committed. After the transaction has been committed, the space occupied by that undo data can be reused, or overwritten. In this case, that undo data could be overwritten if space in the undo tablespace becomes scarce.
Even after a transaction has been committed, it is useful to retain (not overwrite) its undo data, to ensure the success of Oracle Flashback features and for read consistency for long-running queries. To this end, the database maintains and automatically tunes an undo retention period. Committed undo data whose age is less than the undo retention period is retained for use by queries or Oracle Flashback operations.
About Managing Undo Data
Although by default Oracle Database manages undo data and the undo tablespace automatically, if your installation uses Oracle Flashback features, then you may have to perform some undo management tasks to ensure the success of these operations.
Oracle Flashback operations resulting in snapshot too old errors indicate that you must intervene to ensure that sufficient undo data is retained to support these operations.
The following methods better support Oracle Flashback operations:
•Set the minimum undo retention period for the autoextending tablespace to be as long as the longest expected Oracle Flashback operation.
You achieve this goal by setting the UNDO_RETENTION initialization parameter. See Oracle Database Administrator’s Guide for details.
•Change the undo tablespace to a fixed size.
For an autoextending undo tablespace, Oracle Database always automatically tunes the undo retention period to be slightly longer than the longest-running active query. However, this autotuned retention period may be insufficient to accommodate Oracle Flashback operations. If the undo tablespace has autoextending disabled, or has a fixed size, then Oracle Database uses a different method for tuning the undo retention period to better accommodate Oracle Flashback operations.
To change the undo tablespace to a fixed size, you must choose a tablespace size that is sufficiently large. If you choose an undo tablespace size that is too small, then the following errors could occur:
◦DML could fail because there is not enough space to accommodate undo data for new transactions.
◦Long-running queries could fail with a snapshot too old error, which means that there was insufficient undo data for read consistency.
Oracle Enterprise Manager Database Control (Database Control) includes an Undo Advisor to help you determine the minimum size for the fixed size of the undo tablespace. See “Computing the Minimum Undo Tablespace Size Using the Undo Advisor”.
Viewing Undo Information
You can use the Automatic Undo Management page to view the following information about your undo configuration:
•Name and current size of the undo tablespace
•Autoextend tablespace setting (Yes or No)
•Current autotuned undo retention period
To view undo information:
1.Go to the Database Home page.
See “Accessing the Database Home Page”.
2.At the top of the page, click Server to view the Server subpage.
3.In the Database Configuration section, click Automatic Undo Management.
The Automatic Undo Management page appears.
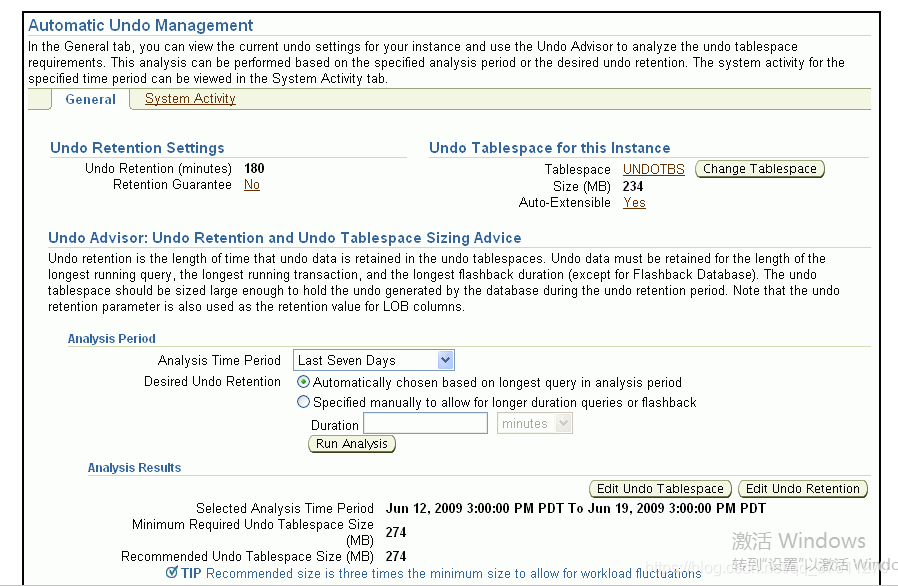
Computing the Minimum Undo Tablespace Size Using the Undo Advisor
If you must change the undo tablespace to a fixed size, then use the Undo Advisor to help determine the minimum required size. You can also use the Undo Advisor to set the minimum undo retention period.
To configure the undo tablespace to have a fixed size, Oracle suggests that you first allow enough time after database creation to run a full workload, thus allowing the undo tablespace to grow to its minimum required size to handle the workload. Then, you can use the Undo Advisor to determine the best size to configure the undo tablespace to allow for future long-running queries and Oracle Flashback operations.
To compute the minimum undo tablespace size using the Undo Advisor:
1.Go to the Automatic Undo Management page.
See “Viewing Undo Information”.
2.Decide whether you want to compute the minimum size of the undo tablespace based on statistics gathered over a designated time period (such as the last 7 days), or based on an undo retention period of a duration that you choose.
The automatically gathered statistics include the duration of the longest-running query and the undo generation rate. Computing the minimum undo tablespace size based on these statistics is advisable if you do not use Oracle Flashback features or if you do not expect future long-running queries to exceed the duration of previous long-running queries.
If you prefer to choose and enter the duration of a desired undo retention period, then the duration must be based on your expectations of the duration of future long-running queries or Oracle Flashback operations.
3.To compute the minimum undo tablespace size based on statistics gathered over a period, complete the following steps:
a.In the Analysis Period section, in the Analysis Time Period list, select the desired analysis time period.
If you select Customize Time Period, then a page appears that enables you to enter the starting and ending date and time for the period.
b.Select Automatically chosen based on longest query in analysis period.
c.Click Run Analysis.
The minimum required undo tablespace size is displayed in the Analysis Results section.
d.(Optional) Click Show Graph to view a graph of the analysis results.
4.To compute the minimum undo tablespace size based on a duration that you enter, complete the following steps:
a.In the Analysis Period section, select Specified manually to allow for longer duration queries or flashback.
b.In the Duration field, enter the desired duration of the undo retention period in seconds, minutes, hours, or days.
You may compute this duration as follows:
◾Determine the duration of the expected longest-running query for your workload.
You can base your determination on the longest-running query recorded during a previous workload period. This information is available from the System Activity subpage of the Automatic Undo Management page. You choose the analysis period for this subpage by selecting from the Analysis Time Period list on the General subpage. You can choose a custom analysis period that corresponds to your typical workload period.
◾Determine the longest duration that is expected for an Oracle Flashback operation.
◾Take the maximum of these two durations.
c.In the Analysis Period section of the General subpage, click Run Analysis.
The minimum required undo tablespace size is displayed in the Analysis Results section.
d.(Optional) Click Show Graph to view a graph of the analysis results.
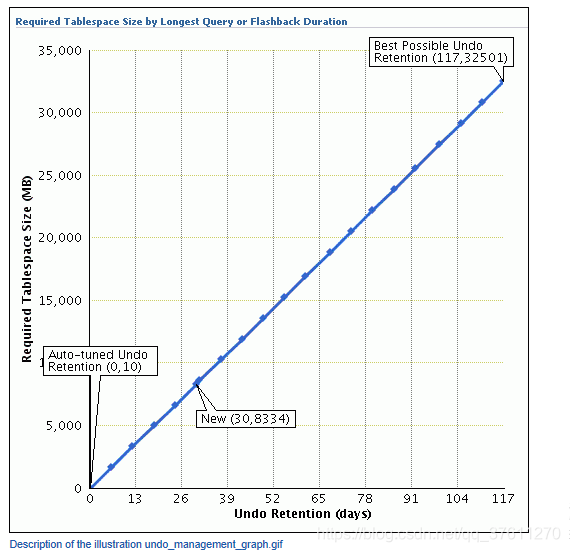
5.(Optional) Click the tick-mark, or point, on the curve that corresponds to the desired undo retention period.
The Duration field changes to match the selected undo retention period, and the Minimum Required Undo Tablespace Size field above the graph changes to reflect the matching required size.
6.(Optional) Click Apply.
The minimum undo retention period is set to the value of the Duration field.
Changing the Undo Tablespace to a Fixed Size
You change the undo tablespace to a fixed size to prevent the tablespace from growing too large or to better support Oracle Flashback operations.
To change the undo tablespace to a fixed size:
1.On the Automatic Undo Management page, after determining the minimum required undo tablespace size, click Edit Undo Tablespace.
The Edit Tablespace page appears, displaying the properties of the undo tablespace.
2.In the Datafiles section, click Edit.
The Edit Datafile page appears.
3.In the File Size field, enter the computed minimum size for the undo tablespace.
See “Computing the Minimum Undo Tablespace Size Using the Undo Advisor”.
4.In the Storage section, deselect Automatically extend data file when full (AUTOEXTEND).
5.Click Continue.
The Edit Tablespace page returns.
6.Click Apply.
A confirmation message appears.
Storage: Oracle By Example Series
Oracle By Example (OBE) has a series on the Oracle Database 2 Day DBA guide. This OBE steps you through the tasks in this chapter and includes annotated screenshots.
To view the Storage OBE, in your browser, enter the following URL:
http://www.oracle.com/webfolder/technetwork/tutorials/obe/db/11g/r2/2day_dba/storage/storage.htm


 1926
1926

 被折叠的 条评论
为什么被折叠?
被折叠的 条评论
为什么被折叠?
 到【灌水乐园】发言


