


 本文介绍了如何使用Nginx和HAproxy实现七层负载均衡,包括Nginx动静分离的基本原理和配置方法,以及HAproxy的安装与配置。详细讲述了Nginx的负载均衡策略,如轮询、权重分配和IP哈希,并演示了NFS共享存储以确保多服务器数据一致性。最后,简述了HAproxy的特点和安装过程,以及其在负载均衡中的应用。
使用Nginx实现动静分离的负载均衡集群
LB负载均衡集群分两类:LVS(四层)Nginx或HAproxy(七层)
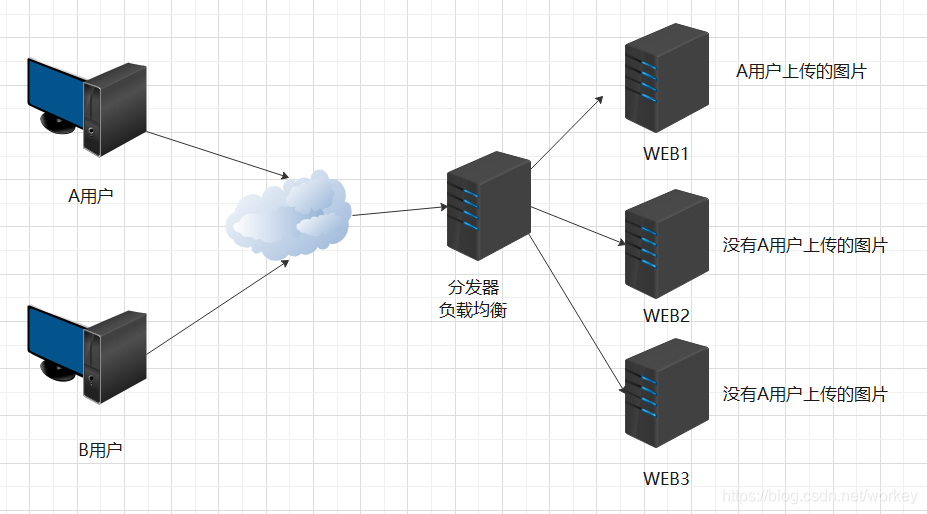
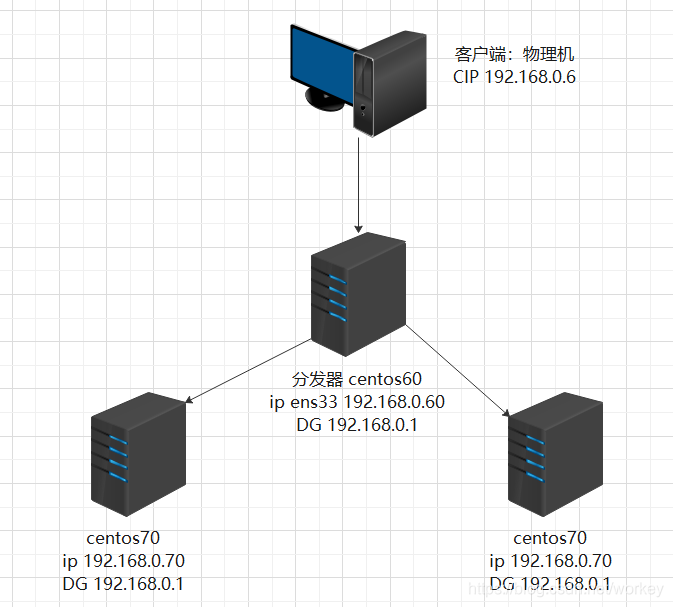
客户端通过访问分发器的VIP来访问网站。
现在应用更复杂,比如现在网站页面有:php html png jpeg jsp等,有动态页面有静态页面。静态页面是不变的,想访问的更快些,要学习SQUID。
但是前面的LVS是四层的,基于IP的。现在需要在应用层基于不同的应用进行分发。
七层LB ,Nginx/ Haproxy都可以支持7层LB。
现在实现nginx动静分离,拓扑图。
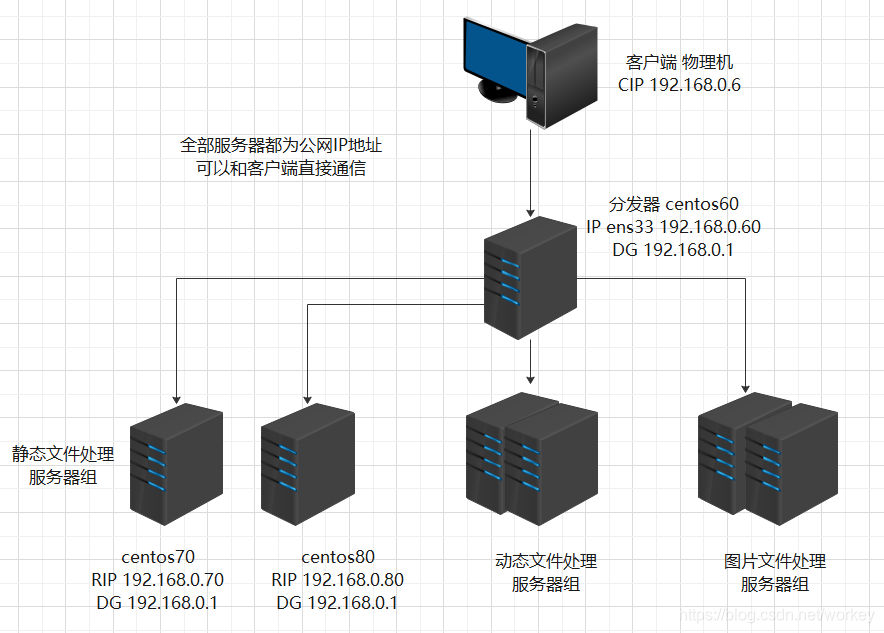
常用解决方案:
静态文件处理:可以使用Nginx或Apache
动态文件处理:可以使用Apache,Tomcat
图片文件处理:可以使用Squid
使用Nginx实现动静分离的负载均衡集群:
1.Nginx负载均衡基础知识
Nginx 的 upstrema 负载的5种方式,目前最常用前3种方式
1)轮询(默认)
每个请求按时间顺序注意分配到不同的后端服务器,如果后端服务器down掉,能自动剔除。
2)weight
指定轮询几率,weight和访问比率成正比,用于后端服务器性能不均的情况。
3)ip_hash
每个请求按访问IP的hash结果分配,这样每个访客固定访问一个后端服务器,可以解决session的问题。
4)fair(第三方)
按后端服务器的响应时间来分配请求,响应时间短的优先分配。
5)url_hash(第三方)url哈希
按访问url的hash结果来分配请求,使同样的url定向到同一个后端服务器,后端服务器为缓存时比较有效。
实例1:使用Nginx实现负载均衡和动静分离。
源码编译安装Nginx:
1.安装nginx时必须先安装相应的编译工具和相关依赖
[root@centos60 ~]# yum -y install gcc gcc-c++ autoconf automake
[root@centos60 ~]# yum -y install zlib zlib-devel openssl openssl-devel pcre pcre-devel
[root@centos60 ~]# wget http://nginx.org/download/nginx-1.14.1.tar.gz
[root@centos60 ~]# tar xf nginx-1.14.1.tar.gz -C /usr/local/src
[root@centos60 ~]# cd /usr/local/src/nginx-1.14.1/
[root@centos60 nginx-1.14.1]# ./configure --prefix=/usr/local/nginx --with-http_dav_module --with-http_stub_status_module --with-http_addition_module --with-http_sub_module --with-http_flv_module --with-http_mp4_module
--prefix=/usr/local/nginx 指定安装路径
--user=nginx --group=nginx 指定运行 nginx 进程的用户和组
--with-http_ssl_module 支持 ssl 加密
--with-http_realip_module 此模块支持显示真实来源 IP 地址,当 NGINX 做负载均衡服务器时,需要这个功能,这样能够使得后台服务器记录原始客户端的 IP 地址。
--with-http_gzip_static_module 开启 nginx 支持 gunzip 压缩静态文件功能,静态文件压缩后,可以节约带宽
--with-http_dav_module #启用支持 WebDAV 功能。WebDAV 一种基于 HTTP 1.1协议的通信协议。它扩展了 HTTP 1.1,在 GET、POST、HEAD 等几个 HTTP 标准方法以外添加了一些新的方法,使应用程序可直接对 Web Server 直接读写,并支持写文件锁定(Locking)及解锁(Unlock),还可以支持文件的版本控制。
--with-http_stub_status_module #启用支持 nginx 监控模块,后期通过调用此模块可以监控nginx 状态。zabbix 也可以通过此模块,来监控 nginx 的性能状态
--with-http_addition_module #启用支持(开启此模块后,nginx 可以在响应 http 请求之前或者之后追加文本内容,比如想在站点底部追加一个 js 或者 css,可以使用这个模块来实现。)。
--with-http_sub_module #启用支持(此模块为 nginx 替换响应内容的模块,比如当站点出现什么敏感字,需要批量修改所有 web 页面,且想修改很耗时间,可以使用这个模块进行替换。或者想临时在站点中加上一个通用 js 或者 css 之类的文件,也可以使用这个模块。)
--with-http_flv_module #启用支持(支持 HTTP-FLV 方式直播视频)。
--with-http_mp4_module #启用支持(此模块允许 nginx 为 H.264/AAC 编译码的视频文件,如: .mp4、.m4v、和.m4a 扩展名的文件, 提供伪流媒体服务端支持。伪流媒体是与 Flash 播放器一起配合使用的。 播放器向服务端发送 HTTP 请求,请求中的查询串是以开始时间为参数的,而服务端以流响应,这样流的开始 位置就能于请求中的时间相对应。)
--with-pcre #启用 perl 正则表达式,perl 的正则表达式一般使用在 location 指令和ngx_http_rewrite_module url 重定向模块中。默认 ngx_http_rewrite_module 是就启用的。
查看参数
[root@centos60 nginx-1.14.1]# ./configure --help|grep mp4
编译和安装:(查看CPU逻辑数 cat /proc/cpuinfo | grep processor | wc -l)
[root@centos60 nginx-1.14.1]# make -j 4
[root@centos60 nginx-1.14.1]# make install
生成运行nginx的用户:
[root@centos60 nginx-1.14.1]# useradd -u 8000 -s /sbin/nologin nginx
[root@centos60 nginx-1.14.1]# id nginx
uid=8000(nginx) gid=8000(nginx) 组=8000(nginx)
nginx目录结构:
[root@centos60 nginx-1.14.1]# ls /usr/local/nginx/
conf html logs sbin
conf 配置文件
html 网站根目录
logs 日志文件
sbin nginx启动脚本
主配置文件:
[root@centos60 nginx-1.14.1]# ls /usr/local/nginx/conf/nginx.conf
/usr/local/nginx/conf/nginx.conf
启动Nginx:
[root@centos60 sbin]# ln -s /usr/local/nginx/sbin/nginx /usr/sbin/
[root@centos60 nginx-1.14.1]# nginx
[root@centos60 nginx-1.14.1]# netstat -anput|grep :80
tcp 0 0 0.0.0.0:80 0.0.0.0:* LISTEN 9405/nginx: master
开机启动:
[root@centos60 nginx-1.14.1]# echo '/usr/local/nginx/sbin/nginx &' >> /etc/rc.local
测试配置文件语法是否有错误:
[root@centos60 ~]# /usr/local/nginx/sbin/nginx -t
nginx: the configuration file /usr/local/nginx/conf/nginx.conf syntax is ok
nginx: configuration file /usr/local/nginx/conf/nginx.conf test is successful
重新加载配置文件:
[root@centos60 logs]# /usr/local/nginx/sbin/nginx -c /usr/local/nginx/conf/nginx.conf
[root@centos60 logs]# /usr/local/nginx/sbin/nginx -s reload
关闭和启动Nginx:
[root@centos60 logs]# /usr/local/nginx/sbin/nginx -s stop
[root@centos60 logs]# /usr/local/nginx/sbin/nginx
配置Nginx成为分发器,实现动静分离:
[root@centos60 logs]# cd /usr/local/nginx/conf/
[root@centos60 conf]# cp nginx.conf nginx.conf.back
[root@centos60 conf]# vim nginx.conf![]()

这段内容要注释掉,否则php文件直接在nginx服务器上解析了,不再给后端服务器;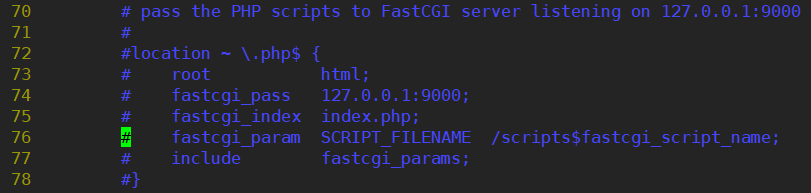
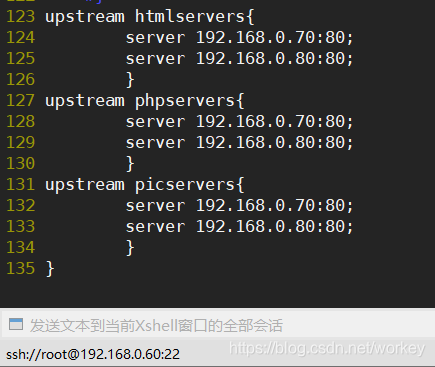
根据工作中的需要,配置成具体业务的IP地址
重新加载nginx服务器配置文件:
[root@centos60 conf]# /usr/local/nginx/sbin/nginx
[root@centos60 conf]# /usr/local/nginx/sbin/nginx -t
[root@centos60 conf]# /usr/local/nginx/sbin/nginx -s reload
配置后端服务器:centos70
[root@centos70 ~]# yum -y install httpd php
生成静态测试文件:
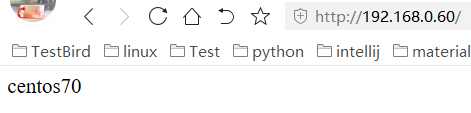
[root@centos70 ~]# echo centos70 > /var/www/html/index.html
生成动态测试文件:
[root@centos70 ~]# vim /var/www/html/test.php
centos70-php
<?php
phpinfo();
?>
生成图片文件:
上传图片文件到centos70 /var/www/html目录下,图片文件名 pic.jpg
[root@centos70 ~]# ls /var/www/html/
index.html pic.jpg test.php
启动Apache服务器:
[root@centos70 ~]# systemctl start httpd
配置后端服务器: centos80
[root@centos80 ~]# yum -y install httpd php
生成静态测试文件:
[root@centos80 ~]# echo centos80 > /var/www/html/index.html
生成动态测试文件:
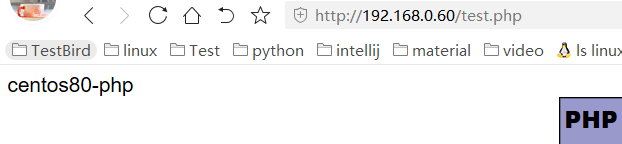
[root@centos80 ~]# vim /var/www/html/test.php
centos80-php
<?php
phpinfo();
?>
生成图片文件:
上传图片文件到centos80 /var/www/html目录下,图片文件名 pic.jpg
[root@centos70 ~]# ls /var/www/html/
index.html pic.jpg test.php
启动Apache服务器:
[root@centos80 ~]# systemctl start httpd
到此Nginx实现负载均衡结束
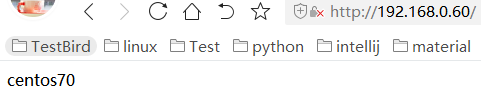
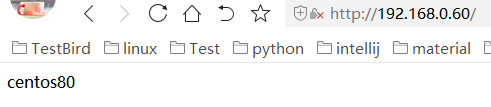
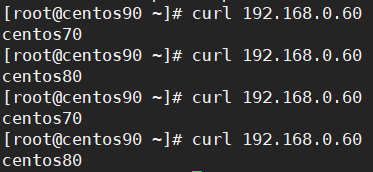
测试转发静态页面
http://192.168.0.60
http://192.168.0.60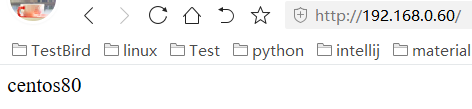
测试转发动态页面
http://192.168.0.60/test.php
http://192.168.0.60/test.php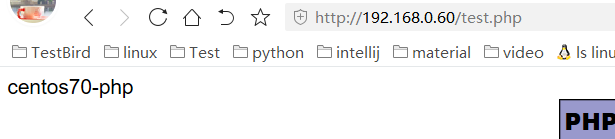
测试转发图片
http://192.168.0.60/pic.jpg
http://192.168.0.60/pic.jpg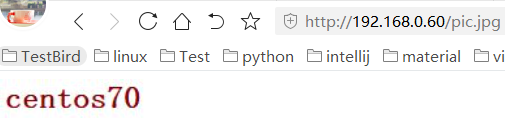 sdfsadf
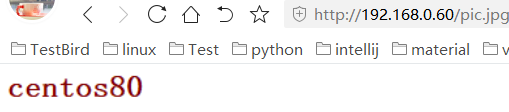
测试性能:
扩展文件打开数过多
[root@centos80 html]# ab -n 1000 -c 1000 http://192.168.0.70/index.html #运行正常
[root@centos80 html]# ab -n 2000 -c 2000 http://192.168.0.70/index.html #报错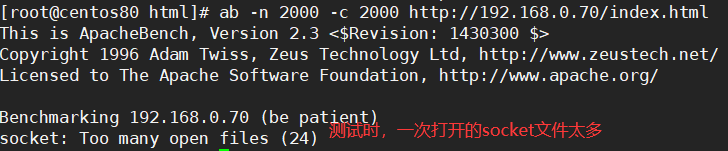
[root@centos80 html]# ulimit -a
[root@centos80 html]# ulimit -n
1024 #系统默认一个进程最多同时允许打开1024个文件
[root@centos80 html]# ulimit -n 10240 #报错的解决方法
Nginx负载的5种策略设置方法:
1.轮询(默认)
每个请求按时间顺序注意分配到不同的后端服务器,如果后端服务器宕机,能自动剔除。
upstream backserver{
server 192.168.0.70;
server 192.168.0.80;
}
2.指定权重
指定轮询几率,weight和访问比率成正比,用于后端服务器性能不均的情况。
upstream backserver{
server 192.168.0.70 wight=1;
server 192.168.0.80 wight=2;
}
down 表示当前的server暂时不参与负载
weight 默认为1.weight越大,负载的权重就越大。
max_fails :允许请求失败的次数默认为1.当超过最大次数时,返回proxy_next_upstream 模块定义的错误
fail_timeout:max_fails次失败后,暂停的时间。
backup: 其它所有的非backup机器down或者忙的时候,请求backup机器。所以这台机器压力会最轻。
3.ip绑定ip_hash
每个请求按访问ip的hash结果分配,这样每个访客固定访问一个后端浏览器,可以解决session的问题。
upstream backserver{
ip_hash;
server 192.168.0.70:80;
server 192.168.0.80:80;
}
4.fair(第三方)
按后端服务器的响应时间来分配请求,响应时间短的优先分配。
upstream backserver{
server 192.168.0.70;
server 192.168.0.80;
fair;
}
5.url_hash(第三方)
按访问url的hash结果来分配请求,使每个url定向到同一个后端服务器,后端服务器为缓存时比较有效。
upstream backserver{
server squid1:3128;
server squid2:3128;
hash $request_uri;
hash_method crc32;
}
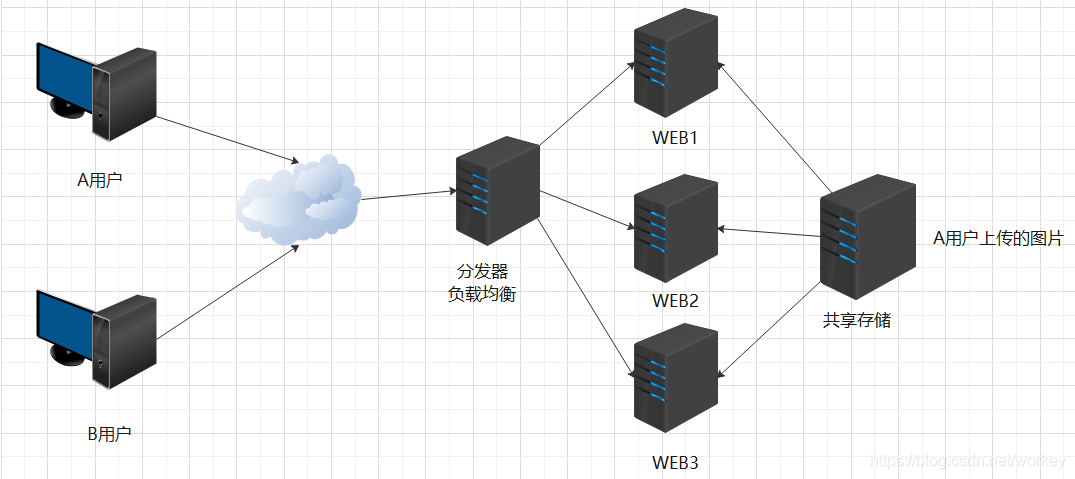
NFS共享存储
实现多台服务器直接数据共享
实现多台服务器直接数据一致
NFS是Network File System 缩写,网络文件系统,是FreeBSD支持的文件系统中的一种,NFS允许一个系统在网络上与他人共享目录文件。通过使用NFS,用户和程序可以像访问本地文件一样访问远程系统上的文件
Rpc.nfsd:它是基本的NFS守护进程,主要功能是管理客户端是否能够登录服务器;
Rpc.mount:主要功能是管理NFS的文件系统。当客户端顺利通过nfsd登录NFS服务器后,在使用NFS服务所提供的文件前,还必须通过文件使用权限的验证。
Portmap:主要功能是进行端口映射工作
环境准备
| 服务器系统 | 角色 | ip |
| centos7.6 | NFS服务端 | 192.168.0.90 |
| centos7.6 | NFS客户端web1 | 192.168.0.70 |
| centos7.6 | NFS客户端web2 | 192.168.0.80 |
安装NFS
客户端服务端都安装 yum -y install rpcbind nfs-utils
启动NFS
客户端服务端都启动
systemctl start rpcbind
systemctl start nfs-server
systemctl enable nfs-server
netstat -lnput | grep 2049
修改/etc/exports配置文件
[root@centos90 ~]# vim /etc/exports
/data 192.168.0.70(rw,no_root_squash)
/data 192.168.0.80(rw,no_root_squash)| ro | 只读访问 |
| rw | 读写访问 |
| sync | 资料同步写入内存和硬盘,数据不丢失 |
| async | 优先将数据保存再内存,然后再写入硬盘,效率高,数据可能丢失 |
| root_squash | 当NFS客户端用root访问时,映射为NFS服务端的匿名用户 |
| no_root_squash | 当NFS客户端度用root访问时,映射为NFS服务端的root |
| all_squash | 共享文件的UID和GID映射匿名用户,适合公用目录,任何NFS客户端账户访问都映射为NFS服务端的匿名用户 |
因为需要跟web用户一致,如果没有一致,用户没有权限上传到/data目录
[root@centos90 ~]# groupadd apache -g 777
[root@centos90 ~]# useradd apache -u 777 -g 777 -s /sbin/nologin -M
[root@centos90 ~]# mkdir /data/
[root@centos90 ~]# chown -R apache.apache /data/
chmod 777 -R /media/
动态装载配置文件,不用重启服务
[root@centos90 ~]# exportfs -rv
客户端开机挂载NFS服务端共享设备(仅限于centos7系统)
vim /etc/fstab
192.168.0.90:/data /opt nfs noatime,nodiratime,rsize=131072,wsize=131072,intr 0 0
mount -a
| async | 异步同步,提高性能,降低数据安全性(适合性能要求高,对数据可靠性没要求的场合,生产环境不推荐使用) |
| noatime | 取消更新文件系统上的inode访问时间,提升I/O性能,推荐使用 |
| nodiratime | 取消更新文件系统上的目录inode访问时间,提高系统性能 |
| initr | 可以中断不成功的挂载 |
| rsize | 读取区块大小,单位byets客户端与服务器端传输数据的缓冲量,客户端和服务器端内存足够,可以设置的大些32768,提升性能。 |
| wsize | 写入区块大小。内存足够,可设置32768,提升性能。 |
配置NFS客户端web1,web2
[root@centos70 ~]# chown -R apache.apache /var/www/html
[root@centos80 ~]# chown -R apache.apache /var/www/html
[root@centos70 ~]# vim /etc/httpd/conf/httpd.conf
[root@centos80 ~]# vim /etc/httpd/conf/httpd.conf![]()
客户端查看nfs服务端
showmount -e 服务器ip
有时showmount -e 192.168.0.90没有出现共享目录,需要在服务端重启下nfs服务
挂载到共享目录
[root@centos70 ~]# mount -t nfs 192.168.0.90:/data/ /var/www/html/
[root@centos80 ~]# mount -t nfs 192.168.0.90:/data/ /var/www/html/
[root@centos70 ~]# showmount -e 192.168.0.90
Export list for 192.168.0.90:
/data 192.168.0.80,192.168.0.70
重启服务后,需要先umout在mount
web1和web2配置一样,不管用户发送图片到哪个web,都会上传到/data目录下,无论分发器到web1还是web2,都会到共享存储访问资源。
使用 haproxy 实现负载均衡集群
HAProxy 提供高可用性、负载均衡以及基于 TCP 和 HTTP 应用的代理,支持虚拟主机,它是免费、快速并且可靠的一种解决方案。根据官方数据,其最高极限支持 10G 的并发。
HAProxy 特别适用于那些负载特大的 web 站点, 这些站点通常又需要会话保持或七层处理。HAProxy 运行在当前的硬件上,完全可以支持数以万计的并发连接。并且它的运行模式使得它可以很简单安全的整合进您当前的架构中, 同时可以保护你的 web 服务器不被暴露到网络上。其支持从 4 层至 7 层的网络交换,即覆盖所有的 TCP 协议。就是说,Haproxy 甚至还支持 Mysql
的均衡负载。
相同点:在功能上,proxy 通过反向代理方式实现 WEB 均衡负载。和 Nginx,ApacheProxy,lighttpd,Cheroke 等一样。
不同点:Haproxy 并不是 web 服务器。以上提到所有带反向代理均衡负载的产品,都清一色是WEB 服务器。简单说,就是他们能处理解析页面的。而 Haproxy 仅仅是一款的用于均衡负载的应用代理。其自身并不能提供 web 服务。
但其配置简单,拥有非常不错的服务器健康检查功能还有专门的系统状态监控页面,当其代理的后端服务器出现故障, HAProxy 会自动将该服务器摘除,故障恢复后再自动将该服务器加入。
https://github.com/haproxy/haproxy/releases/
在 github 可以下载
实验拓扑图
1 安装
wget https://github.com/haproxy/haproxy/archive/v1.8-dev0.tar.gz
[root@centos60 ~]# tar -xzvf v1.8-dev0.tar.gz
[root@centos60 ~]# cd haproxy-1.8-dev0/
[root@centos60 haproxy-1.8-dev0]# uname -r
3.10.0-957.el7.x86_64
[root@centos60 haproxy-1.8-dev0]# vim README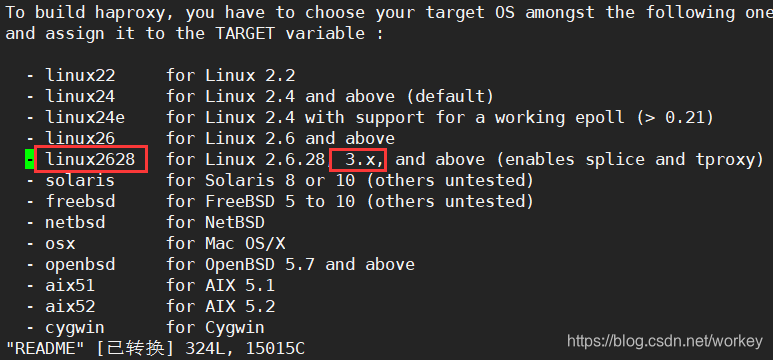 ‘
‘
[root@centos60 haproxy-1.8-dev0]# make TARGET=linux2628
PREFIX=/usr/local/haproxy #指定操作系统内核类型和安装的路径。也可以直接修改
Makefile 配置文件中这两个变量的值。如下:
[root@centos60 haproxy-1.8-dev0]# vim Makefile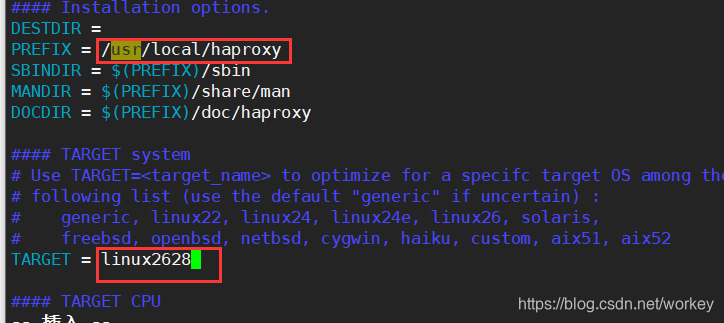
安装依赖
[root@centos60 haproxy-1.8-dev0]# yum -y install make gcc gcc-c++ openssl-devel
[root@centos60 haproxy-1.8-dev0]# make install PREFIX=/usr/local/haproxy
[root@centos60 haproxy-1.8-dev0]# ls /usr/local/haproxy
doc sbin share
没有生成配置文件,自己手动写一个 HAproxy 配置文件
[root@centos60 haproxy-1.8-dev0]# mkdir /usr/local/haproxy/etc
[root@centos60 haproxy-1.8-dev0]# vim /usr/local/haproxy/etc/haproxy.cfg
global
log 127.0.0.1 local0
#log 127.0.0.1 local1 notice
#log loghost local0 info
maxconn 4096
chroot /usr/local/haproxy
uid 99 #所属运行的用户 uid
gid 99 #所属运行的用户组
daemon #以后台形式运行 haproxy
nbproc 1 #启动 1 个 haproxy 实例。# #工作进程数量(CPU 数量) ,实际工作中,应该设置成和 CPU 核心数一样。 这样可以发挥出最大的性能。
pidfile /usr/local/haproxy/run/haproxy.pid #将所有进程写入 pid 文件
#debug #调试错误时用
#quiet #安静
defaults
log global
log 127.0.0.1 local3 #日志文件的输出定向。产生的日志级别为 local3. 系统中local1-7,用户自己定义
mode http #工作模式,所处理的类别,默认采用 http 模式,可配置成 tcp 作 4 层消息转发
option httplog #日志类别,记载 http 日志
option httpclose #每次请求完毕后主动关闭 http 通道,haproxy 不支持 keep-alive,只能模拟这种模式的实现
option dontlognull #不记录空连接,产生的日志
option forwardfor #如果后端服务器需要获得客户端真实 ip 需要配置的参数,可以从Http Header 中获得客户端 ip
option redispatch #当 serverid 对应的服务器挂掉后,强制定向到其他健康服务器
retries 2 #2 次连接失败就认为服务器不可用,主要通过后面的 check 检查
maxconn 2000 #最大连接数
balance roundrobin #负载均衡轮询算法,还有其他算法
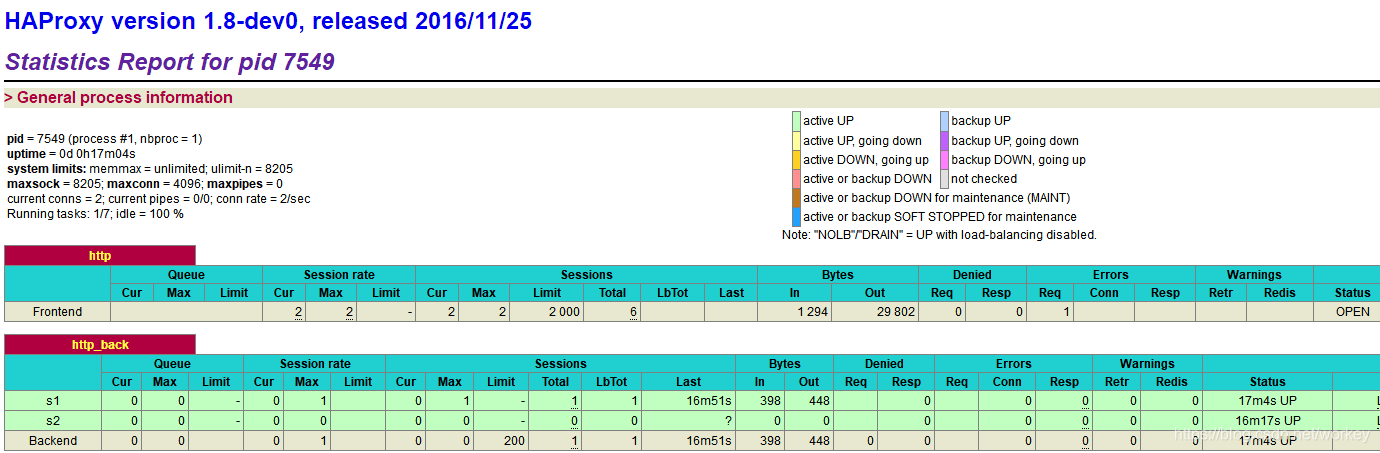
stats uri /haproxy-stats #haproxy 监控页面的访问地址 # 可通过http://localhost:80/haproxy-stats 访问
timeout connect 5000 #连接超时时间。 单位:ms 毫秒
timeout client 50000 #客户端连接超时时间
timeout server 50000 #服务器端连接超时时间
mode http
option httpchk GET /check.html #健康检测#注意实际工作中测试时,应该下载某一个页面来进行测试,因此这个页面应该是个小页面,而不要用首页面。这里是每隔一秒检查一次页面。
frontend http #前端配置,http 名称可自定义
bind 0.0.0.0:80 #发起 http 请求 80 端口,会被转发到设置的 ip 及端口
default_backend http_back #转发到后端 写上后端名称
backend http_back #后端配置,名称上下关联
server s1 192.168.0.70:80 weight 3 check #后端的主机 IP &权衡
server s2 192.168.0.80:80 weight 3 check #后端的主机 IP &权衡
#server node1 192.168.179.131:8081 check inter 2000 rise 3 fall 3 weight 30
# inter 2000 健康检查时间间隔 2 秒
# rise 3 检测多少次才认为是正常的
# fall 3 失败多少次才认为是不可用的
# weight 30 权重关于负载均衡算法
#source 根据请求源 IP
#static-rr 根据权重
#leastconn 最少连接者先处理
#uri 根据请求的 uri
#url_param 根据请求的 url 参数
#rdp-cookie 据据 cookie(name)来锁定并哈希每一次请求
#hdr(name) 根据 HTTP 请求头来锁定每一次 HTTP 请求
#roundrobin 轮询方式
使用 nobody 用户运行 haproxy:
[root@centos60 haproxy-1.8-dev0]# id nobody
uid=99(nobody) gid=99(nobody) 组=99(nobody)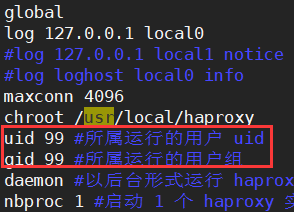
[root@centos60 haproxy-1.8-dev0]# cp ./examples/haproxy.init /etc/init.d/haproxy
[root@centos60 haproxy-1.8-dev0]# chmod 755 /etc/init.d/haproxy
[root@centos60 haproxy-1.8-dev0]# vim /etc/init.d/haproxy
#!/bin/sh
# chkconfig: - 85 15
# description: HA-Proxy server
# processname: haproxy
# config: /usr/local/haproxy/etc/haproxy.cfg
# pidfile: /usr/local/haproxy/run/haproxy.pid
# Source function library.
if [ -f /etc/init.d/functions ]; then
. /etc/init.d/functions
elif [ -f /etc/rc.d/init.d/functions ] ; then
. /etc/rc.d/init.d/functions
else
exit 0
fi
# Source networking configuration.
. /etc/sysconfig/network
# Check that networking is up.
[ "$NETWORKING" = "no" ] && exit 0
# This is our service name
BASENAME=`haproxy`
BIN=/usr/sbin/haproxy
CFG=/usr/local/haproxy/etc/haproxy.cfg
[ -f $CFG ] || exit 1
PIDFILE=/usr/local/haproxy/run/haproxy.pid
LOCKFILE=/usr/local/haproxy/run/haproxy
RETVAL=0
start() {
quiet_check
if [ $? -ne 0 ]; then
echo "Errors found in configuration file, check it with '$BASENAME check'."
return 1
fi
echo -n "Starting $BASENAME: "
daemon $BIN -D -f $CFG -p $PIDFILE
RETVAL=$?
echo
[ $RETVAL -eq 0 ] && touch $LOCKFILE
return $RETVAL
}
stop() {
echo -n "Shutting down $BASENAME: "
killproc $BASENAME -USR1
RETVAL=$?
echo
[ $RETVAL -eq 0 ] && rm -f $LOCKFILE
[ $RETVAL -eq 0 ] && rm -f $PIDFILE
return $RETVAL
}
restart() {
quiet_check
if [ $? -ne 0 ]; then
echo "Errors found in configuration file, check it with '$BASENAME check'."
return 1
fi
stop
start
}
reload() {
if ! [ -s $PIDFILE ]; then
return 0
fi
quiet_check
if [ $? -ne 0 ]; then
echo "Errors found in configuration file, check it with '$BASENAME check'."
return 1
fi
$BIN -D -f $CFG -p $PIDFILE -sf $(cat $PIDFILE)
}
check() {
$BIN -c -q -V -f $CFG
}
quiet_check() {
$BIN -c -q -f $CFG
}
rhstatus() {
status $BASENAME
}
condrestart() {
[ -e $LOCKFILE ] && restart || :
}
# See how we were called.
case "$1" in
start)
start
;;
stop)
stop
;;
restart)
restart
;;
reload)
reload
;;
condrestart)
condrestart
;;
status)
rhstatus
;;
check)
check
;;
*)
echo $"Usage: $BASENAME {start|stop|restart|reload|condrestart|status|check}"
exit 1
esac
exit $?
复制 haproxy 文件到/usr/sbin 下
因为上面的 haproxy.init 启动脚本默认会去/usr/sbin 下找
[root@centos60 haproxy-1.8-dev0]# cp /usr/local/haproxy/sbin/haproxy /usr/sbin/
创建目录和权限
[root@centos60 haproxy-1.8-dev0]# mkdir -p /usr/local/haproxy/run
[root@centos60 haproxy-1.8-dev0]# chown nobody -R /usr/local/haproxy/
配置日志收集
[root@centos60 haproxy-1.8-dev0]# vim /etc/rsyslog.conf![]() 取消注释
取消注释
[root@centos60 haproxy-1.8-dev0]# systemctl restart rsyslog
启动和停止服务
[root@centos60 haproxy-1.8-dev0]# /usr/local/haproxy/sbin/haproxy -f /usr/local/haproxy/etc/haproxy.cfg
查看状态:
[root@centos60 haproxy-1.8-dev0]# ps -aux | grep haproxy
[root@centos60 haproxy-1.8-dev0]# netstat -anput | grep :80
停止:
root@centos60 haproxy-1.8-dev0]# yum -y install psmisc
[root@centos60 haproxy-1.8-dev0]# killall haproxy
HAproxy 脚本启动方法 2
[root@centos60 haproxy-1.8-dev0]# /etc/init.d/haproxy start
配置开机启动
[root@centos60 haproxy-1.8-dev0]# chkconfig --add haproxy
[root@centos60 haproxy-1.8-dev0]# chkconfig haproxy on
配置后端服务器:centos70
yum -y install httpd php
echo centos70 > /var/www/html/index.html
systemctl start httpd
配置后端服务器:centos80
yum -y install httpd php
echo centos80 > /var/www/html/index.html
systemctl start httpd
看 HAproxy 的监控页面
http://192.168.0.60/haproxy-stats


 634
634

 被折叠的 条评论
为什么被折叠?
被折叠的 条评论
为什么被折叠?
 到【灌水乐园】发言


