


 本文介绍了渲染目标的概念及其在实现各种图像特效中的应用,包括模糊、锐化、边缘检测等,并提供了具体的像素着色器代码示例。
渲染目标render target
所谓渲染目标,就是指GPU可以把画面绘制到的目标,我们可以把它理解为GPU的画布。
当场景不是被渲染在正常的屏幕后备缓冲,而是被渲染在一个临时的纹理。这个临时的纹理经过过滤特效处理后,然后传到后备缓冲,最后画到屏幕上。绘制这样的一个可以实现某些功能的临时纹理被称为渲染目标。
实质上,渲染目标是一个连续的内存区域,这样的内存区域可以同时的存在多个,也就是多个渲染目标。一般来说,渲染目标被输出到屏幕上,这样我们就能看到画好的画面了。但是有时为了实现一些特效,某些渲染结果并不直接画到屏幕上,而是再返给GPU做进一步的特效处理,而且渲染目标中也不一定是画好的画面的颜色信息。
要想把纹理目标的内容渲染到屏幕上,就必须把纹理目标投影到屏幕上。

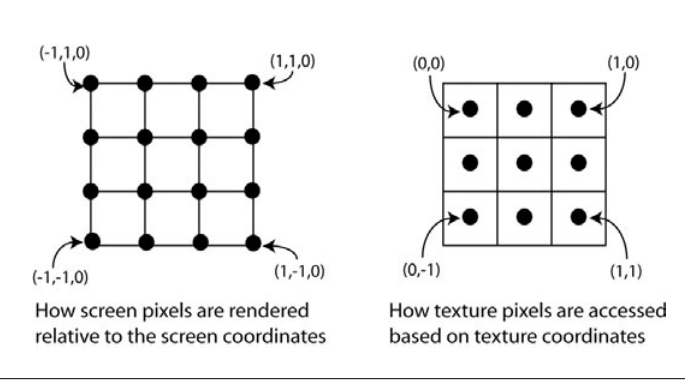
纹理坐标
想把纹理覆盖全部。必须确保矩形的每个角的坐标是以下:(0,1)(1,0)(1,1)(0,0)
要想屏幕上的每一个像素都对应纹理的像素,必须要注意:
![]()
计算纹理坐标 // Texture coordinates are setup so that the full texture // is mapped completely onto the screen Out.texCoord.x = 0.5 * (1 + Pos.x); Out.texCoord.y = 0.5 * (1 - Pos.y); Combining the standard scale and offset with the texture correction offset yields the following code: // Texture coordinates are setup so that the full texture // is mapped completely onto the screen Out.texCoord.x = 0.5 * (1 + Pos.x - viewport_inv_width); Out.texCoord.y = 0.5 * (1 - Pos.y - viewport_inv_height); 光亮度(intensity)和灰阶(grayscale) 求光亮度最直观简单的方法是intensity = (green + blue + red)/3 但是这是有缺陷的,人眼所接收的颜色不是均等,根据研究表明,人眼对颜色的感知得出的光度公式为 intensity = 0.299 * red + 0.587 * Green + 0.114 * blue (注:在《shader for game programmers and Artists》的blue乘以的是0.184) Pixel shader代码 sampler Texture0; float4 ps_main( float4 inDiffuse: COLOR0, float2 inTxr1: TEXCOORD0 ) : COLOR0 { // Output constant color: float4 col = tex2D(Texture0,inTxr1); float Intensity; Intensity = 0.299 * col.r + 0.587 * col.g + 0.114 * col.b; //等同于上面 Intensity = dot(col,float4(0.299,0.587,0.114,0)); // Return the intensity as a uniform RGB color return float4(Intensity.xxx,col.a); } 注:用点乘dot一般效率会比直接用公式要高。 模糊(blur)和运动模糊 模糊纹理: 简单的模糊效果 取一个像素的四周的像素加起来求平均值:

因为模糊效果需要多次采样纹理,所以,最好定义一个常数向量数组: const float4 samples[4] =
-1.0, 0, 0, 0.25, 1.0, 0, 0, 0.25, 0, -1.0, 0, 0.25, 0, 1.0 , 0, 0.25 pass blur的pixel shader代码: float viewport_inv_width; float viewport_inv_height; sampler Texture0; const float4 samples[4] = { -1.0, 0, 0, 0.25, 1.0, 0, 0, 0.25, 0, -1.0, 0, 0.25, 0, 1.0 , 0, 0.25 }; float4 ps_main(float2 texCoord: TEXCOORD) : COLOR { float4 col = float4(0,0,0,0); for(int i = 0; i < 4; i++) { col+=samples[i].w * tex2D(Texture0,texCoord + float2(samples[i].x * viewport_inv_width, samples[i].x * viewport_inv_height)); } return col; } 边缘检测(Edge detection) 在上面的模糊效果改下数组: float viewport_inv_width; float viewport_inv_height; sampler Texture0; const float4 samples[6] = { -1.0, 1.0, 0, 1.0, 0.0, 1.0, 0, 2.0, 1.0, 1.0, 0, 1.0, -1.0, -1.0, 0, -1.0, 0.0, -1.0, 0, -2.0, 1.0, -1.0, 0, -1.0 }; float4 ps_main(float2 texCoord: TEXCOORD) : COLOR { float4 col = float4(0,0,0,0); for(int i = 0; i < 6; i++) { col+=samples[i].w * tex2D(Texture0,texCoord + float2(samples[i].x * viewport_inv_width, samples[i].y * viewport_inv_height)); } return col; } 锐化(sharp color) 在上面的模糊效果改下数组: float viewport_inv_width; float viewport_inv_height; sampler Texture0; const float4 samples[5] = { 0.0, 0.0, 0, 11.0/3.0, 0.0, 1.0, 0, -2.0/3.0, 0.0, -1.0, 0, -2.0/3.0, -1.0, 0.0, 0, -2.0/3.0, 1.0, 0.0, 0, -2.0/3.0 }; float4 ps_main(float2 texCoord: TEXCOORD0) : COLOR { float4 col = float4(0,0,0,0); // Sample and output the averaged colors for(int i=0;i<5;i++) col += samples[i].w*tex2D(Texture0,texCoord+ float2(samples[i].x*viewport_inv_width, samples[i].y*viewport_inv_height)); return col; }


 3710
3710

 被折叠的 条评论
为什么被折叠?
被折叠的 条评论
为什么被折叠?
 到【灌水乐园】发言


