


目录
1 Unet网络介绍
1.1 Unet论文
https://zhuanlan.zhihu.com/p/90418337
1.2 简介
网络结构
分为下采样和上采样两大部分
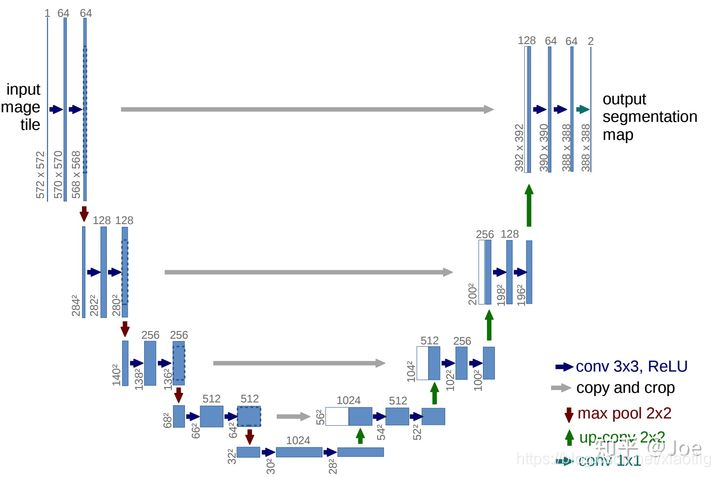
(1)Encoder:左半部分,由两个3x3的卷积层(ReLU)+2x2的max polling层(stride=2)反复组成,每经过一次下采样,通道数翻倍;
(2)Decoder:右半部分,由一个2x2的上采样卷积层(ReLU)+Concatenation(crop[3]对应的Encoder层的输出feature map然后与Decoder层的上采样结果相加)+2个3x3的卷积层(ReLU)反复构成;
(3)最后一层通过一个1x1卷积将通道数变成期望的类别数。
1.3 6大特点
2 Unet网络3种不同的实现方式
实现Unet网络时,可以把网络分成6大部分
(1)两次卷积
(2)4次下采样卷积卷积
(3)1次上采样
(4)3次拼接卷积卷积上采样
(5)1次拼接卷积卷积
(6)1次卷积,输出通道数就是语义分割的类别数,有8类那么通道数就为8,背景也属于1类
2.1 Unet网络的class实现(mIou)
参考网易云课堂日月光华老师的语义分割教程,感谢!
两个文件代码:
一个是网络训练
一个是网络的应用
# 1 网络训练

import tensorflow as tf
import numpy as np
import os
import matplotlib.pyplot as plt
import glob
import matplotlib as mpl
import os
import time
# 使用cpu
os.environ["CUDA_VISIBLE_DEVICES"] = "-1"
# 下面这行代码是为了绘图时显示中文
mpl.rcParams['font.sans-serif'] = ["SimHei"]

# 开始计时
time_start=time.time()

#########################################    1  获取图像和图像预处理

imgs = glob.glob(r"H:\05学习资料\14,软件开发\深度学习\日月光华2.0课程\语义分割课程资料\UNET语义分割\城市街景数据集的一小部分\images\train\*\*.png")
print("训练图像数量:", len(imgs))
print(imgs[20:25])

labels = glob.glob(r"H:\05学习资料\14,软件开发\深度学习\日月光华2.0课程\语义分割课程资料\UNET语义分割\城市街景数据集的一小部分\gtFine分割图\train\*\*gtFine_labelIds.png")
print("训练标签数量:", len(labels))
print(labels[20:25])

### 这里注意一定要让图片和标签一一对应,本例中通过验证是对应的,但是一般都需要安名称进行重新排序,这样确保一致
# 这里进行一个乱序,为了让图像训练时,不至于每个批次的图像属于同一类,
# 当然语义分割中不需要进行乱序,因为本身每张图像就包括各种类型,本例中是因为有17个城市拍的照片,所以还是进行了排序
index= np.random.permutation(len(imgs))
imgs = np.array(imgs)[index]
labels = np.array(labels)[index]

imgs_val = glob.glob(r"H:\05学习资料\14,软件开发\深度学习\日月光华2.0课程\语义分割课程资料\UNET语义分割\城市街景数据集的一小部分\images\val\*\*.png")
print("验证图像数量:", len(imgs_val))
print(imgs_val[20:25])

labels_val = glob.glob(r"H:\05学习资料\14,软件开发\深度学习\日月光华2.0课程\语义分割课程资料\UNET语义分割\城市街景数据集的一小部分\gtFine分割图\val\*\*gtFine_labelIds.png")
print("验证标签数量:", len(labels_val))
print(labels_val[20:25])

dataset_train = tf.data.Dataset.from_tensor_slices((imgs, labels))
dataset_val = tf.data.Dataset.from_tensor_slices((imgs_val, labels_val))

# 通过上面获取的只是图像的路径,还没有获取图像,所以要进行读取图像的操作
def read_png_img(path):
    "读取原始3通道的图像"
    img = tf.io.read_file(path)
    img = tf.image.decode_png(img, channels=3)
    return img

def read_png_label(path):
    "读取单通道的语义分割图像"
    img = tf.io.read_file(path)
    img = tf.image.decode_png(img, channels=1)
    return img

img_1 = read_png_img(imgs[0])
label_1 = read_png_label(labels[0])

print("图像大小")

##############   1.2 图像预处理
# 1 图像翻转
# 2 图像裁剪,先将img图像和label图像进行拼接,拼接成4通道影像,然后裁剪
concat_img = tf.concat([img_1, label_1], axis=-1)
print("拼接后图像的形状:", concat_img.shape)

# 剪切图像
def crop_img(img, mask):
    concat_img = tf.concat([img, mask], axis=-1)
    concat_img = tf.image.resize(concat_img, (280,280), method=tf.image.ResizeMethod.NEAREST_NEIGHBOR)
    crop_img1 = tf.image.random_crop(concat_img, [256,256,4])

    # 如果直接用[:,:,3]那最后一个维度就没了,就是二维的了
    # return crop_img1[:,:,:3], crop_img1[:,:,3]
    # print(img_crop.shape, label_crop.shape)
    # (256, 256, 3) (256, 256)

    return crop_img1[:,:,:3], crop_img1[:,:,3:]
    # print(img_crop.shape, label_crop.shape)
    # (256, 256, 3) (256, 256, 1)
    # 这样才能保留最后一个维度

img_crop, label_crop = crop_img(img_1, label_1)
print(img_crop.shape, label_crop.shape)

"""
### 绘制图像
fig,axes=plt.subplots(nrows=1,ncols=2,figsize=(10,8))

# axes[0,0].imshow(img_crop) 这样写反而会报错,只有一行第一个维度就不能写
axes[0].imshow(img_crop)
axes[0].set_title("原图1")
axes[1].imshow(label_crop)
axes[1].set_title("标签图像1")
plt.show()
"""
# 归一化
def normal(img, mask):
    "这里的两个输入分别代表图像和标签图像"
    # 归一化到-1到1之间,如果除以255就归一化到了0-1之间
    img = tf.cast(img, tf.float32)/127.5-1
    mask = tf.cast(mask, tf.int32)
    return img, mask

def load_image_train(img_path, mask_path):
    "对图像进行处理"
    # 1 先进行读取
    img = read_png_img(img_path)
    mask = read_png_label(mask_path)

    # 2 再进行裁剪
    img, mask = crop_img(img, mask)

    # 3 再进行随即反转
    if tf.random.uniform(())>0.5:
        img = tf.image.flip_left_right(img)
        mask = tf.image.flip_left_right(mask)

    # 4 再进行归一化
    img, mask = normal(img, mask)

    return img, mask

def load_image_test(img_path, mask_path):
    "对测试图像进行处理"
    # 1 先进行读取
    img = read_png_img(img_path)
    mask = read_png_label(mask_path)

    img = tf.image.resize(img, (256, 256))
    mask = tf.image.resize(mask, (256, 256))

    # 2 再进行归一化
    img, mask = normal(img, mask)

    return img, mask


# 让计算机根据cpu自动读取线程数
auto = tf.data.experimental.AUTOTUNE
dataset_train = dataset_train.map(load_image_train, num_parallel_calls = auto)
dataset_val = dataset_val.map(load_image_test, num_parallel_calls = auto)

"""
for i, m in dataset_train.take(1):
    fig, axes = plt.subplots(nrows=1, ncols=2, figsize=(10, 8))

    # axes[0,0].imshow(img_crop) 这样写反而会报错,只有一行第一个维度就不能写
    axes[0].imshow((i.numpy()+1)/2)
    axes[0].set_title("原图2")
    axes[1].imshow(np.squeeze(m.numpy()))
    axes[1].set_title("标签图像2")
    plt.show()
"""
############## 1.2 图像预处理结束


BATCH_SIZE = 2       # 32
BUFFER_SIZE = 300
Step_per_epoch = len(imgs)//BATCH_SIZE
Val_step = len(imgs_val)//BATCH_SIZE

dataset_train = dataset_train.shuffle(BUFFER_SIZE).batch(BATCH_SIZE)
dataset_val = dataset_val.batch(BATCH_SIZE)

#########################################    1  图像预处理结束

#########################################    2 前向传播
class Downsample(tf.keras.layers.Layer):
    "先定义,再调用,进行下采样"
    def __init__(self, units):
        "units是卷积核的数量"
        super(Downsample,self).__init__()
        # 使用了same填充,原论文使用valid填充
        self.conv1 = tf.keras.layers.Conv2D(units, kernel_size=3,padding="same")
        self.conv2 = tf.keras.layers.Conv2D(units, kernel_size=3, padding="same")
        # tf.keras.layers.MaxPooling2D()和tf.keras.layers.MaxPool2D()区别是什么?
        self.pool = tf.keras.layers.MaxPooling2D()

    def call(self, x, is_pool = True):
        if is_pool:
            x = self.pool(x)
        x = self.conv1(x)
        x = tf.nn.relu(x)
        x = self.conv2(x)
        x = tf.nn.relu(x)
        return x


class Upsample(tf.keras.layers.Layer):
    "先定义,再调用,进行上采样"
    def __init__(self, units):
        "units是卷积核的数量"
        super(Upsample, self).__init__()
        self.conv1 = tf.keras.layers.Conv2D(units, kernel_size=3, padding="same")
        self.conv2 = tf.keras.layers.Conv2D(units, kernel_size=3, padding="same")
        self.deconv = tf.keras.layers.Conv2DTranspose(units//2,kernel_size=3,strides=2,padding="same")

    def call(self, x):
        x = self.conv1(x)
        x = tf.nn.relu(x)
        x = self.conv2(x)
        x = tf.nn.relu(x)
        x = self.deconv(x)
        x = tf.nn.relu(x)
        return x

class Unet_model(tf.keras.Model):
    def __init__(self):
        "只进行初始化,定义层,还没有进行前向传播"
        super(Unet_model, self).__init__()
        # 这步只是进行卷积
        self.down1 = Downsample(64)

        # 4次下采样
        self.down2 = Downsample(128)
        self.down3 = Downsample(256)
        self.down4 = Downsample(512)
        self.down5 = Downsample(1024)

        # 4次上采样,定义一个上采样层
        # 第一个上采样只进行上采样,不进行卷积
        self.up1 = tf.keras.layers.Conv2DTranspose(512, kernel_size=3, strides=2, padding="same")
        # 上采样加卷积
        self.up2 = Upsample(512)
        self.up3 = Upsample(256)
        self.up4 = Upsample(128)

        # 进行两次卷积
        self.conv_last = Downsample(64)

        # 进行最后的1*1卷积分类,进行城市街景共34个类别的分类,所以输出层为34
        self.last = tf.keras.layers.Conv2D(34, kernel_size=1, padding="same")

    def call(self, x):
        "进行前向传播模型的构建"

        # 第一次先进行两次卷积
        x1 = self.down1(x, is_pool = False)

        # 进行4次下采样加两次卷积
        x2 = self.down2(x1)
        x3 = self.down3(x2)
        x4 = self.down4(x3)
        x5 = self.down5(x4)

        # 进行一次上采样
        x5 = self.up1(x5)

        # 进行合并,然后卷积卷积上采样
        x6 = tf.concat([x4, x5], axis=-1)
        x6 = self.up2(x6)

        x7 = tf.concat([x3, x6], axis=-1)
        x7 = self.up3(x7)

        x8 = tf.concat([x2, x7], axis=-1)
        x8 = self.up4(x8)

        # 合并,然后两层卷积
        x9 = tf.concat([x1, x8], axis=-1)
        x9 = self.conv_last(x9, is_pool = False)

        # 输出为34层,共34个类别
        out = self.last(x9)

        return out


model = Unet_model()
#########################################    2 前向传播结束

#########################################    3 反向传播
# 1 优化器
# 2 损失函数
# 3 评价指标


class MeanIOU(tf.keras.metrics.MeanIoU):
    "重写MeanIIOU指标"
    def __call__(self, y_true, y_pred, sample_weight=None):
        # 把34维的张量变成一维的分类
        y_pred = tf.argmax(y_pred, axis=-1)
        # 因为内置的求MIOU是需要在一维上求
        return super().__call__(y_true, y_pred, sample_weight=sample_weight)


optimizer = tf.keras.optimizers.Adam(learning_rate=0.0001)
loss_object = tf.keras.losses.SparseCategoricalCrossentropy(from_logits=True)

train_loss = tf.keras.metrics.Mean(name='train_loss')
train_accuracy = tf.keras.metrics.SparseCategoricalAccuracy(name='train_accuracy')
train_iou = MeanIOU(34, name='train_iou')

test_loss = tf.keras.metrics.Mean(name='test_loss')
test_accuracy = tf.keras.metrics.SparseCategoricalAccuracy(name='test_accuracy')
test_iou = MeanIOU(34, name='test_iou')

#########################################    3 反向传播结束

#########################################    4 模型训练
@tf.function
def train_step(images, labels):
    with tf.GradientTape() as tape:
        predictions = model(images)
        loss = loss_object(labels, predictions)
    gradients = tape.gradient(loss, model.trainable_variables)
    optimizer.apply_gradients(zip(gradients, model.trainable_variables))

    train_loss(loss)
    train_accuracy(labels, predictions)
    train_iou(labels, predictions)

@tf.function
def test_step(images, labels):
    predictions = model(images)
    t_loss = loss_object(labels, predictions)

    test_loss(t_loss)
    test_accuracy(labels, predictions)
    test_iou(labels, predictions)

EPOCHS = 2

# jishu用来查看下面的进度
jishu = 0

for epoch in range(EPOCHS):
    # 在下一个epoch开始时,重置评估指标
    print("开始训练了:")
    train_loss.reset_states()
    train_accuracy.reset_states()
    train_iou.reset_states()
    test_loss.reset_states()
    test_accuracy.reset_states()
    test_iou.reset_states()

    for images, labels in dataset_train:
        jishu +=1
        print("第%d次"%jishu)
        ## print(images.shape)
        ## (2, 256, 256, 3)
        train_step(images, labels)

    for test_images, test_labels in dataset_val:
        test_step(test_images, test_labels)

    template = 'Epoch {

   :.3f}, Loss: {

   :.3f}, Accuracy: {

   :.3f}, \
                IOU: {

   :.3f}, Test Loss: {

   :.3f}, \
                Test Accuracy: {

   :.3f}, Test IOU: {

   :.3f}'
    print(template.format(epoch+1,
                           train_loss.result(),
                           train_accuracy.result()*100,
                           train_iou.result(),
                           test_loss.result(),
                           test_accuracy.result()*100,
                           test_iou.result()
                           ))

#########################################    4 模型训练结束

#########################################    5 模型保存


"""
model.save('unet_v7.h5')  这种保存会出错,class定义的不能这样保存

NotImplementedError: Saving the model to HDF5 format requires the model to be a Functional model or a Sequential model.
It does not work for subclassed models, because such models are defined via the body of a Python method,
which isn't safely serializable.
Consider saving to the Tensorflow SavedModel format (by setting save_format="tf") or using `save_weights`.
"""
"""
问题解决
# 创建模型
model = create_model()
# 保存权重
model.save_weights('model_weight')
# 创建新模型读取权重
newModel = create_model()
# 读取权重到新模型
newModel.load_weights('model_weight')
"""
model.save_weights('model_weight')

# 时间截止
time_end=time.time()
print('totally cost',time_end-time_start)
# 2 实现模型的预测应用
import tensorflow as tf
import numpy as np
import os
import matplotlib.pyplot as plt
import glob
import matplotlib as mpl
# 下面这行代码是为了绘图时显示中文
mpl.rcParams['font.sans-serif'] = ["SimHei"]

"""
下面2行代码是解决这个问题的Failed to get convolution algorithm. This is probably because cuDNN failed to initialize, so try looking to see if a warning log message was printed above.
[[node model_1/model/block1_conv1/Conv2D (defined at G:/XiaoMa/Bursxylophilus/310FCN/app.py:44) ]] [Op:__inference_predict_function_1613]
"""

physical_device = tf.config.experimental.list_physical_devices("GPU")
tf.config.experimental.set_memory_growth(physical_device[0], True)


def read_png_img(path):
    "读取原始3通道的图像"
    img = tf.io.read_file(path)
    img = tf.image.decode_png(img, channels=3)
    return img

# 归一化
def normal(img):
    "这里的两个输入分别代表图像和标签图像"
    # 归一化到-1到1之间,如果除以255就归一化到了0-1之间
    img = tf.cast(img, tf.float32)/127.5-1
    return img

def load_image_train(img_path):
    "对图像进行处理"
    # 1 先进行读取
    img = read_png_img(img_path)
    # 2 进行resize
    img = tf.image.resize(img, (256, 256))
    # 3 再进行归一化
    img = normal(img)
    return img


class Downsample(tf.keras.layers.Layer):
    "先定义,再调用,进行下采样"
    def __init__(self, units):
        "units是卷积核的数量"
        super(Downsample,self).__init__()
        # 使用了same填充,原论文使用valid填充
        self.conv1 = tf.keras.layers.Conv2D(units, kernel_size=3,padding="same")
        self.conv2 = tf.keras.layers.Conv2D(units, kernel_size=3, padding="same")
        # tf.keras.layers.MaxPooling2D()和tf.keras.layers.MaxPool2D()区别是什么?
        self.pool = tf.keras.layers.MaxPooling2D()

    def call(self, x, is_pool = True):
        if is_pool:
            x = self.pool(x)
        x = self.conv1(x)
        x = tf.nn.relu(x)
        x = self.conv2(x)
        x = tf.nn.relu(x)
        return x


class 


 1万+
1万+

 被折叠的 条评论
为什么被折叠?
被折叠的 条评论
为什么被折叠?
 到【灌水乐园】发言


