


 本文介绍了C++11中的多线程编程,包括线程的创建、终止、实例,以及C++11标准库std::thread的使用,如构造、析构函数、成员函数、future、promise等,并探讨了线程同步机制mutex和atomic。
多线程
多线程是多任务处理的一种特殊形式,多任务处理允许让电脑同时运行两个或两个以上的程序。
多任务处理分为两种类型:基于进程和基于线程
- 基于进程的多任务处理是程序的并发执行。
- 基于线程的多任务处理是同一程序的片段并发执行
假设您使用的是 Linux 操作系统,我们要使用 POSIX 编写多线程 C++ 程序。POSIX Threads 或 Pthreads 提供的 API 可在多种类 Unix POSIX 系统上可用,比如 FreeBSD、NetBSD、GNU/Linux、Mac OS X 和 Solaris。
线程的创建
创建POSIX线程
#include <pthread.h>
pthread_create(thread,attr,start_routine,arg);
在这里,pthread_create 创建一个新的线程,并让它可执行。下面是关于参数的说明:
- thread:是一个指向线程标识符的指针
- attr:用来被设置线程属性,可以指定,也可以默认NULL
- start_rountine:线程运行的起始地址,一旦线程被创建就会被执行
- arg:运行函数的参数,它必需通过把引用作为指针强制转换为 void 类型进行传递。没有传参就使用NULL。
线程的终止
#include<pthread.h>
pthread_exit(status)
pthread_exit 用于显式地退出一个线程。通常情况下,pthread_exit() 函数是在线程完成工作后无需继续存在时被调用。
如果main函数创建了一个线程,线程如果还没运行完main就退出了。如果通过pthread_exit()退出的,线程继续执行,否则main()结束线程也随之结束。
多线程实例1
用pthread_create()函数创建5个线程,每个线程都输出一段字符串;
要点:
- create线程的第一个参数是一个地址要:&
- 线程得先终止
#include<iostream>
#include<pthread.h>
using namespace std;
#define numofthread 5

//线程的运行函数
void* say_hello(void* args)
{
  cout << "Hello Nowcoder!" << endl;
    return 0;
}

int main()
{
	//定义线程的ID,多使用数组来存储
	pthread_t tids[numofthread];
	for(int i=0;i<numofthread;++i)
	{
	int ret=pthread_create(&tids[i],NULL,say_hello,NULL);//参数依次为:创建线程的id地址,线程参数,线程调用的函数,传入的函数参数(注意这里用int接收是因为say_hello这个函数要返回0才运行成功)
	if(ret!=0)//说明发生异常,线程创建不成功
	{
		cout<<"thread create error,error code="<<ret<<endl;
	}
	}
	pthread_exit(NULL);//各个线程退出之后,main这个进程才结束,否则main如果提前结束了线程可能没有反应过来。

}
使用 -lpthread 库编译下面的程序:
$ g++ test.cpp -lpthread -o test.o
现在,执行程序,将产生下列结果:
$ ./test.o
Hello Nowcoder!
Hello Nowcoder!
Hello Nowcoder!
Hello Nowcoder!
Hello Nowcoder!
多线程实例2:线程接收传入参数并输出参数
以下简单的实例代码使用 pthread_create() 函数创建了 5 个线程,并接收传入的参数:数组的地址。每个线程打印一个 “Hello Nowcoder!” 消息,并输出接收的参数,然后调用 pthread_exit() 终止线程。
要点:
- 线程运行函数的参数一定要强制转化为(void)*
- 而后在运行函数内,将其再次强制转化为可使用的类型
//文件名:test.cpp

#include <iostream>
#include <cstdlib>
#include <pthread.h>

using namespace std;

#define NUM_THREADS     5

void* printhello(void* threadID)
{
	//因为传入的参数是无类型指针,所以我们需要对其进行强制类型转换,为整数型指针,然后再读取
	int tid=*((int*)threadID);
	cout<<"Hello Nowcoder! 线程 ID, " << tid << endl;
	//终止线程
	pthread_exit(NULL);
}

int main()
{
pthread_t thread[NUM_THREADS];
int indexes[NUM_THREADS];//用数组保存整数型id
int rc,i;
for(i=0;i<NUM_THREADS;++i)
{
	cout<<"main创建线程  "<<i<<endl;
	indexes[i]=i;
	//传入的时候必须强制转换为void* 类型,即无类型指针 ,原始类型是每个id的地址&indexes[i]
	rc=pthread_create(&thread[i],NULL,printhello,(void*)&(indexes[i]));
	//注意调用函数正常运行直接终止线程,不会返回数值给rc,也就是说正常情况下rc一直是默认0,如果非0代表异常
	if(rc)
	{
		cout << "Error:无法创建线程," << rc << endl;
         exit(-1);
}
pthread_exit(NULL);

}
执行:
$ g++ test.cpp -lpthread -o test.o
$ ./test.o
main() : 创建线程, 0
main() : 创建线程, 1
Hello Nowcoder! 线程 ID, 0
main() : 创建线程, 3
Hello Nowcoder! 线程 ID, 2
main() : 创建线程, 4
Hello Nowcoder! 线程 ID, 3
Hello Nowcoder! 线程 ID, 4
连接和分离线程
我们可以使用pthread_jion函数来连接线程:
pthread_join (threadid, status)
pthread_join() 子程序阻碍调用程序,直到指定的 threadid 线程终止为止。当创建一个线程时,它的某个属性会定义它是否是可连接的(joinable)或可分离的(detached)。只有创建时定义为可连接的线程才可以被连接。
也可以使用pthread_detach(threadid)分离线程:
pthread_detach (threadid)
如果线程创建时被定义为可分离的,则它永远也不能被连接。
多线程实例3:线程的连接与分离
要点:
- pthread_attr_t attr;定义线程可连接属性
- 初始化并设置线程属性为可连接 pthread_attr_init(&attr); pthread_attr_setdetachstate(&attr,PTHREAD_CREATE_JOINABLE);
- 删除属性,并等待其他线程: pthread_attr_destroy(&attr);
#include <iostream>
#include <cstdlib>
#include <pthread.h>
#include <unistd.h>

using namespace std;

#define NUM_THREADS     5
void *wait(void *t)
{
	int i;
	long tid;
	tid=(long) t;
	sleep(1);
	 cout << "Sleeping in thread " << endl;
   cout << "Thread with id : " << tid << "  ...exiting " << endl;
   pthread_exit(NULL);
}

int main ()
{
   int rc;
   int i;
   pthread_t threads[NUM_THREADS];//定义线程id变量
   pthread_attr_t attr;
   void* status;
   //初始化并设置线程属性为可连接
   pthread_attr_init(&attr);
   pthread_attr_setdetachstate(&attr,PTHREAD_CREATE_JOINABLE);
   for(i=0;i<NUM_THREADS;++i)
   {
 		cout << "main() : creating thread, " << i << endl;
 		rc=pthread_create(&thread[i],NULL,wait,(void*)&i);
 		if(rc)
 		{
 			cout << "Error:unable to create thread," << rc << endl;
         exit(-1);
 		}
   }
 // 删除属性,并等待其他线程
    pthread_attr_destroy(&attr);
    for(i=0;i<NUM_THREADS;++i)
    {
    rc=pthread_join(thread[i],&status);
    if (rc){
         cout << "Error:unable to join," << rc << endl;
         exit(-1);
      }
       cout << "Main: completed thread id :" << i ;
      cout << "  exiting with status :" << status << endl;
	}
    cout << "Main: program exiting." << endl;
   pthread_exit(NULL);
当上面的代码被编译和执行时,它会产生下列结果:
main() : creating thread, 0
main() : creating thread, 1
main() : creating thread, 2
main() : creating thread, 3
main() : creating thread, 4
Sleeping in thread
Thread with id : 4  ...exiting
Sleeping in thread
Thread with id : 3  ...exiting
Sleeping in thread
Thread with id : 2  ...exiting
Sleeping in thread
Thread with id : 1  ...exiting
Sleeping in thread
Thread with id : 0  ...exiting
Main: completed thread id :0  exiting with status :0
Main: completed thread id :1  exiting with status :0
Main: completed thread id :2  exiting with status :0
Main: completed thread id :3  exiting with status :0
Main: completed thread id :4  exiting with status :0
Main: program exiting.
C++11标准库std::thread
构造、析构函数
注意thread传参的时候是以右值引用的&&,所以待用引用参数的函数要格外注意,具体见实例3
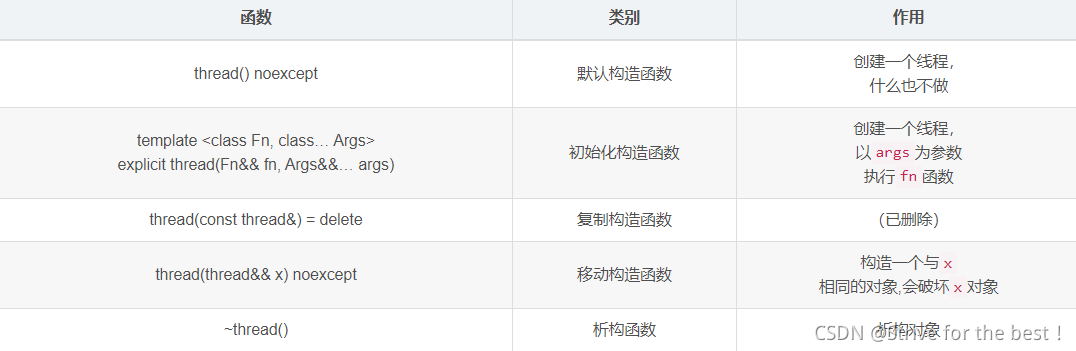
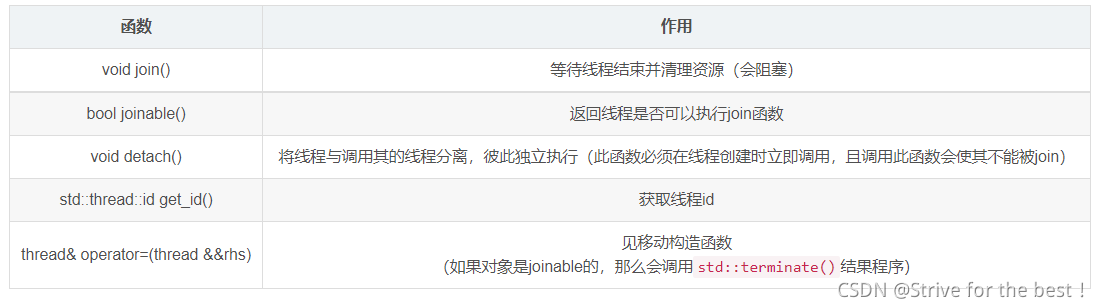
常用成员函数
实例1:基本
#include <iostream>
#include <thread>
using namespace std;
void doit() { cout << "World!" << endl; }
int main() {
	// 这里的线程a使用了 C++11标准新增的lambda函数
	thread a([]{cout << "Hello, " << flush;}), b(doit);
	a.join();
	b.join();
	return 0;
}
注意因为线程之间是异步执行的,所以输出的时候hello 和world谁先输出是不一定的。
实例2:带参数
#include<iostrea>
#include<thread>
using namespace std;
void countnumber(int id,unsigned int n){
for(unsigned int i=1;i<=n;++i){
cout<<"Thread " << id << " finished!" << endl;
}
}
int main(){
thread th[10];//创建10个线程组成的数组
for(int i=0;i<10;++i)
{
	th[i]=thread(countnumber,i,100000000);
}
for(int i=0;i<10;++i)
{
	th[i].join();
}
return 0;
实例3:执行带引用参数的函数:
这里写了一个模板,函数的第一个参数是带引用的。
错误示例:
#include <iostream>
#include <thread>
using namespace std;
template<class T> void changevalue(T &x, T val) {
	x = val;
}
int main() {
	thread th[100];
	int nums[100];
	for (int i = 0; i < 100; i++)
	 th[i]=thread(changevalue<int>,nums[i],i+1);
	 for (int i = 0; i < 100; i++) {
		th[i].join();
		cout << nums[i] << endl;
	}
	return 0;
}
上面这个执行不了,编译器会报错。
原来thread在传递参数时,是以右值传递的:
template <class Fn, class... Args>
explicit thread(Fn&& fn, Args&&... args)
但是我们却想传入一个左值,用ref函数和cref函数可以解决
- ref:包装按引用传递的值。
- cref:包装按const引用传递的值。
将参数传入之前用ref、cref处理以下即可
// Compiler: MSVC 19.29.30038.1
// C++ Standard: C++17
#include <iostream>
#include <thread>
using namespace std;
template<class T> void changevalue(T &x, T val) {
	x = val;
}
int main() {
	thread th[100];
	int nums[100];
	for (int i = 0; i < 100; i++)
		th[i] = thread(changevalue<int>, ref(nums[i]), i+1);
	for (int i = 0; i < 100; i++) {
		th[i].join();
		cout << nums[i] << endl;
	}
	return 0;
}
注意事项:
- 调用join函数只是阻塞等待线程结束并回收资源。
- 分离的线程(执行过detach的线程)会在调用它的线程结束或自己结束时释放资源。
- 线程会在函数运行完毕后自动释放,不推荐利用其他方法强制结束线程,可能会因资源未释放而导致内存泄漏。
示例4:多线程操作同一变量
先看一个线程,我们希望通过多线程从0开始自加一个n。
#include <iostream>
#include <thread>
using namespace std;
int n = 0;
void count10000() {
	for (int i = 1; i <= 10000; i++)
		n++;
}
int main() {
	thread th[100];
	for (thread &x : th)
		x = thread(count10000);
	for (thread &x : th)
		x.join();
	cout << n << endl;
	return 0;
}
按道理说,我们的每个线程最后的n输出的结果都应该是10000才对,但是实际上输出的都比它小一点。因为多线程执行的顺序是同时进行,无次序的,多个线程进行时,如果它们同时操作同一个变量,那么肯定会出错。为了应对这种情况,c++11中出现了std::atomic和std:mutex。
mutex
mutex是一个互斥量,某一个线程将mutex锁住的时候其他线程不能再操作mutex直到其解锁。

我们根据这个特性改写上面的代码:
要点:
- 库函数需要# include< mutex >
- 初始化变量 mutex 变量名,产生一个锁
- 使用时调用lock函数锁住互斥量,调用结束后unlock
#include<iostream>
#include<thread>
#include<mutex>
using namespace std;
int n=0;
mutex mtx;
void countnumber()
{
	for(int i=1;i<10000;++i)
	{
		mtx.lock();
		++n;
		mtx.unlock();
	}
}
int main()
{
	thread th[100];
	for(thread &x:th)
	{
		x=thread(countnumber);
	}
	for(thread &x:th)
	{
		x.join();
		}
		count<<n;
		return 0;
		}
这样输出的就是固定的数。
atomic
使用mutex缺点很明显,很慢,浪费时间。
我们可以申明要操作的对象是原子的,原子操作是最小的且不可并行化的操作。被申明是原子的对象,只能被同步操作,而不能多线程异步,这意味着省去了上锁解锁的时间。
在库函数中
#include<atomic>
使用时
atomic_int n=0;
即可,n不需要上锁解锁。
C++11中的future:获取线程返回值
下面要谈到的async定义在future头文件中。可以先看一下下一个标题。
使用future的主要目的是来获取线程的返回值,之前举例的线程调用函数都没有返回值
future::get() 阻塞等待线程结束并获得返回值
#include<iostream>
#include<future>
using namespace std;
template<class ... Args> decltype(auto) sum(Args&&... args) {
	// C++17折叠表达式
	// "0 +"避免空参数包错误
	return (0 + ... + args);
}
int main(){
future<int> val=async(launch::async,sum<int,int,int>,1,10,100);
cout<<val.get();
return 0;
}
注:
对象val的类型为future< int > ,这里int代表 其返回类型为int类型。创建线程之后我们用get()来获取返回值。
future常用成员函数
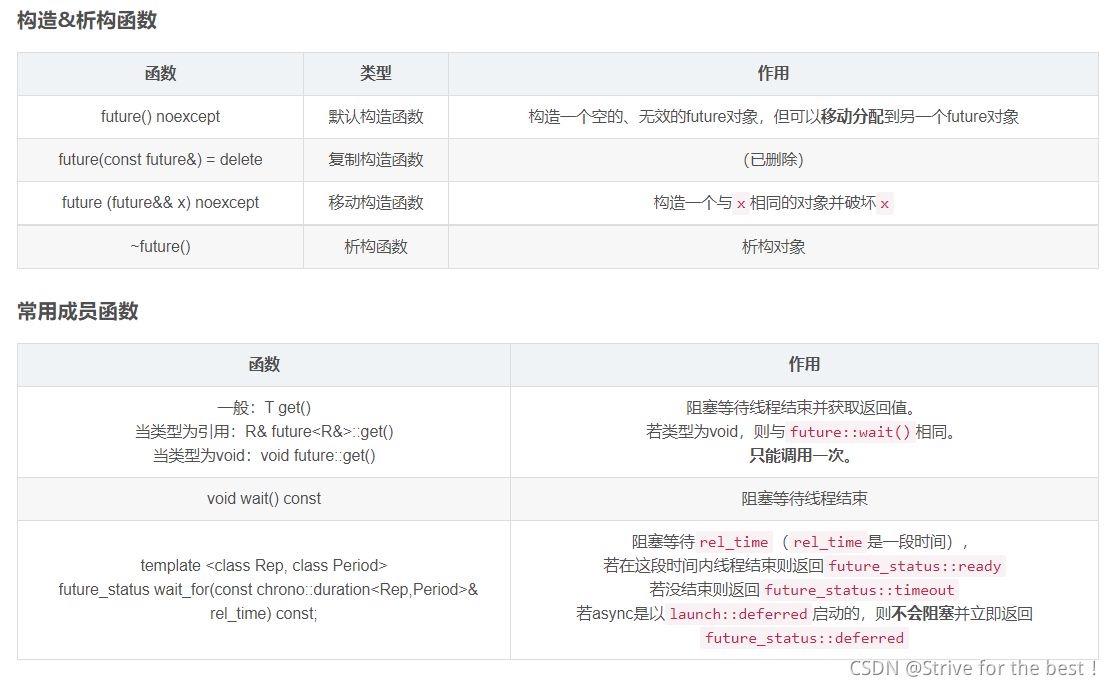
std::future的作用并不只有获取返回值,它还可以检测线程是否已结束、阻塞等待,所以对于返回值是void的线程来说,future也同样重要。
// Compiler: MSVC 19.29.30038.1
// C++ Standard: C++17
#include <iostream>
#include <future>
using namespace std;
void count_big_number() {
	// C++14标准中,可以在数字中间加上单
	// 引号 ' 来分隔数字,使其可读性更强
	for (int i = 0; i <= 10'0000'0000; i++);
}
int main() {
	future<void> fut = async(launch::async, count_big_number);
	cout << "Please wait" << flush;
	// 每次等待1秒
	while (fut.wait_for(chrono::seconds(1)) != future_status::ready)
		cout << '.' << flush;
	cout << endl << "Finished!" << endl;
	return 0;
}
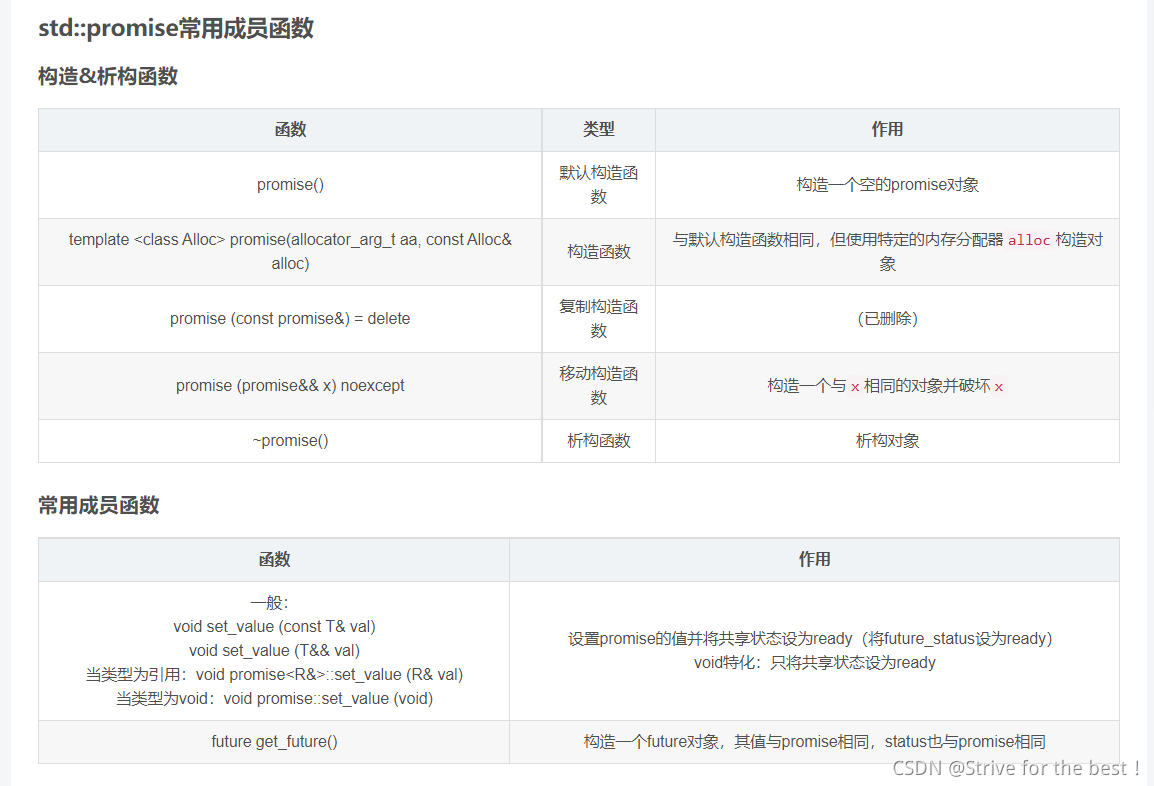
promise
具体待补充,知道一点就够了
future的值是不能变的,如果我们使用thread引用传参,以达到返回值的目的的化,future的值肯定要改变,那么怎么处理?
构造一个拥有特定值的future即可。即用promise可以改变值,用以代替改变值的future
这个例子中,由于变量sum_value要作为引用传参:
- 左右值引用的问题我们在示例3中说过,要使用ref将其包装一下
- 现在我们用thread返回了一个改变值的参数,所以一开始初始化这个sum_value就要被申明为 promise类型
// Compiler: MSVC 19.29.30038.1
// C++ Standard: C++17
#include <iostream>
#include <thread>
#include <future> // std::promise std::future
using namespace std;

template<class ... Args> decltype(auto) sum(Args&&... args) {
	return (0 + ... + args);
}

template<class ... Args> void sum_thread(promise<long long> &val, Args&&... args) {
	val.set_value(sum(args...));
}

int main() {
	promise<long long> sum_value;
	thread get_sum(sum_thread<int, int, int>, ref(sum_value), 1, 10, 100);
	cout << sum_value.get_future().get() << endl;
	return 0;
}
thread vs async
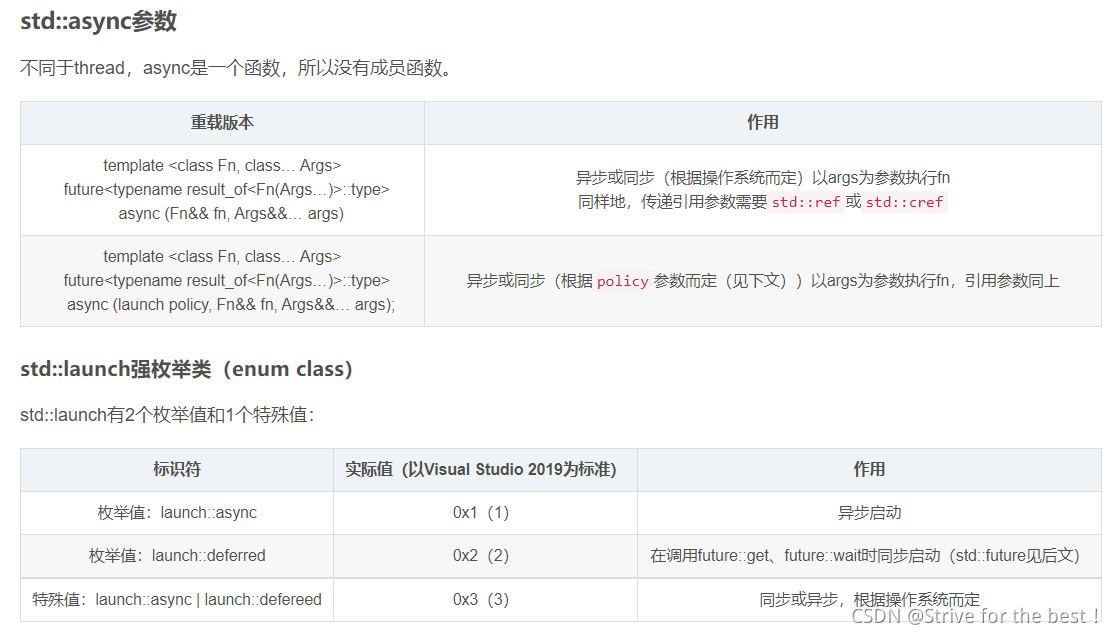
async可以根据情况选择同步执行或创建新线程来异步执行,当然也可以手动选择。对于async的返回值操作也比thread更加方便。不同于thread,async本身是一个函数而非类,因此没有成员函数。
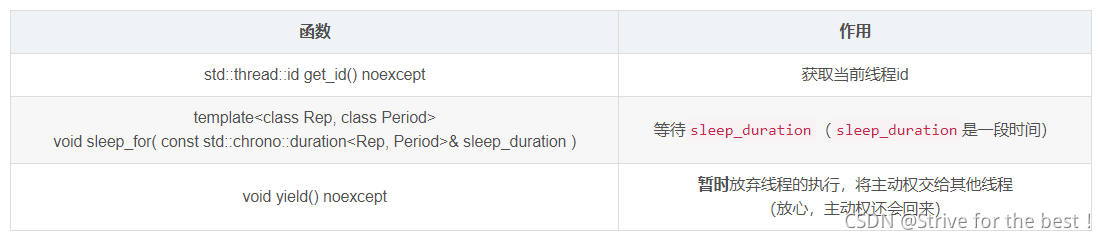
this_thread
#include <iostream>
#include <thread>
using namespace std;
atomic_bool ready = 0;
// uintmax_t ==> unsigned long long
void sleep(uintmax_t ms) {
	this_thread::sleep_for(chrono::milliseconds(ms));
}
void count() {
	while (!ready) this_thread::yield();
	for (int i = 0; i <= 20'0000'0000; i++);
	cout << "Thread " << this_thread::get_id() << " finished!" << endl;
	return;
}
int main() {
	thread th[10];
	for (int i = 0; i < 10; i++)
		th[i] = thread(::count);
	sleep(5000);
	ready = true;
	cout << "Start!" << endl;
	for (int i = 0; i < 10; i++)
		th[i].join();
	return 0;
}
参考文献:https://blog.csdn.net/sjc_0910/article/details/118861539
原文C++11的内容更详细


 4993
4993

 被折叠的 条评论
为什么被折叠?
被折叠的 条评论
为什么被折叠?
 到【灌水乐园】发言


