
PNG Infoっぽい自分用ツールを作ったメモ

2025年8月5日追記
新しいのを作ったよメモ
https://note.com/nullpolab/n/n0fca2e4edc47
前置き
python知らん人がChatGPTやCopilotやGeminiを使って作ったものです。
バグや予期せぬことが起きるかもしれませんので使用は十分注意して自己責任でお願いします。
ソースコードは好きにしていいです。
世の中には便利なツールがあるのでpngに埋め込まれてるプロンプトを見るなら SD Prompt Reader などを使うのがいいと思います。
本題
ツールのサンプル画像
Stable diffusion WebUIにあるPNG Infoっぽい自分用ツールです。
こんな感じにプロンプトが見えます
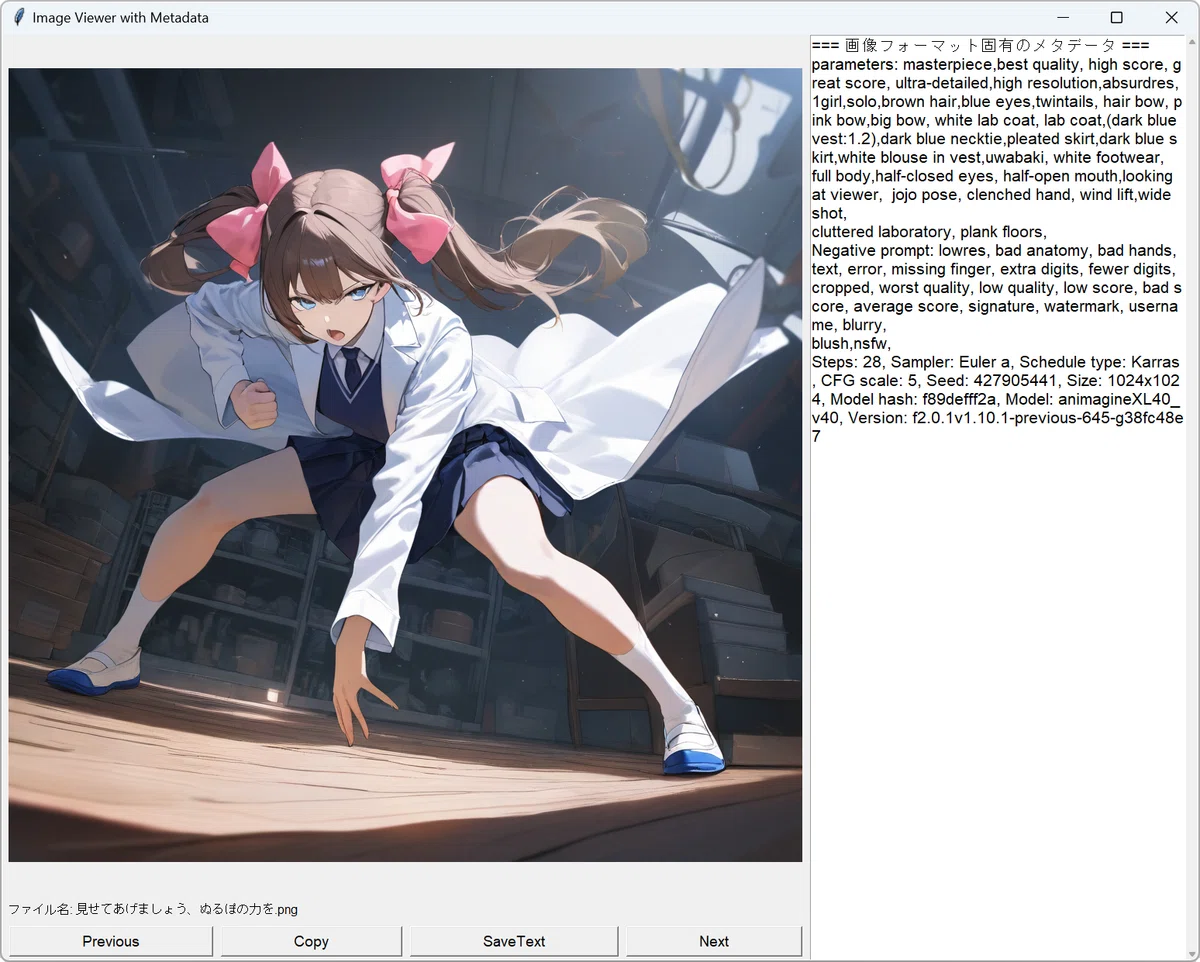
実行環境の準備と実行
仮想環境上で動かします。
いらなくなったらポイッとすればいいからという理由と仮想環境の構築に俺が慣れる意味でもそうしていきます。
pythonのバージョンは 3.11.7 です。他のバージョンでは試してません。
まず自分でわかりやすいフォルダに以下のソースコードを記述した"PngInfoViewer.py"ファイルを置いておきます。
ファイル名は自分がわかれば何でもいいです。
長いです。
import tkinter as tk
from tkinterdnd2 import TkinterDnD, DND_FILES
from PIL import (Image, ImageTk, PngImagePlugin, JpegImagePlugin,
WebPImagePlugin, GifImagePlugin, ExifTags, UnidentifiedImageError)
import piexif
from iptcinfo3 import IPTCInfo
import os
import re
from screeninfo import get_monitors
import datetime
import sys
import threading
# 2025.02.14
# 動作に必要なもの
# python 3.11.7 で実行テスト
# pip install iptcinfo3==2.1.4
# pip install piexif==1.1.3
# pip install pillow==11.1.0
# pip install screeninfo==0.8.1
# pip install tkinterdnd2==0.4.2
# PngInfoっぽいツール
# 自己責任でお願いします
# ソースは自由にしてください
# ※ただし責任は持たない
# 9割9分AIで作ったものです
# 使い方
# 画像をドラッグ&ドロップする
# キーボードの矢印キー左右で戻る・進む
# 画像の上でマウスホイールの上下で戻る進む
# Copyボタンでクリップボードにメタデータをコピー
# SaveTextボタンで"画像ファイル名.txt"で同じ場所に保存
# 注意
# 画像がモニターより大きいと縮小表示されます
# それでもウィンドウがモニターからはみ出ます
# 一応ウィンドウと画像のサイズ調整はしてみたけどはみ出ます
# ファイルによっては変な文字列が出ます
#
# IPTCタグ番号と対応する項目名のマッピング
IPTC_TAG_MAPPING = {
5: "Title", # Object Name
7: "Edit Status",
10: "Priority",
15: "Category",
20: "Supplemental Category",
22: "Fixture Identifier",
25: "Keywords",
30: "Release Date",
35: "Release Time",
40: "Special Instructions",
45: "Reference Service",
47: "Reference Date",
50: "Reference Number",
55: "Date Created",
60: "Time Created",
65: "Digital Creation Date",
70: "Digital Creation Time",
75: "Originating Program",
80: "Author", # By-line
85: "By-line Title",
90: "City",
95: "Sub-location",
100: "Province/State",
101: "Country Code",
103: "Country",
105: "Original Transmission Reference",
110: "Headline",
115: "Credit",
116: "Source",
118: "Copyright Notice",
120: "Caption", # Caption/Abstract
122: "Local Caption",
125: "Special Instructions"
}
# 画像リストとインデックス
image_files = []
current_index = 0
img_tk = None
original_img = None
frames = []
delay = 100
animation_running = False
# メタデータ表示エリアの固定幅
metadata_width = 300
# リサイズ処理フラグとタイマー
resize_pending = False
resize_delay = 200 # 200ms
# Tkinterウィンドウ(TkinterDnDを使用)
root = TkinterDnD.Tk()
root.title("Image Viewer with Metadata")
root.update_idletasks()
# ウィンドウの最小サイズを設定
min_window_width = 800
min_window_height = 600
root.geometry(f"{min_window_width}x{min_window_height}")
root.minsize(min_window_width, min_window_height)
# グリッドの重みを設定
root.grid_rowconfigure(0, weight=1)
root.grid_rowconfigure(1, weight=0)
root.grid_rowconfigure(2, weight=0)
root.grid_columnconfigure(0, weight=1)
root.grid_columnconfigure(1, weight=0)
# メタデータ表示エリア(固定幅)
metadata_frame = tk.Frame(root)
metadata_frame.grid(row=0, column=1, rowspan=3, sticky="ns")
metadata_frame.grid_rowconfigure(0, weight=1)
metadata_frame.grid_columnconfigure(0, weight=1)
metadata_text = tk.Text(metadata_frame, width=40, font=("Arial", 16))
metadata_text.grid(row=0, column=0, sticky="nsew")
# メタデータ領域のスクロール設定
metadata_scroll = tk.Scrollbar(metadata_frame, orient="vertical",
command=metadata_text.yview)
metadata_scroll.grid(row=0, column=1, sticky="ns")
metadata_text.config(yscrollcommand=metadata_scroll.set)
# 画像表示エリア
image_frame = tk.Frame(root)
image_frame.grid(row=0, column=0, sticky="nsew")
image_frame.grid_rowconfigure(0, weight=1)
image_frame.grid_columnconfigure(0, weight=1)
# 画像ラベル
image_label = tk.Label(image_frame)
image_label.grid(row=0, column=0, padx=0, pady=0, sticky="")
# ファイル名を表示するラベルを追加
filename_label = tk.Label(root, text="", font=("Arial", 12))
filename_label.grid(row=1, column=0, padx=5, pady=5, sticky="w")
# ボタンフレームを作成
button_frame = tk.Frame(root)
button_frame.grid(row=2, column=0, padx=5, pady=5, sticky="ew")
# ボタンフレームの列の重みを設定
for i in range(4):
button_frame.columnconfigure(i, weight=1)
# ボタンを配置
# 前の画像
# 最初のファイルだった場合最後の画像を表示
prev_button = tk.Button(button_frame, text="Previous",
command=lambda: previous_image(), font=("Arial", 14))
prev_button.grid(row=0, column=0, padx=5, sticky="ew")
# クリップボードにコピー
copy_button = tk.Button(button_frame, text="Copy",
command=lambda: copy_metadata(), font=("Arial", 14))
copy_button.grid(row=0, column=1, padx=5, sticky="ew")
# テキストファイルにメタデータを画像ファイル名で保存
save_button = tk.Button(button_frame, text="SaveText",
command=lambda: save_metadata(), font=("Arial", 14))
save_button.grid(row=0, column=2, padx=5, sticky="ew")
# 次の画像
# 最後の画像だった場合最初の画像を表示
next_button = tk.Button(button_frame, text="Next",
command=lambda: next_image(), font=("Arial", 14))
next_button.grid(row=0, column=3, padx=5, sticky="ew")
# gif最小の遅延時間(ミリ秒) 高速再生防止用
# gifは1フレームごとにdurationがあるようだがそこは考えない
# きちんとやるなら1フレームごと取得する
# なおapngも影響を受ける模様
min_delay = 80
# `after()` のIDを処理ごとに管理する辞書
# root.after用
after_ids = {}
# 画像を表示する関数
def show_image(img_path):
global current_index, img_tk, original_img, frames, delay, animation_running
try:
img = Image.open(img_path)
original_img = img.copy()
frames = []
delay = img.info.get('duration', min_delay) # 設定されてない場合min_delayが入る
if delay < min_delay:
delay = 80
animation_running = False
# 現在アニメーションgifが表示されていれば `after()` をキャンセル(キー: "gif_key")
if "gif_key" in after_ids:
root.after_cancel(after_ids["gif_key"])
del after_ids["gif_key"] # IDを辞書から削除
# フレーム数をチェック
if getattr(img, "is_animated", False):
frame_count = img.n_frames
else:
frame_count = 1
# モニターサイズを取得(get_monitorsを使用)
monitor = get_monitors()[0] # メインモニターを取得
screen_width = monitor.width
screen_height = monitor.height
# ウィンドウの装飾やボタン、メタデータエリアのサイズを考慮
window_decor_width = 200
window_decor_height = 150
img_margin = 20 # 画像ラベルのマージン
# 画像サイズ
img_width, img_height = img.size
# 必要なウィンドウサイズを計算
required_window_width = img_width + metadata_width + window_decor_width + img_margin
required_window_height = img_height + window_decor_height + img_margin
aspect_ratio = img_width / img_height
# 画像がモニターより小さい場合
if required_window_width <= screen_width and required_window_height <= screen_height:
# 画像を元のサイズで表示
new_width, new_height = img_width, img_height
else:
# ウィンドウがモニターサイズを超える場合、画像を縮小
available_width = screen_width - metadata_width - window_decor_width - img_margin
available_height = screen_height - window_decor_height - img_margin
# 利用可能な幅と高さに基づいて、アスペクト比を維持して新しいサイズを計算
width_ratio = img_width / available_width
height_ratio = img_height / available_height
if width_ratio > height_ratio:
new_width = available_width
new_height = int(available_width / aspect_ratio)
else:
new_height = available_height
new_width = int(available_height * aspect_ratio)
# フレームをリサイズしてリストに格納
if frame_count > 1:
target_size = (int(new_width), int(new_height))
img.seek(0)
for frame in range(frame_count):
try:
img.seek(frame)
except EOFError:
print("frame EOFerror")
continue
frame_img = img.convert("RGBA").copy()
if target_size != img.size:
frame_img = frame_img.resize(target_size, Image.LANCZOS)
frames.append(ImageTk.PhotoImage(frame_img))
animation_running = True
animate(0)
else:
if (int(new_width), int(new_height)) != img.size:
img = img.resize((int(new_width), int(new_height)), Image.LANCZOS)
img_tk = ImageTk.PhotoImage(img)
image_label.config(image=img_tk)
image_label.image = img_tk
# ウィンドウサイズを調整
total_width = new_width + metadata_width + window_decor_width + img_margin
total_height = max(new_height + window_decor_height + img_margin, min_window_height)
root.geometry(f"{int(total_width)}x{int(total_height)}")
# ファイル名を表示
filename = os.path.basename(img_path)
filename_label.config(text=f"ファイル名: {filename}")
# メタデータ表示
show_metadata(img_path)
except Exception as e:
print(f"Error loading image: {e}")
image_label.config(image=None)
metadata_text.delete(1.0, tk.END)
metadata_text.insert(tk.END, f"Error loading image: {e}\n")
filename_label.config(text="ファイル名: エラー")
# GIFアニメーションを表示する関数
def animate(frame_index):
global frames, delay, animation_running
if not animation_running:
return
# frame_indexが範囲外の場合は0にリセットする
if frame_index >= len(frames):
frame_index = 0
frame = frames[frame_index]
image_label.config(image=frame)
image_label.image = frame
next_frame = (frame_index + 1) % len(frames)
after_ids["gif_key"] = root.after(int(delay), animate, next_frame)
# ウィンドウリサイズ時の処理
def on_resize(event):
global resize_pending
if resize_pending:
return
resize_pending = True
after_ids["resize_key"] = root.after(int(resize_delay), resize_image)
# リサイズ処理
def resize_image():
global resize_pending, frames, animation_running
margin_size = 10
if original_img:
window_width = image_frame.winfo_width() - margin_size # 余白を考慮
window_height = image_frame.winfo_height() - margin_size # 余白を考慮
img_width, img_height = original_img.size
aspect_ratio = img_width / img_height
if img_width > window_width or img_height > window_height:
if img_width / window_width > img_height / window_height:
new_width = window_width
new_height = int(new_width / aspect_ratio)
else:
new_height = window_height
new_width = int(new_height * aspect_ratio)
else:
new_width, new_height = img_width , img_height
# アニメーションGIFの場合
# のはずだがimg.copy()だとgifのフレームすべてをコピーするわけじゃないっぽいので実際にこの処理に入ることはない模様
# 対処するのならばフレームを一つ一つコピーして新たなGIFを作るっぽい
if frames and getattr(original_img, "is_animated", False):
animation_running = False
# 現在アニメーションgifが表示されていれば `after()` をキャンセル(キー: "gif_key")
if "gif_key" in after_ids:
root.after_cancel(after_ids["gif_key"])
del after_ids["gif_key"] # IDを辞書から削除
print("gif")
frames.clear()
frame_count = original_img.n_frames
target_size = (int(new_width), int(new_height))
img.seek(0)
for frame in range(frame_count):
try:
original_img.seek(frame)
except EOFError:
print("Frame EOF Error")
continue
frame_img = original_img.convert("RGBA").copy()
frame_img = frame_img.resize(target_size, Image.LANCZOS)
frames.append(ImageTk.PhotoImage(frame_img))
animation_running = True
animate(0)
else:
display_img = original_img.resize((int(new_width ), int(new_height)), Image.LANCZOS)
img_tk = ImageTk.PhotoImage(display_img)
image_label.config(image=img_tk)
image_label.image = img_tk
resize_pending = False
# リサイズ処理にある root.after `after()` をキャンセル(キー: "resize_key")
if "resize_key" in after_ids:
root.after_cancel(after_ids["resize_key"])
del after_ids["resize_key"] # IDを辞書から削除
# IPTCメタデータ取得
def extract_iptc_metadata(image_path):
try:
img = Image.open(image_path)
if img.format != "JPEG":
# print("jpegじゃないよ")
return
# Falseのほうが処理が軽くなる
# 標準エラー出力を一瞬だけ無効化
# No IPTC data found in ~などが出力されるのを抑制する
sys.stderr = open(os.devnull, 'w')
try:
info = IPTCInfo(image_path,force=False)
finally:
sys.stderr = sys.__stderr__ # 確実に元に戻す
# 内部データにアクセス
if not hasattr(info, '_data') or not info._data:
print("No IPTC metadata found.")
return
# print("IPTC Metadata:")
metadata_text.insert(tk.END, "\n=== IPTC メタデータ ===\n")
for key, value in info._data.items():
# キーが None の場合はスキップ
if key is None:
continue
# マッピング辞書からフレンドリな項目名を取得
tag_name = IPTC_TAG_MAPPING.get(key, f"Unknown ({key})")
# valueが空の場合は表示しない
if value is None:
continue
# 値がリストの場合は各要素をデコードして結合
if isinstance(value, list):
decoded_list = []
for item in value:
if isinstance(item, bytes):
try:
item = item.decode('utf-8')
except UnicodeDecodeError:
item = item.decode('latin-1', 'ignore')
decoded_list.append(str(item))
value_str = ', '.join(decoded_list).strip()
if not value_str:
continue
value = value_str
# 値がbytes型の場合はデコード
elif isinstance(value, bytes):
try:
value = value.decode('utf-8')
except UnicodeDecodeError:
value = value.decode('latin-1', 'ignore')
if not value.strip():
continue
# 文字列の場合、空文字列はスキップ
elif isinstance(value, str):
if not value.strip():
continue
# print(f"{tag_name}: {value}")
metadata_text.insert(tk.END,tag_name + ": " + value + "\n")
if value == []:
metadata_text.delete(1.0, tk.END)
except Exception:
pass # 取得できない場合は無視
def decodeXP(t):
b = bytes(t)
return b[:-2].decode('utf-16-le')
# メタデータを表示する関数
def show_metadata(img_path):
try:
image = Image.open(img_path)
metadata_text.delete(1.0, tk.END) # 既存のテキストをクリア
# メタデータ変数の初期化
metadata = {}
# === EXIF情報の取得 ===
exif_bytes = image.info.get("exif")
if exif_bytes:
try:
exif_dict = piexif.load(exif_bytes) # バイナリを辞書形式に変換
metadata_text.insert(tk.END, "=== EXIF 情報 ===\n")
for ifd_name in exif_dict:
if isinstance(exif_dict[ifd_name], dict):
for tag_id, value in exif_dict[ifd_name].items():
tag_name = piexif.TAGS[ifd_name].get(tag_id, {}).get("name", f"Unknown-{tag_id}")
if tag_name.startswith("XP"):
value = decodeXP(value)
else:
# バイナリデータはデコードする
if isinstance(value, bytes):
try:
value = value.decode("utf-8", errors="ignore")
except Exception:
value = "[バイナリデータ]"
metadata_text.insert(tk.END, f"{tag_name}: {value}\n")
# 確認
# print(f"tag_name = {tag_name}")
# ユーザーコメント & 画像の説明
user_comment = exif_dict["Exif"].get(37510) # UserComment
image_description = exif_dict["0th"].get(270) # ImageDescription
if user_comment:
# ユーザーコメントがバイナリデータ (b'UNICODE\x00') だった場合、NULLバイトを除去してからデコード
if isinstance(user_comment, bytes):
# NULLバイトを除去
user_comment = user_comment.replace(b'\x00', b'').decode("utf-8", errors="ignore")
metadata_text.insert(tk.END, f"\n=== ユーザーコメント ===\n{user_comment}\n")
if image_description:
metadata_text.insert(tk.END, f"\n=== 画像の説明 ===\n{image_description}\n")
except Exception as e:
metadata_text.insert(tk.END, f"\nEXIF デコードエラー: {e}\n")
# === IPTCメタデータの取得 ===
extract_iptc_metadata(img_path) # こっちに処理を移行、下記は詳細なものは出ない
"""
try:
with open(img_path, "rb") as f:
img_data = f.read()
iptc_start = img_data.find(b"Photoshop 3.0\x00")
if iptc_start != -1:
metadata_text.insert(tk.END, "\n=== IPTC メタデータ ===\n")
iptc_data = img_data[iptc_start:iptc_start + 512] # IPTCデータの一部を取得
metadata_text.insert(tk.END, iptc_data.decode("utf-8", errors="ignore") + "\n")
except Exception:
pass # 取得できない場合は無視
"""
# === XMP メタデータの取得 ===
try:
with open(img_path, "rb") as f:
img_data = f.read()
xmp_start = img_data.find(b"<x:xmpmeta")
xmp_end = img_data.find(b"</x:xmpmeta>") + len(b"</x:xmpmeta>")
if xmp_start != -1 and xmp_end != -1:
metadata_text.insert(tk.END, "\n=== XMP メタデータ ===\n")
xmp_data = img_data[xmp_start:xmp_end].decode("utf-8", errors="ignore")
metadata_text.insert(tk.END, re.sub(r'>\s+<', '>\n<', xmp_data) + "\n")
except Exception:
pass # 取得できない場合は無視
# === 画像フォーマット固有のメタデータ ===
if isinstance(image, PngImagePlugin.PngImageFile):
metadata = image.text # PNGのテキスト情報
elif isinstance(image, (JpegImagePlugin.JpegImageFile, WebPImagePlugin.WebPImageFile, GifImagePlugin.GifImageFile)):
metadata = image.info # 一般的なメタデータ情報
if metadata:
if not metadata_text.get("1.0", "end-1c").strip() == "": # 空じゃなかった場合 一回改行を挟む
metadata_text.insert(tk.END,"\n")
metadata_text.insert(tk.END, "=== 画像フォーマット固有のメタデータ ===\n")
for key, value in metadata.items():
metadata_text.insert(tk.END, f"{key}: {value}\n")
# メタデータが何もない場合
if not exif_bytes and not metadata:
metadata_text.insert(tk.END, "メタデータはありません\n")
except Exception as e:
metadata_text.delete(1.0, tk.END)
metadata_text.insert(tk.END, f"メタデータの読み込みエラー: {e}\n")
# メタデータをクリップボードにコピーする関数
def copy_metadata():
metadata = metadata_text.get(1.0, tk.END)
root.clipboard_clear()
root.clipboard_append(metadata)
print("メタデータをクリップボードにコピーしました。")
# メタデータをファイルに保存する関数 (問答無用で上書き)
def save_metadata_old():
if image_files:
img_path = image_files[current_index]
base_name = os.path.splitext(os.path.basename(img_path))[0]
directory = os.path.dirname(img_path)
output_path = os.path.join(directory, f"{base_name}.txt")
metadata = metadata_text.get(1.0, tk.END)
try:
with open(output_path, 'w', encoding='utf-8') as f:
f.write(metadata)
print(f"メタデータをファイルに保存しました: {output_path}")
except Exception as e:
print(f"メタデータの保存に失敗しました: {e}")
# メタデータをファイルに保存する関数 (同名ファイルがあった場合連番をつけて保存)
# どっちがいいかは呼び出してるところを書き変える
def save_metadata():
if image_files:
img_path = image_files[current_index]
base_name = os.path.splitext(os.path.basename(img_path))[0]
directory = os.path.dirname(img_path)
# 連番を考慮したファイル名生成
output_path = os.path.join(directory, f"{base_name}.txt")
counter = 2
while os.path.exists(output_path): # ファイルがすでに存在する場合
output_path = os.path.join(directory, f"{base_name} ({counter}).txt")
counter += 1 # 連番を増やす
# メタデータ取得
metadata = metadata_text.get(1.0, tk.END)
# ファイルに書き込む
try:
with open(output_path, 'w', encoding='utf-8') as f:
f.write(metadata)
print(f"メタデータをファイルに保存しました: {output_path}")
except Exception as e:
print(f"メタデータの保存に失敗しました: {e}")
# 進む関数
def next_image(event=None):
global current_index, animation_running
if image_files:
animation_running = False
current_index = (current_index + 1) % len(image_files)
show_image(image_files[current_index])
# 戻る関数
def previous_image(event=None):
global current_index, animation_running
if image_files:
animation_running = False
current_index = (current_index - 1) % len(image_files)
show_image(image_files[current_index])
# 初期化
def init():
if "dd_key" in after_ids:
root.after_cancel(after_ids["dd_key"])
del after_ids["dd_key"] # IDを辞書から削除
if "gif_key" in after_ids:
root.after_cancel(after_ids["gif_key"])
del after_ids["gif_key"] # IDを辞書から削除
if "resize_key" in after_ids:
root.after_cancel(after_ids["resize_key"])
del after_ids["resize_key"] # IDを辞書から削除
image_files = [] # 初期化
image_label.config(image='') # 初期化
image_label.image = None # 初期化
# ドラッグ&ドロップ設定
def drop(event):
global image_files, current_index, animation_running
init() #初期化
# event.data を Tcl リスト形式の文字列として分割して Python のタプルに変換
# 最初のファイルパスを取得(パスに空白があっても正しく扱える)
file_list = root.tk.splitlist(event.data)
# print(f"{file_list}")
img_path = file_list[0] # 複数ドロップされた時、最初のものだけを抽出 下記は一つだけの入力の名残
# img_path = re.sub(r"{|}", "", img_path)
img_path = os.path.abspath(img_path)
# スレッドで画像ファイル処理を実行
thread = threading.Thread(target=process_images, args=(img_path,))
thread.start()
def process_images(img_path):
global image_files, current_index, animation_running
# 画像ファイル処理のコード (元の drop 関数から移動)
directory = os.path.dirname(img_path)
image_files = []
current_index = -1
for f in os.listdir(directory):
file_path = os.path.join(directory, f)
# **ファイルパスがファイルであるかチェック (フォルダを除外)**
if not os.path.isfile(file_path):
# print(f"スキップ: '{f}' はフォルダであるため、処理をスキップします。")
continue # フォルダの場合は次のファイルへ
try:
# Pillow で画像ファイルとして開けるか試す (変更なし)
Image.open(file_path)
# エラーなく開けた場合は画像ファイルとみなす (変更なし)
image_files.append(file_path)
except FileNotFoundError:
# ファイルが見つからない場合はスキップ (変更なし)
continue
except UnidentifiedImageError:
# 画像ファイルとして認識できない場合はスキップ (変更なし)
# print(f"スキップ: '{f}' はサポートされていない画像形式、または画像ファイルとして認識できませんでした。")
continue
except Exception as e:
# その他の予期せぬエラー (変更なし)
print(f"スキップ: '{f}' 処理中にエラーが発生しました: {e}")
continue
image_files.sort()
try:
current_index = image_files.index(img_path)
except ValueError:
current_index = -1
# GUIの更新はメインスレッドで行う必要があるため、`after` を使用
after_ids["dd_key"] = root.after(0, update_gui, image_files, current_index,img_path) # `root` は Tk() インスタンス
def update_gui(partial_image_files, current_index_param,img_path):
global image_files, current_index, animation_running
image_files = partial_image_files # グローバル変数を更新 (必要に応じて)
current_index = current_index_param # グローバル変数を更新 (必要に応じて)
if current_index != -1:
animation_running = False
show_image(image_files[current_index])
else:
init() #初期化
print(f"エラー: ドロップされたファイル '{img_path}' は有効な画像ファイルではありません。")
metadata_text.delete(1.0, tk.END)
metadata_text.insert(tk.END, f"エラー: ドロップされたファイル '{img_path}' は有効な画像ファイルではありません")
# キーボードショートカット
root.bind("<Right>", next_image)
root.bind("<Left>", previous_image)
root.bind("<Escape>", lambda event: root.quit())
# マウスホイールで画像を切り替える
def on_mousewheel(event):
if event.delta > 0:
previous_image()
else:
next_image()
# 画像表示エリアでのマウスホイールイベントをバインド
image_label.bind("<MouseWheel>", on_mousewheel)
image_label.bind("<Button-4>", on_mousewheel)
image_label.bind("<Button-5>", on_mousewheel)
# ウィンドウリサイズイベント
root.bind("<Configure>", on_resize)
# ドラッグ&ドロップを有効化
root.drop_target_register(DND_FILES)
root.dnd_bind('<<Drop>>', drop)
# 実行
root.mainloop()
次にそのフォルダで仮想環境を構築します。
PowerShellを開いて次のコマンドを打ちます。
python -m venv venv次に仮想環境を有効化します。
.\venv\Scripts\activate次に必要なパッケージをインストールします。
pip install iptcinfo3==2.1.4
pip install piexif==1.1.3
pip install pillow==11.1.0
pip install screeninfo==0.8.1
pip install tkinterdnd2==0.4.2
バージョン指定してるのは今の時点で動いてるバージョンを明確にしておきたいからです。
バージョン指定なんざいらねーぜ!って人は以下のコマンドで
pip install iptcinfo3 piexif pillow screeninfo tkinterdnd2いよいよ実行します。
python PngInfoViewer.py起動!
してるといいな。使おうとした人も。
◤◢◤◢◤◢◤◢◤◢◤◢◤◢◤◢◤◢◤◢
使い方と注意!!
◤◢◤◢◤◢◤◢◤◢◤◢◤◢◤◢◤◢◤◢
・どういうバグがあるかわからないので覚悟がある人だけ使用してください
・大量にファイルがあるフォルダの画像は読み込まないでください
・画像ファイルを"1つだけ"ドラッグ&ドロップしてください
・大きい画像だとウィンドウがモニターからはみ出ます
・モニターより大きい画像だとリサイズの関係で画像がちょっと動きます
・読み込んだ画像のフォルダにある読み込める画像ファイルを切り替えて表示できます
・ESCキーで終了します
・キーボードの矢印キーの左右で戻る・進むです
・"画像上だけ"でマウスホイールの上下で戻る・進むが効きます
・"Copy"ボタンはクリップボードに右側に表示されてるテキストをコピーします
・"SaveText"は"[画像のファイル名].txt"で右側に表示されているテキストを保存します
・同名ファイルがある場合は連番が付加されて保存されます。
適当に画像を読み込んでいくとわかるけどズラズラとよくわからん文字が出ることがあるけど無視してください。
アニメーションGIFやAPNGを縮小しようとすると画像が見切れます。
プロンプトが表示される以外はおまけです。
( ΦωΦ)σ< プロンプトが表示されてるのでヨシ!
仮想環境をいちいちアクティブにして起動するのめんどくせーって人は
@echo off
cd /d %~dp0
call .\venv\Scripts\activate
python PngInfoViewer.py
deactivate
pause
って記述したテキストファイルを"run.bat"みたいな名前にして仮想環境とセットにして置いてあるPngInfoViewer.pyがあるフォルダにおいて実行するといいかも
これもChatGPTに聞いて作りました
ChatGPTに聞いた説明
@echo off ―― バッチファイル実行時にコマンドそのものを表示しないようにする設定
cd /d %~dp0 ―― バッチファイルの実行ディレクトリをそのバッチファイルがあるフォルダに変更する
call .\venv\Scripts\activate ―― 仮想環境(venv)をアクティブにする
・call を使うと、実行後に元のバッチファイルに戻って処理を続けることができますとのこと
以下省略
以上です。
制作日記っぽいもの(自分の思い出し用、長い)
詰まったところ抜粋
・ドラッグ&ドロップでファイルを読み込むとパスやファイル名に半角スペース(全角スペースは検証してない)があると自動的に"{}"がつけられてしまうのできちんと取り除く処理を入れよう
・モニターの解像度を正確に知りたい時は"get_monitors"を使う
・Exifは複雑怪奇なので素人が手を出すものではない
・ICCプロファイルにも手を出してはいけない
きっかけはpnginfoがサクッと見られるものがないかなと思ったこと。
実際あるね Stable Diffusion Prompt Reader ってものが。他にもいくつかある。
まぁせっかくpython環境があるしChatGPTやCopilotやGeminiがあるし聞けば作れるんじゃね?と思った。
とりあえず聞いてみるかってことでChatGPTに聞いてみた。
「Stable Diffusion の "png info"という機能を知っていますか?」
さすがだね。あれこれと機能の説明をしてくれた。
じゃあってことで
「その機能と同じものをpythonプログラムで作成してください。フォルダにあるpng画像を読み込み、メタデータをpng画像のファイル名と同じ名前のテキストで出力するものをお願いします」
て言ったらサクッとコマンドラインで使える――
・input_images フォルダに PNG 画像を入れる
・スクリプトを実行すると、output_metadata フォルダに画像ごとのメタデータを含むテキストファイルが生成される
・各テキストファイルには tEXt や iTXt に保存されたプロンプトやパラメータが記録される
というプログラムを作ってくれた。
おお~すげーと思いながらコピペして実行。
「こいつ……動くぞ!」
それならってんで次は
「インプットフォルダはコマンドライン引数で受け取れるようにしてください」
それができるとさらに要望はエスカレートしていき
◆画像を開いて左側に画像を表示し右側にプロンプト情報
◆ドラッグ&ドロップして画像を表示
・色々読み込ませてみたところパスやファイル名に空白が入るものだと表示できないことに気づく
・空白が入ると駄目だから直してとアバウトに何回言っても直らない
・printで出力して調べるとどうやらパスやファイル名に空白が入ると自動で"{}"大括弧がつく仕様のようだった
・読み込んでその後に受け取る文字列に"{}"が入ってた場合それを除去するように具体的に指示すると直してくれた
・具体的に指示するのが大事のようだ
・だが結局最後は違う方法"タプル化"というものになった
・なぜなら複数ドロップされた時の処理を追加したからで最初のファイルのみ参照している
◆gif画像もいける?と聞いてgif画像も表示できるように(gifはあまり検証してない)
◆画像の元の解像度で表示するように
◆画像がモニターより大きい場合は縮小して表示(ウィンドウがモニターからはみ出る雑な縮小表示)
・windowsの設定でディスプレイ、拡大縮小とレイアウトで150%(DPI スケーリング)にしてると画像自体の解像度よりも大きく表示される問題の対処
・モニター自体の解像度を取得するのには get_monitors で取得すればいいっぽいのでそれを使うように指示する
◆gif画像もいける?と聞いてgif画像も表示できるように(gifはあまり検証してない)
◆画像の元の解像度で表示するように
◆画像がモニターより大きい場合は縮小して表示(ウィンドウがモニターからはみ出る雑な縮小表示)
・windowsの設定でディスプレイ、拡大縮小とレイアウトで150%(DPI スケーリング)にしてると画像自体の解像度よりも大きく表示される問題の対処
・モニター自体の解像度を取得するのには get_monitors で取得すればいいっぽいのでそれを使うように指示する
◆メタデータ表示エリアを考慮に入れて画像を表示
◆画像を読み込んだらその画像と同じフォルダにある画像を順番に表示できるように
◆戻る・進むボタンの追加
◆キーボードの矢印キーの左右で戻る進むを追加
◆メタデータのクリップボードへのコピーボタンを追加
◆メタデータのテキストファイルへの書き出しボタンを追加
◆ウィンドウを縮小拡大すると処理が重くなってるので軽減するように指示(これだけでやってくれるんだから凄いね)
・200ms秒待つ処理
・もっと遅くしたい場合は書き変える
この時点で修正したい箇所として、画像を開いた時メタデータ表示エリアが途切れた状態でウィンドウが出てきていた
ウィンドウを自分で大きくすればいいがそれはわずらわしい
それの修正を指示すると、今度は画像が縮小されて表示されたりしてどうにもうまくいかなかった
ChatGPTの無料枠だからかなと思って、んじゃCopilotはどうだろう?と思いソース全部をCopilotに投げて、画像エリアとテキストエリアを最初から全部表示されるようにしてと要望したら一発でこちらの意図通りに直してくれた
Copilotの仕様が変わってから使いにくいと思って使ってなかったけど今回使ってみて「ごめんなさい」をした
さらにCopilotさんにモニターより大きい画像が入力された場合の処理の改善を要望したりした
それでも画像がでかいとウィンドウがモニター外にはみ出るんだけどね
そこはまぁ別にいいかと妥協した
これでいいかなと思ったけど、画像を読み込んでテストしてると気になりだしたメタデータの謎の文字列
Exifかーってことでそれを適切に表示するようにできる?と聞いてできるっぽいんでやってもらうがメタデータを全部表示するところは未処理
webpにもなんかプロンプト情報があるっぽいぞとなり、デコード処理をしてもらうがここで変な空白が現れる
聞いたらおそらく"NULL"文字でしょう、と
これはぬるぽ!いや"ぽ"はないんだが、とりあえずそれを取り除く処理を指示する
さらによくわからんデータもあるので色々やってもらうが、XPなんちゃらってタグがうまく処理できない
そこを直すように指示してもうまくできない
ってことで検索して出てきたのがこちら
下記のコードを使わせてもらいました
ありがとうございます
def decode(t):
    b = bytes(t)
    return b[:-2].decode('utf-16-le')
タグの先頭にXPが出てきたらとりあえずこれを使ってデコードするように
そしてなんだかんだで色々試しつつなんとかできた
ズラズラと意味不明な文字が出る時もあるけど"プロンプトを表示したい"という目的は達成されてるのでこの辺で終了
いやー面白かった
画像表示するだけだった最初の頃でもプログラムが動くと楽しい
普段何気なく色々なアプリを使ってるけど、よく考えられてできてるんだなぁと思った
SDXLのControlNetの学習の記事だけで終わると思ってたけどまさかの2つ目の記事になった
アニメと漫画を見ないでずっと作ってた
さて溜まってたものを消化しよう