
はじめてのJavaScript #31|ローディング表示とエラー処理を実装しよう

今回のゴール
ローディング表示とエラー処理を実装して、ユーザーにやさしいアプリに仕上げる。
なぜローディング表示とエラー処理が必要?
これまで作ってきたアプリはAPIからデータを取得できることを前提にしていました。しかし実際のアプリでは次のような状況が起こります。
通信に時間がかかって画面が固まったように見える
ネットワークが切れてデータが取得できない
存在しない都市名を入力してしまう
APIサーバーが一時的にダウンしている
こういった状況でもユーザーが不安にならないように、適切なフィードバックを返すのがプロのアプリの基本です。今回は #29 で作った天気アプリを題材に、ローディング表示とエラー処理を本格的に実装します。
ローディング表示の考え方
ローディング表示には3つの状態を用意します。
① idle(待機中)  ── 初期状態。何も表示しない
② loading(取得中)── くるくるアニメーションを表示する
③ done(完了)   ── 結果またはエラーを表示する
この3状態を切り替えることで、ユーザーは今アプリが何をしているかを常に把握できます。
CSSでローディングアニメーションを作る
JavaScriptだけでなくCSSも少し活用して、見栄えのよいローディングアニメーションを実装します。
css
.spinner {
  width: 36px;
  height: 36px;
  border: 4px solid #ddd;
  border-top-color: royalblue;
  border-radius: 50%;
  animation: spin 0.8s linear infinite;
}

@keyframes spin {
  to { transform: rotate(360deg); }
}
シンプルな円形のスピナーです。border-top-color だけ色を変えることで、回転しているように見えます。
エラーの種類を分けて対応する
エラーにはいくつかの種類があります。それぞれに合ったメッセージを出すとユーザーが次の行動を取りやすくなります。
js
// ネットワークエラー(通信自体が失敗)
if (!navigator.onLine) {
  throw new Error("インターネットに接続されていません。接続を確認してください。");
}

// APIのレスポンスエラー(サーバー側の問題)
if (!response.ok) {
  if (response.status === 404) {
    throw new Error("データが見つかりませんでした。");
  } else if (response.status >= 500) {
    throw new Error("サーバーエラーが発生しました。しばらく待ってから再試行してください。");
  } else {
    throw new Error("エラーが発生しました(コード:" + response.status + ")");
  }
}

// 入力値のエラー(ユーザーのミス)
if (!cityName) {
  throw new Error("都市名を入力してください。");
}
実際に書いてみよう
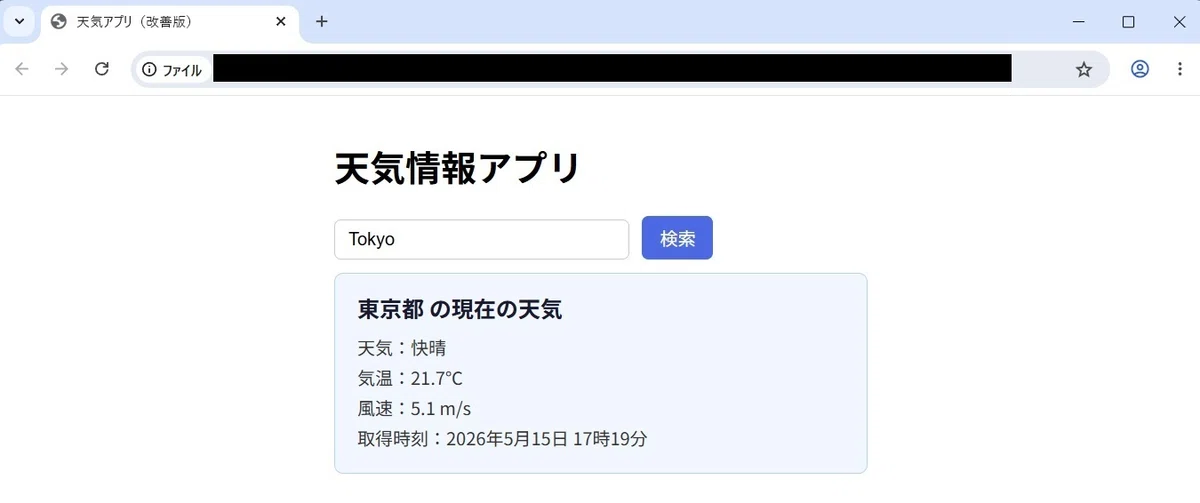
index.html
html
<!DOCTYPE html>
<html lang="ja">
  <head>
    <meta charset="UTF-8">
    <title>天気アプリ(改善版)</title>
    <style>
      body {
        font-family: sans-serif;
        max-width: 480px;
        margin: 40px auto;
        padding: 0 20px;
      }
      .spinner {
        display: none;
        width: 36px;
        height: 36px;
        border: 4px solid #ddd;
        border-top-color: royalblue;
        border-radius: 50%;
        animation: spin 0.8s linear infinite;
        margin: 16px 0;
      }
      @keyframes spin {
        to { transform: rotate(360deg); }
      }
      .spinner.active {
        display: block;
      }
      .error-box {
        display: none;
        padding: 12px 16px;
        background: #fff0f0;
        border: 1px solid #ffcccc;
        border-radius: 8px;
        color: #c0392b;
        margin: 12px 0;
      }
      .error-box.active {
        display: block;
      }
      .result-box {
        display: none;
        padding: 16px 20px;
        background: #f0f6ff;
        border: 1px solid #b3d1ff;
        border-radius: 8px;
        margin: 12px 0;
      }
      .result-box.active {
        display: block;
      }
      .result-box h2 {
        margin: 0 0 10px;
        font-size: 20px;
        color: #1a1a2e;
      }
      .result-box p {
        margin: 4px 0;
        font-size: 16px;
        color: #333;
      }
      input {
        padding: 8px 12px;
        font-size: 16px;
        border: 1px solid #ccc;
        border-radius: 6px;
        width: 240px;
      }
      button {
        padding: 8px 16px;
        font-size: 16px;
        background: royalblue;
        color: white;
        border: none;
        border-radius: 6px;
        cursor: pointer;
        margin-left: 8px;
      }
      button:disabled {
        background: #aaa;
        cursor: not-allowed;
      }
    </style>
  </head>
  <body>
    <h1>天気情報アプリ</h1>

    <input id="cityInput" type="text" placeholder="都市名(例:Tokyo)">
    <button id="btnSearch">検索</button>

    <div id="spinner" class="spinner"></div>

    <div id="errorBox" class="error-box">
      <p id="errorMessage"></p>
      <button id="btnRetry">再試行する</button>
    </div>

    <div id="resultBox" class="result-box">
      <h2 id="cityName"></h2>
      <p id="weather"></p>
      <p id="temperature"></p>
      <p id="windspeed"></p>
      <p id="updatedAt"></p>
    </div>

    <script src="script.js"></script>
  </body>
</html>
script.js
js
// 天気コードの説明
const weatherDescriptions = {
0: "快晴", 1: "ほぼ快晴", 2: "一部曇り", 3: "曇り",
45: "霧", 48: "霧氷",
51: "霧雨(弱)", 53: "霧雨", 55: "霧雨(強)",
61: "雨(弱)", 63: "雨", 65: "雨(強)",
71: "雪(弱)", 73: "雪", 75: "雪(強)",
80: "にわか雨(弱)", 81: "にわか雨", 82: "にわか雨(強)",
95: "雷雨", 99: "雷雨と雹"
};
// 要素の取得
const cityInput = document.getElementById("cityInput");
const btnSearch = document.getElementById("btnSearch");
const spinner = document.getElementById("spinner");
const errorBox = document.getElementById("errorBox");
const errorMessage = document.getElementById("errorMessage");
const btnRetry = document.getElementById("btnRetry");
const resultBox = document.getElementById("resultBox");
const cityNameEl = document.getElementById("cityName");
const weatherEl = document.getElementById("weather");
const temperatureEl = document.getElementById("temperature");
const windspeedEl = document.getElementById("windspeed");
const updatedAtEl = document.getElementById("updatedAt");
// 状態を切り替える関数
function setState(state, message = "") {
spinner.classList.remove("active");
errorBox.classList.remove("active");
resultBox.classList.remove("active");
btnSearch.disabled = false;
if (state === "loading") {
spinner.classList.add("active");
btnSearch.disabled = true;
} else if (state === "error") {
errorBox.classList.add("active");
errorMessage.textContent = message;
} else if (state === "done") {
resultBox.classList.add("active");
}
}
// 都市名から緯度・経度を取得する関数
async function getCoordinates(cityName) {
const url =
"https://geocoding-api.open-meteo.com/v1/search?name=" +
encodeURIComponent(cityName) +
"&count=1&language=ja";
const response = await fetch(url);
if (!response.ok) {
throw new Error("都市情報の取得に失敗しました(コード:" + response.status + ")");
}
const data = await response.json();
if (!data.results || data.results.length === 0) {
throw new Error("「" + cityName + "」は見つかりませんでした。別の都市名を試してください。");
}
return {
name: data.results[0].name,
latitude: data.results[0].latitude,
longitude: data.results[0].longitude
};
}
// 緯度・経度から天気を取得する関数
async function getWeather(latitude, longitude) {
const url =
"https://api.open-meteo.com/v1/forecast" +
"?latitude=" + latitude +
"&longitude=" + longitude +
"¤t=temperature_2m,weathercode,windspeed_10m" +
"&timezone=Asia%2FTokyo";
const response = await fetch(url);
if (!response.ok) {
if (response.status >= 500) {
throw new Error("サーバーエラーが発生しました。しばらく待ってから再試行してください。");
}
throw new Error("天気情報の取得に失敗しました(コード:" + response.status + ")");
}
const data = await response.json();
return data.current;
}
// メインの処理
async function searchWeather() {
const cityName = cityInput.value.trim();
// 入力チェック
if (!cityName) {
setState("error", "都市名を入力してください。");
return;
}
// ネットワーク接続チェック
if (!navigator.onLine) {
setState("error", "インターネットに接続されていません。接続を確認してください。");
return;
}
setState("loading");
try {
const location = await getCoordinates(cityName);
const weather = await getWeather(location.latitude, location.longitude);
const description = weatherDescriptions[weather.weathercode] || "不明";
// 現在時刻を取得
const now = new Date();
const updatedAt =
now.getFullYear() + "年" +
(now.getMonth() + 1) + "月" +
now.getDate() + "日 " +
now.getHours() + "時" +
now.getMinutes() + "分";
// 画面に表示
setState("done");
cityNameEl.textContent = location.name + " の現在の天気";
weatherEl.textContent = "天気:" + description;
temperatureEl.textContent = "気温:" + weather.temperature_2m + "℃";
windspeedEl.textContent = "風速:" + weather.windspeed_10m + " m/s";
updatedAtEl.textContent = "取得時刻:" + updatedAt;
} catch (error) {
setState("error", error.message);
}
}
// 検索ボタン
btnSearch.addEventListener("click", function() {
searchWeather();
});
// Enterキーでも検索
cityInput.addEventListener("keydown", function(e) {
if (e.key === "Enter") searchWeather();
});
// 再試行ボタン
btnRetry.addEventListener("click", function() {
setState("idle");
searchWeather();
});コードのポイント解説
setState() で状態を一元管理する
表示の切り替えを setState() 関数にまとめたことで、どこからでも状態を切り替えられます。
js
setState("loading"); // ローディング中
setState("error", "エラーメッセージ"); // エラー
setState("done"); // 成功
classList.add() と classList.remove() でCSSのクラスを操作して表示・非表示を切り替えています。style.display を直接書くよりもCSSと役割が分離されてすっきりします。
navigator.onLine でネットワーク状態を確認する
js
if (!navigator.onLine) {
  setState("error", "インターネットに接続されていません。");
  return;
}
navigator.onLine はブラウザがオンラインかどうかを true/false で返します。APIを呼ぶ前にチェックすることで、無駄なリクエストを防げます。
Date オブジェクトで現在時刻を取得する
js
const now = new Date();
now.getFullYear()    // 年
now.getMonth() + 1   // 月(0始まりなので+1する)
now.getDate()        // 日
now.getHours()       // 時
now.getMinutes()     // 分
new Date() で現在の日時を取得できます。月だけ0始まりなので +1 が必要な点に注意してください。
まとめ
ローディング・エラー・完了の3状態を setState() で一元管理すると切り替えがシンプルになる
navigator.onLine でネットワーク接続状態を事前にチェックできる
エラーの種類ごとに具体的なメッセージを出すとユーザーが次の行動を取りやすい
次回予告
Web API編はここで完結です。これまで学んだことをさらに発展させ、次の第7章では実用的なアプリ作りに挑戦したいなと(*^^*)。
→ 第7章新章!
いいなと思ったら応援しよう!
 よろしければ応援お願いします! いただいたチップは引き続きプログラミングや学びについて、皆さんの利益になるようなよい記事を書くことで恩返しをさせていただきます!