
Step88 はじめてのAPI ➤前回の天気プログラムをデスクトップ常駐型に変更する

前回は、APIを利用したとても簡単な気温情報プログラムを作成しました。
このプログラム、このままで終わらせるのはすこしもったいないので、どうせならもう少しだけ実用的になるように、
Windowsの画面右下に常に表示される天気ウィジェット
に仕上げてみましょう!(*'▽')
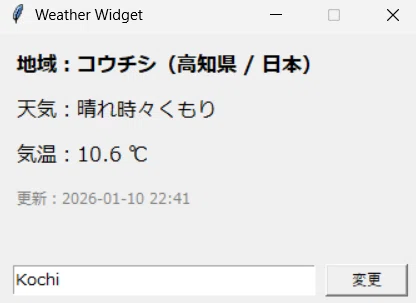
できあがるのは、
現在の天気(晴れ・雨 など)
気温
地域を変更できる入力欄とボタン
を持った、小さな常駐アプリとなります。
事前準備
今回使う外部ライブラリは 1 つだけです。
requests をインストール
ターミナル(PowerShell等)を開いて、次を入力してください。
pip install requestsすでに入っている場合は、そのまま進んで大丈夫です。
完成コード(まずは写経しましょう)
今回は、完成形のコードをそのまま写経します。
意味が分からなくても問題ありません。
Pythonファイルを作成し、名前を「weather_widget.py」にしてください。
※ファイル名は好きなものに変えても問題ありません。
import tkinter as tk
from tkinter import messagebox
import requests
import threading
import time

UPDATE_MINUTES = 10
DEFAULT_CITY = "Kochi"

WINDOW_WIDTH = 340
WINDOW_HEIGHT = 220

GEOCODE_URL = "https://geocoding-api.open-meteo.com/v1/search"
WEATHER_URL = "https://api.open-meteo.com/v1/forecast"


def weathercode_to_jp(code):
    if code == 0:
        return "晴れ"
    if code in (1, 2):
        return "晴れ時々くもり"
    if code == 3:
        return "くもり"
    if 61 <= code <= 67:
        return "雨"
    if 71 <= code <= 77:
        return "雪"
    if 80 <= code <= 82:
        return "にわか雨"
    if 95 <= code <= 99:
        return "雷雨"
    return "不明"


def geocode_city(city):
    params = {"name": city, "count": 1, "language": "ja"}
    r = requests.get(GEOCODE_URL, params=params)
    data = r.json()
    return data["results"][0]


def fetch_current_weather(lat, lon):
    params = {
        "latitude": lat,
        "longitude": lon,
        "current_weather": True,
        "timezone": "Asia/Tokyo",
    }
    r = requests.get(WEATHER_URL, params=params)
    data = r.json()
    return data["current_weather"]


class WeatherWidgetApp:
    def __init__(self, root):
        self.root = root
        self.root.title("Weather Widget")
        self.root.attributes("-topmost", True)
        self.root.resizable(False, False)
        self.root.geometry(f"{WINDOW_WIDTH}x{WINDOW_HEIGHT}")

        self.current_city = DEFAULT_CITY

        self.build_ui()
        self.place_bottom_right()

        self.update_weather(self.current_city)
        self.schedule_update()

    def build_ui(self):
        frame = tk.Frame(self.root, padx=12, pady=10)
        frame.pack(fill="both", expand=True)

        self.label_city = tk.Label(frame, text="地域:--", font=("Meiryo", 12, "bold"))
        self.label_city.pack(anchor="w")

        self.label_weather = tk.Label(frame, text="天気:--", font=("Meiryo", 12))
        self.label_weather.pack(anchor="w", pady=(6, 0))

        self.label_temp = tk.Label(frame, text="気温:-- ℃", font=("Meiryo", 12))
        self.label_temp.pack(anchor="w", pady=(6, 0))

        self.label_time = tk.Label(frame, text="更新:--", font=("Meiryo", 9), fg="gray")
        self.label_time.pack(anchor="w", pady=(8, 0))

        bottom = tk.Frame(self.root, padx=12, pady=10)
        bottom.pack(fill="x")

        self.entry = tk.Entry(bottom)
        self.entry.pack(side="left", fill="x", expand=True)
        self.entry.insert(0, self.current_city)

        btn = tk.Button(bottom, text="変更", command=self.change_city)
        btn.pack(side="left", padx=(8, 0))

    def place_bottom_right(self):
        self.root.update_idletasks()
        sw = self.root.winfo_screenwidth()
        sh = self.root.winfo_screenheight()
        x = sw - WINDOW_WIDTH - 20
        y = sh - WINDOW_HEIGHT - 90
        self.root.geometry(f"{WINDOW_WIDTH}x{WINDOW_HEIGHT}+{x}+{y}")

    def update_weather(self, city):
        def worker():
            try:
                loc = geocode_city(city)
                lat = loc["latitude"]
                lon = loc["longitude"]

                weather = fetch_current_weather(lat, lon)
                temp = weather["temperature"]
                text = weathercode_to_jp(weather["weathercode"])

                now = time.strftime("%Y-%m-%d %H:%M")

                self.root.after(0, lambda: self.label_city.config(text=f"地域:{loc['name']}"))
                self.root.after(0, lambda: self.label_weather.config(text=f"天気:{text}"))
                self.root.after(0, lambda: self.label_temp.config(text=f"気温:{temp} ℃"))
                self.root.after(0, lambda: self.label_time.config(text=f"更新:{now}"))
                self.current_city = city

            except Exception as e:
                self.root.after(0, lambda: messagebox.showerror("エラー", str(e)))

        threading.Thread(target=worker, daemon=True).start()

    def schedule_update(self):
        self.root.after(UPDATE_MINUTES * 60 * 1000, lambda: self.update_weather(self.current_city))

    def change_city(self):
        city = self.entry.get().strip()
        if city:
            self.update_weather(city)


def main():
    root = tk.Tk()
    WeatherWidgetApp(root)
    root.mainloop()


if __name__ == "__main__":
    main()
実行 ➤動作の確認
ターミナルで動かす場合には、ファイルを保存したフォルダに移動した上で下記のコマンドを実行します。
※VSCodeなどの場合には、▶ボタンで実行。
python weather_widget.pyうまくいくと、画面の右下に小さな天気ウィンドウが表示されます。
使い方
下の入力欄に都市名を入力します
(例:Tokyo / Osaka / Kochi)「変更」ボタンを押します
数秒後、天気と気温が更新されます
※ 都市名は 英語表記 の方が安定します。
解説 ➤ざっくり仕組みを理解
細かい部分は、今は理解できなくても大丈夫です。
ポイントだけ見ておきましょう。
① APIで天気を取得している
都市名 → 緯度・経度
緯度・経度 → 天気情報
という流れで、外部のサービス(API)から情報をもらっています。
② tkinterで画面を作っている
tkinter は Python 標準の画面ライブラリ
ボタンや文字表示を簡単に作れます
③ 別スレッドで通信している
天気取得は時間がかかることがある
画面が固まらないよう、裏側で処理しています
まとめ
PythonでGUIアプリを作った
APIを使って天気情報を取得した
デスクトップに常駐するプログラムを動かした
いかがでしょう?
ちゃんと動きましたか??
tkinter自体は、あまり可愛らしい見た目が得意ではありませんが、それでもデスクトップ画面上に常駐してくれるアイテムを作ることができたら、ちょっとだけ嬉しくなりますよね(*^^*)
ぜひ、自分の欲しい機能を追加するなど、改造についても考えてみてください。
次の記事
いいなと思ったら応援しよう!
 よろしければ応援お願いします! いただいたチップは引き続きプログラミングや学びについて、皆さんの利益になるようなよい記事を書くことで恩返しをさせていただきます!