Angular provides powerful tools to create reusable libraries that can be utilized across multiple applications. One of the key features is the ability to export multiple components, pipes, or services from a single library, facilitating easy reuse and modularization of code. We will explore how to add Multi-Imports in a library using Angular efficiently.
Table of Content
Steps To Add MultiImports in Angular
Step 1: If you haven’t installed Angular CLI yet, install it using the following command
npm install -g @angular/cliStep 2: Create an Angular Project
ng new my-lib --create-application=false
cd my-lib
Step 3: Create a library
ng generate library lib
cd projects/lib/src/lib
This command generates a new Angular workspace with a library named my-lib.
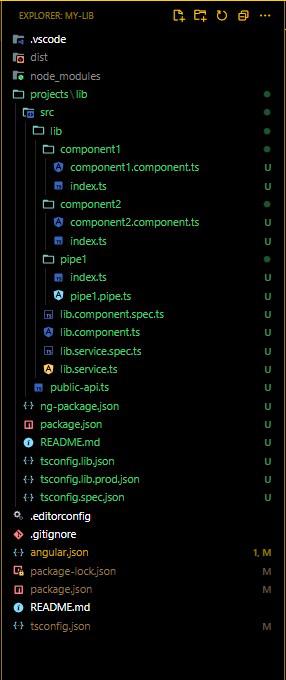
Step 4: Add Components and Pipes as mentioned in Folder Structure.
Folder Structure
Dependencies
"dependencies": {
    "@angular/animations": "^18.0.0",
    "@angular/common": "^18.0.0",
    "@angular/compiler": "^18.0.0",
    "@angular/core": "^18.0.0",
    "@angular/forms": "^18.0.0",
    "@angular/platform-browser": "^18.0.0",
    "@angular/platform-browser-dynamic": "^18.0.0",
    "@angular/router": "^18.0.0",
    "rxjs": "~7.8.0",
    "tslib": "^2.3.0",
    "zone.js": "~0.14.3"
}
Approach 1: Using the public-api.ts file
The public-api.ts file serves as the main entry point for your library. This file is where you declare all the exports from your library, making them available for import in other applications.
Example: Add the following code in respective files.
//Component 1
//projects/lib/src/lib/component1/component1.component.ts
import { Component } from '@angular/core';

@Component({
    selector: 'app-component1',
    template: '<p>Component 1</p>',
})
export class Component1 { }
//Component 2
//projects/lib/src/lib/component2/component2.component.ts
import { Component } from '@angular/core';

@Component({
    selector: 'app-component2',
    template: '<p>Component 2</p>',
})
export class Component2 { }
//Pipe1
//projects/lib/src/lib/pipe1/pipe1.pipe.ts
import { Pipe, PipeTransform } from '@angular/core';

@Pipe({
    name: 'pipe1',
})
export class Pipe1 implements PipeTransform {
    transform(value: string): string {
        return `Pipe 1: ${value}`;
    }
}
//public-api.ts
//projects/lib/src/lib/public-api.ts
export * from './component1/component1.component';
export * from './component2/component2.component';
export * from './pipe1/pipe1.pipe';
Note: Compile the library with the following command:
ng build libApproach 2: Using Barrel Files
For larger libraries with more complex structures, barrel files can help organize exports in a more structured way. Each folder can have an index.ts file to re-export its contents.
Step 1: Updated angular.json file
{
    "$schema": "./node_modules/@angular/cli/lib/config/schema.json",
    "version": 1,
    "projects": {
        "my-lib": {
            "projectType": "library",
            "root": "projects/my-lib",
            "sourceRoot": "projects/lib/src",
            "prefix": "lib",
            "architect": {
                "build": {
                    "builder": "@angular-devkit/build-ng-packagr:build",
                    "options": {
                        "tsConfig": "projects/lib/tsconfig.lib.json",
                        "project": "projects/lib/ng-package.json"
                    },
                    "configurations": {
                        "production": {
                            "tsConfig": "projects/lib/tsconfig.lib.prod.json"
                        }
                    }
                },
                "test": {
                    "builder": "@angular-devkit/build-angular:karma",
                    "options": {
                        "main": "projects/lib/src/test.ts",
                        "tsConfig": "projects/lib/tsconfig.spec.json",
                        "karmaConfig": "projects/lib/karma.conf.js"
                    }
                }
            }
        }
    },
    "defaultProject": "my-lib",
    "cli": {
        "analytics": false
    }
}
Step 2: Create Barrel Files
//Component Barrel File
//projects/lib/src/lib/component1/index.ts
export * from './component1.component';

//projects/lib/src/lib/component2/index.ts
export * from './component2.component';
//Pipe Barrel File
//projects/lib/src/lib/pipe1/index.ts
export * from './pipe1.pipe';
//Update public-api.ts
//projects/lib/src/lib/public-api.ts
export * from './lib/component1';
export * from './lib/component2';
export * from './lib/pipe1';
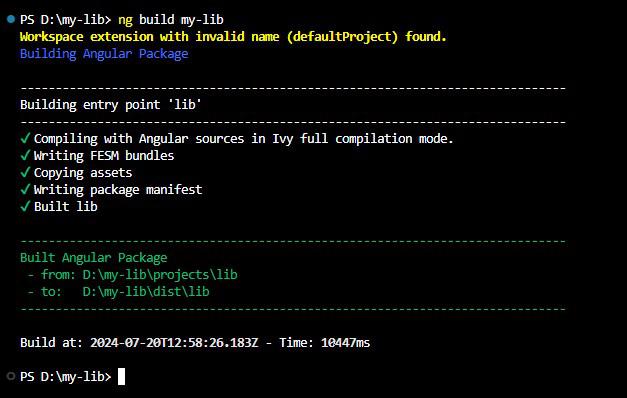
Note: Compile the library with the following command:
ng build my-libThis will generate the build artifacts in the dist folder, ready for use in other applications.
Output