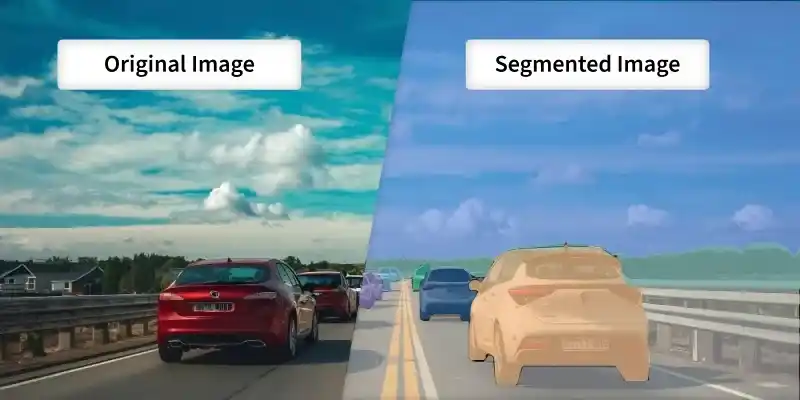
Image segmentation using models from Hugging Face allows developers to divide an image into meaningful segments or regions by assigning labels to each pixel. With pretrained vision models, it becomes easy to build applications that require detailed understanding of image content. It is commonly used in medical imaging, autonomous driving and object tracking
Implementation
Step 1: Set Up the Environment
First, install the required libraries. Run the following command in your command prompt.
pip install transformers torch pillow matplotlib
Step 2: Import Libraries
from transformers import pipeline
from PIL import Image
import matplotlib.pyplot as plt
Step 3: Initialize Segmentation Pipeline
- "image-segmentation" Specifies the segmentation task
- "facebook/detr-resnet-50-panoptic" Loads a pre trained panoptic segmentation model
- The pipeline automatically handles image preprocessing and model inference
segmenter = pipeline(
    task="image-segmentation",
    model="facebook/detr-resnet-50-panoptic"
)
Output:

Step 4: Load Image
This opens the image file and displays it using Matplotlib, confirming that the image has been loaded correctly before running image segmentation
You can download the image from here
image = Image.open("your image path")
plt.imshow(image)
plt.axis("off")
plt.show()
Output:
Step 5: Run Segmentation
This runs the segmentation model on the image and returns detected regions.
- label: Predicted object category
- score: Confidence level
- mask: Pixel wise segmented region for that object
results = segmenter(image)

print(results)
Output:

Step 6: Visualize Masks
This loops through all detected objects and displays their individual segmentation masks. Each mask highlights the exact pixels belonging to that object, allowing to clearly see the segmented regions.
for result in results:
    plt.figure()
    plt.title(result["label"])
    plt.imshow(result["mask"])
    plt.axis("off")
Output:
You can download the full code from here
