OpenClaw is a self-hosted AI gateway that connects messaging platforms such as WhatsApp, Telegram, Discord and iMessage to AI coding agents, by running a single gateway process on a local machine or server.
- Self-Hosted: Runs entirely on your own machine or server, ensuring greater privacy, security, and full control over data.
- Multi-Channel Support: A single gateway process can connect and manage multiple chat platforms simultaneously.
- Agent-Native Architecture: Designed specifically for AI agents, supporting advanced capabilities such as sessions, memory management, tool usage and multi-agent routing.
- Open Source: Distributed under the MIT license, enabling developers to explore the codebase, customize features and contribute improvements.
OpenClaw vs Other AI Assistants
While many AI assistants provide conversational interfaces for interacting with large language models, OpenClaw offers a different approach by acting as a self-hosted gateway that connects multiple messaging platforms to AI agents. This architecture provides greater flexibility, privacy and extensibility compared to traditional AI assistants.
- Deployment Model: Most AI assistants run on cloud-based platforms, whereas OpenClaw is self-hosted, giving users full control over their data and infrastructure.
- Platform Integration: Traditional AI assistants are usually limited to web or app interfaces, while OpenClaw allows interaction through multiple messaging platforms.
- Agent Capabilities: OpenClaw is designed specifically for AI coding agents, supporting features like tool usage, session management and multi-agent routing.
- Customization and Extensions: Many AI assistants are closed ecosystems, but OpenClaw is open source and extensible, allowing developers to build plugins and add new communication channels.
- Privacy and Data Control: Since OpenClaw runs locally or on a private server, users maintain full ownership of their data and conversations, unlike cloud-hosted AI services.
How OpenClaw Works
OpenClaw works as a central gateway that connects multiple messaging platforms with AI agents. Instead of each chat application communicating with an AI model separately, OpenClaw runs a single gateway process that acts as the coordination layer between chat channels, AI agents and management interfaces.
- A user sends a message from a chat application (e.g., WhatsApp or Telegram).
- The message is received by the OpenClaw Gateway through the corresponding channel plugin.
- The gateway manages the session and routes the request to the configured AI agent.
- The AI agent processes the request and generates a response.
- The gateway sends the response back to the original messaging platform.
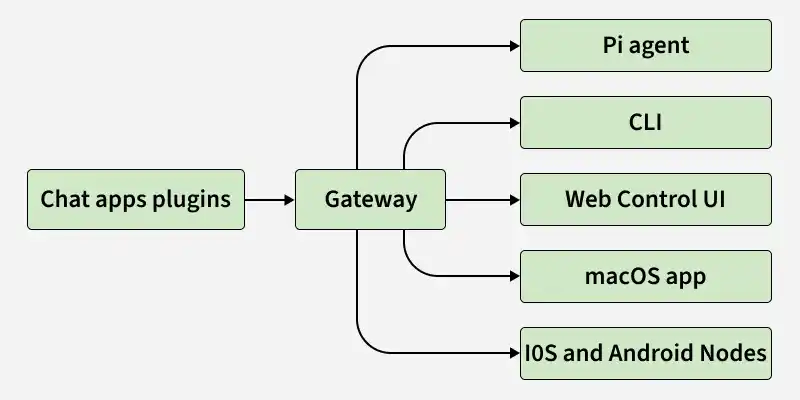
OpenClaw Gateway Functionality
The gateway functions as the core control system, responsible for handling sessions, routing messages and managing communication between different components of the system.
- Session Management: The gateway maintains separate sessions for users, groups or workspaces, ensuring conversations remain organized and context-aware.
- Message Routing: Incoming messages from chat platforms are processed by the gateway and routed to the appropriate AI agent or tool.
- Channel Integration: Chat applications such as WhatsApp, Telegram, Discord and iMessage connect to the gateway through channel plugins.
- Agent Communication: The gateway forwards user requests to AI agents such as the Pi agent and returns generated responses back to the originating chat platform.
- Control Interfaces: OpenClaw provides multiple ways to interact with the system, including the CLI, Web Control UI dashboard and macOS application.
- Mobile Node Integration: iOS and Android nodes can be paired with the gateway to enable additional capabilities such as voice interaction, camera access, screen sharing and device commands.
Setting up OpenClaw in VS Code
OpenClaw can be set up directly within VS Code, allowing developers to run and manage their self-hosted AI gateway seamlessly.
Step 1: Install VS Code
Download and install Visual Studio Code (VS Code) on your local system.
Refer: How to install VS Code
Step 2: Install the Latest Version of Node.js
Download and install the latest version of Node.js (version 22 or later) on your system. Node.js is required to run OpenClaw since it provides the runtime environment needed to execute the gateway and its commands.
Refer : How to install node.js
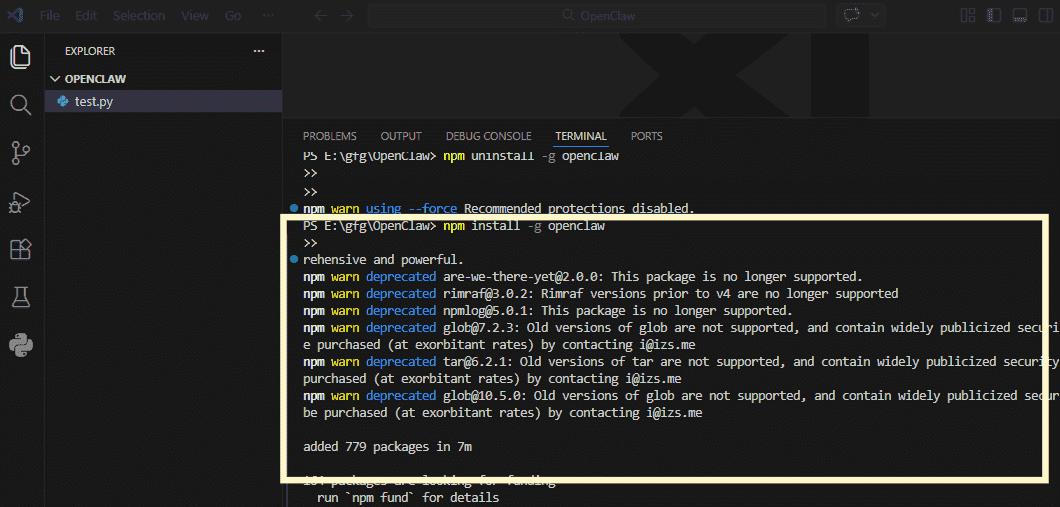
Step 3: Install OpenClaw Using npm
After installing Node.js, you need to install OpenClaw globally using the npm package manager. This allows you to run OpenClaw commands directly from the terminal or VS Code.
- Open the VS Code terminal or your system command prompt.
- Run the following command to install OpenClaw globally
npm install -g openclaw
- Once installed, the OpenClaw CLI tools will be available to configure and run the gateway.
Step 4: Verify the OpenClaw Installation
After installing OpenClaw, it is important to verify that the installation was successful and that the CLI is working correctly.
- Run the following command to check globally installed packages:
npm list -g --depth=0
- Check the installed OpenClaw version using:
openclaw --version
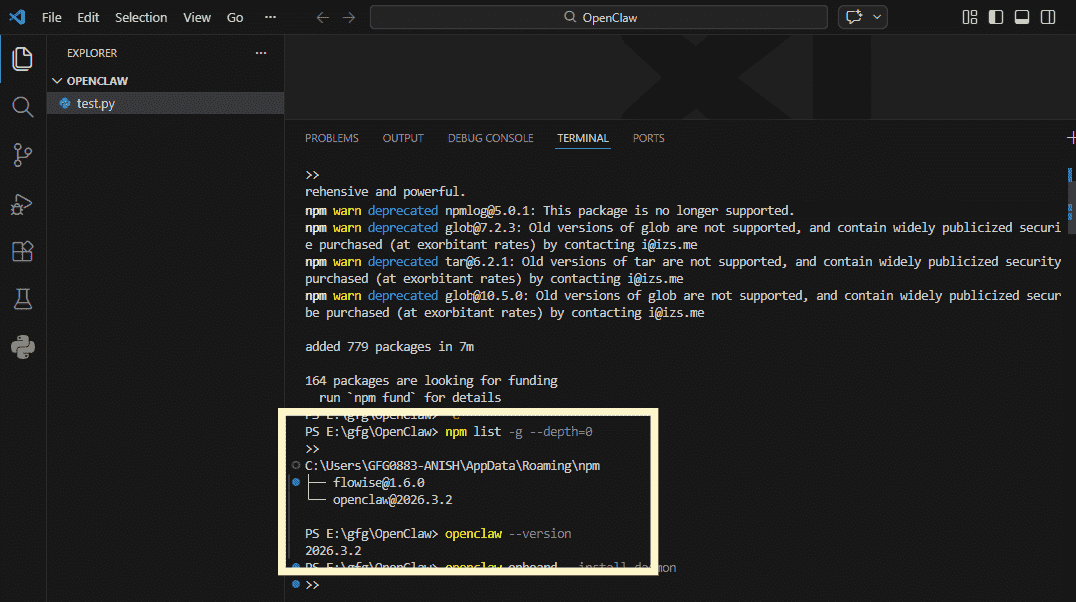
If the version number appears, it confirms that OpenClaw has been installed successfully on your system.
Step 5: Onboard OpenClaw and Install the Service
Before using OpenClaw, you need to onboard the gateway and install it as a background service (daemon). This step initializes the OpenClaw environment and prepares it to run automatically on your system.
openclaw onboard --install-daemon
During the onboarding process, OpenClaw will guide you through several configuration options to properly set up the gateway and connect it with your preferred AI provider and system settings.
- Onboarding Mode: Select the onboarding mode to configure how OpenClaw will be initialized and set up on your system.
- Set Up: Choose the components you want to configure such as the gateway service, channels or AI agent integration.
- Model/Auth Provider: Specify the AI model provider and authentication method (API key or OAuth) that OpenClaw will use to communicate with the AI agent.
- API Key Configuration: Enter the API key for your selected AI provider (such as OpenAI or Anthropic) so OpenClaw can communicate with the model.
- Gateway Bind: Define the network address and port where the OpenClaw gateway will run and listen for incoming requests.
- Control UI: Enable the web-based dashboard that allows you to manage chats, configurations, sessions and connected nodes from your browser.
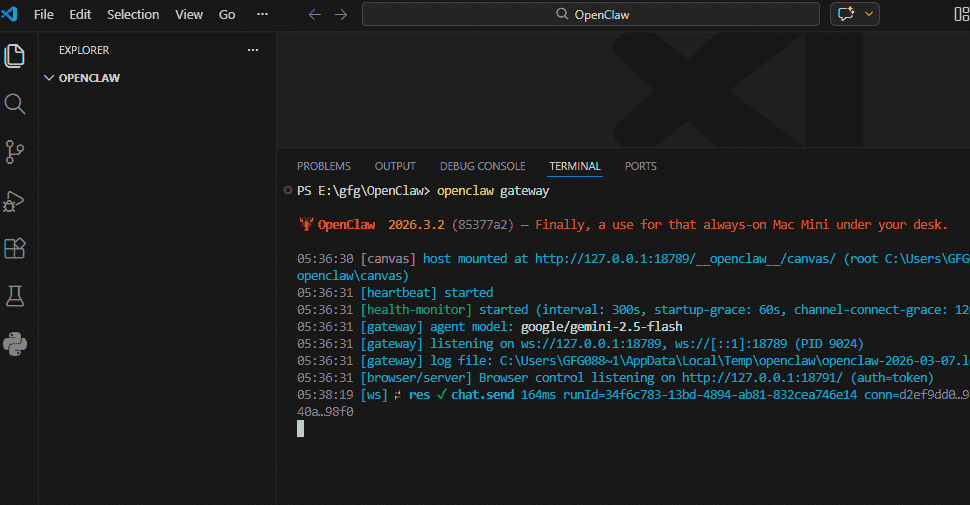
Step 6: Start the OpenClaw Gateway
After completing the onboarding process, you need to start the OpenClaw Gateway to enable communication between your messaging platforms and the AI agent.
openclaw gateway
- Starts the OpenClaw gateway service, allowing it to handle messages and route them to the configured AI agent.
- Once running, the gateway begins managing sessions, channels and AI interactions for connected chat platforms.
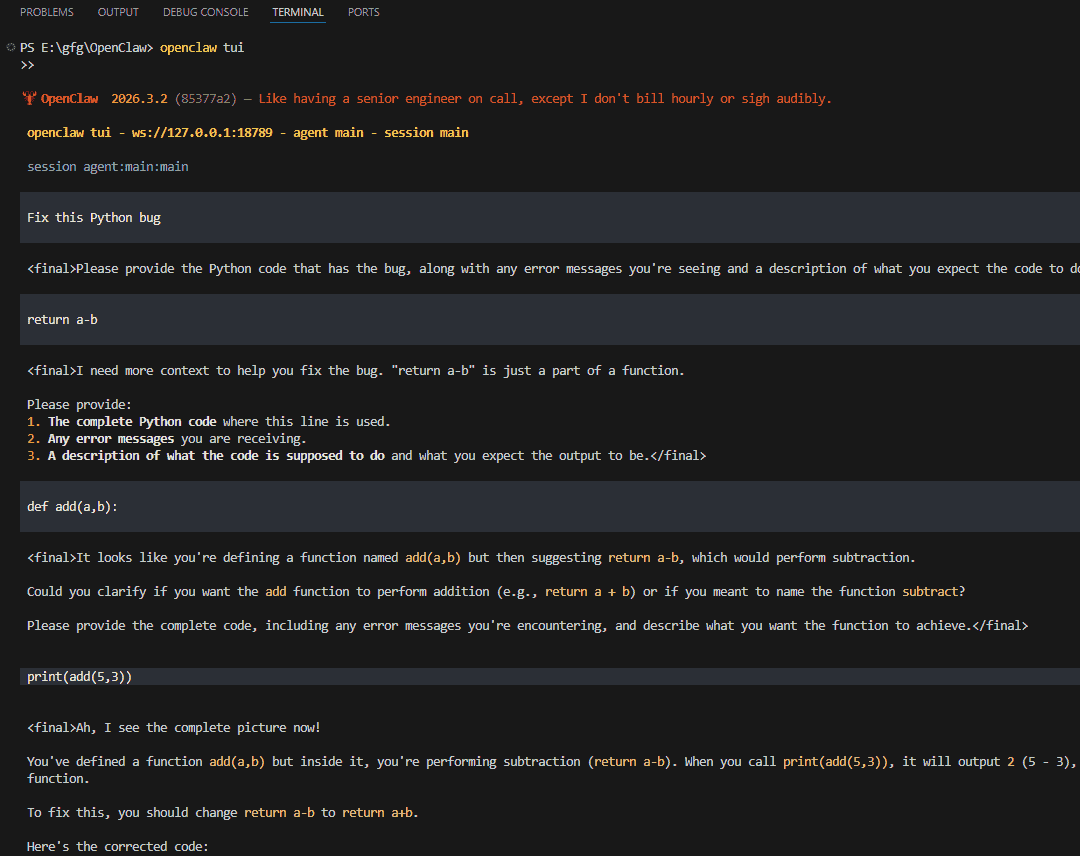
Step 7: Launch the OpenClaw Terminal UI (TUI)
OpenClaw also provides a Terminal User Interface (TUI) that allows you to monitor and interact with the gateway directly from the command line. This interface helps you manage sessions and observe system activity in real time.
openclaw tui
- Opens the interactive terminal dashboard for managing OpenClaw operations.
- Allows you to view sessions, monitor messages, and control gateway activities from the terminal.
Configuring OpenClaw with WhatsApp
OpenClaw allows you to connect WhatsApp to the gateway so you can interact with your AI assistant directly from your phone. This setup uses WhatsApp Web authentication to securely pair your WhatsApp account with the OpenClaw gateway.
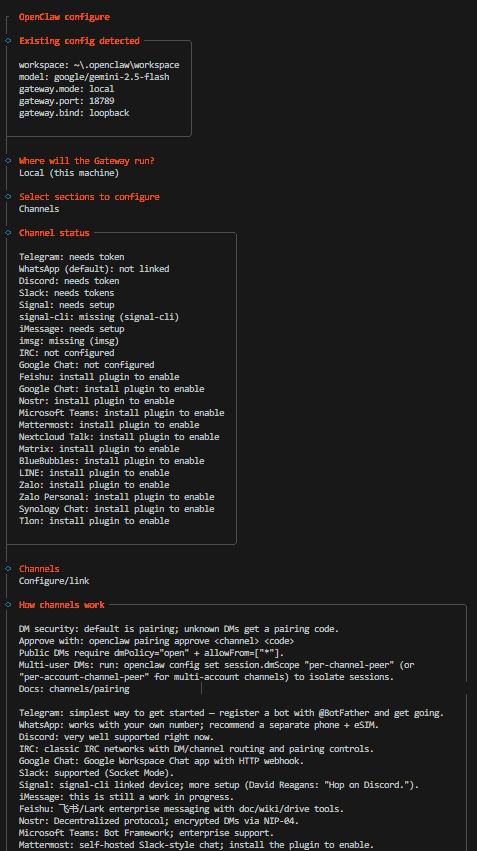
Step 1: Run the OpenClaw Configuration Command
To begin connecting WhatsApp with OpenClaw, you first need to open the configuration interface. This command allows you to configure channels, authentication settings, and other gateway options.
openclaw configure
Step 2: Configure OpenClaw Gateway Settings
After running the configuration command, OpenClaw will guide you through several setup options to connect the gateway with WhatsApp.
- Gateway Setup: Specify the environment where the OpenClaw gateway will operate such as your local machine or a remote server.
- Select Sections to Configure: Choose which configuration sections you want to modify, such as channels, authentication, or gateway settings.
- Channel: Select WhatsApp as the communication channel to connect your WhatsApp account with the OpenClaw gateway.
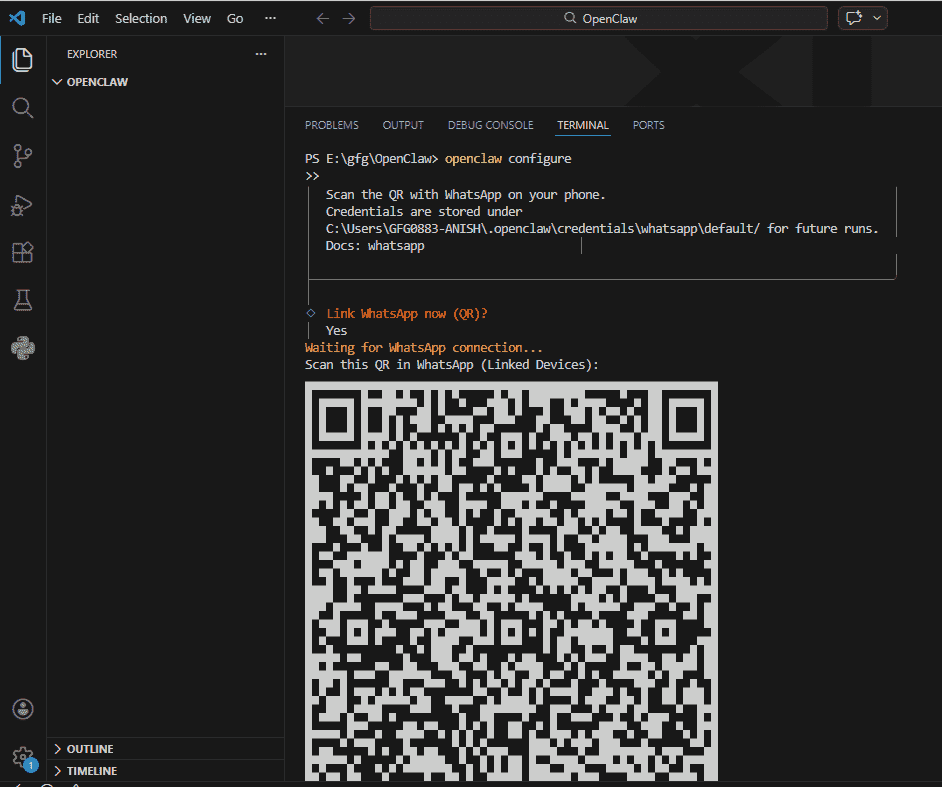
Step 3: Pair WhatsApp Using QR Code
After selecting WhatsApp as the channel, OpenClaw will generate a QR code that you need to scan from your WhatsApp application to complete the connection.
- QR Code Generation: OpenClaw displays a QR code in the terminal or interface for authentication.
- Scan the QR Code: Open WhatsApp, Linked Devices then Link a Device on your phone and scan the QR code.
- Account Pairing: Once scanned, your WhatsApp account becomes linked to the OpenClaw gateway.
- Connection Ready: After successful pairing, you can start interacting with the AI assistant directly through WhatsApp.
Step 4: Restrict Access to Specific Phone Numbers
To improve security, you can configure OpenClaw to respond only to selected phone numbers. This prevents unauthorized users or groups from interacting with your AI assistant.
{
"channels": {
"whatsapp": {
"allowFrom": ["+15555550123"]
}
}
}
- Edit the Configuration File: Open the ~/.openclaw/openclaw.json file in your editor.
- Add Allowed Numbers: Use the allowFrom field to specify phone numbers that are allowed to chat with OpenClaw.
- Restrict Unauthorized Access: Messages from numbers not listed will be ignored by the gateway.
- Restart the Gateway: After saving the changes, restart OpenClaw for the configuration.
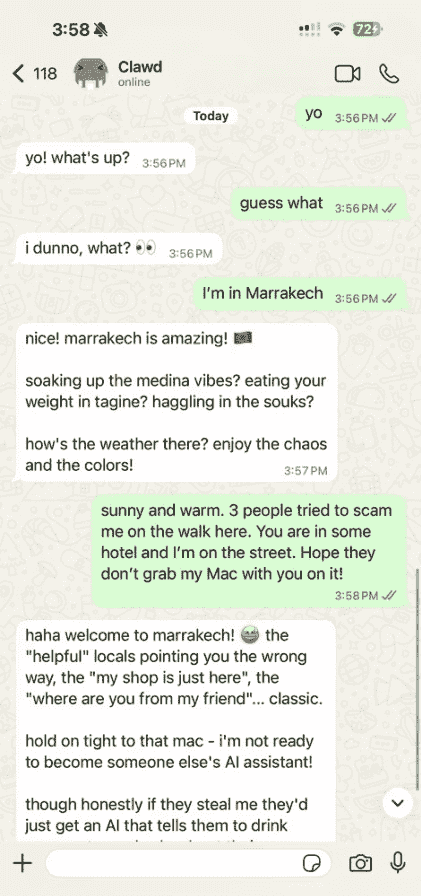
Step 5: Start Chatting with OpenClaw on WhatsApp
Once the setup is complete, you can begin sending messages to the configured WhatsApp chat and interact with the AI assistant directly from your phone.
Applications
OpenClaw can be used in various scenarios where users want to interact with AI assistants directly through messaging platforms.
- Personal AI Assistant: Allows users to communicate with an AI assistant through messaging apps like WhatsApp or Telegram for quick answers and assistance.
- Team Collaboration: Enables teams to use AI within group chats to get instant technical explanations, documentation help or problem-solving support.
- Automation and Task Assistance: Automates routine tasks such as answering common queries, retrieving information or processing simple requests.
- Cross-Platform AI Interaction: Allows users to access the same AI assistant across multiple messaging platforms from different devices.
- Media-Based AI Processing: Supports sending images, audio and documents to AI agents for analysis, transcription or explanation.
