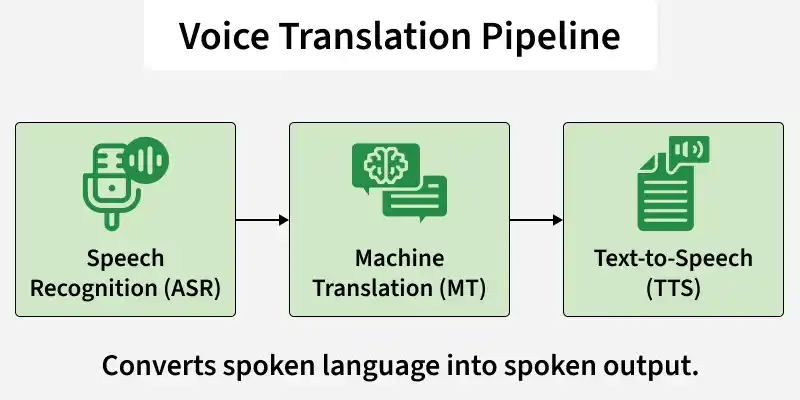
Voice translation is a technology that converts spoken language in one language into spoken output in another. It functions like an AI-powered interpreter, listening to speech, understanding it, translating it and delivering a response in a different language. At a technical level, voice translation integrates three main components:
- Speech Recognition (ASR): Converts spoken audio into text
- Machine Translation (MT): Translates the extracted text into a target language
- Text to Speech (TTS): Converts the translated text back into natural-sounding audio
Implementation
This implementation converts English speech into Hindi speech using three models:
- Whisper: A transformer based Automatic Speech Recognition model by OpenAI that converts spoken audio into text. It is multilingual, robust to noise and capable of accurate speech transcription.
- Helsinki-NLP: A sequence to sequence transformer model designed for translating text between languages. It generates context aware and grammatically correct translations.
- MMS-TTS: A multilingual text to speech model by Meta that converts text into natural sounding speech using the Variational Inference with Adversarial Learning(VITS) architecture.
Step 1: Set Up the Environment
First, install the required libraries. Run the following command in your command prompt.
pip install transformers torch torchaudio soundfile
Step 2: Import Required Libraries
These libraries provide:
- Pretrained transformer models from Hugging face
- Audio processing utilities
- Waveform generation and saving functionality
from transformers import WhisperProcessor, WhisperForConditionalGeneration
from transformers import AutoTokenizer, AutoModelForSeq2SeqLM
from transformers import AutoProcessor, VitsModel
import torch
import torchaudio
import soundfile as sf
Step 3: Download Sample Audio Input
This audio file serves as the input to our speech recognition system.
You can also download the audio file from here
import requests

url = "https://huggingface.co/datasets/Narsil/asr_dummy/resolve/main/mlk.flac"
r = requests.get(url)

with open("input_audio.flac", "wb") as f:
    f.write(r.content)
Step 4: Converting Speech to Text
Load Whisper Model
whisper_processor = WhisperProcessor.from_pretrained("openai/whisper-small")
whisper_model = WhisperForConditionalGeneration.from_pretrained("openai/whisper-small")
Output:

Load and Resample Audio
Here we load the audio and checks its sampling rate. Since models like Whisper require 16kHz audio, it resamples the waveform if needed and updates the sampling rate. This ensures the audio is compatible for speech recognition.
audio, sr = torchaudio.load("/content/input_audio.flac")

if sr != 16000:
    resampler = torchaudio.transforms.Resample(sr, 16000)
    audio = resampler(audio)
    sr = 16000

inputs = whisper_processor(
    audio.squeeze().numpy(),
    sampling_rate=sr,
    return_tensors="pt"
)
Convert Audio to Text
This code converts the audio waveform into model ready features using whisper_processor. The model then generates token IDs from these audio features, and batch_decode converts those tokens into readable text. Finally, it prints the transcribed speech.
with torch.no_grad():
    predicted_ids = whisper_model.generate(inputs["input_features"])

speech_text = whisper_processor.batch_decode(
    predicted_ids,
    skip_special_tokens=True
)[0]

print("Recognized Text:", speech_text)
Output:
Recognized Text: I have a dream that one day this nation will rise up and live out the true meaning of its creed.
Step 5: Machine Translation (English to Hindi)
Load Translation Model
model_name = "Helsinki-NLP/opus-mt-en-hi"

tokenizer = AutoTokenizer.from_pretrained(model_name)
translation_model = AutoModelForSeq2SeqLM.from_pretrained(model_name)
Output:

Translate Text
This code converts the recognized speech text into tokens using the tokenizer. The translation model then generates translated token IDs, and decode() converts them back into readable text. Finally, it prints the translated sentence.
inputs = tokenizer(speech_text, return_tensors="pt")

with torch.no_grad():
    outputs = translation_model.generate(**inputs)

translated_text = tokenizer.decode(outputs[0], skip_special_tokens=True)

print("Translated Text:", translated_text)
Output:
Translated Text: मैं एक सपना देखा है कि एक दिन इस राष्ट्र उठकर अपने धर्म - सिद्धांत के वास्तविक अर्थ से बाहर जी जाएगा।
Step 6: Text to Speech Translation
Load Hindi Text To Speech Model
tts_processor = AutoProcessor.from_pretrained("facebook/mms-tts-hin")
tts_model = VitsModel.from_pretrained("facebook/mms-tts-hin")
Output:

Generate Speech from Hindi Text
This code converts the translated text into speech. The processor prepares the text for the model, the TTS model generates the audio waveform and the waveform is converted to a NumPy array. Finally, the audio is saved as a WAV file using the model’s sampling rate.
inputs = tts_processor(text=translated_text, return_tensors="pt")

with torch.no_grad():
    output = tts_model(**inputs)

audio_output = output.waveform.squeeze().cpu().numpy()

sf.write(
    "translated_audio.wav",
    audio_output,
    tts_model.config.sampling_rate
)
Output:
You can download the full code from here
