In this project, we will be integrating a deep learning model with the Django framework. This deep learning model converts greyscale images to colorful images.
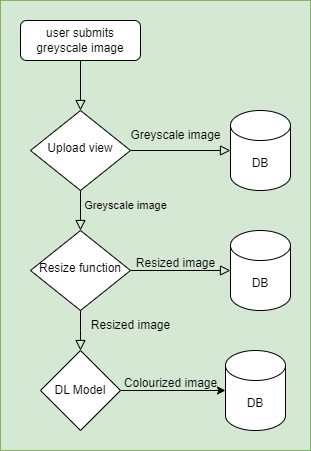
We will store the user-given greyscale image in our database and then resize the image, submit this resized image, to our DL model, and then provide the user with a token. This token can be used to download the colorful image.
Note :
- This project implements the simplest frame/skeleton to integrate a deep learning model with the Django backend.
- This project receives an image input, submits that image to the model for processing and then returns a download token to download the processed image.
Prerequisites:
- There should be a deep learning project ready for implementation.
- The project must include a file containing the trained model's weights. We are using a model trained with the Caffe deep learning framework, where the .prototxt and .caffemodel files are standard formats. The .prototxt file stores the architecture of the network, while the .caffemodel file contains the weights of the compiled and trained model.
- You should be familiar with Django and database schemas, as well as handling static and media files in Django.
Table of Content
Flow chart for image post event
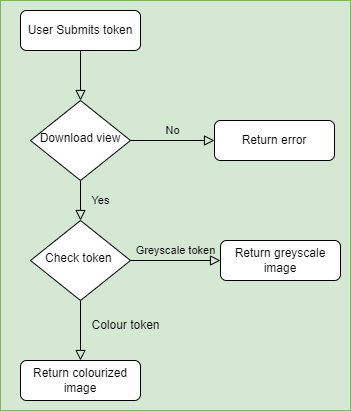
Flow chart for token post event
Project Setup:
Step 1: Create a directory named as myDL_project.
Step 2: Open that directory in Vscode.
Step 3: Create a virtual environment. We will be using pipenv to create a virtual environment.
pipenv shellStep 4: Install Django, opencv and pillow required for this project by using command:
pipenv install django opencv pillowStep 5: Start a project in django by using command:
django-admin startproject DLWebApp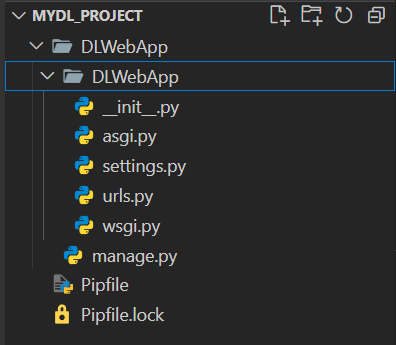
Step 6: Create a new app home inside the project director (myDL_project/DLWebApp). It will handle the landing page and upload/download form for image.
cd DLWebApp
python manage.py startapp home
Step 7 : Register our new home app in the project settings.
In DLWebApp/DLWebApp/settings.py
# ...

INSTALLED_APPS = [
  	# ...
  	'home',
]
Step 8: Create a template directory in the parent directory, at the same level as our project and app directories (DLWebApp/templates).
Setup the templates path in settings.py in the project directory.
TEMPLATES = [
    {
        'BACKEND': 'django.template.backends.django.DjangoTemplates',
        'DIRS': [os.path.join(BASE_DIR,'templates')],
        'APP_DIRS': True,
        'OPTIONS': {
            'context_processors': [
                'django.template.context_processors.debug',
                'django.template.context_processors.request',
                'django.contrib.auth.context_processors.auth',
                'django.contrib.messages.context_processors.messages',
            ],
        },
    },
]
- Inside template directory create a base.html.
- We will use bootstrap for css.
- We will use django-templates to render webpages in this base.html.
In DLWebApp/templates/base.html
<!DOCTYPE html>
<html lang="en">
<head>
    <meta charset="UTF-8">
    <meta name="viewport" content="width=device-width, initial-scale=1.0">
    <link href="https://cdn.jsdelivr.net/npm/bootstrap@5.3.3/dist/css/bootstrap.min.css"
          rel="stylesheet"
          integrity="sha384-QWTKZyjpPEjISv5WaRU9OFeRpok6YctnYmDr5pNlyT2bRjXh0JMhjY6hW+ALEwIH"
          crossorigin="anonymous">
    <title>DL_Project</title>
</head>
<body>
    {% block body %}
    {% endblock %}
    <script src="https://cdn.jsdelivr.net/npm/bootstrap@5.3.3/dist/js/bootstrap.bundle.min.js"
            integrity="sha384-YvpcrYf0tY3lHB60NNkmXc5s9fDVZLESaAA55NDzOxhy9GkcIdslK1eN7N6jIeHz"
            crossorigin="anonymous"></script>
</body>
</html>
Create a upload_form.html in templates directory. This form will accept greyscale image from user.
{% extends 'base.html' %}
{% block body %}
<div class="container">
  <form id="uploadForm" class="m-5" enctype="multipart/form-data">
    {% csrf_token %}
    <div class="mb-3">
      <label for="greyImage" class="form-label">
        Greyscale Image
      </label>
      <input type="file" id="greyImage"
      class="form-control" name="greyImage">
      <div id="emailHelp" class="form-text">
        We'll never share your data with anyone else.
      </div>
    </div>
    <button type="submit" class="btn btn-primary">Submit</button>
  </form>
  <a href="{% url 'download_coloured_image' %}">Download</a>
</div>
{% endblock
Create a download_form.html in templates directory. This form will accept token for colored image from user.
{% extends 'base.html' %}
{% block body %}
<div class="container">
    <form class="m-5" action="{% url 'download_coloured_image' %}" method="post">
        {% csrf_token %}
        <div class="mb-3">
          <label class="form-label">Token</label>
          <input type="text" class="form-control" name="token">
          <div class="form-text">We'll never share your data with anyone else.</div>
        </div>
        <button type="submit" class="btn btn-primary">Submit</button>
      </form>
</div>
{% endblock %}
Views And Model to Handle Image Upload
Step 1: Creating Views
Create an index view in home app to handle the loading of upload_form page.
In DLWebApp/home /views.py
from django.shortcuts import render, redirect, HttpResponse
from django.views import View

class Index(View):

    def get(self, request):
        return render(request, "upload_form.html")

    def post(self, request):
        pass
We will add logic to handle image processing later.
Step 2: URL Setup:
- Create urls.py in home app directory.
- Create an URL path for Index view.
In DLWebApp/home /urls.py
from django.urls import path
from .views import Index,Download

urlpatterns = [
    path("", Index.as_view(), name="index")
]
Include home.urls. in projects urls.py.
In DLWebApp/DLWebApp/urls.py
from django.contrib import admin
from django.urls import path, include

urlpatterns = [
    path("admin/", admin.site.urls),
    path("", include("home.urls")),
]
Run the development server using command:
python manage.py runserverStep 3: Creating Model
Create a model which can store greyscale image and its id. Create another model which can store colored image and its id. Create one more model which can store resized image.(DLWebApp/home/models.py)
from django.db import models
import uuid

class GrayscaleImage(models.Model):
    image = models.ImageField(upload_to='grayscale_images/')
    signature = models.UUIDField(default=uuid.uuid4, editable=False, unique=True)
    created_at = models.DateTimeField(auto_now_add=True)

    def __str__(self):
        return str(self.signature)

class ResizedImage(models.Model):
    grayscale_image = models.OneToOneField(GrayscaleImage, on_delete=models.CASCADE)
    image = models.ImageField(upload_to='resized_images/')

    def __str__(self):
        return f"Resized image for {self.grayscale_image.signature}"

class ColorizedImage(models.Model):
    grayscale_image = models.OneToOneField(GrayscaleImage, on_delete=models.CASCADE)
    image = models.ImageField(upload_to='colorized_images/')
    download_token = models.UUIDField(default=uuid.uuid4, editable=False, unique=True)

    def __str__(self):
        return str(self.download_token)
Run migration commands to migrate these models into the data base.
python manage.py makemigrations
python manage.py migrate

Step 4: Add View Logic to process image
Design a view logic which will handle the greyscale post event.
- The view will receive the greyscale image then call a resize function to resize that image.
- This greyscale and resized images were saved in the database.
- After successful resizing call the colorize_image, function to use DL to convert the resized grey image to colorful image.
- Save this colorful image to the database and return the token to download this image.
In DLWebApp/home/views.py
# ...

def resize_image(image, size=(224, 224)):
    try:
        resized_image = image.resize(size)
        return resized_image
    except Exception as e:
        print(f"An error occurred: {e}")
        return None

class Index(View):

    def get(self, request):
        return render(request, "upload_form.html")

    def post(self, request):
        image = request.FILES["greyImage"]
        if not image:
            return HttpResponse("no image")

        # Get the uploaded file
        image_file = request.FILES["greyImage"]

        # Save the grayscale image
        grayscale_image = GrayscaleImage(image=image_file)
        grayscale_image.save()

        # Open the uploaded image with Pillow
        pil_image = Image.open(image_file)

        # Resize the image
        resized_image = resize_image(pil_image)
        if resized_image is None:
            return HttpResponse("Error resizing image", status=500)

        # Save the resized image to a BytesIO object
        resized_image_io = io.BytesIO()
        resized_image.save(resized_image_io, format="JPEG")
        resized_image_file = ContentFile(
            resized_image_io.getvalue(), "resized_image.jpg"
        )

        # Save the resized image to the database
        resized_image_entry = ResizedImage(
            grayscale_image=grayscale_image, image=resized_image_file
        )
        resized_image_entry.save()

        # temperary path
        temp_path = default_storage.save(
            "temp/" + str(uuid.uuid4()) + ".jpg",
            ContentFile(resized_image_io.getvalue()),
        )

        # call the funtion to convert grey scale image to coloured image
        colorized_image_np = colorize_image(default_storage.path(temp_path))
        colorized_pil_image = Image.fromarray(colorized_image_np)
        colorized_image_io = io.BytesIO()
        colorized_pil_image.save(colorized_image_io, format="JPEG")
        colorized_image_file = ContentFile(
            colorized_image_io.getvalue(), "colorized_image.jpg"
        )

        # Save the colorized image to the database
        colorized_image_entry = ColorizedImage(
            grayscale_image=grayscale_image, image=colorized_image_file
        )
        colorized_image_entry.save()
        response_data = {
            "signature_token": grayscale_image.signature,
            "download_token": colorized_image_entry.download_token,
        }

        return JsonResponse(response_data, status=201)
Step 5: Add Javascript code
Inside upload.html to display these signature and download tokens as alert messages.
{% extends 'base.html' %}
{% block body %}

<!-- HTML Content -->

<script>
  document.getElementById("uploadForm")
  .addEventListener("submit", function (e) {
    e.preventDefault();

    const imageInput = document.getElementById("greyImage");
    if (imageInput.files.length === 0) {
      alert("Please select an image.");
      return;
    }

    const formData = new FormData();
    formData.append("greyImage", imageInput.files[0]);

    fetch("/upload_grey_image", {
      method: "POST",
      body: formData,
      headers: {
        // Include CSRF token for Django if needed
        'X-CSRFToken': getCookie('csrftoken')
      }
    })
      .then(response => response.json())
      .then(data => {
        if (data.error) { alert(data.error); }
        else {
          if (data.signature_token) {
          alert(`Image uploaded! Your signature token: ${data.signature_token}`);
          }
          if (data.download_token) {
          alert(`Image uploaded! Your download token: ${data.download_token}`);
          }
        }
      })
  });

  // Function to get CSRF token for Django
  function getCookie(name) {
    let cookieValue = null;
    if (document.cookie && document.cookie !== '') {
      const cookies = document.cookie.split(';');
      for (let i = 0; i < cookies.length; i++) {
        const cookie = cookies[i].trim();
        if (cookie.substring(0, name.length + 1) === (name + '=')) {
          cookieValue = decodeURIComponent(cookie.substring(name.length + 1));
          break;
        }
      }
    }
    return cookieValue;
  }
</script>
{% endblock %}
Setup the media file path
Step 1: In settings.py file of the project update the media file root, url and startic_url.
In DLWebApp/DLWebApp /settings.py
STATIC_URL = 'static/'
MEDIA_URL = '/media/'
MEDIA_ROOT = os.path.join(BASE_DIR, 'media')
Step 2 : Add url for media directory in the projects urls.py.
from django.contrib import admin
from django.urls import path, include

urlpatterns = [
    path("admin/", admin.site.urls),
    path("", include("home.urls")),
]

from django.conf import settings
from django.conf.urls.static import static

if settings.DEBUG:
  	urlpatterns += static(settings.STATIC_URL, document_root=settings.STATIC_ROOT)
    urlpatterns += static(settings.MEDIA_URL, document_root=settings.MEDIA_ROOT)
Step 3: Upload an image through the form and check if it is saved in the DLWebApp/media/grayscale_images directory.
Integrating Deep Learning Model:
Deep Learning Model :
- The deep learning model is converting a grey image to colorized image.
- We have used Caffe framework to develop my model so .caffemodel file contains the weight of my model. You can also use .h5 format to store your model weights.
- Integration of a deep learning model and a machine learning model with Django follows different procedures.
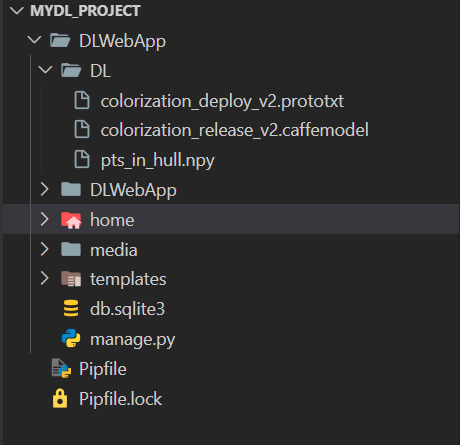
Step 1 : Create a DL directory in same level as the project and home app.
Step 2 : Upload all model files to this directory. We are the Caffe framework for model training, so the model weights are saved in .caffemodel files, and the network architecture is defined in .prototxt. Additionally, we may have some data saved in .npy format.
Step 3 : Import all the dependencies we will need to handle image processing and your model. Additionally import os module.
In DLWebApp/home/views.py
from django.shortcuts import render, redirect, HttpResponse
from .models import GrayscaleImage, ColorizedImage, ResizedImage
from django.core.files.storage import default_storage
from django.core.files.base import ContentFile
from django.http import JsonResponse
from django.conf import settings
from django.views import View
from PIL import Image
import numpy as np
import uuid
import io
import cv2
import os
Step 4: Load the model
In DLWebApp/home/views.py
NETWORK = os.path.join(settings.BASE_DIR, r"DL/colorization_deploy_v2.prototxt")
VALS = os.path.join(settings.BASE_DIR, r"DL/pts_in_hull.npy")
MODEL = os.path.join(settings.BASE_DIR, r"DL/colorization_release_v2.caffemodel")

# Load the model for colorizing
print("Loading model")
net = cv2.dnn.readNetFromCaffe(NETWORK, MODEL)
pts = np.load(VALS)

# Load centers for ab channel quantization used for rebalancing.
class8 = net.getLayerId("class8_ab")
conv8 = net.getLayerId("conv8_313_rh")
pts = pts.transpose().reshape(2, 313, 1, 1)
net.getLayer(class8).blobs = [pts.astype("float32")]
net.getLayer(conv8).blobs = [np.full([1, 313], 2.606, dtype="float32")]
Step 5 : Complete the colorize_image function which converts the resized grey image to colorful image.
In DLWebApp/home/views.py
def colorize_image(image_path):
    image = cv2.imread(image_path)
    scaled = image.astype("float32") / 255.0
    lab = cv2.cvtColor(scaled, cv2.COLOR_BGR2LAB)
    resized = cv2.resize(lab, (224, 224))
    L = cv2.split(resized)[0]
    L -= 50
    net.setInput(cv2.dnn.blobFromImage(L))
    ab = net.forward()[0, :, :, :].transpose((1, 2, 0))
    ab = cv2.resize(ab, (image.shape[1], image.shape[0]))
    L = cv2.split(lab)[0]
    colorized = np.concatenate((L[:, :, np.newaxis], ab), axis=2)
    colorized = cv2.cvtColor(colorized, cv2.COLOR_LAB2BGR)
    colorized = np.clip(colorized, 0, 1)
    colorized = (255 * colorized).astype("uint8")
    return colorized
Step 6 : Upload a greyscale image and check if our backend is producing a colourful image in media/colorized_images directory.
We should receive alerts containing the token for signature and download.
Views to handle download
In DLWebApp/home/views.py
Step 1 : Create a Download class in home/views.py which will render download_form.html for get request.
# ...

class Download(View):

    def get(self,request):
        return render(request, "download_form.html")
Step 2 : Create POST method in Download class to handle the form submission. This method will search and return a colorized image for the provided token.
class Download(View):

    def get(self,request):
        return render(request,"download_form.html")

    def post(self,request):
        token = request.POST.get("token")
        if not token:
            return HttpResponse("No token provided")

        # Fetch the colorized image using the token
        colorized_image = ColorizedImage.objects.filter(download_token=token).first()
        if not colorized_image:
            return HttpResponse("No image found for this token")

        try:
            # Open and return the colorized image
            with default_storage.open(colorized_image.image.name, "rb") as f:
                response = HttpResponse(f.read(), content_type="image/jpeg")
                response["Content-Disposition"] = (
                    f'attachment; filename="colorized_image.jpg"'
                )
                return response
        except Exception as e:
            return HttpResponse(f"Error during download: {str(e)}")
URL setup: Add path to post the token to Download class.
In DLWebApp/home/urls.py
from django.urls import path
from .views import Index,Download

urlpatterns = [
    path("", Index.as_view(), name="index"),
    path("upload_grey_image", Index.as_view(), name="upload_grey_image"),
    path("download_coloured_image", Download.as_view(), name="download_coloured_image"),
]
Step 3 : Add the URL of download class to the action of the download_form.html .
{% extends 'base.html' %}
{% block body %}
<div class="container">
    <form class="m-5" action="{% url 'download_coloured_image' %}" method="post">
        {% csrf_token %}
        <div class="mb-3">
          <label class="form-label">Token</label>
          <input type="text" class="form-control" name="token">
          <div class="form-text">We'll never share your data with anyone else.</div>
        </div>
        <button type="submit" class="btn btn-primary">Submit</button>
      </form>
</div>
{% endblock %}
Step 4 : Create a download link in the upload form which will redirect user to the download form.
In DLWebApp/templates/upload_form.html
<div class="container">
  <form id="uploadForm" class="m-5" enctype="multipart/form-data">
    {% csrf_token %}
    <div class="mb-3">
      <label for="greyImage" class="form-label">
        Greyscale Image
      </label>
      <input type="file" id="greyImage"
      class="form-control" name="greyImage">
      <div id="emailHelp" class="form-text">
        We'll never share your data with anyone else.
      </div>
    </div>
    <button type="submit" class="btn btn-primary">Submit</button>
  </form>
  <a href="{% url 'download_coloured_image' %}">Download</a>
</div>
Output:
Step 5 : Upload a grey scale image to the upload form. It will return you two tokens signature and download. Copy download token and go to download form, paste the download token and you will receive a colored image.
Scope for optimization :
- As this project aims to provide a basic skeleton to integrate a Deep Learning Model with django framework, it doesn't focus much on optimizing database queries.
- Always load your model in top of the views so that this model can be loaded beforehand and is ready to accept inputs.
- With this skeleton the model will be loaded only once in the server which is an optimized way of handling models in backend. For each different inputs, views will only call the pre loaded model there is no need to load the model for each different inputs.
