Amazon SageMaker is a fully managed Machine Learning service provided by AWS that helps developers and data scientists build, train, and deploy machine learning models quickly and efficiently in the cloud.
- Provides tools for building, training, and deploying ML models.
- Supports real-time and batch predictions.
- Integrates with AWS services like Lambda, S3, and API Gateway.
- Helps automate Machine Learning workflows.
- Reduces infrastructure management for developers.
This project demonstrates how to deploy a Machine Learning model using Amazon SageMaker and integrate it with a custom web application using AWS services.
Steps
Step 1: Create a SageMaker Notebook
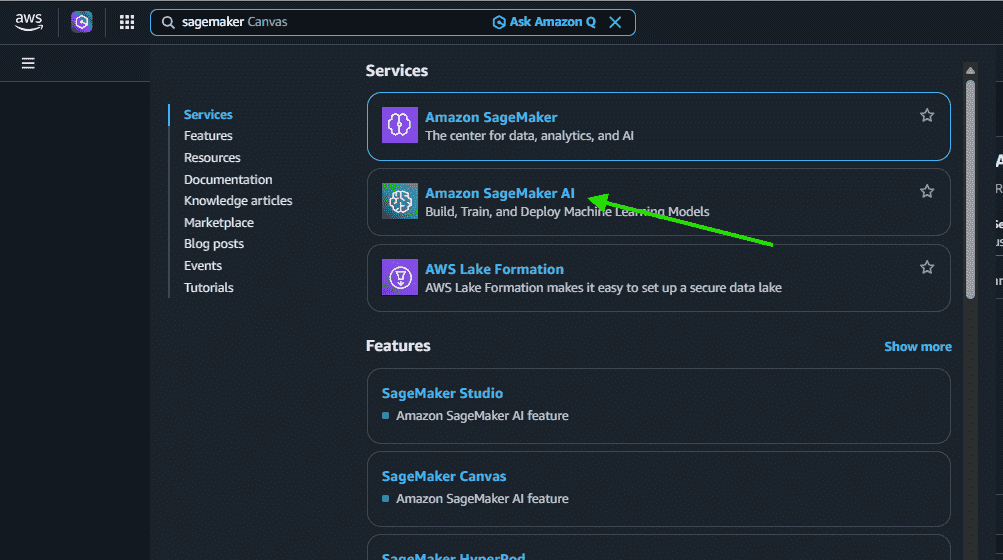
1. Open AWS Console.
2. Search for Amazon SageMaker AI in the AWS search bar and open the service.
3. Create a Notebook Instance
- Enter the notebook instance name as “sagemaker-custom-ui-lab”.
- Choose notebook instance type “ml.t2.medium”.
- Select an existing IAM role or create a new IAM role.
- Click “Create notebook instance”.
- Wait until status becomes "InService".

Step 2: Train a Simple Machine Learning Model in SageMaker
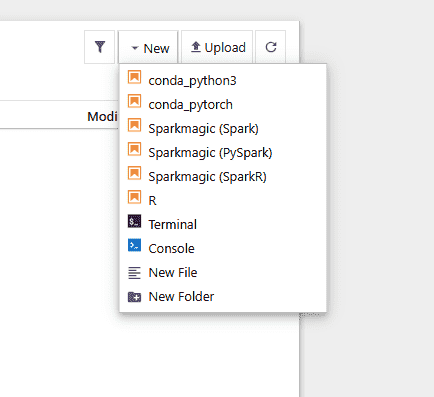
1. Open Jupyter Notebook.
- Click new and choose "conda_python3".
2. Run This Model
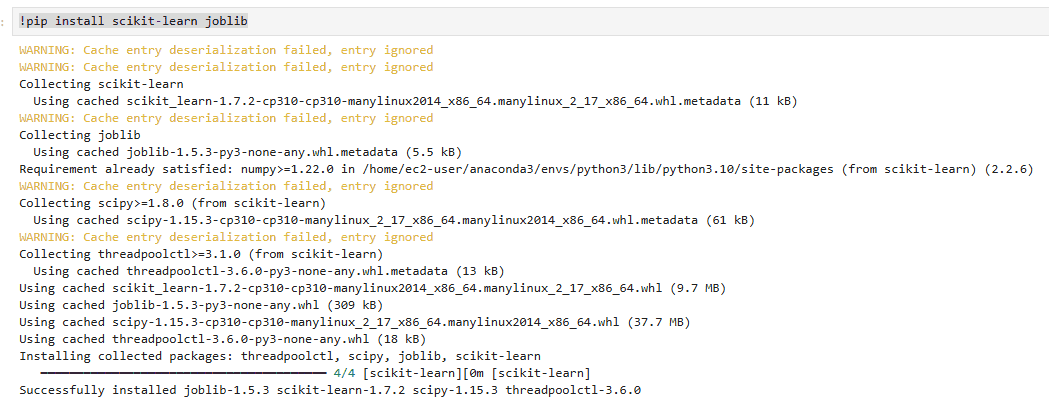
- First, run the following command in a new notebook cell to install the required libraries.
!pip install scikit-learn joblib
- Add a new Cell and Run this.
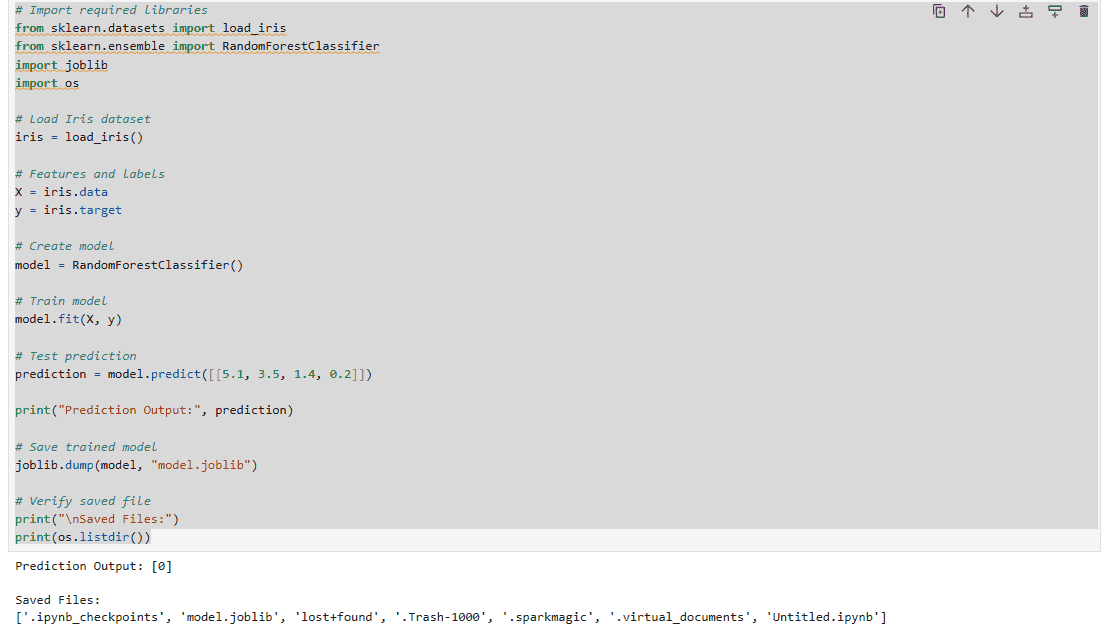
# Import required libraries
from sklearn.datasets import load_iris
from sklearn.ensemble import RandomForestClassifier
import joblib
import os

# Load Iris dataset
iris = load_iris()

# Features and labels
X = iris.data
y = iris.target

# Create model
model = RandomForestClassifier()

# Train model
model.fit(X, y)

# Test prediction
prediction = model.predict([[5.1, 3.5, 1.4, 0.2]])

print("Prediction Output:", prediction)

# Save trained model
joblib.dump(model, "model.joblib")

# Verify saved file
print("\nSaved Files:")
print(os.listdir())
3. Download the Model file
- Click the Jupyter logo to open the file explorer.
- Locate the file named “model.joblib”.
- Select the file by checking the checkbox beside it.
- Click “Download” to save the file to your system.
Step 3: Upload the Model file to Amazon S3
- Open Amazon s3.
- Create a Bucket.
- Configure Bucket.
- Choose Name “sagemaker-custom-ui-username”.
- Keep default setting.
- Click on “Create bucket”.
- Open the Bucket.
- Upload Model file.
- Verify Upload.

Step 4: Deploy Model to SageMaker Endpoint
Important Note
SageMaker deployment requires:
- A model archive (model.tar.gz)
- An inference script (inference.py)
So first we will create these files inside Jupyter.
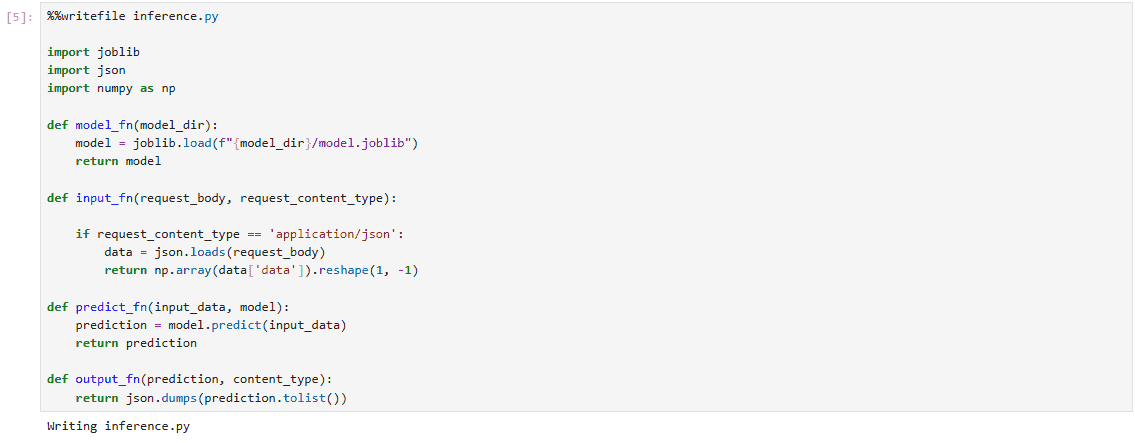
1. Create inference.py in a New Cell.
%%writefile inference.py

import joblib
import json
import numpy as np

def model_fn(model_dir):
    model = joblib.load(f"{model_dir}/model.joblib")
    return model

def input_fn(request_body, request_content_type):

    if request_content_type == 'application/json':
        data = json.loads(request_body)
        return np.array(data['data']).reshape(1, -1)

def predict_fn(input_data, model):
    prediction = model.predict(input_data)
    return prediction

def output_fn(prediction, content_type):
    return json.dumps(prediction.tolist())
2. Create model.tar.gz
- Create another new cell and run.
!tar -czvf model.tar.gz model.joblib

- Download the model.tar.gz file.
- Upload the model.tar.gz on S3.
- Copy the S3 URI of model.tar.gz "s3://your-bucket-name/model.tar.gz".
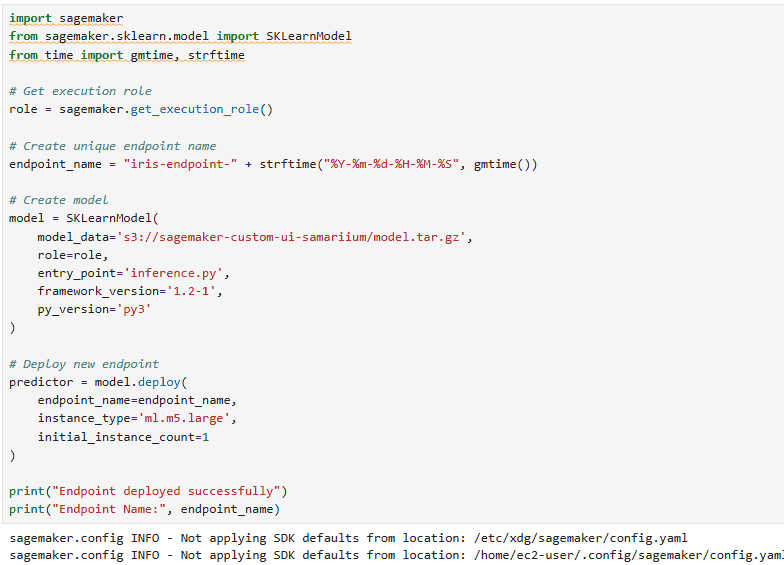
3. Deploy Endpoint
- Create another new cell and run.
- Replace: "YOUR_S3_PATH" with the S3 URI that you copied.
import sagemaker
from sagemaker.sklearn.model import SKLearnModel
from time import gmtime, strftime

# Get execution role
role = sagemaker.get_execution_role()

# Create unique endpoint name
endpoint_name = "iris-endpoint-" + strftime("%Y-%m-%d-%H-%M-%S", gmtime())

# Create model
model = SKLearnModel(
    model_data='s3://your_bucket/model.tar.gz',
    role=role,
    entry_point='inference.py',
    framework_version='1.2-1',
    py_version='py3'
)

# Deploy new endpoint
predictor = model.deploy(
    endpoint_name=endpoint_name,
    instance_type='ml.m5.large',
    initial_instance_count=1
)

print("Endpoint deployed successfully")
print("Endpoint Name:", endpoint_name)
4. Endpoint Testing
- Create another new cell and run.
import json

response = predictor.predict(
    json.dumps({
        "data": [5.1, 3.5, 1.4, 0.2]
    }),
    initial_args={"ContentType": "application/json"}
)

print(response)
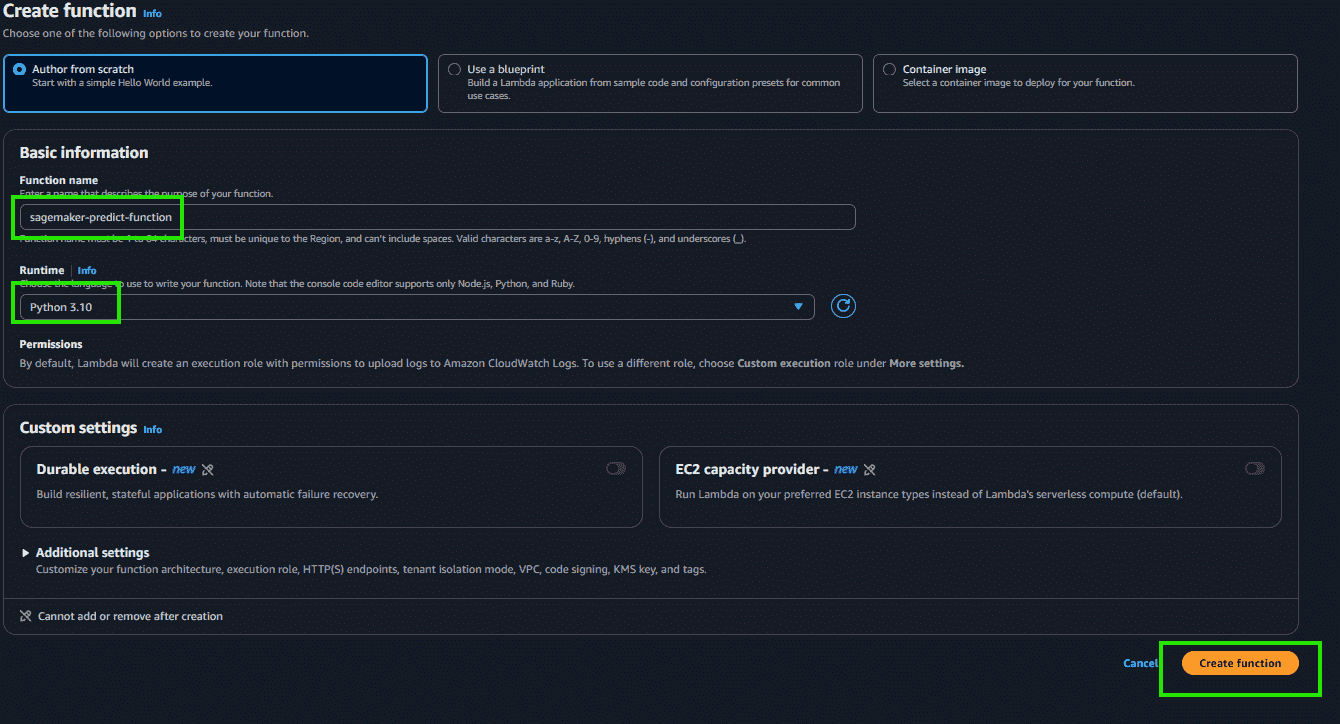
Step 5: Create AWS Lambda function
- Open AWS lambda.
- Create function.
- Go to the “Configuration” tab and select “Permissions”.
- Click on the IAM Role name link under Execution Role.
- Click “Add permissions”.
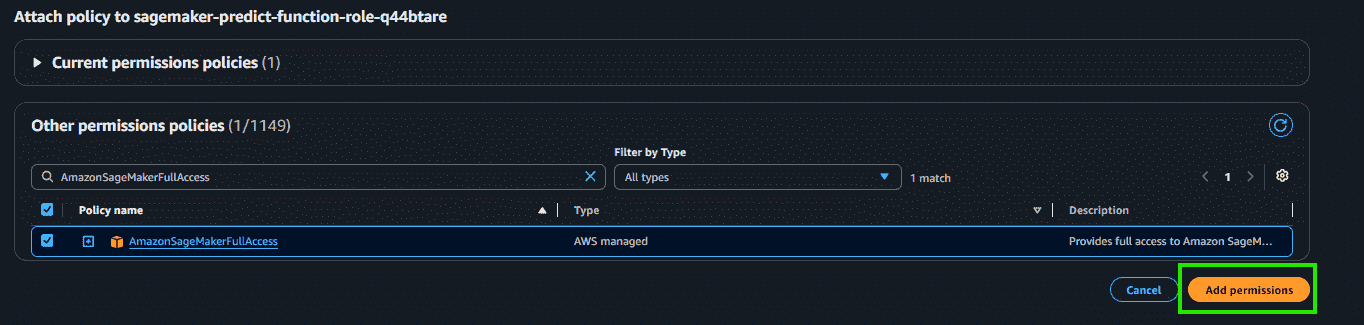
- Select “Attach policies”.
- Search for “AmazonSageMakerFullAccess”.
- Select the policy and click “Add permissions”.
- Go back to Lambda function page.
- Replace the default code.
import json
import boto3

runtime = boto3.client('sagemaker-runtime')

ENDPOINT_NAME = 'iris-endpoint-2026-05-28-06-24-46'

def lambda_handler(event, context):

    # Handle API Gateway request
    if 'body' in event:
        body = json.loads(event['body'])
    else:
        body = event

    response = runtime.invoke_endpoint(
        EndpointName=ENDPOINT_NAME,
        ContentType='application/json',
        Body=json.dumps(body)
    )

    result = response['Body'].read().decode()

    return {
        'statusCode': 200,
        'headers': {
            'Access-Control-Allow-Origin': '*'
        },
        'body': result
    }
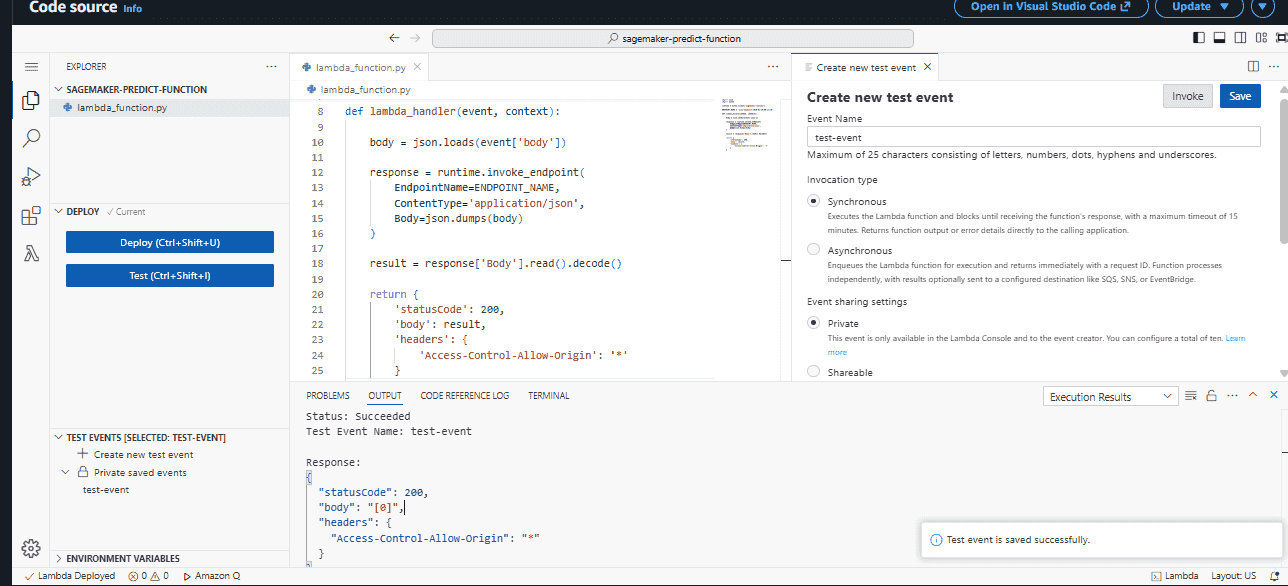
- Click “Deploy” and wait until the message “Successfully updated the function sagemaker-predict-function” appears.
- Click “Test”.
- Enter the Event Name as “test-event”.
- Paste the following test event code.
- Click “Save”.
- Click “Test” again to execute the Lambda function.
{
  "body": "{\"data\": [5.1, 3.5, 1.4, 0.2]}"
}
Step 6: Create API Gateway
- Open API Gateway.
- Click on “Create API”.
- Choose API type “Rest API”.
- API name “sagemaker-api”.
- Click “Create API”.

Step 7: Create POST Method
- Go to Resources and click “create resources”.
- Resource Name “predict”.
- Click “Create Resource”.
- Select /predict.
- Click “Create method”.
- Select POST.
- Choose Lambda function.
- Choose "sagemaker-predict-function".
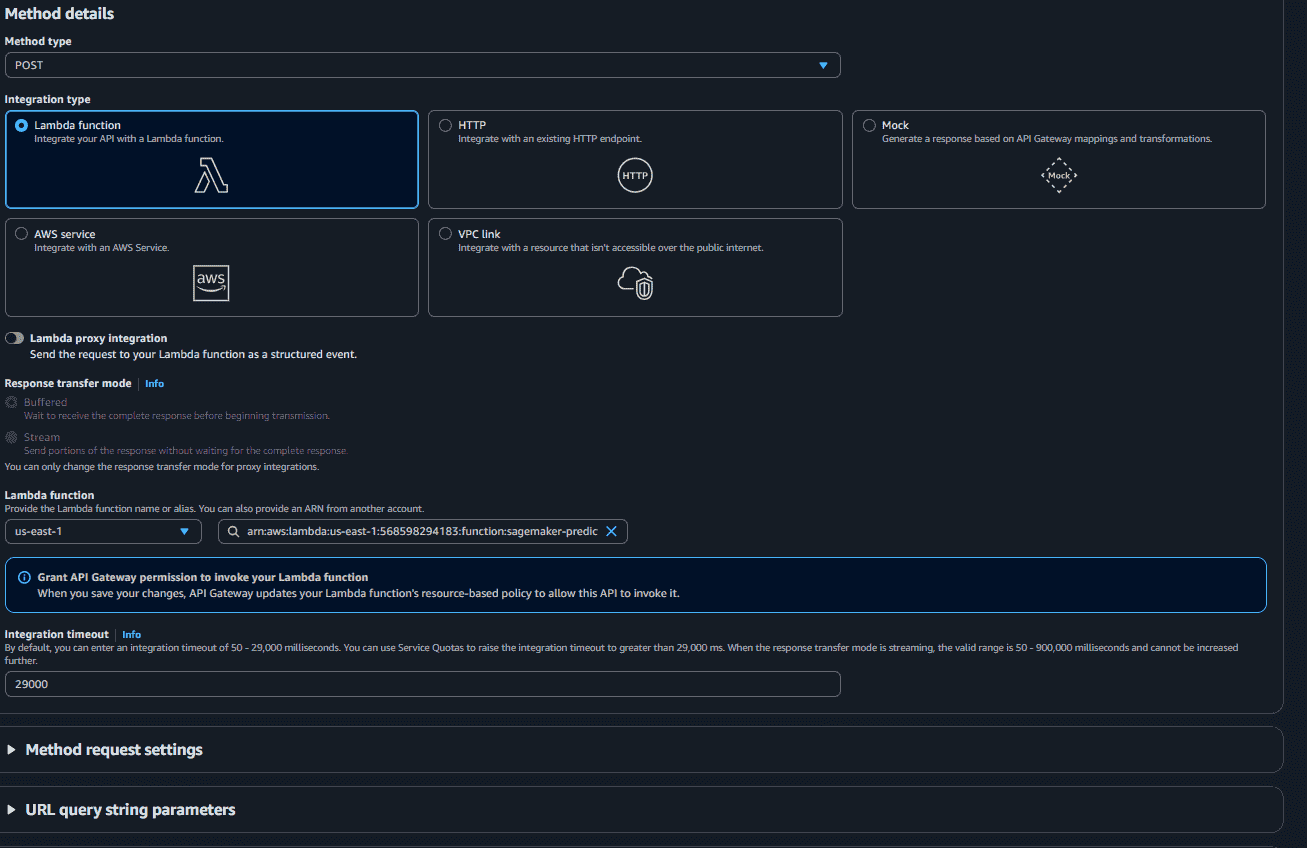
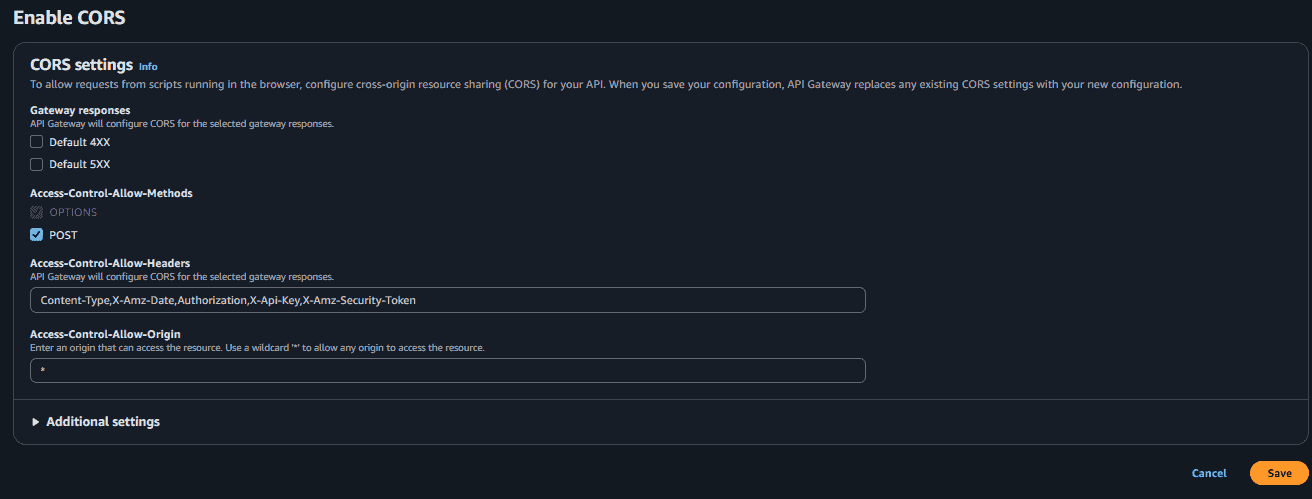
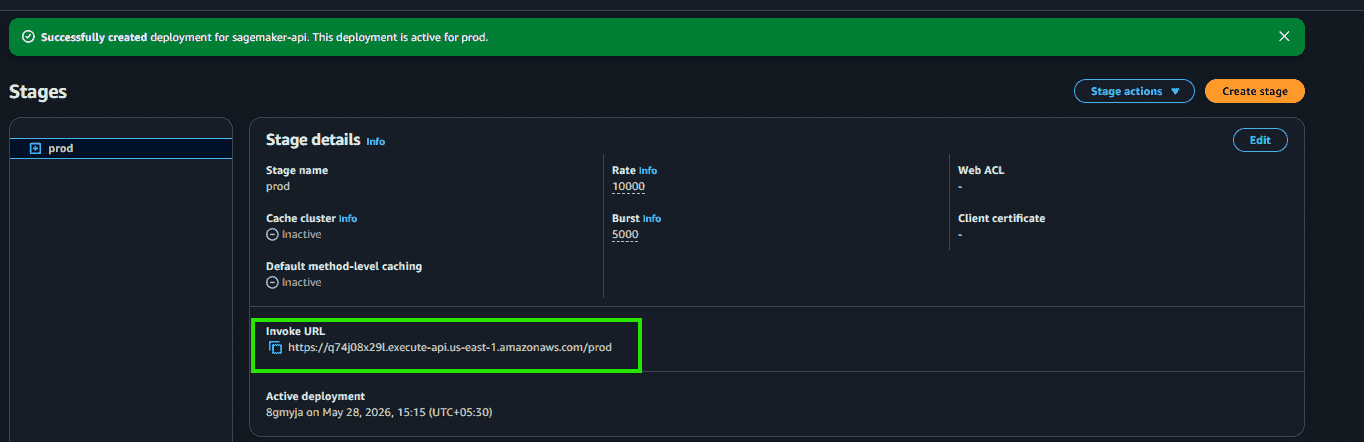
- Enable CORS
- Click on “Deploy API”.
- Stage “new stage”.
- Stage Name “prod”.
- Click on “Deploy”.
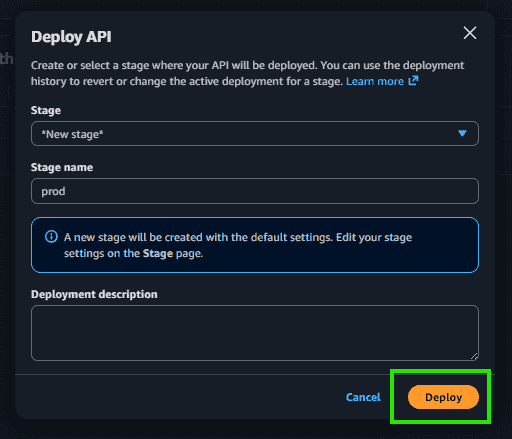
- Copy the invoke URL.
Step 8: Create Custom HTML UI
- Open Notepad or VS Code.
- Create a index.html file.
<!DOCTYPE html>
<html>

<head>

    <title>SageMaker Prediction UI</title>

    <style>

        body {
            font-family: Arial, sans-serif;
            text-align: center;
            margin-top: 100px;
            background-color: #f4f4f4;
        }

        .container {
            background: white;
            width: 500px;
            margin: auto;
            padding: 30px;
            border-radius: 10px;
            box-shadow: 0px 0px 10px rgba(0,0,0,0.1);
        }

        input {
            width: 80%;
            padding: 12px;
            margin-top: 20px;
            font-size: 16px;
        }

        button {
            padding: 12px 25px;
            margin-top: 20px;
            font-size: 16px;
            cursor: pointer;
            background-color: #0073e6;
            color: white;
            border: none;
            border-radius: 5px;
        }

        button:hover {
            background-color: #005bb5;
        }

        h2 {
            color: #333;
        }

        #result {
            margin-top: 20px;
            color: green;
        }

    </style>

</head>

<body>

    <div class="container">

        <h2>Iris Flower Prediction</h2>

        <p>
            Enter values separated by commas
        </p>

        <input
            type="text"
            id="inputData"
            placeholder="Example: 5.1,3.5,1.4,0.2"
        >

        <br>

        <button onclick="predict()">
            Predict
        </button>

        <h3 id="result"></h3>

    </div>

    <script>

        async function predict() {

            const input =
                document.getElementById("inputData").value;

            const values =
                input.split(',').map(Number);

            try {

                const response = await fetch(
                    "YOUR_INVOKE_URL",
                    {
                        method: "POST",

                        headers: {
                            "Content-Type": "application/json"
                        },

                        body: JSON.stringify({
                            data: values
                        })
                    }
                );

                const data = await response.json();

                document.getElementById("result")
                    .innerHTML =
                    "Prediction Result: " + data.body;

            }

            catch(error) {

                document.getElementById("result")
                    .innerHTML =
                    "Error connecting to API";

            }

        }

    </script>

</body>

</html>
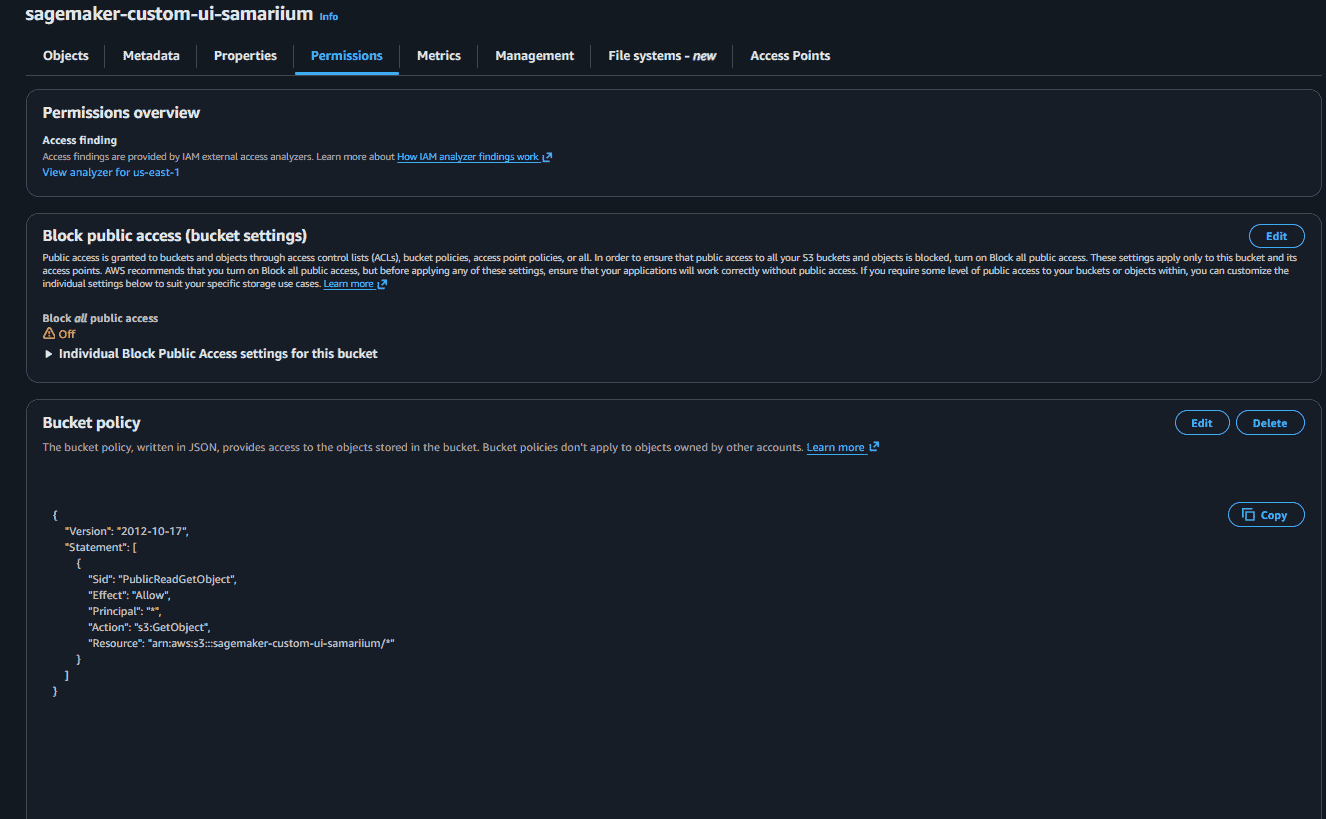
Replace YOUR_API_URL with your actual API Gateway invoke URL.Upload this index.html in your s3 bucket.Go to properties.Scroll down to Static Website Hosting and enable it.Go to permissions and disable “Block all public access”.Scroll to bucket policy and edit it.Paste this code.
{
  "Version": "2012-10-17",
  "Statement": [
    {
      "Sid": "PublicReadGetObject",
      "Effect": "Allow",
      "Principal": "*",
      "Action": "s3:GetObject",
      "Resource": "Your-s3-arn"
    }
  ]
}
Step 9: Test Application
- Go to properties of S3.
- Scroll to static website hosting.
- Copy the Bucket website endpoint.
- Pate the URL in your browser.
- Enter Input.
- Click “Predict”.
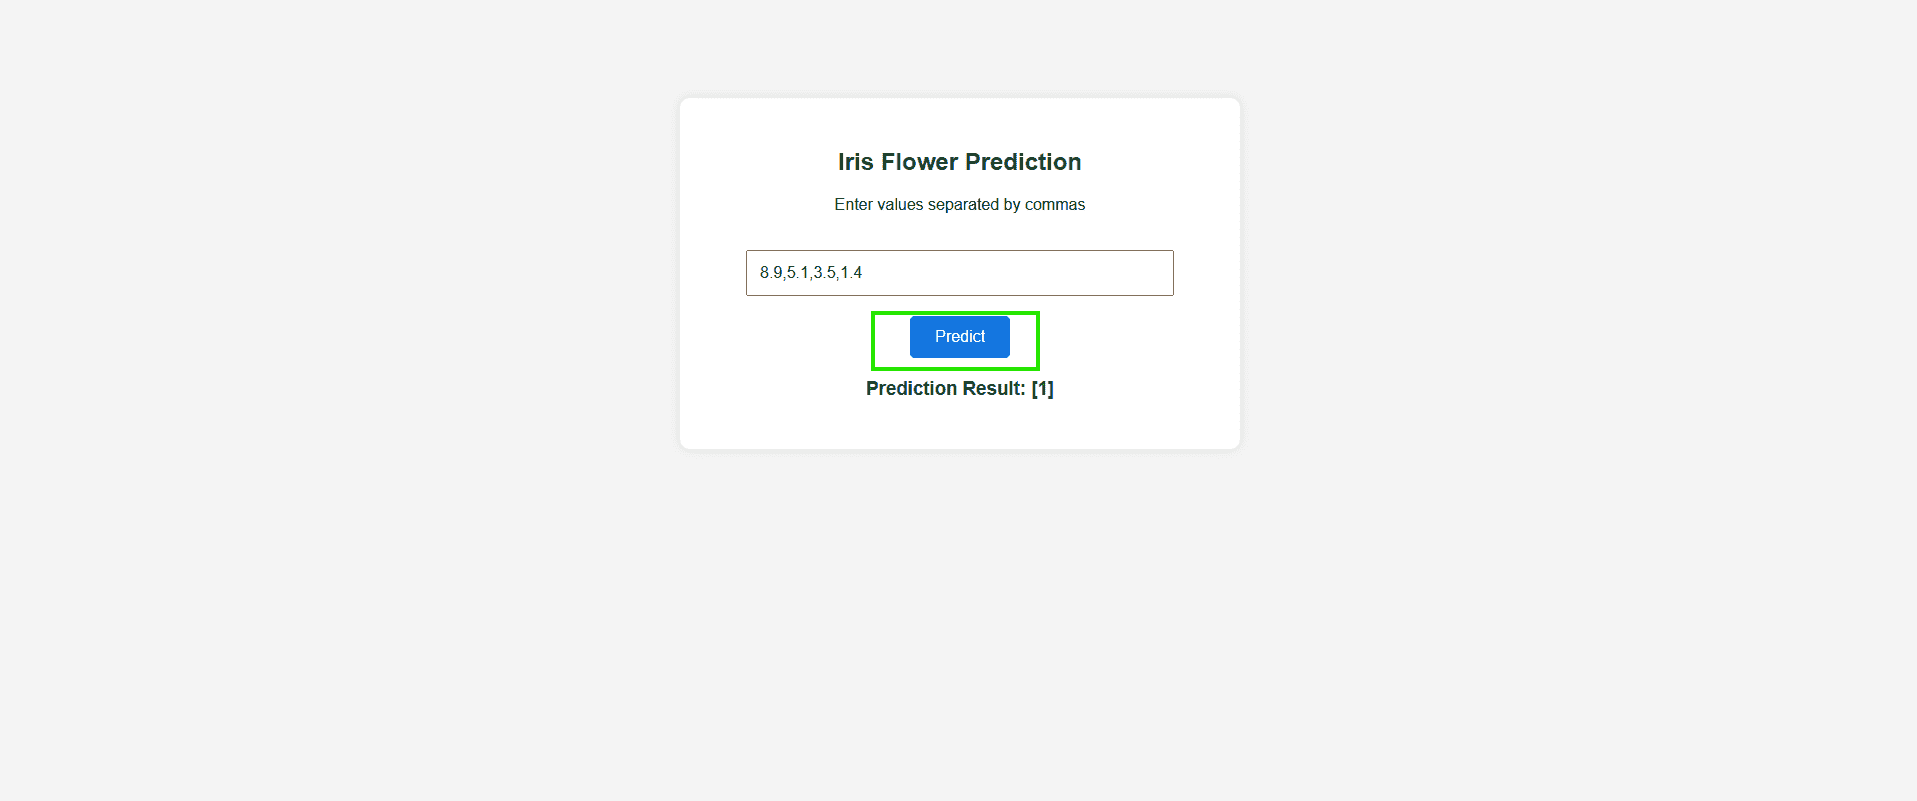
In the Iris dataset:
[0]= Iris-setosa[1]= Iris-versicolor[2]= Iris-virginica
