Amazon EC2 is a core AWS compute service that allows users to run virtual servers in the cloud with full control over compute resources.
It provides flexibility in choosing instance types based on workload requirements such as compute, memory, and storage.
- Instance types define the combination of cpu, memory, storage, and networking capacity for different workloads.
- Tenancy determines whether instances run on shared hardware or dedicated physical servers.
- Placement groups control how instances are placed within the aws infrastructure to optimize performance or availability.
- Selecting the right combination improves scalability, fault tolerance, and application performance.
Amazon EC2
Amazon EC2 is a web service that provides resizable compute capacity in the cloud. It allows users to run virtual servers, known as instances, which can be easily scaled up or down to accommodate varying workloads. EC2 instances serve as the foundation for a wide range of applications, from simple websites to complex, data-intensive processing tasks.
Key Features of Amazon EC2:
Scalability: EC2 instances can be provisioned and terminated rapidly, enabling users to scale their infrastructure based on demand. This flexibility is crucial for handling dynamic workloads and ensuring optimal performance.
Variety of Operating Systems: Amazon EC2 supports various operating systems, including Linux and Windows, allowing users to choose the environment that best suits their application requirements.
Instance Types: EC2 offers a diverse set of instance types, each optimized for specific use cases. These instance types provide a balance of compute, memory, storage, and networking capabilities.
Security: AWS emphasizes security, and EC2 is no exception. Users can leverage features like Virtual Private Cloud (VPC), security groups, and key pairs to enhance the security posture of their EC2 instances.
Pay-as-You-Go Pricing: EC2 follows a pay-as-you-go pricing model, where users pay only for the compute capacity they consume. This cost-effective approach allows businesses to optimize their expenses based on actual usage.
Instance Types in Amazon EC2
The versatility of Amazon EC2 stems from its extensive range of instance types, each tailored to meet specific performance and resource requirements. Instance types are categorized based on families, and within each family, there are different sizes or generations. Let's explore some of the prominent instance families:
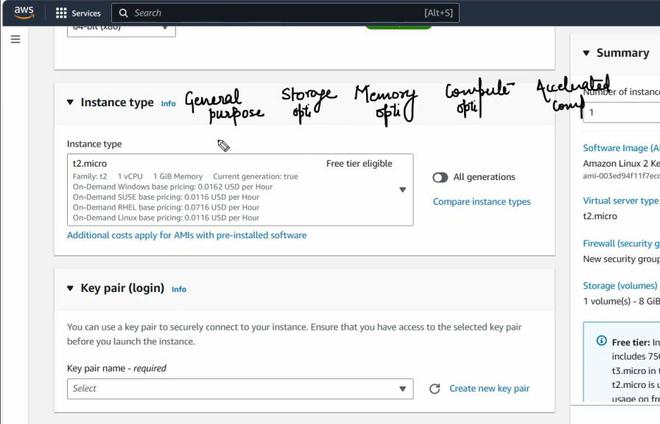
- General Purpose Instances (T3, T4g, M6g, M5, M5a, M5n, M5zn) : General-purpose instances are well-suited for a diverse set of applications, offering a balance of compute, memory, and networking resources. T3 instances, for example, are burstable performance instances, making them cost-effective for applications with variable workloads.
- Compute Optimized Instances (C7g, C6g, C5, C5a, C5n): Compute optimized instances are designed for compute-bound applications that require high-performance processors. These instances are ideal for tasks such as batch processing, scientific modeling, and high-performance computing.
- Memory Optimized Instances (R7a, R6g, R5, R5a, R5n, U4sg, X1e, U-6tb1.metal): Memory optimized instances are crafted for memory-intensive workloads, such as in-memory databases and real-time big data analytics. These instances provide a substantial amount of RAM to handle large datasets efficiently.
- Storage Optimized Instances (I3, I3en, D2, H1): Storage optimized instances are geared towards applications that demand high, sequential read and write access to very large data sets. Use cases include NoSQL databases, data warehousing, and distributed file systems.
- Accelerated Computing Instances (P4d, P3, Inf1, F1): Accelerated computing instances are equipped with specialized hardware, such as GPUs or FPGAs, to accelerate specific workloads like machine learning, graphics rendering, and video processing.
- Bare Metal Instances (i3.metal, i3en.metal): Bare metal instances provide direct access to the underlying hardware without virtualization. These instances are suitable for applications that require access to physical resources for performance optimization or compliance reasons.
Choosing the Right Instance Type
Selecting the appropriate EC2 instance type is a critical decision that depends on the specific requirements of your workload. Factors to consider include:
- Compute Power: Assess the CPU performance needed for your application.
- Memory Requirements: Choose an instance type with sufficient RAM for your workload.
- Storage: Consider the type and amount of storage required, as well as any specific performance characteristics.
- Network Performance: Evaluate the network bandwidth and latency requirements of your application.
- Cost Considerations: Optimize costs by choosing instances based on actual usage patterns.
Amazon EC2, with its broad spectrum of instance types, empowers users to tailor their computing resources to match the unique demands of their applications. Whether you're running a small web server or conducting complex machine learning tasks, EC2 provides the flexibility and scalability needed to thrive in the dynamic landscape of cloud computing.
Tenacy & Placment group:
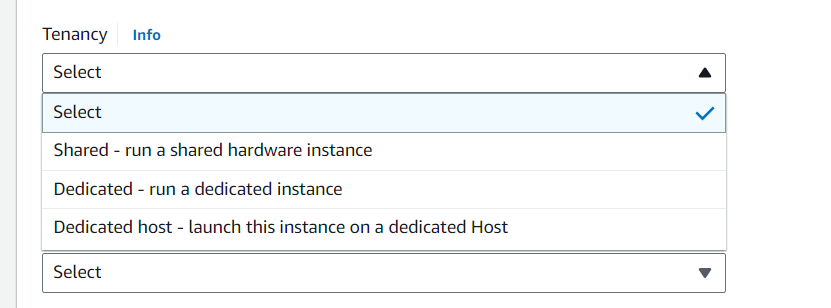
Tenancy in Amazon EC2 defines how instances are placed on the underlying physical hardware. It determines whether your instances share hardware with other AWS customers or run on dedicated infrastructure for compliance, licensing, or isolation requirements.
- Shared Tenancy: Instances run on shared hardware managed by AWS, offering cost efficiency and automatic scaling. This is the default option for most workloads.
- Dedicated Instances: Instances run on hardware dedicated to a single AWS account, providing isolation without giving visibility or control over the physical server.
- Dedicated Hosts: Physical servers are fully dedicated to your use, allowing you to bring your own licenses and gain visibility into socket, core, and host-level details.
Placement Groups allow you to influence how EC2 instances are physically placed within AWS data centers to optimize performance, availability, or fault tolerance.
- Cluster Placement Group: Places instances close together within a single Availability Zone to achieve low-latency and high-throughput networking, ideal for HPC and big data workloads.
- Spread Placement Group: Distributes instances across distinct hardware to reduce the risk of simultaneous failures, suitable for critical applications.
- Partition Placement Group: Divides instances into logical partitions, ensuring that failures in one partition do not affect others, commonly used in large distributed systems like HDFS or Cassandra.
Choosing the right combination of tenancy and placement group helps balance cost, performance, fault tolerance, and compliance requirements for EC2 workloads.
Steps to set up an EC2 instance:
Creating an EC2 instance on Amazon Web Services (AWS) involves several steps. Below is a step-by-step guide to help you set up an EC2 instance:
Step 1: Sign in to the AWS Management Console
- Navigate to the AWS Management Console.
- Sign in with your AWS account credentials.
Step 2: Access the EC2 Dashboard
- In the AWS Management Console, find the "Services" dropdown in the top left corner.
- Under "Compute," select "EC2" to access the EC2 Dashboard.
-(1)-660.jpg)
Step 3: Launch an Instance
- In the EC2 Dashboard, click the "Launch Instance" button.
-660.jpg)
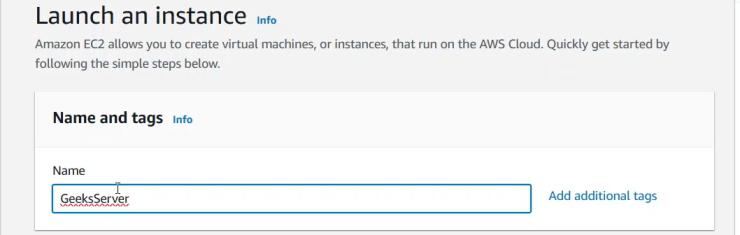
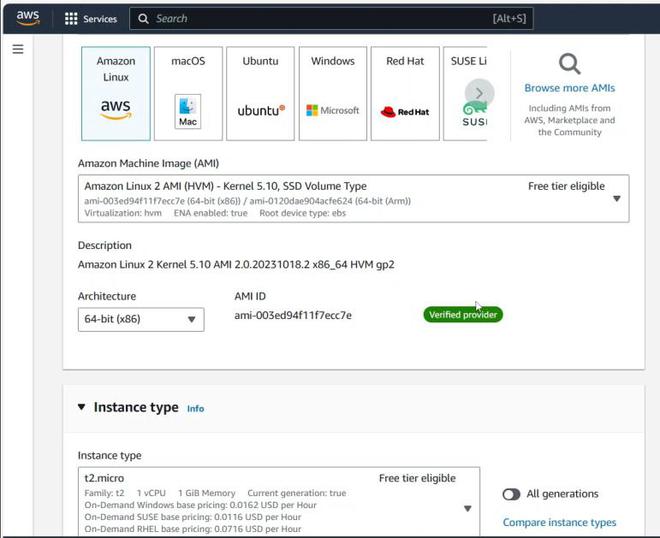
Step 4: Choose an Amazon Machine Image (AMI) and give name to your server
- Give name to your server , for example: GeeksServer
- Select an AMI, a pre-configured template for your virtual machine.
- Click the "Next: Configure Instance Details" button.
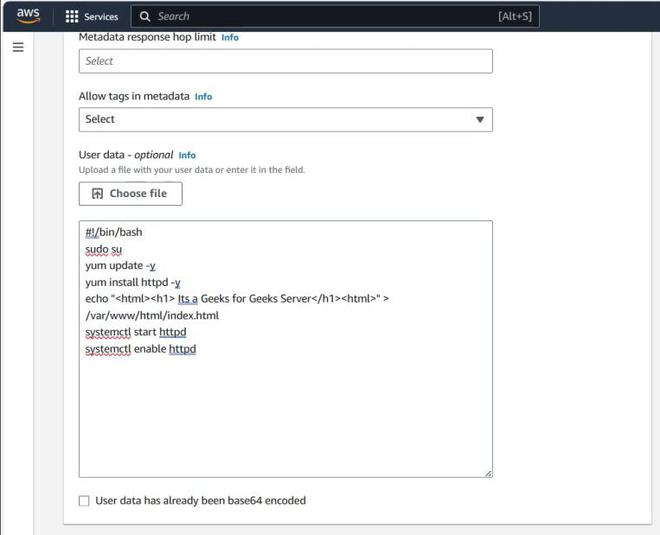
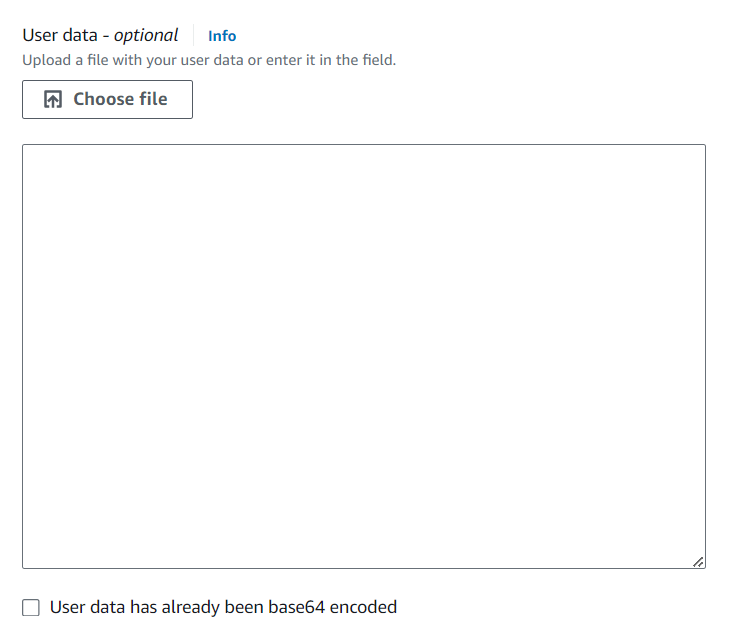
Step 5: Configure Instance Details with User Data
- In the "Configure Instance Details" section, scroll down to the "Advanced Details."
- In the "User data" field, enter initialization scripts or commands for custom configuration during instance launch.
- Click the "Next: Add Storage" button.
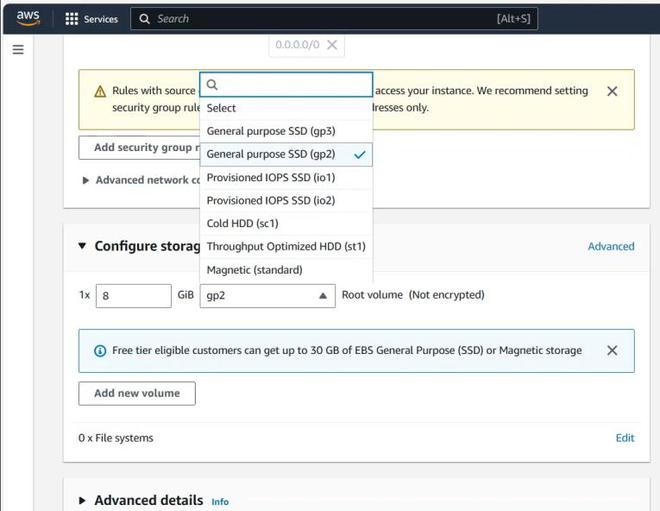
Step 6: Add Storage
- Specify the storage requirements for your instance, configuring the root volume and additional volumes as needed.
- Click the "Next: Add Tags" button.
Step 7: Add Tags (Optional)
- Add tags to your instance for better organization and management.
- Click the "Next: Configure Security Group" button.

Step 8: Configure Security Group
- Configure security groups to control inbound and outbound traffic.
- Click the "Review and Launch" button.
Step 9: Review and Launch
- Review your instance configuration.
- Click the "Launch" button.
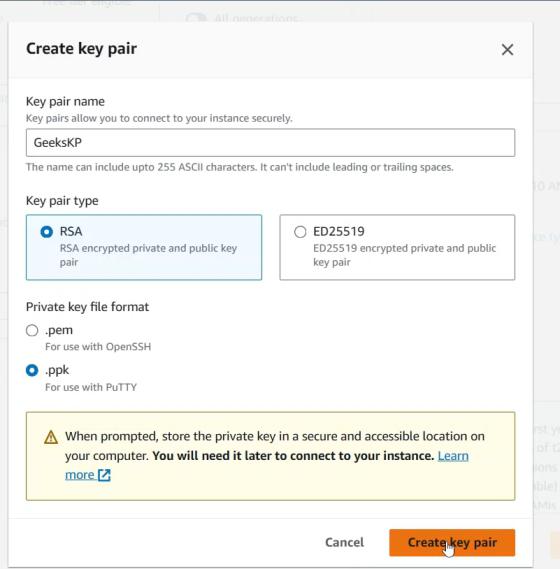
Step 10: Select Key Pair
- Choose an existing key pair or create a new one for secure instance access.
- Acknowledge that you have access to the selected key pair.
- Click the "Launch Instances" button.
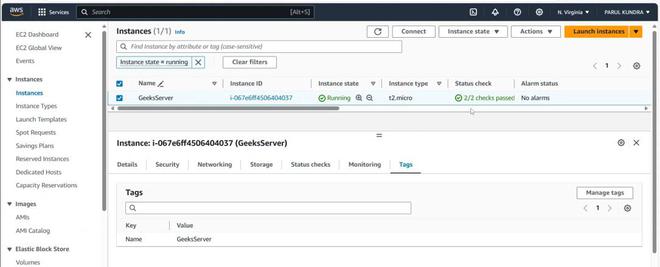
Step 11: View Instances
- Once launched, view your instances on the EC2 Dashboard.
- Wait for the instance status to change to "running" before connecting to it.
Step 12: Connect to Your Instance
- Select your instance on the EC2 Dashboard.
- Click the "Connect" button to get connection instructions.
Step 13: Access Your EC2 Instance
Use the provided connection instructions (SSH for Linux instances or RDP for Windows instances) to securely connect to your EC2 instance.
Congratulations! You have successfully created an EC2 instance on AWS, including user data for additional customization during the launch process. You can do some advance configuration as well while creating EC2 instance like:-
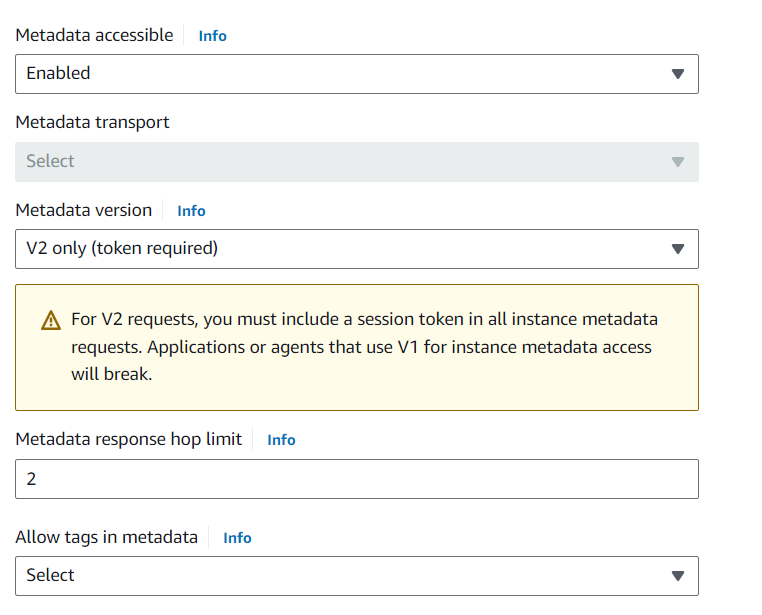
1. Advanced Details: Consider additional advanced details during the launch process, such as user data scripts and metadata. User data scripts allow you to execute commands or scripts on the instance at launch, automating configuration tasks. Metadata provides information about the instance, offering a dynamic way to retrieve details from within the instance.
2. Tenancy and Placement Groups:Tenancy options, including "Shared" or "Dedicated," impact the underlying hardware of your EC2 instance. Shared tenancy allows multiple instances to share physical hardware, while dedicated tenancy ensures that your instances run on isolated hardware. Placement groups enable you to influence the placement of instances to achieve low-latency, high-throughput communication.
3. Scripts and Metadata: Leverage user data scripts and instance metadata to enhance the functionality and configuration of your EC2 instances. Automation through scripts ensures consistency and repeatability in your deployment process, while metadata offers a dynamic way to retrieve instance-specific information.
Lab:
In this lab, we will delve into the next steps after successfully creating an EC2 instance on Amazon Web Services (AWS). We'll explore the installation and usage of PuTTY, a popular SSH client, and discuss the concept of Amazon Machine Image (AMI), along with creating an image of a server. Additionally, we'll touch upon the AMI catalog, providing a comprehensive understanding of these crucial aspects of AWS infrastructure.
Step 1: Installing and Using PuTTY
1.1 Install PuTTY:
- PuTTY is a widely used SSH and telnet client for Windows. Download the PuTTY installer from the official PuTTY website and follow the installation instructions.
1.2 Connect to Your EC2 Instance:
- Launch PuTTY and enter the public IP address of your EC2 instance.
- Configure the connection settings, specifying the key pair (.ppk) file for authentication.
- Click "Open" to establish an SSH connection to your EC2 instance.
1.3 Explore the Instance:
- Once connected, you have command-line access to your EC2 instance. Use this to explore the instance, install software, and perform necessary configurations.
Step 2: Understanding AMI and Creating an Image
2.1 AMI
- An Amazon Machine Image (AMI) is a pre-configured template used to create instances in the AWS environment. It contains information about the operating system, application server, and application.
2.2 Creating an AMI:
- Open the AWS Management Console and navigate to the EC2 Dashboard.
- Select the instance you want to create an AMI from.
- Right-click on the instance, choose "Create Image," and follow the prompts.
- Provide a name and description for the image.
- Click "Create Image" to initiate the AMI creation process.
2.3 Understanding AMI Lifecycle:
- During the AMI creation, the instance is temporarily stopped, and a snapshot of the root volume is taken to create the image.
- New instances can be launched from the AMI, preserving the configuration of the original instance.
Step 3: Exploring the AMI Catalog
3.1 AMI Catalog
- The AMI Catalog is a repository of AMIs available on AWS, consisting of both Amazon-provided and community-contributed AMIs.
- The catalog enables users to discover and use pre-configured images for various applications and operating systems.
3.2 Browsing the AMI Catalog:
- In the AWS Management Console, navigate to the EC2 Dashboard and click "AMIs" in the left navigation pane.
- Here, you can search for AMIs based on criteria such as region, owner, or specific keywords.
- Explore the available AMIs, understanding the diversity and versatility they offer.
