Creating a Custom Virtual Private Cloud (VPC) is often the first step in setting up a secure, production-ready environment on AWS. While the "Default VPC" is great for learning, it lacks the security isolation required for real-world applications.
In this guide, we will build a standard 3-Tier Network Architecture (Public & Private subnets across multiple Availability Zones) using the modern AWS console wizard.
Need yo Create a Custom VPC
The default VPC has public subnets only. This means every resource you launch gets a public IP address and is potentially reachable from the internet. A custom VPC allows you to:
- Isolate Resources: Put databases in private subnets with NO internet access.
- Network Control: Define your own IP ranges (CIDR blocks) to avoid conflicts with on-premises networks.
- Traffic Filtering: Use Route Tables and NACLs to control network traffic.
Prerequisites
Before clicking "Create," you need to pick an IP address range.
- Standard Choice: 10.0.0.0/16. This gives you 65,536 IP addresses (10.0.0.0 to 10.0.255.255).
- Avoid: 172.31.0.0/16 because it is commonly used by the Default VPC.
- Subnets: Smaller IP ranges can be created from the main CIDR block, such as `10.0.1.0/24` for a public subnet.
Best Practices for Creating a VPC
The following are some best practices for creating a VPC:
- Implement Encryption: Use encryption such as SSL/TLS to protect sensitive data and secure communication.
- Use Multiple Availability Zones: Create subnets in different Availability Zones to improve availability and reduce downtime.
- Regularly Backup: Performing regular backups for sensitive data that is stored in our VPC. This will ensure the data can be restored in case of deletion, corruption, or other issues.
- Limit Public Access: Keep databases and internal applications in private subnets without direct internet access.
- Use Security Groups & Network ACLs: Restrict inbound and outbound traffic to only what’s necessary.
How To Create Custom VPC in AWS: Easy Steps
Follow these steps to set up a custom VPC for your AWS environment:
Step 1: Login into to AWS account dashboard. To know how to create an AWS account free tier refer to Amazon Web Services (AWS) – Free Tier Account Set up.
Step 2: From the AWS Management Console, type VPC into the search bar and select VPC under the Networking & Content Delivery section.

Step 3: In the VPC dashboard, on the left-hand panel, click on Your VPCs and then click the Create VPC button.

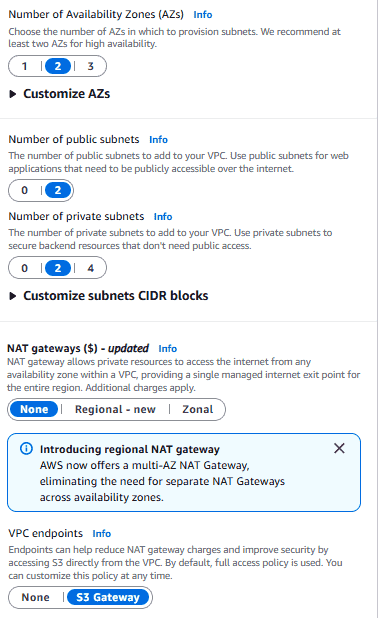
Step 4:
- For Resources to create, choose VPC and more
- For Name tag auto-generation, enter any name you like for example: "Nitin-vpc"
- IPv4 CIDR Block: Enter an IP range for your VPC. A common CIDR block for a VPC is 10.0.0.0/16, which provides 65,536 IP addresses.

- For Availability Zones (AZs), choose 2.
- For the Number of public subnets, choose 2.
- For the Number of private subnets, choose 2.
- For NAT gateways, choose none
- For VPC endpoints, choose S3 gateway
Step 5: AWS will show a diagram preview of your VPC configuration. Review it to ensure that your subnets, CIDR blocks, and settings align with your requirements.
.png)
Step 6: After configuring all the options, click Create VPC. AWS will begin creating your custom VPC, which might take a minute or two.
Step 7: Once the creation process is complete, click on View VPC to review your settings and make any necessary changes.

Best Practices After Creation
1. Enable Flow Logs:
- Go to your VPC -> Flow Logs tab -> Create flow log.
- Send logs to CloudWatch. This is critical for troubleshooting connection issues later.
2. Tagging: Ensure all resources (Subnets, Route Tables) are tagged correctly so you know which is Public and which is Private.
3. Network ACLs: Leave the default Network ACL (Allow All) unless you have a specific security requirement. Use Security Groups on your instances for firewalling instead.
