If you need to run PowerShell x86 in Visual Studio Code, this guide will help you set up your PowerShell x86 configuration in VS Code. Despite Visual Studio Code being a 64-bit application, you can still execute PowerShell x86 in VS Code to ensure compatibility with 32-bit scripts or modules. We'll walk you through the steps to configure and run 32-bit PowerShell in VS Code, so you can seamlessly integrate and utilize PowerShell x86 in VS Code.
Table of Content
- Powershell x86 vs. Powershell x64
- How to Run Powershell x86 Inside Visual Studio Code x64?
- Step 1: Open Powershell as Administrator
- Step 2: Update Powershell Using Command
- Step 3: Open the Search Bar in Visual Studio Code
- Step 4: Open Default Terminal Profile Settings
- Step 5: Select Powershell x86 as Default
- Step 6: Check if Powershell is Default
- How to Run Powershell x86 Inside Visual Studio Code x64 - FAQs
Powershell x86 vs. Powershell x64
Powershell x86 is your 32-bit version of the original Powershell, there would be very limited cases where you would need 32-bit over 64. Maybe if you were running server 2008 32-bit OS. the PowerShell x86 version can be described as the 32-bit version of the PowerShell, there are rare cases in which you may have to run this version of the PowerShell instead of the usual x64 version such as if you are running the windows server edition of 2008 on the 32-bit operating system or some other similar case.
Running the x86 version instead of the PowerShell x64 is a bit tough because there are not many guides available on how we can do that so it is important to understand how we can do this in case any 32-bit server edition-based operating system requires this approach.
How to Run Powershell x86 Inside Visual Studio Code x64?
To run the PowerPoint x86 inside the virtual studio code x64 we will first update the PowerShell to the latest version and then do some configuration inside the visual studio code so that it loads the Powershell x86 as the default version whenever we execute the code, following are the steps we need to take:
Step 1: Open Powershell as Administrator
We need to update the PowerShell to the latest version available, for this go to the start menu and open the PowerShell by clicking on "Run As Administrator"

Step 2: Update Powershell Using Command
To update the PowerShell to the latest version available we use the following command:
winget install --id Microsoft.PowerShell --source wingetNote: Make sure you have active internet connection as this step requires downloading the latest version.
This command will give us the following output:

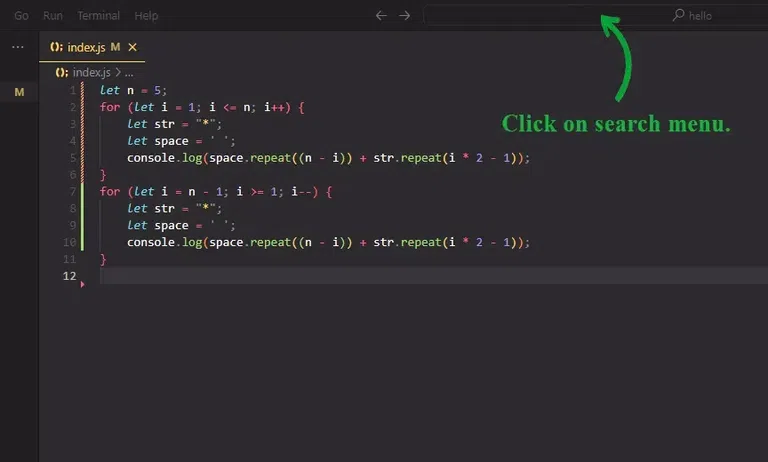
Step 3: Open the Search Bar in Visual Studio Code
This step requires opening the search bar in the top corner, simply click on the search bar that says "hello" and it will allow you to type your required settings.
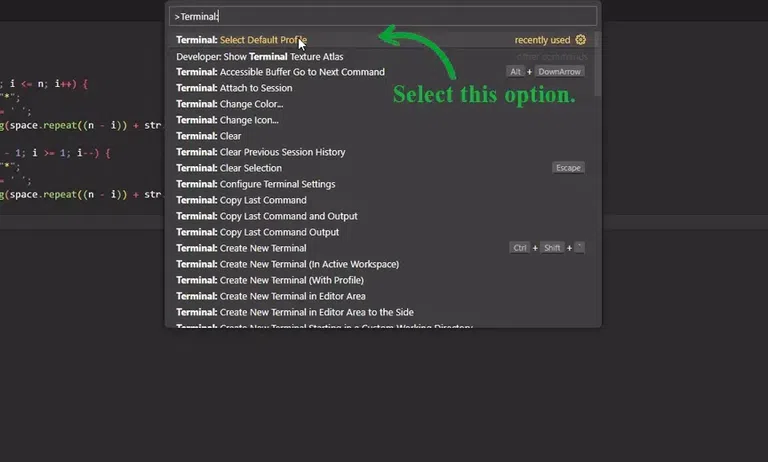
Step 4: Open Default Terminal Profile Settings
Type the following command in the search bar and select the option from the menu:
>Terminal: Select Default Profile(as described in the image below)
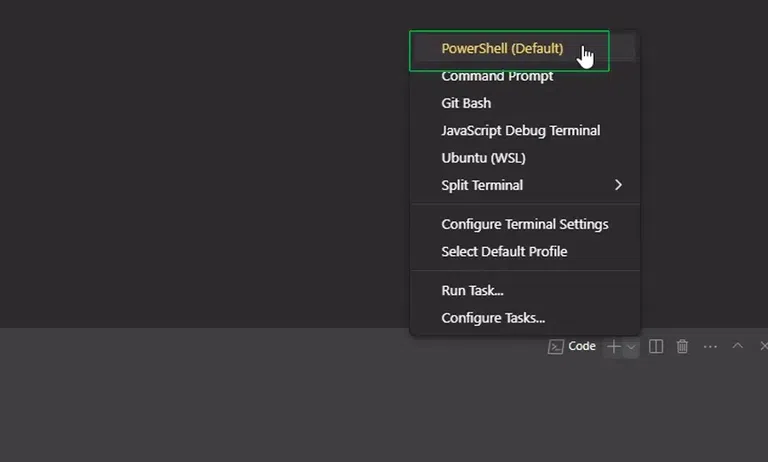
Step 5: Select Powershell x86 as Default
After completing the above step click on the option that says PowerShell x86 in its path (in my case it is in the first option but in yours, it can be 2nd or 3rd option)

Step 6: Check if Powershell is Default
We will check whether the setting we just made has been applied or not, for this go to terminal > new terminal or simply type Ctrl + ` [backtick] to open the terminal window, then click on the + icon and make sure that PowerShell is set to default.
Conclusion
Configuring PowerShell x86 in Visual Studio Code can streamline your workflow and ensure compatibility with various scripts. By following the steps outlined to run PowerShell x86 in Visual Studio Code, you'll be able to effectively manage and execute your 32-bit PowerShell commands within the 64-bit environment of VS Code. This setup not only enhances productivity but also ensures that your development environment supports a broader range of tools and scripts.
