EasyUI is an HTML5 framework for using user interface components based on jQuery, React, Angular, and Vue technologies. It helps in building features for interactive web and mobile applications saving a lot of time for developers.
In this article, we will learn how to design a textbox using jQuery EasyUI. The textbox is used to input text in a form.
Downloads for EasyUI for jQuery:
https://www.jeasyui.com/download/index.php
Syntax:
<input class="easyui-textbox">
Properties:
- width: The width of the component.
- height: The height of the component.
- cls: Add a CSS class to the textbox.
- prompt: The prompt message to be displayed in the input box.
- value: The default value.
- type: The textbox type.
- label: The label selector bound to the textbox.
- labelWidth: The label width.
- labelPosition: The label position.
- labelAlign: The label alignment.
- multiline: It defines a multiline textbox.
- editable: It defines if the user can type text directly into the field.
- disabled: It defines if the field needs to be disabled.
- readonly: It defines if the component is read-only.
- icons: The icons attached to the textbox.
- iconCls: The background icon displayed on the textbox.
- iconAlign: It defines the position of the icons.
- iconWidth: The icon width.
- buttonText: The displaying text of the button that is attached to the textbox.
- buttonIcon: The displaying icon of the button that is attached to the textbox.
- buttonAlign: Position of the button.
Events:
- onChange: This event fires when the field value is changed.
- onResize: This event fires when the textbox is resized.
- onClickButton: This event fires when the user clicks the button.
- onClickIcon: This event fires when the user clicks on an icon.
Methods:
- options: Return the options object.
- textbox: Return the textbox object.
- button: Return the button object.
- destroy: Destroy the textbox component.
- resize: Resize the component width.
- disable: Disable the component.
- enable: Enable the component.
- readonly: Enable/Disable read only mode.
- clear: Clear the component value.
- reset: Reset the component value.
- initValue: Initialize the component value.
- setText: Set the displaying text value.
- getText: Get the displaying text value.
- setValue: Set the component value.
- getValue: Get the component value.
- getIcon: Get specified icon object.
Approach:
- First, add jQuery Easy UI scripts needed for your project.
<script type="text/javascript" src="jquery.min.js"></script>
<!--jQuery libraries of EasyUI -->
<script type="text/javascript" src="jquery.easyui.min.js"> </script>
<!--jQuery library of EasyUI Mobile -->
<script type="text/javascript" src="jquery.easyui.mobile.js"> </script>
Example:
<!doctype html>
<html>

<head>
    <meta charset="UTF-8">
    <meta name="viewport" content="initial-scale=1.0,
        maximum-scale=1.0, user-scalable=no">

    <!-- EasyUI specific stylesheets-->
    <link rel="stylesheet" type="text/css"
        href="themes/metro/easyui.css">

    <link rel="stylesheet" type="text/css"
        href="themes/mobile.css">

    <link rel="stylesheet" type="text/css"
        href="themes/icon.css">

    <!--jQuery library -->
    <script type="text/javascript" src="jquery.min.js">
    </script>

    <!--jQuery libraries of EasyUI -->
    <script type="text/javascript"
        src="jquery.easyui.min.js">
    </script>

    <!--jQuery library of EasyUI Mobile -->
    <script type="text/javascript"
        src="jquery.easyui.mobile.js">
    </script>

<script type="text/javascript">
  $(document).ready(function (){
      $('#gfg').textbox({
          buttonText:'Search'
      });
  });
    </script>
</head>

<body>

    <h1>GeeksforGeeks</h1>
    <h3>EasyUI jQuery textbox widget</h3>

  Enter name : <input id="gfg" class="easyui-textbox">

</body>
</html>
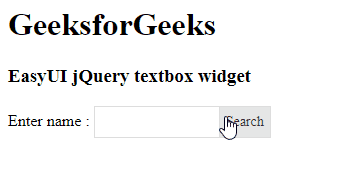
Output:
Reference: http://www.jeasyui.com/documentation/
