WebSocket is a full-duplex protocol that enables real-time, bidirectional communication between client and server. Unlike HTTP's request-response model, it allows continuous data exchange without repeated client requests.
Working of Websocket
- Client sends an HTTP request with an Upgrade: websocket header
- Server responds with 101 Switching Protocols if accepted
- Connection upgrades from HTTP to WebSocket
- Client and server can now send data simultaneously (full-duplex)
- Either side can close the connection, releasing resources
Setting Up FastAPI for WebSocket Communication
This example creates a simple app that establishes a WebSocket connection and sends messages from the server to the client every second. FastAPI’s WebSocket class handles connections and enables sending and receiving messages.
Installing Websocket
Install WebSocket's using the below command:
pip install websockets
For defining the Websocket endpoint in your fastAPI application you can use the below code:
@app.websocket("/ws")
async def websocket_endpoint(websocket: WebSocket):
The "/ws" WebSocket endpoint is defined in the application. The handler accepts a WebSocket parameter to manage the connection.
Example: Create a folder named gfg_websockets and copy paste the below code:
from fastapi.templating import Jinja2Templates
from fastapi.responses import HTMLResponse
from fastapi import FastAPI, WebSocket, Request

app = FastAPI()
templates = Jinja2Templates(directory="templates")

@app.get("/", response_class=HTMLResponse)
def read_index(request: Request):
    # Render the HTML template
    return templates.TemplateResponse("index.html", {"request" : request})

@app.websocket("/ws")
async def websocket_endpoint(websocket: WebSocket):
    await websocket.accept()
    while True:
        data = await websocket.receive_text()
        await websocket.send_text(data)
This uses Jinja templates to serve HTML. The / endpoint returns index.html, while /ws establishes a WebSocket connection. The handler accepts the connection, receives data from the client and sends the response back over the same connection.
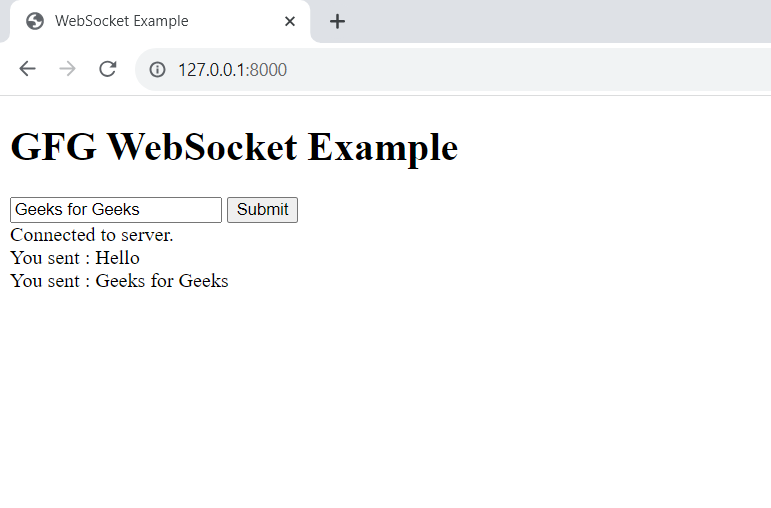
index.html: This HTML page is used to view the messages send by the client to the server.
<!DOCTYPE html>
<html lang="en">
<head>
    <meta charset="UTF-8">
    <meta name="viewport" content="width=device-width, initial-scale=1.0">
    <title>WebSocket Example</title>
</head>
<body>
    <h1>GFG WebSocket Example</h1>
    <input type="text" id="inputText" placeholder="Type something...">
    <button id="submitButton">Submit</button>
    <div id="container"></div>

    <script>
        // Create a WebSocket connection to the server
        const socket = new WebSocket('ws://127.0.0.1:8000/ws');

        // Function to display messages on the web page
        function showMessage(message) {
            const messageContainer = document.getElementById('container');
            const messageElement = document.createElement('div');
            messageElement.textContent = message;
            messageContainer.appendChild(messageElement);
        }

        // Event handler for when the connection is established
        socket.addEventListener('open', (event) => {
            showMessage('Connected to server.');
        });

        // Event handler for receiving messages from the server
        socket.onmessage = (event) => {
            showMessage("You sent : " + event.data)
        }

        // Event handler for when the connection is closed
        socket.addEventListener('close', (event) => {
            showMessage('Connection closed.');
        });

        const inputText = document.getElementById("inputText");
        const submitButton = document.getElementById("submitButton");

        submitButton.addEventListener("click", function() {
            const inputValue = inputText.value;
            socket.send(inputValue)
        });

    </script>
</body>
</html>
Deployment of the Project
When the client loads index.html, JavaScript runs and establishes a WebSocket connection with the server.
const socket = new WebSocket('ws://127.0.0.1:8000/ws');
Then this socket is used to send and receive messages from the server. To run the fastAPI server using uvicorn, use below command:
python -m uvicorn app:app --reload
Server:
.jpg)
Client:
Video Output:
