In React, events represent user actions such as clicking a button, typing in a field, or moving the mouse. These actions are managed through React’s built-in event system.
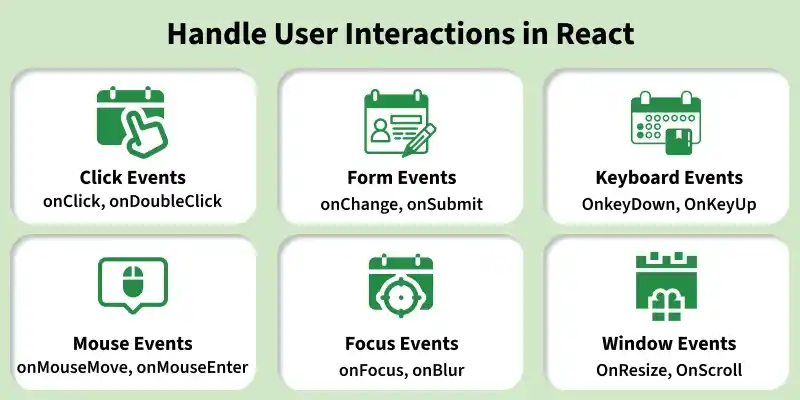
- Event handlers like onClick and onChange are used to capture user interactions in the interface.
- The onSubmit event helps handle form submissions and control their behavior
/*App.css*/

.App {
    text-align: center;
    margin-top: 50px;
    font-family: Arial, sans-serif;
}

h1 {
    color: #4CAF50;
    font-size: 2.5rem;
    margin-bottom: 20px;
}

h2 {
    font-size: 1.5rem;
    color: #333;
}

.input-field {
    padding: 10px;
    font-size: 16px;
    width: 250px;
    margin: 20px 0;
    border: 2px solid #ddd;
    border-radius: 5px;
    outline: none;
    transition: border 0.3s ease;
}

.input-field:focus {
    border-color: #4CAF50;
}

.save-button {
    padding: 10px 20px;
    font-size: 16px;
    background-color: #4CAF50;
    color: white;
    border: none;
    border-radius: 5px;
    cursor: pointer;
    transition: background-color 0.3s ease;
}

.save-button:hover {
    background-color: #45a049;
}

.save-button:active {
    background-color: #388e3c;
}
//App.js

import "./App.css";
import { useState } from "react";

function App() {
    const [inp, setINP] = useState("");
    const [name, setName] = useState("");

    const clk = () => {
        setName(inp);
        setINP("");
    };

    return (
        <div className="App">
            <h1>GeeksforGeeks</h1>
            {name ? <h2>Your Name: {name}</h2> : null}
            <input
                type="text"
                placeholder="Enter your name..."
                onChange={(e) => setINP(e.target.value)}
                value={inp}
            />
            <button onClick={clk}>Save</button>
        </div>
    );
}

export default App;
Output:
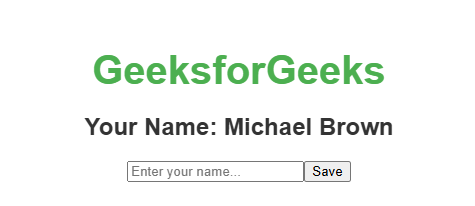
- useState manages inp for input and name for the saved value.
- onChange updates inp while typing.
- "Save" stores inp in name and clears the field.
- The name is displayed only after it is saved.
Syntax:
<element onEvent={handlerFunction} />- element: The JSX element where the event is triggered (e.g., <button>, <input>, etc.).
- onEvent: The event name in camelCase (e.g., onClick, onChange).
- handlerFunction: The function that handles the event when it occurs.
React Event Handlers
- onClick: Mouse clicks in the user interface are detected using the onClick event.
- onChange: Any change in an input field within the user interface is captured through the onChange event.
- onSubmit: Form submission in the user interface is handled by the onSubmit event, which is also used to stop the default form behavior.
- onKeyDown: When a user presses any key on the keyboard, the onKeyDown event gets triggered.
- onKeyUp: Releasing a key on the keyboard activates the onKeyUp event.
- onMouseEnter: When the mouse enters the boundary of an element, the onMouseEnter event is fired.
Handling Events in React
Event handling in React allows applications to respond to user actions such as clicks, typing, and form submissions by connecting events with component logic.
1. Adding Event Handlers
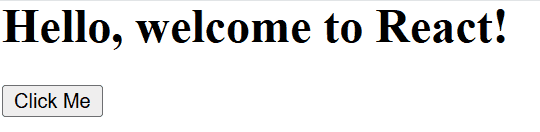
In React, event handlers are added directly to elements via JSX attributes. React uses the camelCase convention for event names, which differs from the standard HTML event names (e.g., onClick instead of onclick).
import React, { Component } from 'react';

class App extends Component {
    constructor(props) {
        super(props);
        this.state = {
            message: 'Hello, welcome to React!',
        };

        this.handleClick = this.handleClick.bind(this);
    }


    handleClick() {

        this.setState({
            message: 'You clicked the button!',
        });
    }

    render() {
        return (
            <div>
                <h1>{this.state.message}</h1>
                {/* Add event handler to the button */}
                <button onClick={this.handleClick}>Click Me</button>
            </div>
        );
    }
}

export default App;
Output:
2. Reading Props in Event Handlers
In React, event handlers often need access to the props passed from parent components. This is useful when the event handler needs to perform actions based on the data provided via props.
body {
    margin: 0;
    padding: 0;
    display: flex;
    align-items: flex-start;
    height: 100vh;
    background-color: #f0f0f0;
}

.parent-container {
    text-align: center;
}

.child-container {
    display: inline-block;
    margin-top: 20px;
    padding: 20px;
    background-color: #fff;
    border: 1px solid #ddd;
    box-shadow: 0 4px 8px rgba(0, 0, 0, 0.1);
}

button {
    padding: 10px 20px;
    background-color: #007BFF;
    color: white;
    border: none;
    cursor: pointer;
    font-size: 16px;
}

button:hover {
    background-color: #0056b3;
}
import React, { Component } from 'react';
import Child from './Child';
import './App.css';

class Parent extends Component {
    render() {
        return (
            <div className="parent-container">
                <h1>Parent Component</h1>
                <Child greeting="Hello from Parent!" />
            </div>
        );
    }
}

export default Parent;
import React, { Component } from 'react';

class Child extends Component {
    handleClick = () => {
        alert(this.props.greeting);
    };

    render() {
        return (
            <div className="child-container">
                <h2>Child Component</h2>
                <button onClick={this.handleClick}>Click to See Greeting</button>
            </div>
        );
    }
}

export default Child;
Output:
3. Passing Event Handlers as Props
Event handlers can be passed down to child components as props. This allows child components to communicate back to the parent and trigger actions in the parent when events occur.
import React, { Component } from 'react';
import Child from './Child';

class Parent extends Component {

    handleClick = () => {
        alert("Button clicked in Child component!");
    };

    render() {
        const containerStyle = {
            display: "flex",
            justifyContent: "center",
            alignItems: "flex-start",
            height: "100vh",
            margin: "0",
        };

        return (
            <div style={containerStyle}>
                <div>
                    <h1>Parent Component</h1>
                    {/* Passing the event handler as a prop to the Child component */}
                    <Child onClickHandler={this.handleClick} />
                </div>
            </div>
        );
    }
}

export default Parent;
import React from 'react';

function Child({ onClickHandler }) {
    const buttonStyle = {
        padding: "12px 24px",
        fontSize: "16px",
        color: "white",
        backgroundColor: "#007bff",
        border: "none",
        borderRadius: "4px",
        cursor: "pointer",
        transition: "background-color 0.3s",
    };

    const buttonHoverStyle = {
        backgroundColor: "#0056b3",
    };

    return (
        <div>
            <h2>Child Component</h2>
            {/* Button to call the event handler */}
            <button
                onClick={onClickHandler}
                style={buttonStyle}
                onMouseOver={(e) => (e.target.style.backgroundColor = buttonHoverStyle.backgroundColor)}
                onMouseOut={(e) => (e.target.style.backgroundColor = "#007bff")}
            >
                Click Me!
            </button>
        </div>
    );
}

export default Child;
Output:
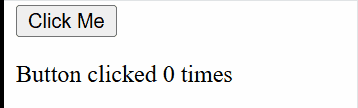
4. Naming Event Handler Props
In React, it’s common to name event handler props according to the event being handled. This helps in maintaining clarity and consistency in your codebase.
import React from "react";

function Button({ onClickHandler }) {
    return <button onClick={onClickHandler}>Click Me</button>;
}

function Parent() {
    const handleClick = () => {
        alert("Button clicked!");
    };

    return <Button onClickHandler={handleClick} />;
}

export default Parent;
Output:
Event Propagation in React
In React, event propagation describes how an event moves through elements after it is triggered on a specific target. This movement helps parent components respond to child events.
- By default, React follows the bubbling phase, where events travel from the target element to its parent elements.
- Event propagation can be controlled or stopped to prevent it from moving to ancestor elements.
import React from "react";

function Child() {
    const handleClick = (event) => {
        event.stopPropagation();
        alert("Child button clicked");
    };

    return <button onClick={handleClick}>Child Button</button>;
}

function Parent() {
    const handleClick = () => {
        alert("Parent div clicked");
    };

    return (
        <div
            onClick={handleClick}
            style={{ padding: "50px", backgroundColor: "lightgray" }}
        >
            <Child />
        </div>
    );
}

export default Parent;
Output:
Preventing Default Behavior in React Events
In React, event.preventDefault() stops the browser from performing its default action when an event occurs. It allows events to be handled in a custom way.
- It prevents actions like form submission or page reload.
- It gives full control over how the event should behave.
import React, { useState } from "react";

function SimpleForm() {
    const [name, setName] = useState("");

    const handleSubmit = (event) => {
        event.preventDefault();
        alert(`Form submitted with name: ${name}`);
    };

    return (
        <div style={styles.container}>
            <form onSubmit={handleSubmit} style={styles.form}>
                <input
                    type="text"
                    value={name}
                    onChange={(e) => setName(e.target.value)}
                    placeholder="Enter your name"
                    style={styles.input}
                />
                <button type="submit" style={styles.button}>
                    Submit
                </button>
            </form>
        </div>
    );
}

const styles = {
    container: {
        display: "flex",
        justifyContent: "center",
        alignItems: "flex-start", // Align items at the top
        height: "100vh", // Full viewport height
        backgroundColor: "#f0f0f0",
        paddingTop: "50px", // Added padding to center it towards top
    },
    form: {
        textAlign: "center",
        padding: "20px",
        backgroundColor: "white",
        borderRadius: "5px",
        boxShadow: "0 4px 8px rgba(0, 0, 0, 0.1)",
    },
    input: {
        padding: "10px",
        fontSize: "16px",
        marginBottom: "10px",
        borderRadius: "4px",
        border: "1px solid #ccc",
        width: "200px",
    },
    button: {
        padding: "10px 20px",
        fontSize: "16px",
        borderRadius: "4px",
        border: "1px solid #ccc",
        backgroundColor: "#4CAF50",
        color: "white",
        cursor: "pointer",
        marginTop: "20px",
    },
};

export default SimpleForm;
Output:
HTML DOM vs React DOM
Here are some differences between HTML DOM and React DOM:
HTML DOM | React DOM |
|---|---|
HTML DOM represents the structure of the HTML document. | React DOM represents the virtual representation of the UI. |
Updates the actual DOM directly after every change. | Updates the virtual DOM first, then selectively updates the real DOM. |
Can lead to performance issues with frequent direct updates | Optimized performance using a virtual DOM and efficient reconciliation. |
Requires a full re-render of the page or element. | Events are attached to the virtual DOM and handled by React’s synthetic event system. |
Events are directly attached to DOM elements. | React uses state and props to manage and bind data between components. |
The DOM is a tree structure where each element is a node. | React DOM uses a virtual DOM, a lightweight copy of the real DOM for efficient updates. |
