Using bullet lists in Google Docs is an effective way to organize information and present content in a clean and structured format. Whether you're creating notes, drafting documents, or preparing presentations, bullet lists can make your content more readable and impactful. Adding these lists in Google Docs is straightforward, but many users may not know the specific steps for their device or how to troubleshoot common issues.
This guide walks you through the benefits of using bullet lists in Google Docs and provides detailed, step-by-step instructions for adding them on computers, Android devices, and iPhones/iPads. Additionally, we'll address common issues you might encounter while working with bullet lists.

Table of Content
Benefits of Bullet Lists in Google Docs
- Easy to Read: Breaks up text for quick understanding.
- Organized: Helps group ideas clearly.
- Looks Good: Adds a clean, professional touch.
- Saves Time: Automatically formats lists for you.
- Customizable: Change styles and indents as needed.
- Works Anywhere: Use on desktop, Android, or iPhone easily.
How to Add Bullet List in Google Docs on a Computer(Pc/Mac)
Adding a bullet list in Google Docs on your computer is quick and easy. Follow these steps to organize your content and make your document look neat and professional. You can use the toolbar or a keyboard shortcut for even faster formatting. Here’s how to do it:
Step 1: Open Your Google Doc
On your computer, open the Google Docs document where you want to add the bullet list.
Step 2: Click Where You Want the List
Click on the spot in the document where you want to begin your bullet list.

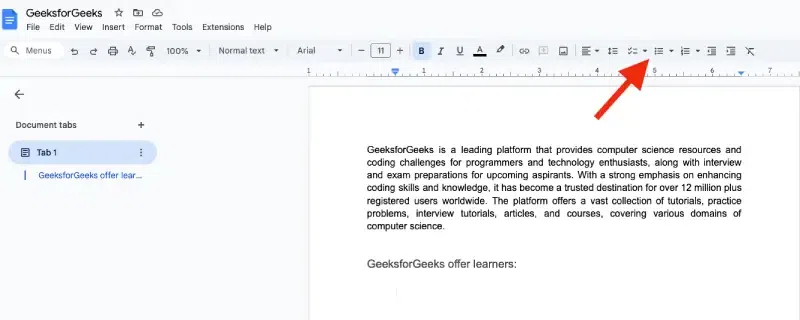
Step 3: Choose Bullet List from the Toolbar
In the toolbar at the top, look for the bullet list icon (a little dot with lines next to it).
Keyboard shortcuts for Google Docs - Computer
Press Ctrl + Shift + 8 (Windows) or Command + Shift + 8 (Mac) to quickly add a bullet list.If you can't find it, click on More (three dots) to see additional options.
Step 4: Start Typing Your List
Type your first item and press Enter to add the next bullet point. Google Docs will automatically add a new bullet for you.
Add More Items: Keep typing and press Enter after each item to add more bullets.

Step 5: Optional - Change Bullet Style
If you want to change the bullet style, click the dropdown arrow next to the bullet list icon and select a different style.
How to Add a Bullet List in Google Docs on Android
Adding a bullet list in Google Docs on Android is quick and easy. Follow these simple steps:
Step 1: Open the Google Docs App
Open your Google Docs app and select the document where you want to add a bullet list.
Step 2: Tap Where You Want the List
Tap the area in your document where you'd like the bullet list to start.
Step 3: Open the Format Menu
At the top, tap Format (the paintbrush icon).
Step 4: Select Bullet List
Choose Bulleted list from the options.
Add Items: Start typing your list. When you press Enter, a new bullet point will appear.
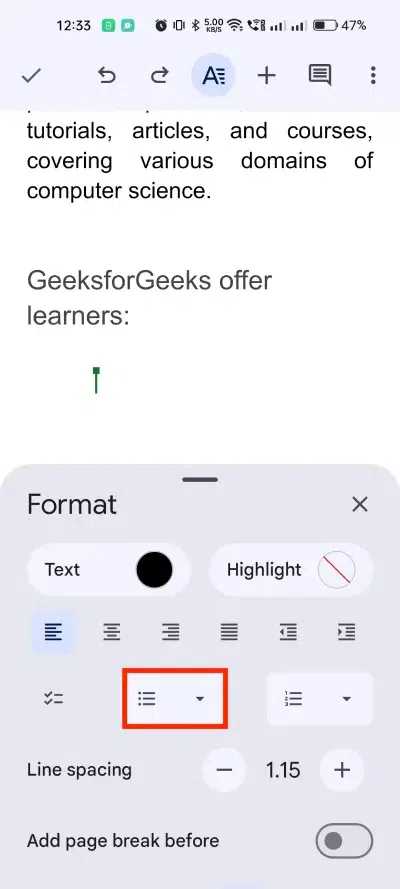
Step 5: Change Bullet Style (Optional)
To change the style, tap the Right arrow next to the list type and pick a new bullet style.

How to Add a Bullet List in Google Docs on iPhone & iPad
Adding a bullet list in Google Docs on your iPhone or iPad is easy. Follow these steps:
Step 1: Open the Google Docs App
Open the Google Docs app on your iPhone or iPad and select your document and click pencil icon to start editing.

Step 2: Tap Where You Want the List
Tap on the area where you want to insert your bullet list.
Step 3: Go to Format
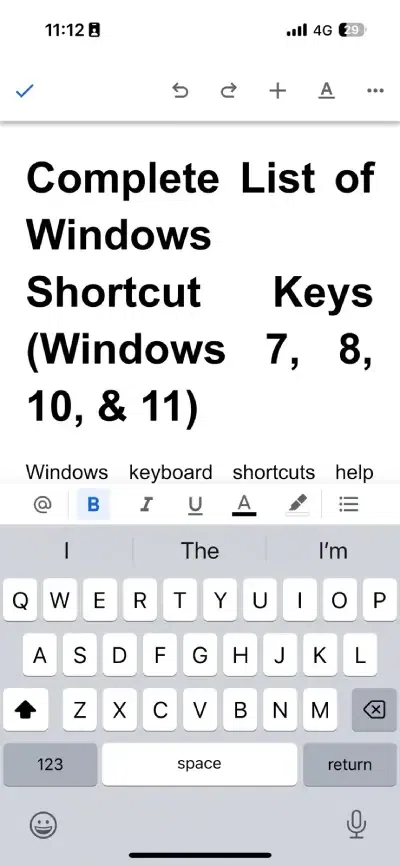
At the top, tap Format (the paintbrush icon), then select Paragraph.

Step 4: Select Bullet List
Choose Bulleted list from the list of options.
Add Items: Start typing your first item and press Enter to add the next bullet.

Or you can directly choose bullet list format from the toolbar in bottom right:
Step 5: Change Bullet Style (Optional)
To change the bullet style, tap the Right arrow and choose the style you prefer.
Tips:
- Indenting Your List: If you want to make sub-lists, you can indent your bullets. On the computer, press Tab to indent. On Android or iPhone, you can use the Increase indent option in the menu.
- Removing Bullet Points: To stop using bullet points, press Enter twice to leave a line without a bullet.
Common Issues with Google Docs Bulleted Lists
- Bullet List Icon Missing: If the bullet list icon isn’t visible in the toolbar, click the More (three dots) button to expand additional options or go to Format > Bullets & Numbering to access it.
- Keyboard Shortcut Not Working: Ensure you're using the correct shortcut:
Windows:Ctrl + Shift + 8
Mac:Command + Shift + 8
If it still doesn’t work, check your keyboard layout or try enabling shortcuts in Tools > Preferences.
- Bullets Not Appearing: Highlight the text you want to format and click the Bulleted List icon again. Ensure the selected text isn’t within a table or pre-formatted layout that might block bullet styles.
- Can't Change Bullet Style: If the dropdown for changing bullet styles isn’t working, refresh the page or try a different browser. Ensure your Google Docs app or browser is updated to the latest version.
- Misaligned or Indented Bullets: Use the Decrease Indent or Increase Indent buttons to adjust the alignment. Pressing
Tabcan also indent a sub-bullet, andShift + Tabmoves it back. - Formatting Issues on Mobile: If formatting is unresponsive on mobile, try switching to desktop mode or check your internet connection. Restarting the app can also resolve common issues.
- Bullets Printing Incorrectly: Preview your document by selecting File > Print Preview to ensure the bullets appear as intended. Adjust margins or use a different printer setting if bullets are cut off.
These tips should help you quickly resolve common issues when adding or formatting bullet lists in Google Docs.
Conclusion
Adding bullet lists in Google Docs helps you present information effectively, regardless of the device you're using. With the steps outlined for computers, Android devices, and iPhones/iPads, you'll be able to create professional and organized content with ease. If you encounter any challenges, refer to the troubleshooting tips to resolve issues and keep your documents looking polished.
Also Read:
