


Although the Raspberry Pi boards can fit within the palm of your hands, these tiny SBCs pack enough horsepower to run a plethora of games. While you shouldn't expect an ARM-based Raspberry Pi to run graphically demanding games that can tax even the most cutting-edge PCs, they're quite capable when it comes to emulating games.
For those unaware, an emulator is a tool that allows a device to mimic the functionality of another system. Typically used for retro gaming, emulation lets users run games that don't have official ports on modern hardware. If you're new to emulation or aren't familiar with the Raspberry Pi ecosystem, installing emulators and adding ROMs can seem rather intimidating. Here's a detailed guide on how to make an all-in-one emulation device out of your Raspberry Pi!
All the components you’ll need
A Raspberry Pi board will serve as the heart of the project. While I’ve used a Raspberry Pi 5 for this guide, you don’t necessarily need its extra processing power. In fact, you can run simple 2D games designed for older systems on a cheap Raspberry Pi Zero model.
Since you’ll most likely store all the games, emulators, and BIOS files on the microSD card, it’s possible to run out of space pretty soon. That's why I recommend getting a fast microSD card with at least 32GB storage capacity.
-
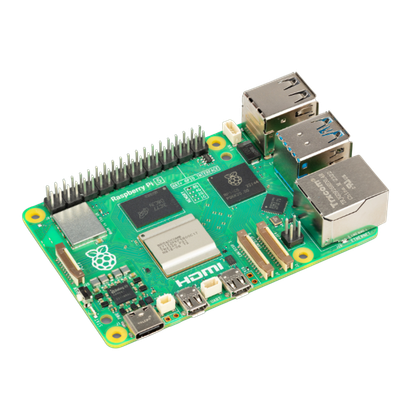
Raspberry Pi 5
- CPU
- Arm Cortex-A76 (quad-core, 2.4GHz)
- Memory
- Up to 8GB LPDDR4X SDRAM
- Operating System
- Raspberry Pi OS (official)
- Ports
- 2× USB 3.0, 2× USB 2.0, Ethernet, 2x micro HDMI, 2× 4-lane MIPI transceivers, PCIe Gen 2.0 interface, USB-C, 40-pin GPIO header
- GPU
- VideoCore VII
- Starting Price
- $60
The Raspberry Pi is back, and the fifth iteration of the SBC is a lot more capable than the older models. From a new quad-core Arm Cortex-A76 CPU, support for dual monitor setups at 4K 60Hz, and a dedicated power button, there's a lot to love about this palm-sized computer.
-
-

Samsung Pro Endurance microSD card
If durability is your first priority, the Samsung PRO Endurance microSD card does the trick. It's slower, but its longevity up to 140,160 hours makes it ideal for tasks where it's constantly used, like video monitoring cameras.


How to set up Batocera on Raspberry Pi
Batocera is a Linux distribution that comes with most of the popular emulators pre-installed, so you don’t have to go through the hassle of setting up individual emulators for all your ripped console games. Installing Batocera on the Raspberry Pi is extremely simple; all you have to do is flash its .img file onto your microSD card.
- Head to the official download page and pick the version of Batocera that’s compatible with your Raspberry Pi model.
- Download the Raspberry Pi Imager app.
- Run the Imager.exe file with admin privileges and press the Install button.
-
Boot up the Raspberry Pi Imager and pick your Raspberry Pi model after clicking the Choose Device button.

-
Select Choose OS and click the Use Custom option.

-
Navigate to the directory where you downloaded the image file of Batocera and select it before pressing the Open button.

-
Click on Choose Storage and select your microSD card from the list of devices.

-
Press Next and pick Yes when prompted for confirmation.


Once the Imager has finished creating the bootable microSD card, you can plug it into your Raspberry Pi and boot into the Batocera OS. Fortunately, Batocera doesn’t require any initial setups, and you can simply connect the keyboard and a mouse to your RPi to navigate the UI.
How to add ROMs to Batocera
You might notice that, by default, Batocera doesn’t display many emulators. The emulators are pre-installed, and you just need to add ROMs compatible with the emulators before they can appear on the UI. To do so:
- Tap the F1 key to enter File Manager.
- Attach a storage drive containing the ripped games to the Raspberry Pi.
-
Navigate to the /userdata/roms directory and paste the game into the folder of the console it was developed for.

- Press Ctrl+Q to exit File Manager.
-
Open the Main Menu by pressing the Spacebar key, and select Game Settings.

-
Click Update Gamelists.


How to set up Lakka on Raspberry Pi

Lakka is another all-in-one emulation distribution that supports multiple emulators. Its UI is very similar to the default theme on most PlayStation consoles, making it better than Batocera if you’re accustomed to the layout of Sony’s gaming systems. It’s worth noting that Lakka doesn’t include Kodi by default, so you should check out Batocera, Recalbox, or RetroPie if you want additional video player functionality out of your emulation machine.
Writing the image file of Lakka is largely similar to how we flashed Batocera onto the microSD card. You can download the Lakka image file from here.
If you’re using a Raspberry Pi 5, you’ll have to download the latest Nightly build of Lakka instead.
How to add ROMs to Lakka
The easiest way to transfer your games to Lakka is with the help of the Samba service, which is pre-installed on Lakka.
- Open File Explorer.
-
Type \\lakka into the Search Bar.

- Transfer the games to \\lakka\ROMs.

How to set up Recalbox

Recalbox is our third emulation-centric OS that works out-of-the-box without requiring any additional tweaks. It serves as a great alternative to Batocera and Lakka, since Recalbox features a fully-functional web interface (unlike these other two). You can download the Recalbox image file for your Raspberry Pi via the official link and write it to the microSD card the same way as Batocera.
How to add ROMs to Recalbox
Adding games to Recalbox is relatively easy:
- Plug a storage drive into your Raspberry Pi.
-
Choose the Initialize option to create a ROMs folder on the drive.

- Unplug the drive from the Raspberry Pi and insert it into your PC.
-
Head to the DriveLetter\recalbox\roms directory.
Be sure to replace DriveLetter with the letter associated with the drive.

- Transfer your ripped games into the folders of their respective consoles.


If the ROM’s format is compatible with its emulator, you’ll be able to boot into the game from the main screen of Recalbox.
How to set up RetroPie

RetroPie is the most popular emulation software for Raspberry Pi devices and for good reason. While it’s less user-friendly than the other options, RetroPie boasts a huge community and is extremely customizable, as it supports a powerful command-line interface. The official RetroPie “OS” is built on the Lite version of Raspberry Pi OS, and its image is available for all models besides the RPi5 on the official website.
Since we’re using the latest Pi board in this guide, we’ll have to write Raspberry Pi OS (Lite) onto the microSD card and then install RetroPie via the Terminal. The flashing procedure is the same as ever, except you’ll have to choose Raspberry Pi OS (Other) followed by Raspberry Pi OS Lite (32-bit) when picking the operating system.

Once your Raspberry Pi board boots into the OS, you can install RetroPie by following these steps:
- Log in using your username and password.
-
Install Git using this command:
sudo apt install git -y
-
Clone the RetroPie repository with the help of Git:
git clone https://github.com/RetroPie/RetroPie-Setup
-
Switch to the RetroPie-Setup folder using the following command:
cd RetroPie-Setup
-
Convert the RetroPie_setup.sh batch file into an executable via the chmod command:
chmod +x RetroPie_setup.sh
-
Execute this script with the help of:
sudo ./RetroPie_setup.sh
-
Press OK when the warning screen pops up.

-
Hover the pointer over Basic Install, and tap OK when prompted for confirmation.

-
Scroll down to Manage Packages and select samba - Configure Samba ROM Shares.

-
Pick the Install RetroPie Samba Shares option.

-
Click the Perform Reboot option and hit OK.

- Log into the Raspberry Pi when it reboots and type emulationstation into the Terminal.
-
RetroPie prompts you to plug in a controller and set up the key bindings. You don’t necessarily need a gamepad, as it’s possible to proceed with the standard keyboard and mouse combo.
Simply follow the instructions on the screen to map the keys to specific inputs, and you'll arrive at the RetroPie main screen.


How to add ROMs to RetroPie
As with Lakka, we can use Samba to transfer the ROMs to RetroPie. Luckily, we've already installed Samba on RetroPie, so all that's left is to access it on the PC.
-
Open File Explorer and type \\RASPBERRYPI into the Search Bar.

- Copy your game files to their respective console folders in the \\RASPBERRYPI\roms directory.

Which emulation software should you choose?
If you’re unfamiliar with emulation and just want a simple way to play all your favorite games, I recommend Recalbox, as it offers the perfect combination of functionality and performance. But for those who want a highly capable and customizable emulation app, RetroPie is easily the best choice.
