


If you've used a Windows PC for an extended period of time, there's a very good chance you've run into some issue with your internet connection. It's a very common situation, and the root cause can vary a lot. A potential culprit, however, is a corrupted or excessively long DNS cache.
Domain Name System (DNS) is basically an index of every web domain in the world. It associates a domain with an IP address, allowing you to establish a connection to a given website. To speed up your connection, Windows 11 will generally store a DNS cache so your PC can memorize the domain linked to a given IP address and, thus, connect more quickly to it. It's an important part of how the internet works, but the DNS cache can get corrupted or pile up a lot of unnecessary info over the years, slowing things down and resulting in potential connection errors.
Clearing the DNS cache on your Windows 11 PC is thankfully relatively easy, and there are multiple ways to do it. Let's take a look at some of them.
Clear DNS cache using the Run dialog
Arguably the easiest and quickest way to clear the DNS cache on your PC is to use the Run dialog. You may already be familiar with it, especially if you're a fan of keyboard shortcuts. Here's how to use it:
- Press Windows key + R on your keyboard to launch the Run dialog.
-
Enter the text ipconfig /flushdns into the text box.

- Press Enter to run the command.
The command will run and the DNS cache will be reset.
Clear DNS cache using Windows Terminal (PowerShell and or Command Prompt)
Another way to clear the DNS cache on Windows 11 is to use the Windows Terminal. This tool can run both Windows PowerShell and the Command Prompt (CMD), but the same command works for both.
-
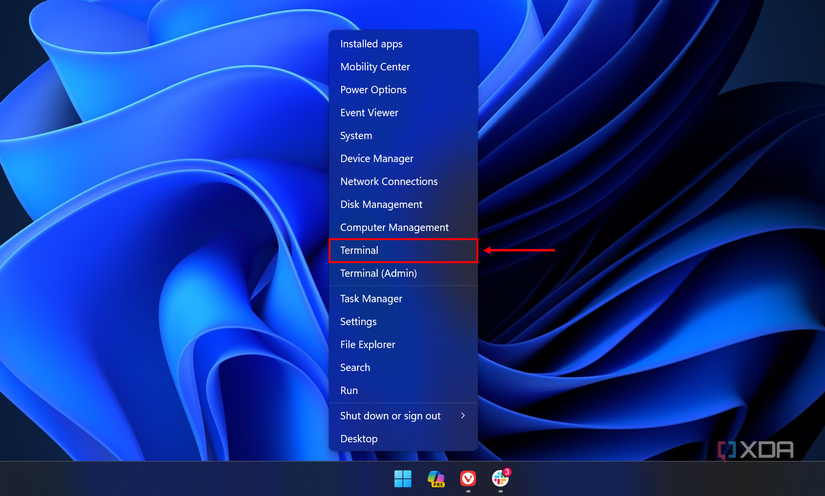
Right-click the Start menu icon on your taskbar and choose Terminal. Some older versions of Windows 11 may say Windows Terminal, and on Windows 10, you may see Windows PowerShell or Command Prompt instead.
-
Enter the following command and then press Enter:
ipconfig /flushdns
- Your DNS cache will be cleared and you'll see a confirmation message.

Alternatively, if you're using Windows PowerShell, you can also use the Clear-DnsClientCache command to clear the DNS cache. This method doesn't show a confirmation message however.
Clear DNS cache using a batch file
There's yet another option for clearing the DNS cache on Windows 11, and that's using a batch file. This will run a similar command to the ones above, but since it's a file, it may be easier to use again in the future since you can run it whenever you need to. Here's what you need to do:
-
Open Notepad.

-
Enter the text ipconfig /flushdns.

-
Click File and then Save as.

-
In the Save dialog, change the Save type as option to All types.

-
Name the file whatever you prefer, but make sure it has .bat at the end.

-
Once you've saved the file, double-click it to run it whenever you'd like.

- The command will run and clear your DNS cache.


Now that you have the file saved, you can simply run it as an administrator whenever you need to clear the DNS cache on your PC again.
Automatically clear DNS cache
There shouldn't be any need to clear the DNS cache often, but if you happen to run into problems frequently, you can set Windows 11 to automatically clear the DNS cache on a set schedule. For that, you'll need to use the Registry Editor, which is something we don't recommend messing with unless you know what you're doing. If you feel confident using it, here's what to do:
- Open the Registry Editor. This requires administrator privileges.
-
Navigate to this location: HKEY_LOCAL_MACHINE\SYSTEM\CurrentControlSet\Services\Dnscache\Parameters.

- Right-click an empty space in the area on the right.
-
Choose New, then DWORD (32-bit) Value.

-
Name the new value MaxCacheTtl.

- Double-click the item you created to edit its properties.
-
Change the Value data field to the amount of time that should pass, in seconds, for the DNS cache to be reset. For example, to reset the cache every 24 hours, you'll want to enter 86400 in this field.

- Click OK.
- Right-click an empty area of the window again, and select New, then DWORD (32-bit) Value.
-
Name the file MaxNegativeCacheTtl.

-
Double-click the item to change its properties and change the Value data field to 5.

- Click OK.


Why clear the DNS cache?
Of course, you might be wondering why you would want to clear the DNS cache in the first place. There are a few reasons, but the most likely is that you may be running into trouble connecting to a website, either seeing a 404 error or simply failing to load the page as expected. While it's uncommon, it's possible that a domain is no longer associated with the same IP address, and by trying to load outdated information from the DNS cache, your computer can't properly resolve the DNS and connect to the right server.
In more extreme cases, it's possible for an ill-intended attacker to hijack a DNS entry and get you to connect to a fake website that can cause damage to your precious laptop or PC. This isn't something you need to worry about normally, but it's an example of why it might be a good idea to clear the cache every now and then.
Clearing DNS cache is easy and harmless
Even if you don't need to, clearing the DNS cache on your computer shouldn't cause any issues. The only downside is that the next time you connect to a website, you may have to wait a little longer for the DNS to be resolved, but that will only happen once, and it shouldn't be a huge difference anyway. You can always follow the steps above to clear the DNS cache without having to worry.
