


Due to major improvements in their computing prowess, the newer Raspberry Pi boards are capable of running some of the most popular Linux distributions and even the ARM version of Windows 11 without major performance issues. But if you’re bored with the same ol’ desktop interface, you can choose to run Android on these tiny systems. And not just any version of Android; thanks to the efforts of developer KonstaKANG, it’s possible to set up the latest version of the Android operating system on tiny Raspberry Pi boards.
What you’ll need
A Raspberry Pi board is mandatory for obvious reasons, and an RPi 3 will suffice for those who don’t mind running an outdated copy of Android. That said, Android 14 is only available on the Raspberry Pi 4 and 5 models, so you may have to switch to a newer RPi model if you wish to install the latest version of Android.
Aside from the palm-sized system, you’ll need a microSD card and I recommend getting one with at least 8GB of space. That way, you can install your favorite Android apps without running out of storage.
-
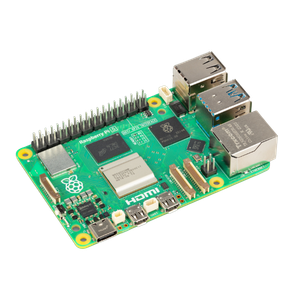
Raspberry Pi 5
- CPU
- Arm Cortex-A76 (quad-core, 2.4GHz)
- Memory
- Up to 8GB LPDDR4X SDRAM
- Operating System
- Raspberry Pi OS (official)
- Ports
- 2× USB 3.0, 2× USB 2.0, Ethernet, 2x micro HDMI, 2× 4-lane MIPI transceivers, PCIe Gen 2.0 interface, USB-C, 40-pin GPIO header
- GPU
- VideoCore VII
- Starting Price
- $60
-

Flashing the LineageOS/AOSP files
Assuming you’re using a Raspberry Pi 4 or 5, KonstKANG’s repository provides links for both LineageOS and AOSP releases of Android 14. We’ll use the standard Android version of LineageOS for this tutorial.
1. Start by downloading the portable release of Balena Etcher from the official website.
2. Head to KonstKANG’s website, hover your cursor over the Devices tab and pick your Raspberry Pi model.

3. Download the version of Android you wish to use with your Raspberry Pi. Be sure to extract it afterward.
4. Run Balena Etcher as an administrator.
5. Select Flash from file, choose the .img file you extracted earlier, and hit Open.

6. Click on Select Storage before picking the microSD card where you plan to flash the OS files.

7. Press the Flash button.

Booting into Android for the first time
Similar to how you'd set up Ubuntu or Windows 11 on the Raspberry Pi, you’ll need to configure some settings when you launch Android for the first time on the SBC.
1. Slot the microSD card into the Raspberry Pi and connect all necessary cables before powering on the SBC.
2. Press Start at the Welcome screen.

3. Accept the End-User License Agreement.
4. Pick the Language and click on the Next button.

5. If you haven’t plugged in an Ethernet cable, click on your Wi-Fi network and enter its Password before pressing Next.

6. Set the Date & time settings, and click on Next.

7. Hit Next after you’re done customizing the Location settings and LineageOS features.

8. LineageOS will ask you to protect your tablet and recover data from another device.

You can ignore these settings by clicking on Skip.
9. If you’re using a keyboard and mouse, be sure to pick 3-button navigation before selecting Next.

10. Click on the Next button two more times to complete the setup procedure.
(Optional) Installing Google apps
If you’ve followed all the steps correctly, the Raspberry Pi will boot into the LineageOS home screen. However, you’ll notice your Raspberry Pi doesn’t have the usual Google Play apps installed.
For beginners, I suggest saving yourself the hassle of installing GApps by switching to Aurora, F-Droid, or another application store. But if you’re a hardened veteran who’s willing to put up with a grueling ordeal to use Google’s App suite, then read on.
1. Download the Arm64 version of BiTGApps from the Pling store.
2. Open the Settings app on your Raspberry Pi.

3. Type power into the Search Bar and pick Power menu items from the suggestions.

4. Scroll down and enable the toggle next to Advanced restart.

5. Access the Notification panel and click on the Power button.

6. Choose Restart followed by Recovery.

7. Select the Install tab inside the TWRP interface.

8. Navigate to the Downloads folder and select the BiTGApps.zip file.
9. Swipe right to install the app.

10. Be sure to select the Wipe Dalvik option and restart your Raspberry Pi.

After rebooting the Android-powered Raspberry Pi, you’ll notice Google Play displays an error message claiming that the device isn’t Play Protect certified. This means you won’t be able to sign in to your Google account or download any apps from the Play Store. Thankfully, there’s a fix for that (even though it’s pretty cumbersome).
1. Plug one end of a USB cable into your PC and the other end into the USB Type-C port on your Raspberry Pi, and wait for the latter to power on.
2. Open the Settings app on your Raspberry Pi and enable the Developer options by tapping seven times on the Build Number in the About tablet header.

3. Open the Developer options and enable USB debugging and Rooted debugging.

4. Switch to your PC and set up ADB by following this guide.
5. Open the terminal/PowerShell at the ADB and type the following command:
.\adb root

Be sure to Accept the connection request inside your Raspberry Pi.
6. Next, access the Unix shell by running this command:
.\adb shell

7. Paste this command inside the Unix shell:
sqlite3 /data/data/com.google.android.gsf/databases/gservices.db

8. Inside the sqlite interface, type the final command:
select * from main where name = "android_id";

9. Here, the hex string is your Android ID, and you’ll need to certify your device by pasting it on this link.

10. Reboot your Raspberry Pi once you’ve clicked the Register button on the previous link.
Once the Raspberry Pi reboots, Google Play Services will stop displaying the error message, and you'll be able to log into your Google account.
(Optional) Installing Magisk
Now that we’ve installed Google Play, setting up Magisk is the final step in turning your Raspberry Pi into a full-fledged Android device.
1. Download version 25.2 of the Magisk apk file alongside its LineageOS-compatible zip file.
2. Enter the Recovery mode as you did when setting up Google Play.
3. (Optional) While you're inside the Recovery environment, I recommend flashing the Resize module as it will let you use all the unallocated space on your microSD card.
4. Flash the Magisk zip file inside the TWRP interface before rebooting into Android 14.
5. Using the File Manager, locate the Magisk.apk file and install it.

6. Upon launching Magisk, the app will prompt you to finish the installation by restarting your Raspberry Pi.

7. Simply tap the OK button to wrap up the Magisk setup procedure.
Running Android on the Raspberry Pi

With that, your Raspberry Pi-flavored Android tablet is ready for use. While even the most expensive 8GB variant of the Raspberry Pi 5 struggles with running Steam games, Android games tend to work well on the device. As such, you can even use the Raspberry Pi as an Android emulator should you grow tired of running retro console games on the SBC.
