


Emulating old-school titles is a fun way to experience your nostalgic games at higher resolutions. But once you plunge into the rabbit hole that’s ROM collection, it’s easy to find yourself with a disorganized mess of game files on your retro-gaming machine. And the pile is bound to get even more cluttered once you start ripping the ROMs from other consoles,
That’s where RomM comes in handy. However, setting it up can be a bit of an issue when you’re just starting out. So, we’ve compiled a step-by-step tutorial to help you deploy a working instance of RomM on your home server.
What’s RomM?
And why should you use it?

RomM is a self-hosted utility that lets you arrange all your ROMs from a neat web-based GUI. Compatible with multiple console generations, RomM can display all the details of your ROM files once you link the app with your IGDB and MobyGame API keys. It also supports robust tagging to help you sort all the game files, and you can even run this FOSS tool alongside EmulatorJS to run games directly from your web browser. Besides games and BIOS, RomM can also keep track of your screenshots and save states, making it perfect for emulation lovers.
How to set up RomM?
What you’ll need
Whether you rely on hypervisors or host all your apps on your system, you’ll want to use a Linux distribution to set up RomM, as installing it on Windows will add even more complexities to an already cumbersome setup process. I recommend using a virtualization platform like Proxmox or XCP-ng for this project, but you can follow along on a VirtualBox/VMware Workstation Pro home lab. If you’re using Type-2 hypervisors, remember to set the Network adapter to Bridged mode, as this will make the RomM server accessible from your PC.
I’ve chosen Ubuntu for the purpose of this guide, but you shouldn’t encounter too many issues on other Debian-based systems. The Unraid app store has a plugin for RomM which simplifies the initial setup, but you’ll need to follow a similar procedure to the one we’ve mentioned when adding the API keys. If you’re not using Unraid, you’ll want to set up Docker Engine on your VM, as it has all the plugins and tools you’ll need to create and run the RomM server.
Grabbing (and editing) the RomM docker compose file
Since RomM has many fields that you need to edit in the config file, it’s easier to deploy it using a compose file instead of pulling an image from the Docker hub.
-
Head to the official RomM GitHub link and click on the Download raw file button under the docker-compose.example.yml file.

- Navigate to the Downloads folder and open the file using a text editor.
-
Enter your preferred password next to the DB_PASSWD field under the environment section of the romm header.

-
Type the same password in the MYSQL_PASSWORD parameter of the environment tab under romm-db.

-
Create new folders for the library, assets, and config directories before pasting their folder paths into the respective fields in the yml file.
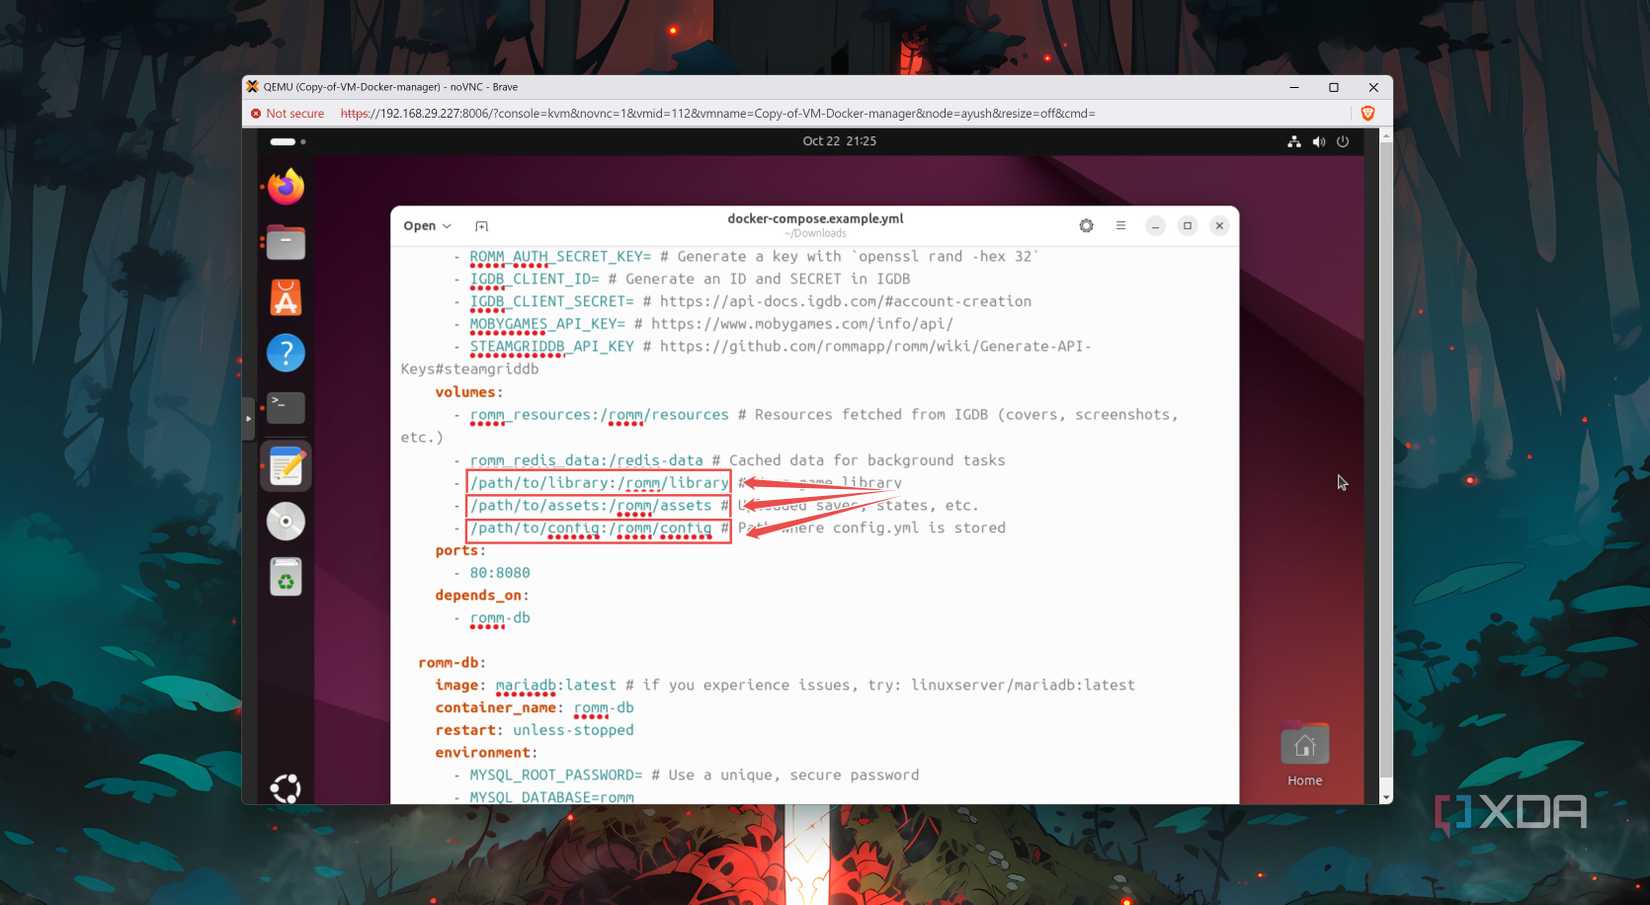
- Add a folder called roms inside the library before adding the sub-folders for your consoles.


Generating the API and auth keys for RomM
RomM relies on a multitude of secret keys to integrate with all the third-party video game databases. So, you’ll have to create multiple keys and paste them inside the yml file.
- With the docker-compose.example.yml file still open, launch the terminal.
-
Enter the following command inside the terminal and paste the result into the ROM_AUTH_SECRET_KEY field of the yml file.
openssl rand -hex 32

-
Head to the SteamGridDB website and log in using your Steam credentials.

-
Click on the drop-down button next to your Profile and choose Preferences.

-
Switch to the API tab and paste the API Key into the STEAMGRIDDB_API_KEY field of the Docker compose yml file.

Remember to add an equal (=) symbol after the STEAMGRIDDB_API_KEY parameter, as the example file doesn’t include it by default.
- For the IGDB key, enable 2FA on your Twitch account and use the same credentials to sign in to your Twitch Developer account.
-
Navigate to the Applications tab and click on the Register Your Application button.

-
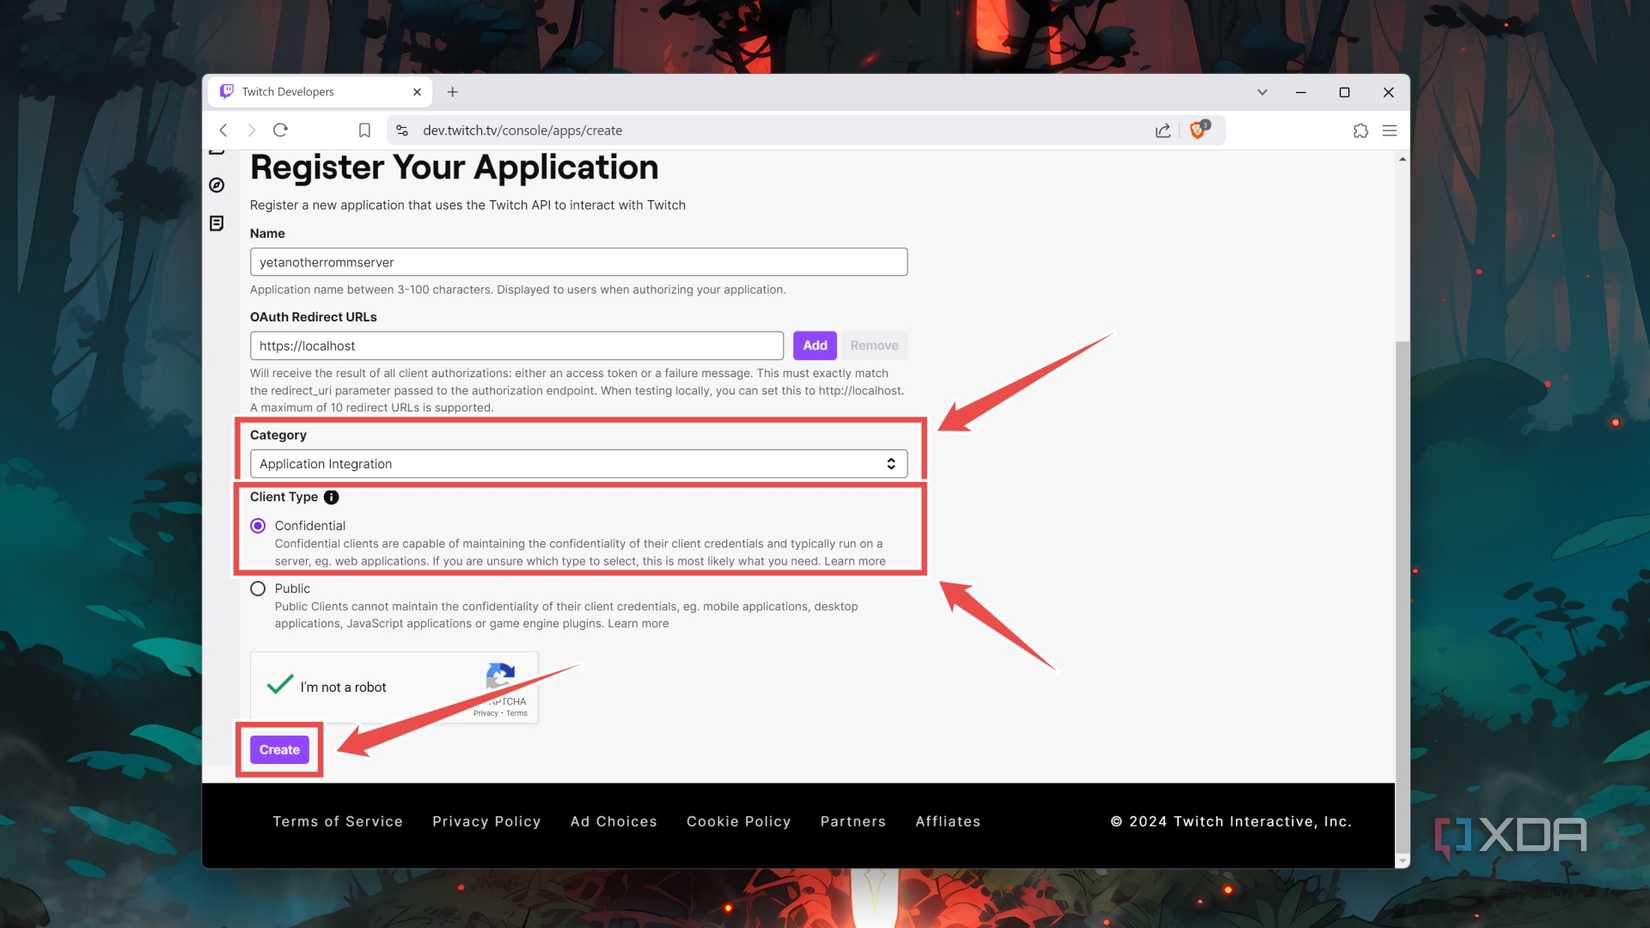
Type a unique Name and press the Add button after entering https://localhost under the OAuth Redirect URLs field.

-
Set Application Integration as the Category, pick Confidential as the Client Type, and tap Create.
-
Hit the Manage button inside your new application and paste the Client ID into the IGDB_CLIENT_ID parameter of the docker-compose.example.yml file.

-
Tap the New Secret button to generate the Client Secret and copy it into the IGDB_CLIENT_SECRET field.


Deploying the RomM container
With all keys and accounts set up, it’s time to fire up the container and access the RomM web UI.
- Rename the file you’ve been editing all this time to docker-compose.yml.
-
Right click anywhere inside the folder containing this file and choose Open in terminal.

-
Execute the docker compose command to create and deploy the RomM container.
sudo docker compose up -d

-
Switch to your PC and type the IP address of your RomM VM followed by a colon (:) and the port number 80.
You can get this IP address by viewing the network settings of the VM on your hypervisor or with the help of a network scanner tool like Fing.

-
Enter the Username and Password for the admin user before hitting Next.

- Double-check whether your metadata sources are correct and press Finish.
-
Click on the Upload tab and select the console of your choice.

-
Tap the Add button, select the ROM file you wish to transfer to RomM, and hit Upload.


Organizing your ROM files with the help of RomM

If you followed all the steps correctly, your ROMs should show up inside the web UI, and RomM will utilize the databases you linked earlier to display the covers, summary, and other details for each title.
Not very fond of gaming? There’s a surprising number of useful apps you can self-host on your home lab, especially if you’re using a bare-metal virtualization platform like Proxmox.
