


With all the viruses, keyloggers, and other malware prowling the computing industry, it’s essential to arm your devices with cybersecurity tools. By helping you configure hardened traffic rules to filter malicious packets, firewalls are among the most useful tools to grant an extra oomph to your network’s security.
While there are plenty of easy-to-setup firewall apps on the market, a dedicated router OS is better when you want network-wide coverage for the devices in your home lab. So, here’s a detailed guide on installing OPNsense on your local hardware to protect the rest of the devices on your home network.
What you’ll need
As a lightweight distro, OPNsense has fairly modest hardware requirements. So long as your router, mini-PC, or SBC is powered by the x86-64 architecture and has 2GB RAM alongside 4G of free disk space, you won’t have any issues getting the OS up and running.
Without going into VLAN shenanigans, you’ll require at least two Ethernet ports on the device where you intend to install OPNsense. One of these ports will serve as the WAN interface, and you’ll have to plug it into your modem to connect your home network to the Internet. The other one will serve as the LAN port, which you must pair with your network switch.
Although most routers include multiple ports, many mini-PCs and SBCs may only support a single Ethernet connection. Thankfully, you can use a dedicated NIC or, for those with a spare PCIe expansion slot, an inexpensive Ethernet-to-USB adapter to add the second port to the system.
Creating a bootable USB drive for OPNsense
As is the case with every operating system, you’ll need to write the OPNsense files onto a USB drive. Since Balena Etcher supports flashing IMG files, we’ll use it for this tutorial.
- Head to the official OPNsense website, select your preferred Image Type using the drop-down menu, and hit the Download button.
- Download the latest version of Balena Etcher’s setup file and use it to install the tool on your system.
- Run Balena Etcher.exe as an administrator.
-
Inside Balena Etcher, press the Flash from file button and select the OPNsense image you downloaded earlier.
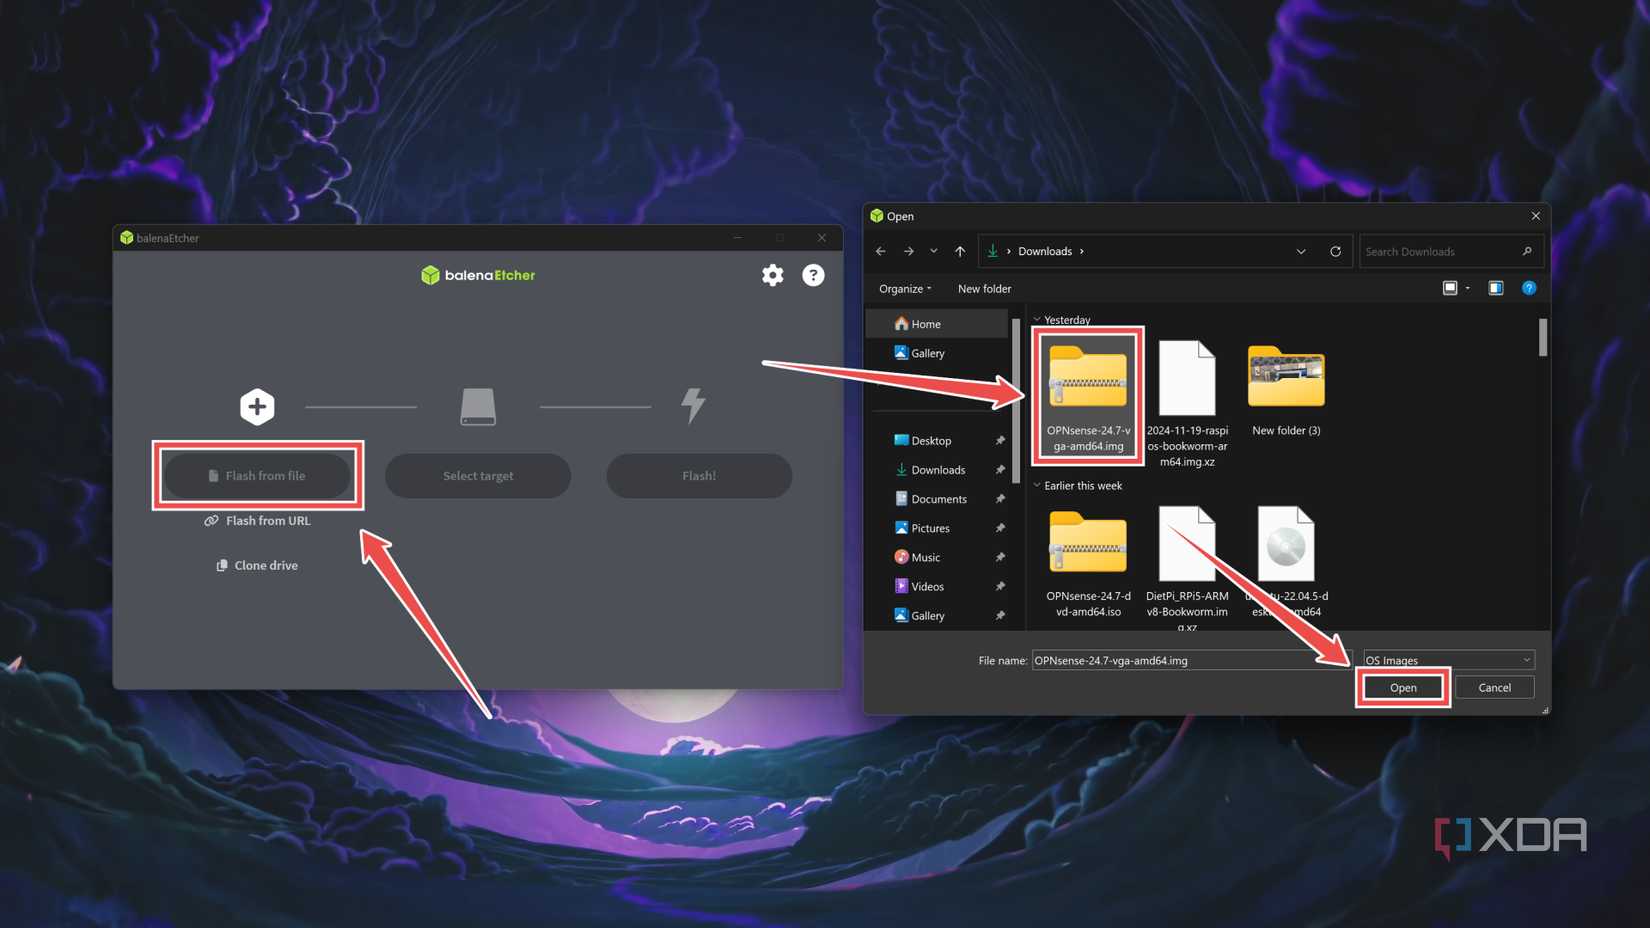
-
Ignore the Missing partition table error message and tap Continue.

-
Hit Select target and choose the flash drive you intend to use as the bootable disk.

-
Finally, tap Flash and wait for Balena Etcher to work its magic.


Modifying the BIOS settings
Now that your bootable drive is operational, it’s time to switch the boot order of your router/mini-PC/SBC BIOS. Although the exact procedure varies from one motherboard to another, here’s a general overview of the process:
- Plug the pen drive into the system and repeatedly tap the Del key as it boots up.
-
Head to the Boot tab and set the USB drive as Boot Option #1.
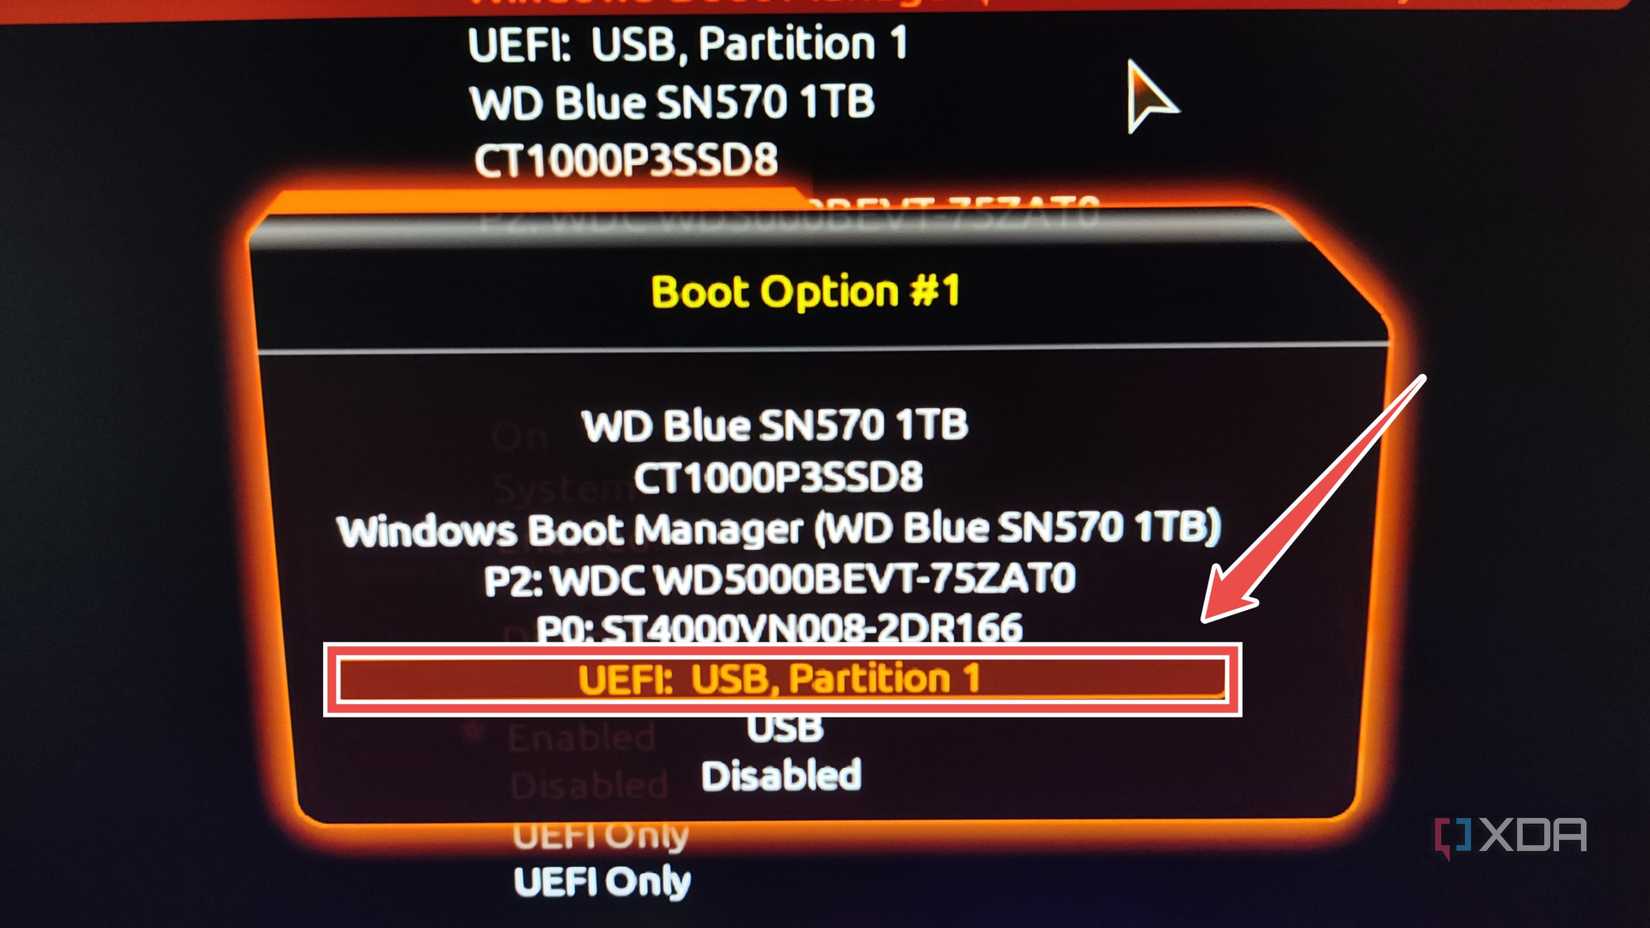
- Save the changes and exit the BIOS.

Installing OPNsense
Once the PC restarts, you’ll enter the OPNsense live boot environment, and the OS will begin assigning the network interfaces automatically. If you want, you can interrupt the process and manually enter the WAN and LAN interfaces. Otherwise, you can wait until the login option appears on the screen. Either way,
-
Enter installer as the login name followed by opnsense as the password.
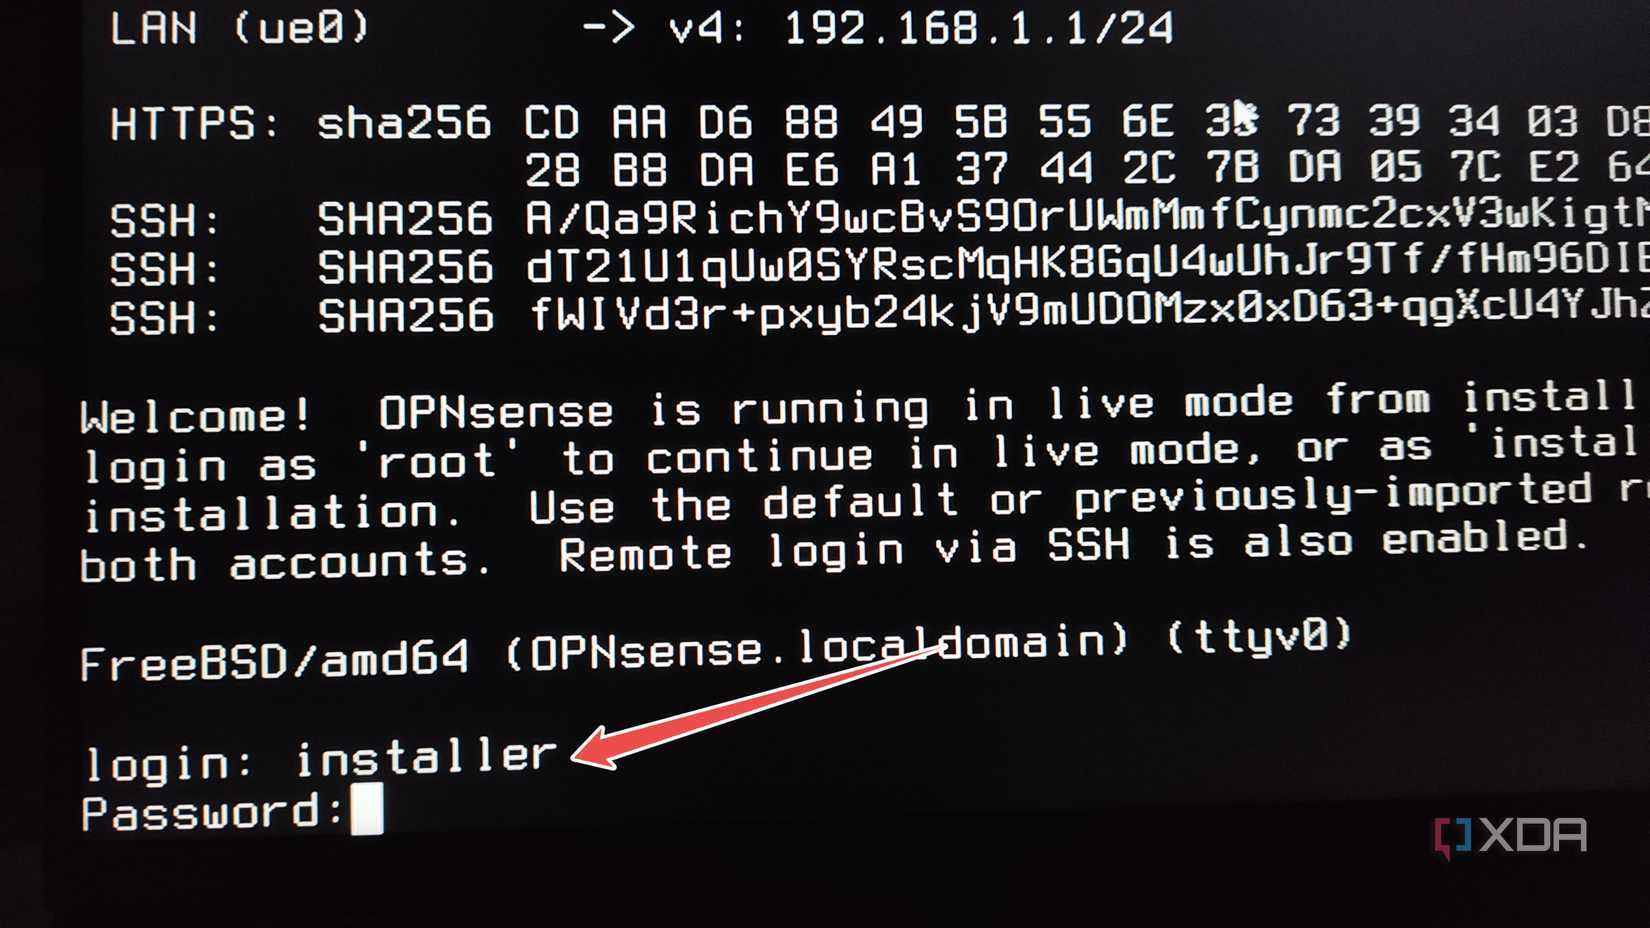
-
Choose your preferred Keymap settings.

-
Select Install (ZFS) when the OPNsense installer prompts you to pick a task.

-
Choose the ideal Virtual Device Type in accordance with the RAID setup on your router/mini-PC/SBC.

-
Use the Spacebar key to highlight the OPNsense installation drives and tap Yes when the installer prompts for your final confirmation.

-
Once the installation wraps up, select the Root Password option and enter a Password for your root user.

-
Hit Complete Install and unplug your bootable drive while the system restarts.


Configuring the OPNsense web UI
Although you’ve successfully installed OPNsense on your home router, you’ll have to modify one last set of options inside the web UI.
-
Assuming you haven’t modified the default IP address of the LAN interface earlier, enter 192.168.1.1 into the web browser of another PC connected to the same network as the OPNsense router.

-
Enter root as the username followed by the password you’d set during the installation process.

-
Inside the OPNsense web UI, hit Next and enter the Primary and Secondary DNS options under the General Information section.
For enhanced security, you can check the Enable DNSSEC Support and Harden DNSSEC Data options. Remember to click on Next after each step.

-
Select the Time server hostname and Timezone.
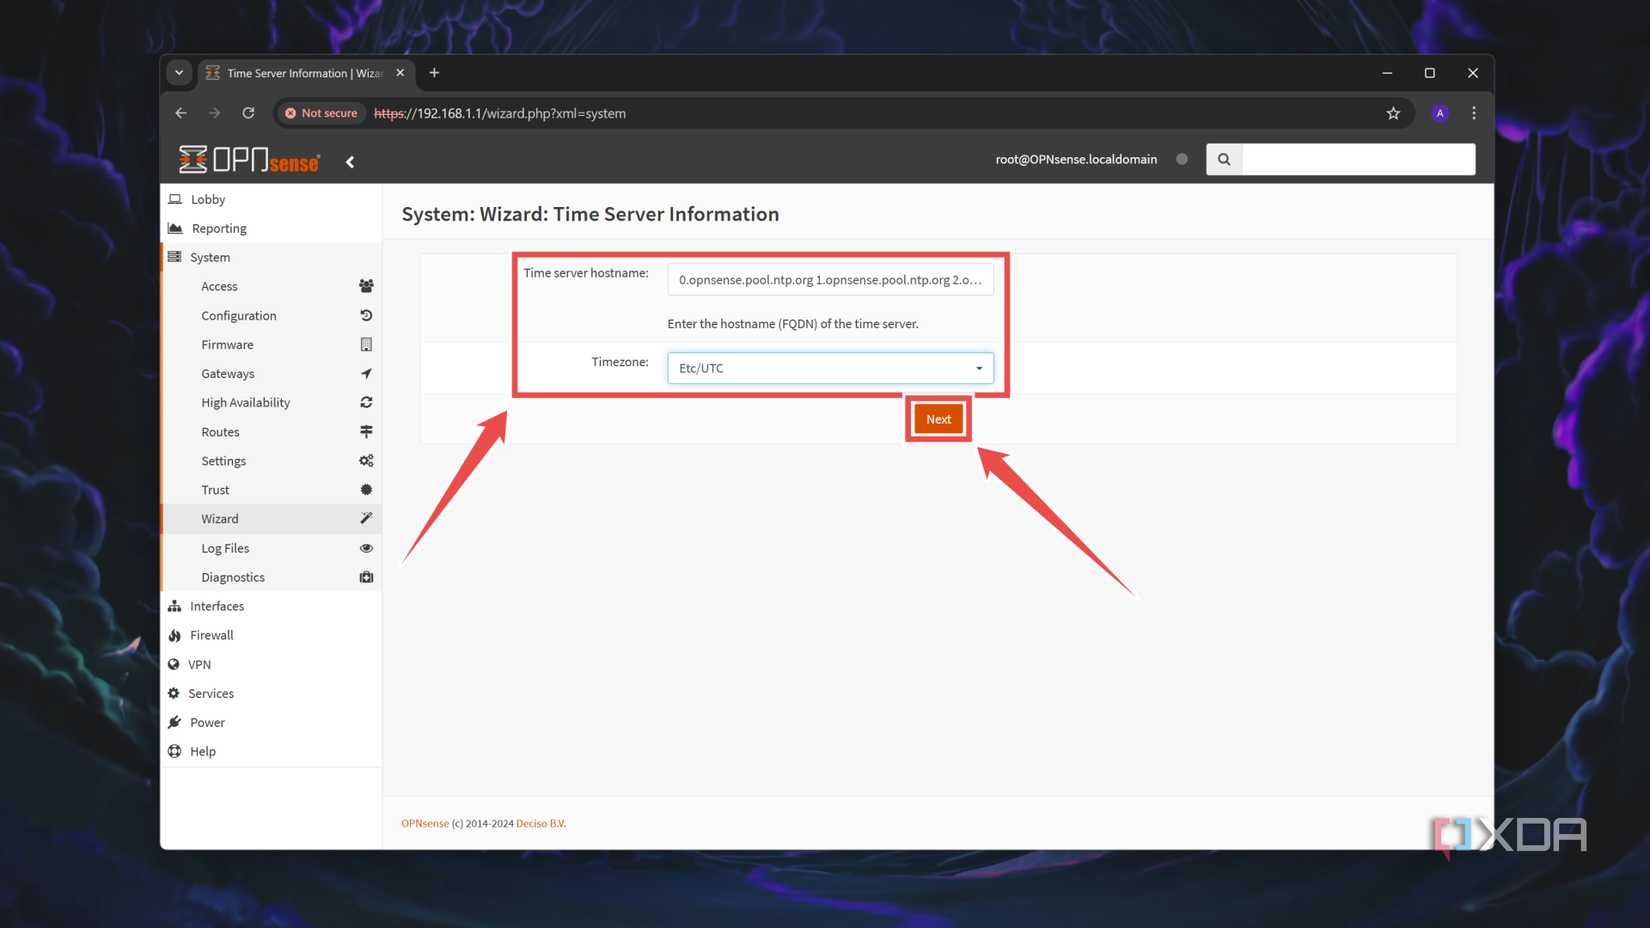
-
For the WAN interface settings, you can either take the easy way out by switching the IPv4 Configuration Type to DHCP.
Alternatively, you can forgo DHCP in favor of the Static option and fill in the MAC Address, Hostname, IP Address, and other settings manually.

-
Leave the LAN IP Address and Root Password settings unchanged and hit Reload.


Hardening the OPNsense firewall
With the OPNsense UI ready, you’re free to tinker with a myriad of options, toggles, and radio buttons offered by this amazing router OS. Here’s a collection of settings we recommend checking out:
-
The Rules tab inside the Firewall settings lets you create custom rules for the inbound and outgoing network packets, and you can also use it to block most of the unneeded ports on your network.

-
If you want to access your self-hosted services and home lab paraphernalia from external networks, the Port Forward section within the NAT tab is your best bet.

-
Since forwarding your ports can expose your home lab to different vulnerabilities, you’d want to configure the VPN settings for your favorite tunneling protocol.

-
The Dnsmasq DNS is another tab you should check out if you want to manage your own DNS server.

-
In case you’re paranoid about malicious actors breaking into your system, you can head to the Intrusion Detection tab under Services.


Building a secure router using OPNsense

While we’ve mentioned most of the essential security-hardening options, OPNsense is pretty complex – even by typical router OS standards. If you’re not too fond of allocating an entire device to OPNsense, you could technically run it inside a VM using Proxmox or another virtualization environment. But unless you’re using a high-availability cluster, I’d recommend against setting up a network-wide firewall on your experimentation machine, as your Internet connection will go down if (or rather, when) the home lab crashes under the weight of your projects.
