

... a little crafty place...


Showing posts with label Tutorials. Show all posts

Saturday, August 21, 2010

6 Petal Flower Tutorial

Hello readers!!! I'm so sorry I've been gone for so long. I've been soooooo busy you have no idea. I wanted to let you know that I'll be going on a little vacations to Venezuela (Yay!!!). I'll be gone for about a month, but don't worry!!! I'll be posting from there of course. I've prepared several posts, I just have to press "Publish Post" and you'll be able to see what I've got to show you. Stay tuned for fun tutorials and crocheting ideas. I'll also post some pictures to show you a little bit of my beautiful country.

Now, I've been wanting to post this tutorial for days!!!. It's a really cute flower, and the best thing is, that it's super easy. Let's get started then...

We'll be using the following stitches.

Slip Knot. You can watch my video here if you're not sure how to make one.

Sl St (Slip Stitch). Insert hook, yarn over, pull the loop back through the stitch, then through the loop on your hook.

Dc (Double Crochet). Learn how to make dc here.

Tr (Treble or Triple Stitch). It's the same as dc but this time you yarn over twice on your hook before going through the stitch and then pull through two, 3 times. I'll show some pictures.
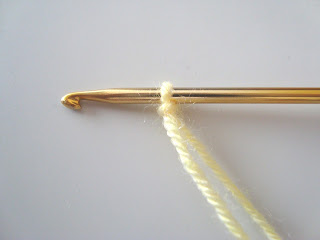
First, make a Slip Knot.
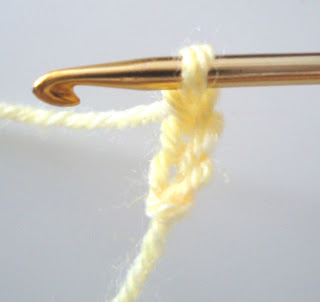
Then, ch. 3
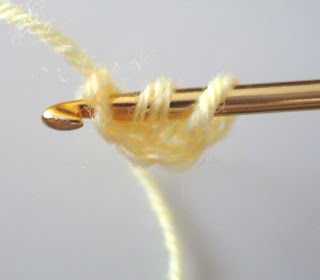
Now, make 1 dc on the first chain, or the 3rd chain from your hook. It counts as the 1st stitch.
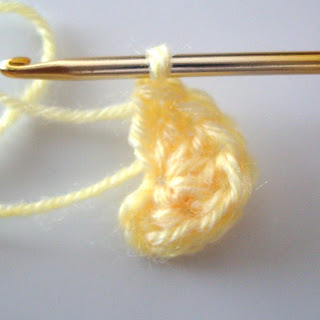
Dc 12 around on the same chain. It would get a little tight (but that's the idea) ;)
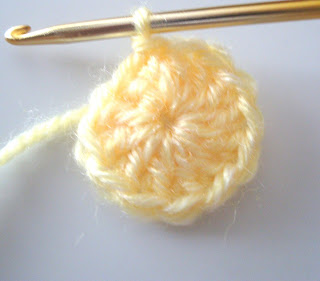
When you're done you should have 13 stitches. Make a Sl st on the 3rd chain of the 1st chain.
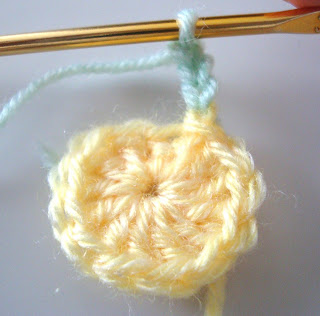
Join the second color, and ch.3 (counts as the 1st st.)
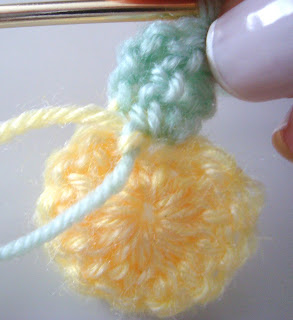
Make a knot in the back to secure both yarns.
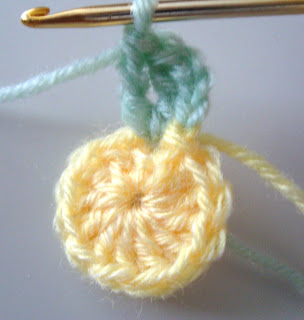
Make 2 tr on the next stitch.
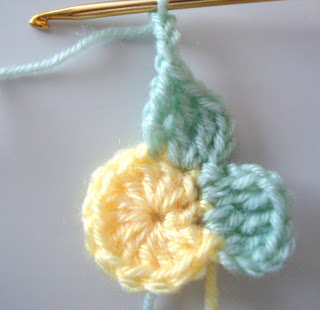
Now, make 1 tr on the next stitch. Then ch 3.
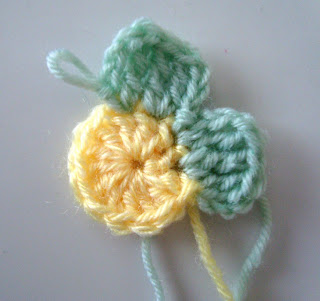
Make a sc on the base of the last tr. Ch 3 to start the next petal.
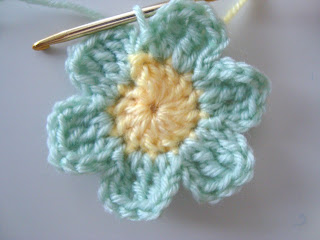
Repeat these steps 5 more times.
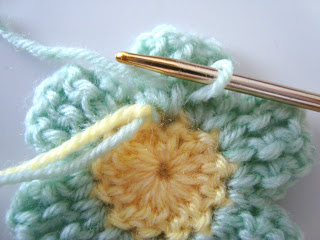
Sl st at the base of the 1st ch. and make a knot.
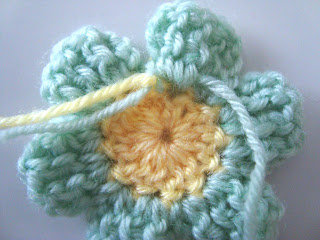
Now, hide the yarn on the back of the flower. Pull it through the back stitches several times and then bind off.
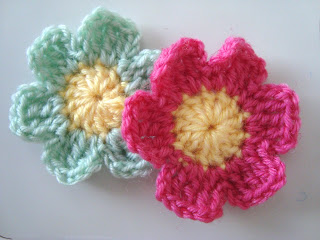
Make any color combination!!! It's super easy.

Ok, I'll repeat the petal steps just in case you get a little confused, here it is:

After you've changed colors, **ch3
then 2 tr on the next stitch.
1 tr on the next stitch, ch3
sc on the next stitch, ch3**

Repeat from ** to ** 5 times.

I hope it is clear enough. I mean, it makes sense to me because I wrote it, but PLEASE don't hesitate to make questions, I'll be glad to help you.

Enjoy these pretty flowers!!!

Ciao, Ciao


Wednesday, July 14, 2010

Crochet tutorial (Double Crochet)

Hello again!!! here's the third tutorial. You'll learn how to make the double crochet stitch... Now, let me explain a few things before you start watching the video. I started the double crochet (dc) row on top of a sc row. If your pattern starts with a chain and then double crochet, you'll have to make the foundation row and then 3 more chains, in this case you'll make the 1st dc on the fourth (4th) chain from the hook. For example, the pattern starts like this: Chain 25. You chain 25 plus 3 more with a total of 28 ch. (which represents the first dc of the first row). I really hope this makes sense :\ Here's the video to make it a little easier... (oh! I edited part of the video in slow motion, so you'll be able to see better every step.)

Here it is!!!


Enjoy!!! ^_^

Friday, July 9, 2010

Let's talk crochet...

I want to talk a little more about the basics of crochet. With the two simple steps I showed you before, you can already start making some projects. For example, you can make a scarf, making a chain as long as you want, and single crochet (sc) all the way to the end and start going up, and up, until you have the length you want. Yeap, as simple as that, oh! and if you use a bigger hook, you'll get a looser weave, so you could get a really pretty yarn, and make something you could wear during the day, something that wouldn't be too hot, or too cold :)

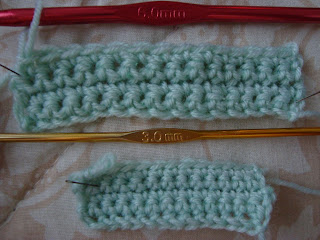
When you buy your yarn, read the label and it would tell you the hook size needed for that specific yarn. Now, let's say you want to make a more open weave, you just use a bigger hook :) For example:


I made this two samples, both have the exact same number of stitches and rows. I used the same yarn and two different size hooks.

I'll post the next video soon, where you'll learn the Double Crochet (dc) another basic crochet stitch... Now, go get your hook and yarn and start crocheting your new scarf :)

Thanks for visiting!!!

Monday, July 5, 2010

Crochet Tutorial (Single Stitch)

Hello again ^_^. I really couldn't wait until Wednesday to upload the video and post the tutorial... This video shows you how to make the Single Crochet (SC) stitch. This one has higher quality so you'll be able to see better the subtitles. It is a basic stitch and practically the easiest. Once you know how to crochet the SC, you can do anything!!! really. I say on the video that it is a little tricky to start crocheting over the chain, yes, this is the most "difficult" part. I would recommend you to watch this video. Futuregirl, shows you how to make the chain and the foundation row (the first SC row) at the same time. It sounds complicated, but believe me, it's super easy. For those of you who are just starting, you can practice first with the traditional way, and then go to futuregirl's video. I really hope this videos are useful... and again, if you have any question post a comment or email me to bluefarfallina@gmail.com


Thanks for visiting...
Enjoy!!!

Watch the First Tutorial here.

Wednesday, June 30, 2010

Wednesday! Crochet Tutorial I

Hello readers!!! thanks for visiting again... Oh! Goodness!!! The making of this video took me longer than I thought!!! I've never uploaded a video on Blogger before, or on YouTube. I had to edit it twice... but at the end it came out how I wanted, soooo, here I have what I promised :) My first crochet tutorial for beginners. Now, let me explain a few things before we start. On the video I tried to go really slow and repeated some steps so you could see better what I was doing. If the music bothers you, you can always play it mute :). I had to play some background music, because I live by a really busy street, so you'll only hear buses and cars. You can also pause it or rewind it, so you don't miss any step, that's what I like about video tutorials :).

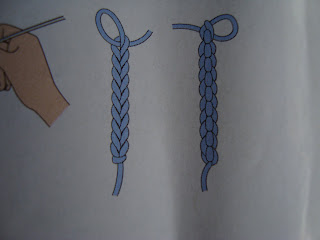
On this tutorial I'll show you how to make the Slip Knot and the Chain which is abbreviated this way (Ch.) and I also show how the Right Side (RS) and the Wrong Side (WS) of the chain look like. I have this picture from a magazine that shows the difference between the RS and WS, just in case you can't see the difference on the video.


See? the RS has like V's close together, and the WS has vertical lines. You'll need to be able to know the difference for some projects and for the next tutorial as well.


I really hope you liked the video, I know it's of the best quality, I have to practice more... Well, it was the first time, I guess next time is going to be easier :) ... If you're having any trouble or you have questions about the tutorial email me to bluefarfallina@gmail.com or comment below, I'll be happy to help you.

Thanks for watching!!!
Now, grab your hook and start crocheting!!! :)

Chao, Chao!