Showing posts with label Tools. Show all posts

Thursday, April 24, 2014

Unconventional Storage Solution

I know that I have teased you about my craft room and the progress, but today ends some of the teasing. I'm here to show you how the hutch turned out, and the process that it took to get there.

It wasn't as difficult as I thought it was going to be, but that's because of my palm sander and the new paint sprayer. First, the obligatory before pictures, and some background on the hutch itself. The hutch belonged to my grandmother, and she kept it in a storage space just behind the kitchen in her apartment. The bottom held all of her Corningware, and the top was for food storage. It was a two-piece hutch made of solid wood, never finished, and was slightly too large for the space she chose for it.  

When it came time for her to move out of the apartment and into an assisted living facility, the hutch was stored in my parent's garage. It spent two years there, until Dylan and I moved into our second apartment, where we had space for it since my parents were moving to Georgia and weren't going to be taking it with them. At that point, the raw wood had aged a bit from being out in the garage for so long, and it had started turning to a darker color. I had already started disassembling the bottom part of the cabinet, so you'll notice that the hinges are already off, but that just shows you the difference in the color of the wood where it was protected by the hinges and the rest of the hutch that was out and exposed to the elements in the garage.  


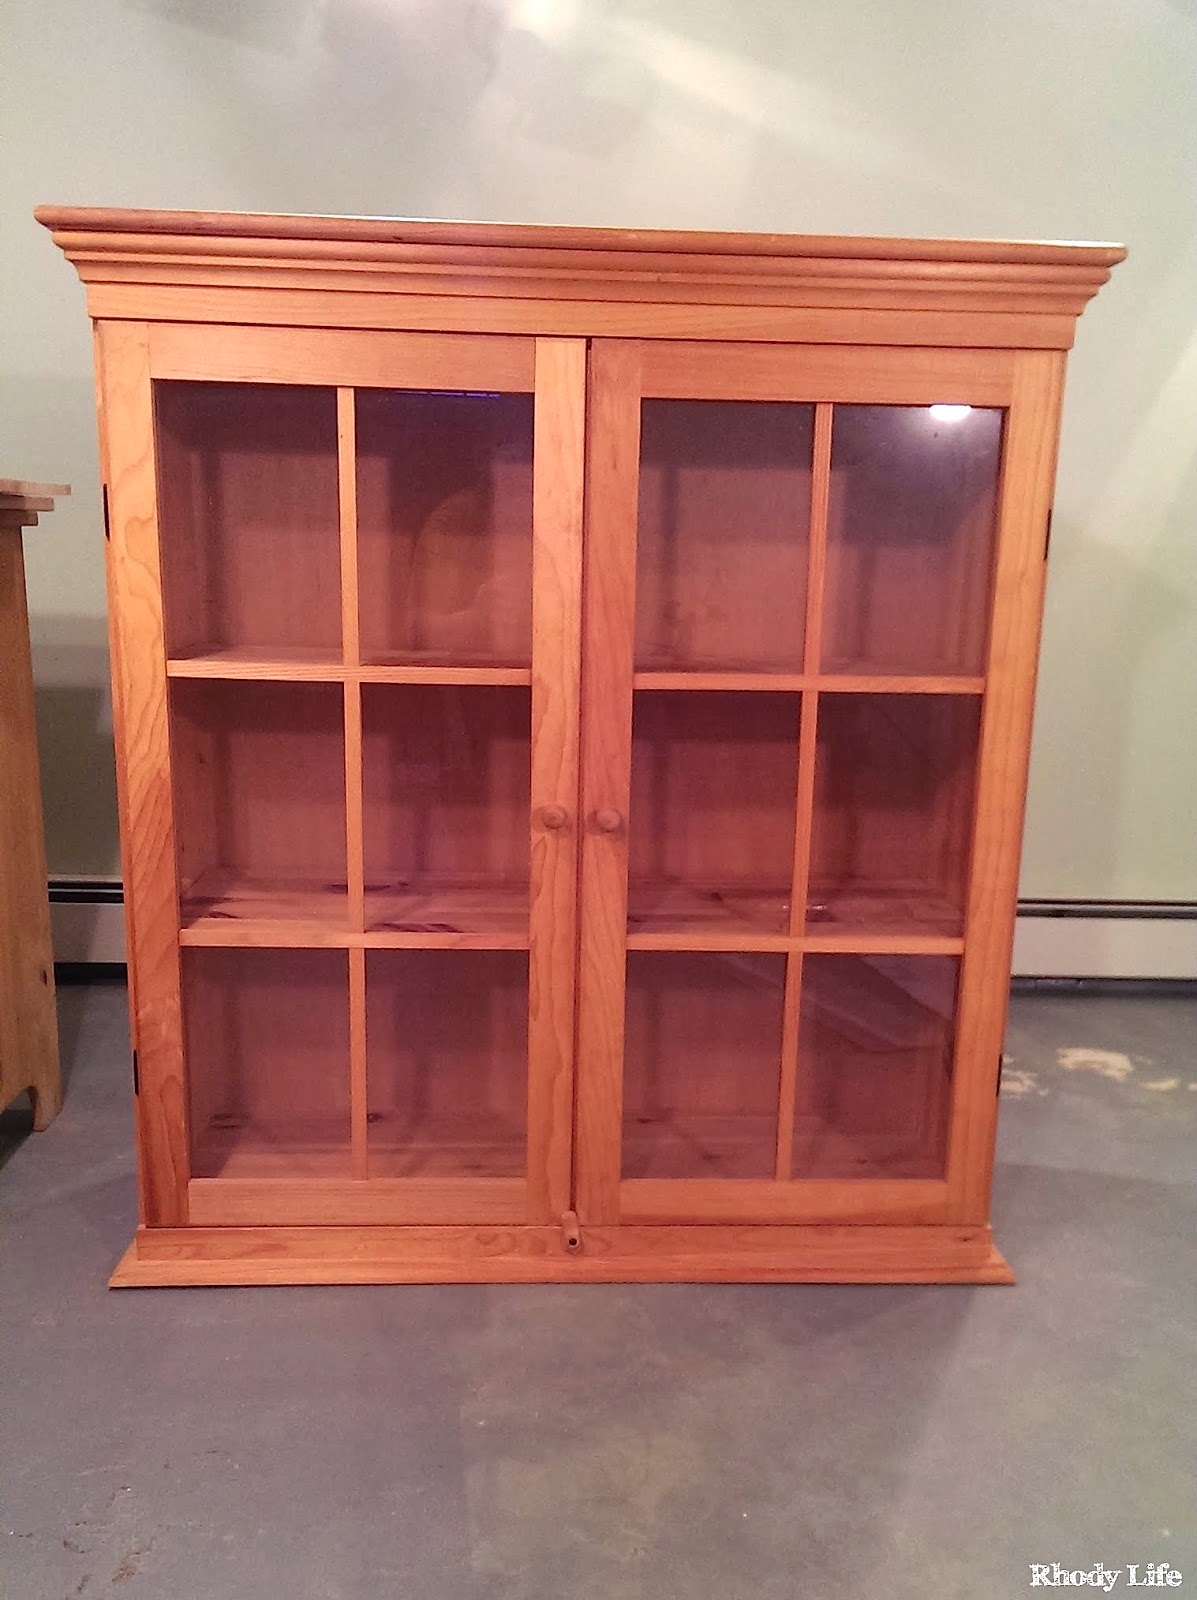
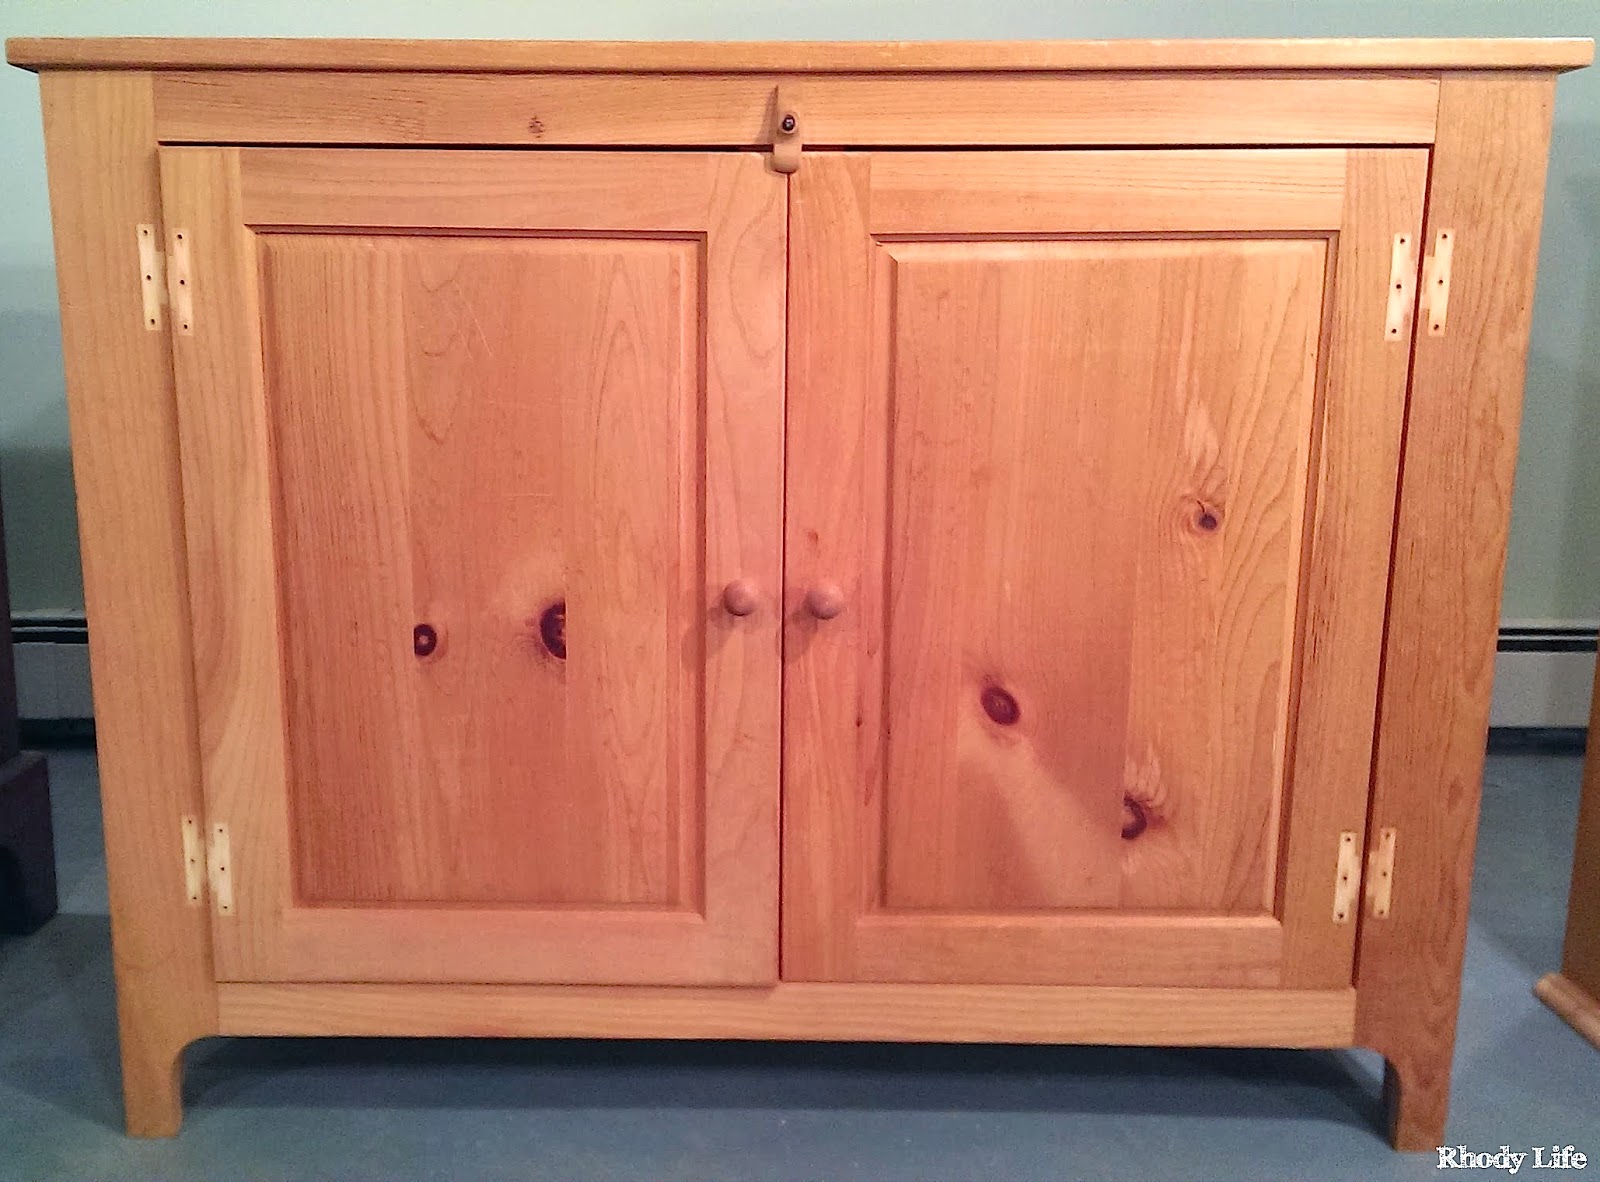
The first step in refinishing it was to sand the wood down. I wanted to get the years of dirt off of the piece and by sanding it, I would be able to make sure that the paint would be absorbed into the wood properly, leaving me with a good finish. It took me just about an hour to sand all of the shelves, the doors, and both the inside and outside of the two large pieces. I had decided to paint the inside of the hutch as well, even though the bottom part would have it's doors put back on, painting the inside white was going to help make it brighter and easier to see the contents. Painting the inside of the top  of the hutch white was going to be necessary because I had decided that I wasn't going to put the glass doors back on. They made the hutch look a little too traditional, and I wanted some easily accessible storage space with open shelves, which would work out perfectly without doors.


I began the painting process with two coats of primer, both of which I painted by hand with my favorite brush and mini-roller, and it took me about two hours to do the bottom part of the hutch and all the shelves and doors. I took a break to eat dinner and then painted the top half of the hutch. And I repeated that the next day. And it was so boring, honestly. In fact, I was so bored with it, that I didn't start the actual painting until I was trying out the first paint sprayer I bought. When that one didn't work as expected, I tried out a different paint sprayer, and in all my excitement, I decided to just use it on the entire thing, not just the shelves and doors as originally planned. And it turns out that that was a genius idea, because the hutch only needed one coat of paint with the sprayer, and it was done in less time than it took me to hand prime just the bottom part of the hutch!

Have I mentioned how much I love this paint sprayer? Didn't think so. :)


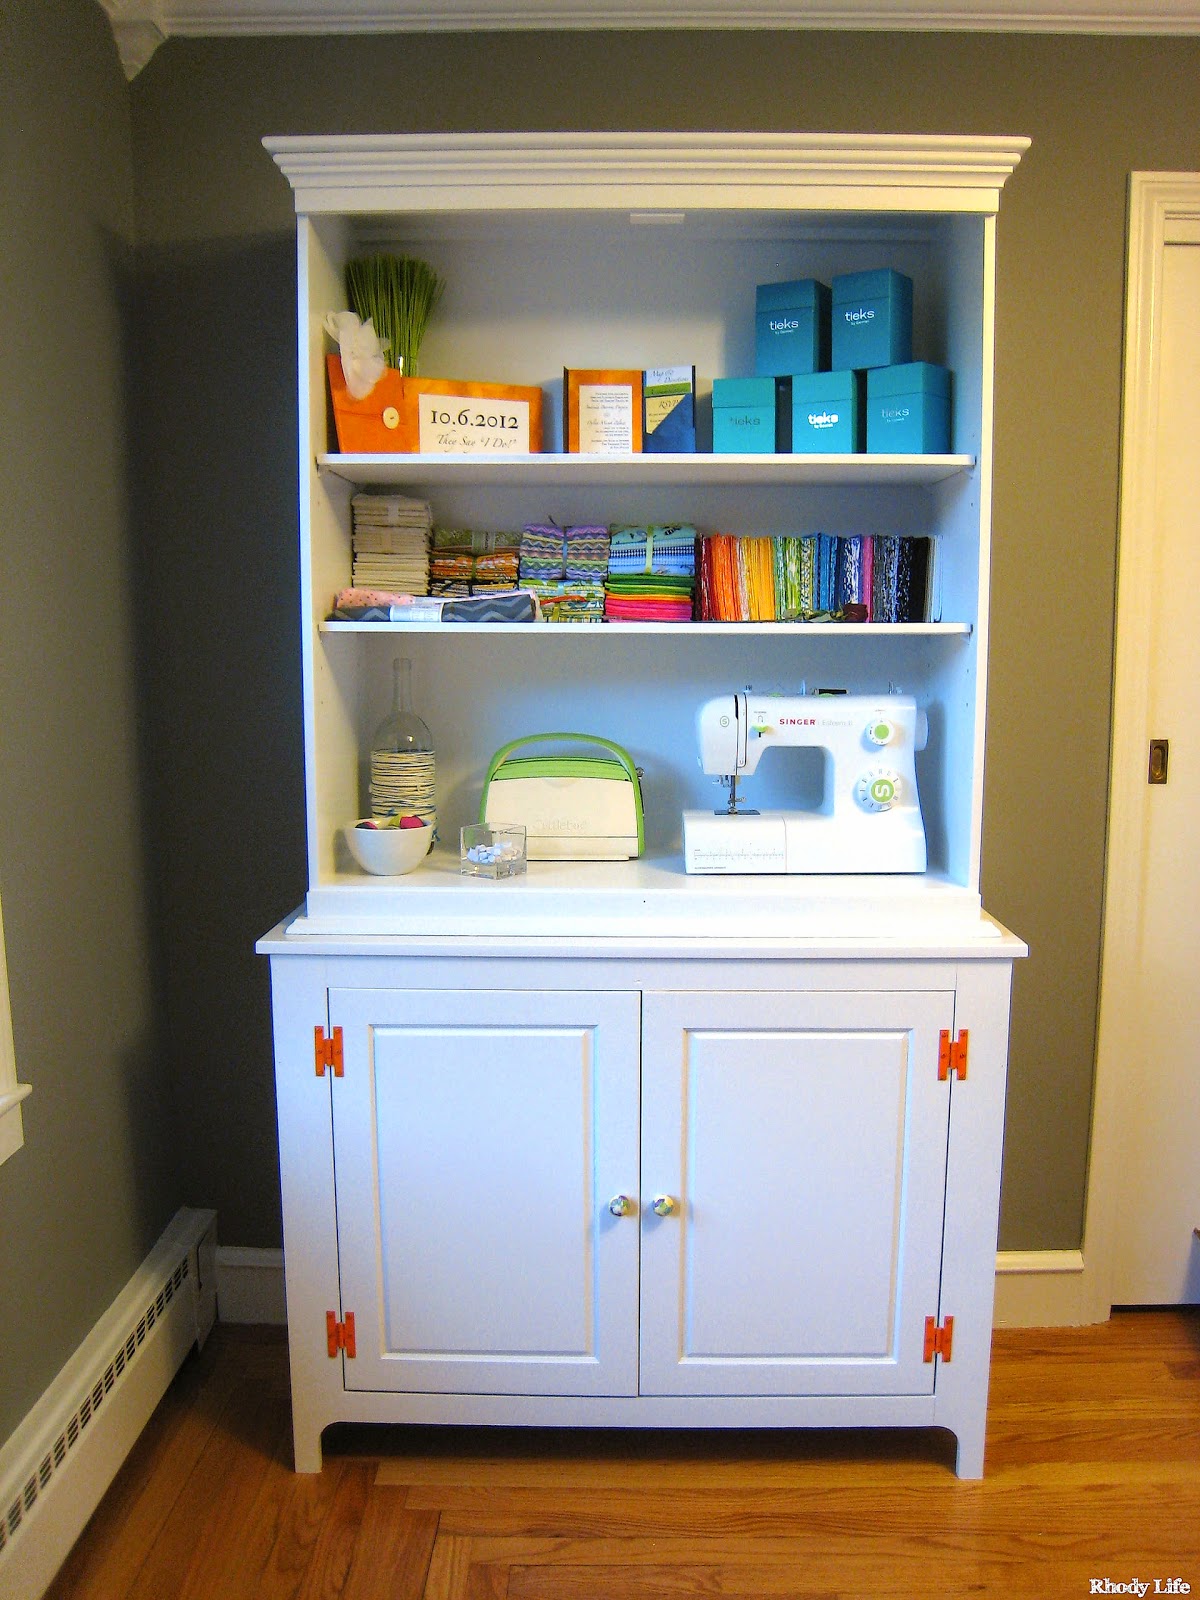
Anyways, once it was finished, I had Dylan help me bring it back upstairs and into the craft room, where I pushed it into what I am hoping is it's final location in the room. I'm still not quite sure if I like it where it is, but if I need to move it around a little bit, it should be pretty easy to do so. In the meantime, however, I did populate it with some of the items from our wedding, the boxes from my favorite shoes, all of my fat-quarters, my sewing machine, the Cuttlebug, and in the closed part of the hutch are some fabric scraps and batting, and paper products. It probably won't stay that way, since I still have tons of stuff in boxes that needs unpacking, but for now, it's great! It's so funny that a dining room hutch would be the perfect solution to storage for a craft room - just shows how repurposing furniture can end up working out so well!


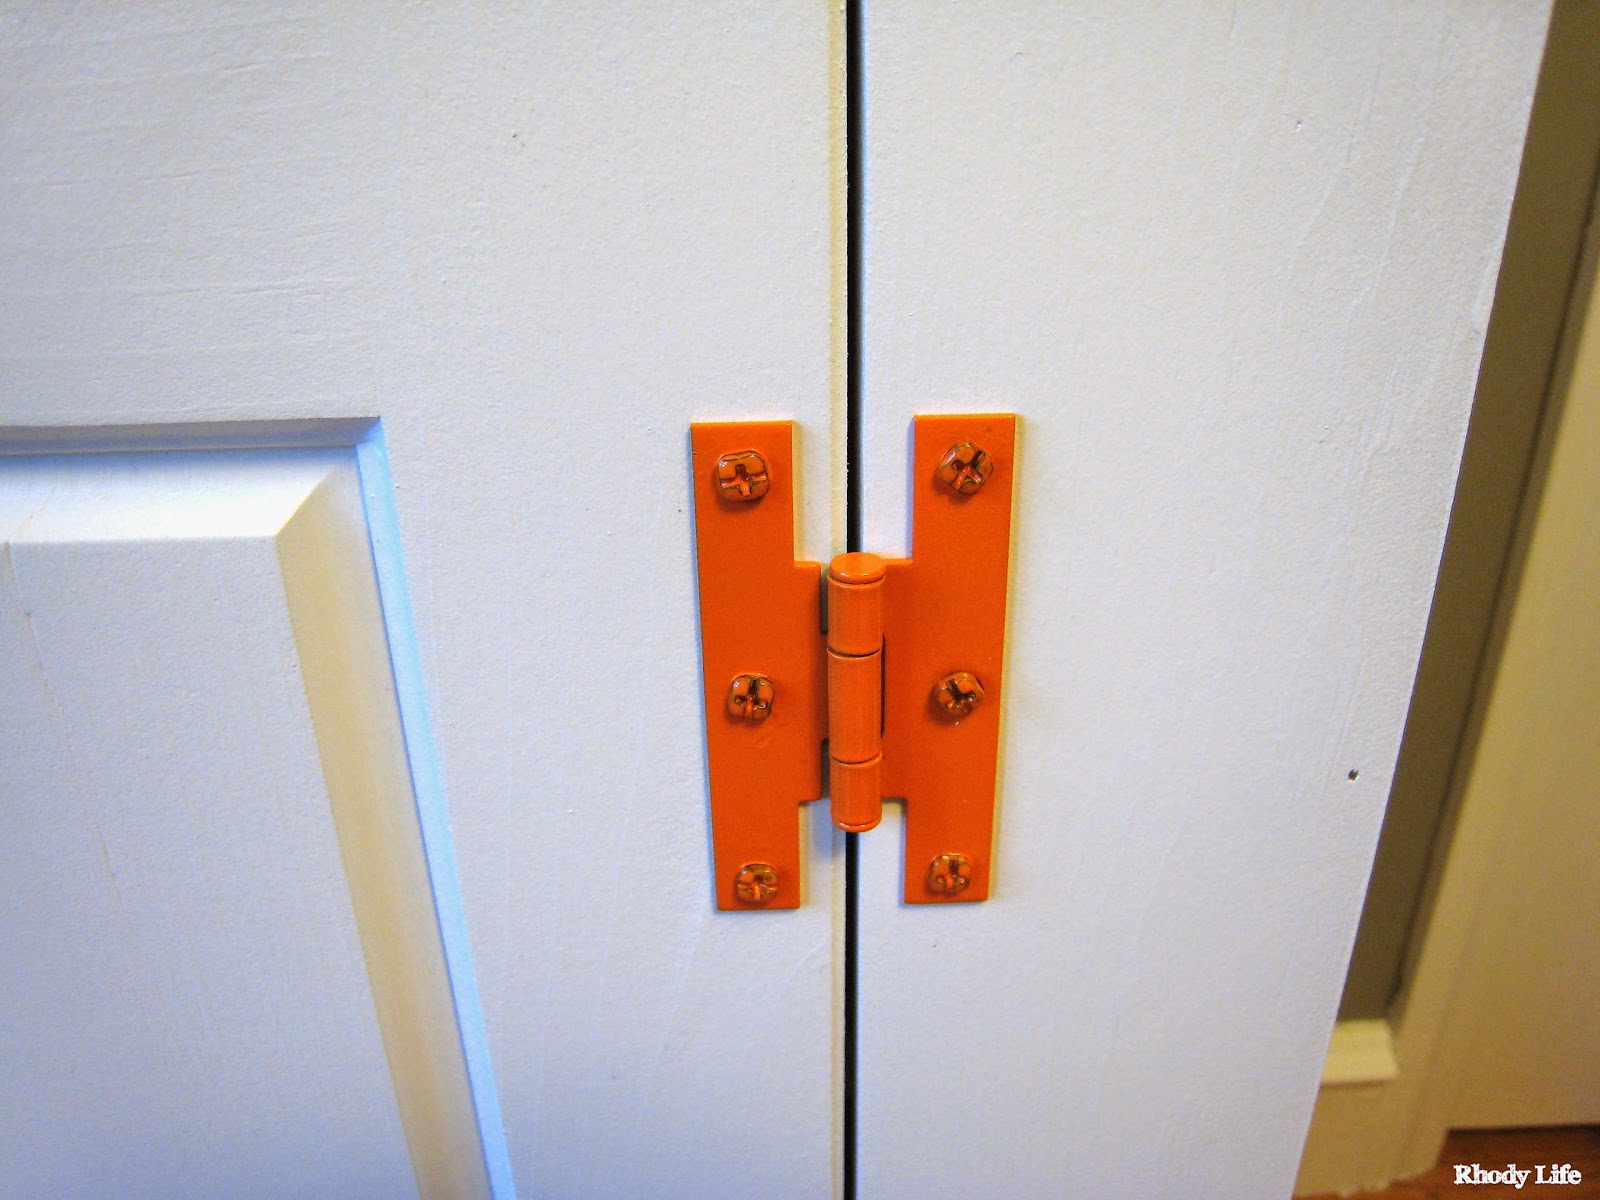
In terms of the hardware, I didn't change it out, as the holes were already there, and the hinges were in good condition, they just date the piece a little bit. But, instead of keeping them black, I decided to prime them and then spray paint them orange! A little more color in a room for crafting just makes it happier, plus, a little more orange is never a bad thing, especially since it's my favorite color!


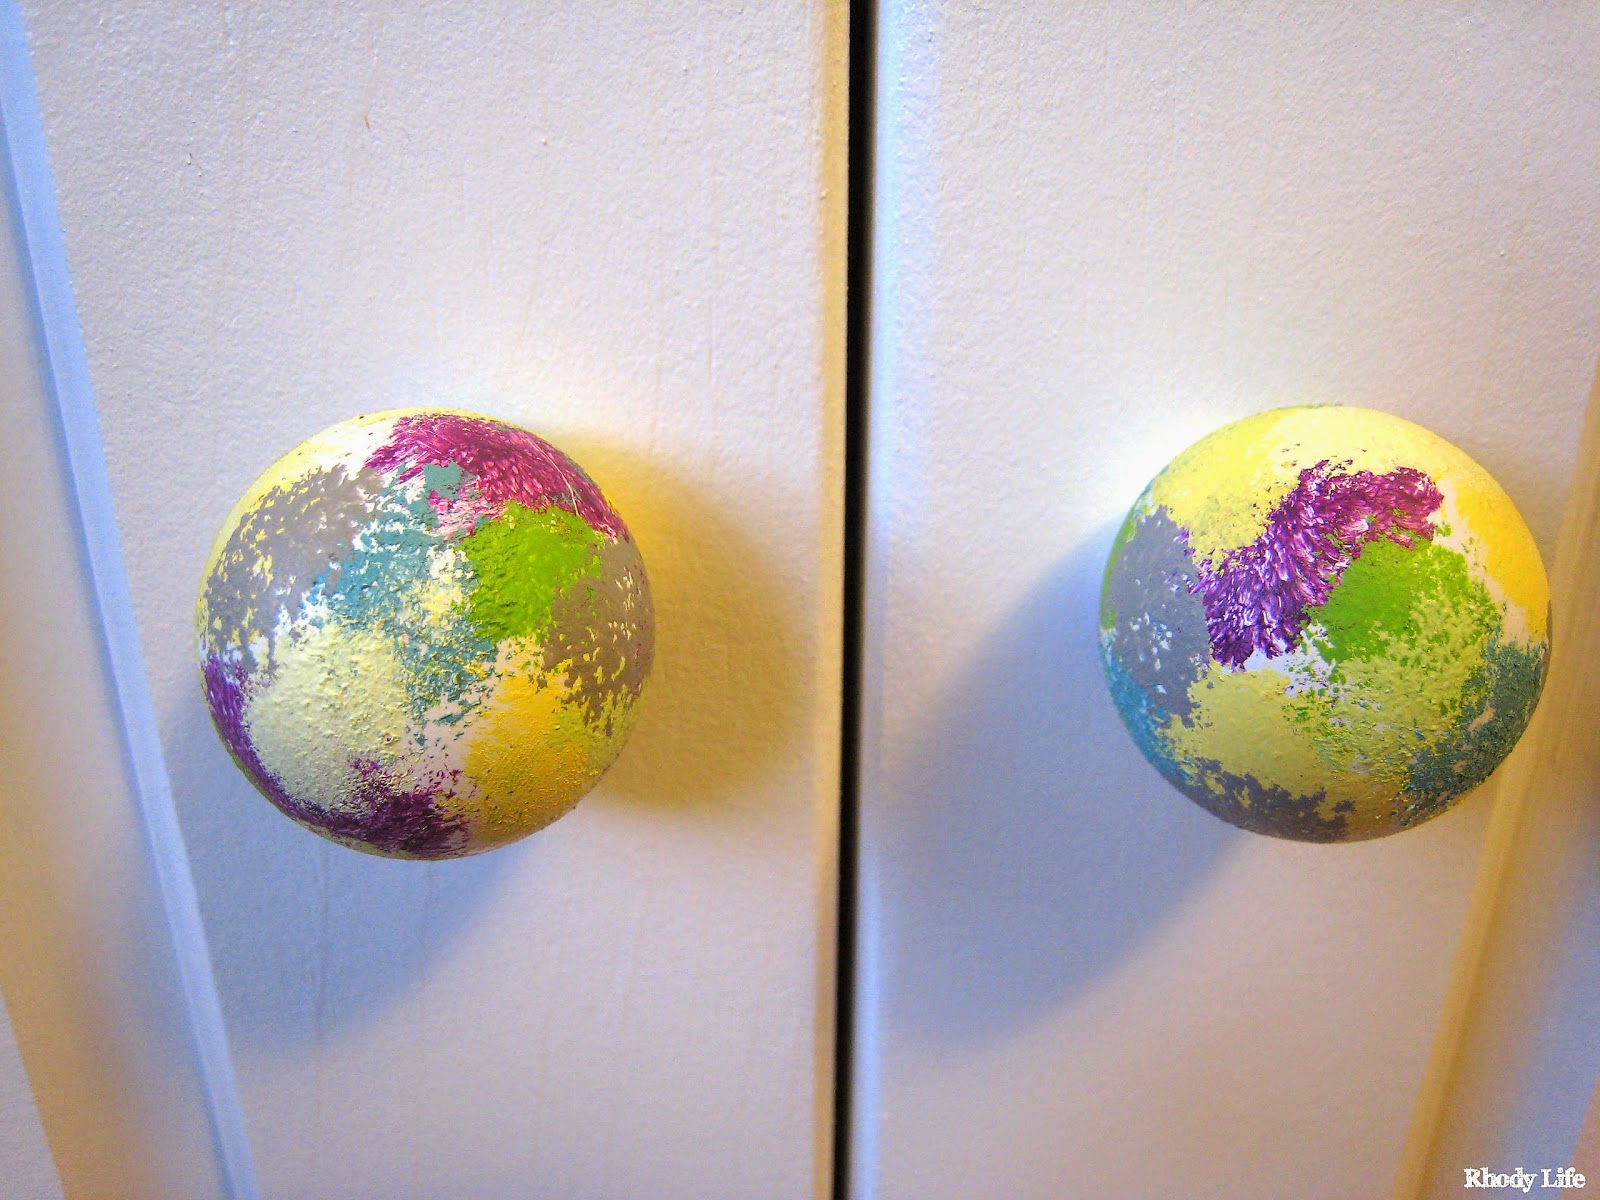
The knobs were in good condition too, but they were just a little too small, in my opinion. I took a trip to Hobby Lobby to see if they had anything fun and playful, but I didn't realize how expensive knobs could be! So while I was there, I just went to the wood crafts aisle and grabbed a bag of 4 round knobs for less than it would have cost me for one knob! I put a few coats of high-gloss white paint on them, and then decided to pull out the paint rollers that I used for testing swatches on the interior walls of the house that I had been storing in plastic baggies since the Fall! Since they were stored in air-proof baggies, they still had a lot of paint on them, so I just took out all of the rolls and starting pressing them onto the knobs in different places. And when I had almost all of the white covered and all of the colors of the house, I left them to dry, and then put them up on the doors of the hutch and loved them!


I'm so glad that I have this room started and that I now have some great storage in the space. I'm really looking forward to getting things finished, and checking another room off the list. Just a few more things to hang, some tables to set up, and a chair to find, and then this room will be done until I decide to tackle the serious lack of organization in the closet. 

Have you ever painted a piece of furniture with a spray gun? What about decorated your own furniture knobs?

Wednesday, April 9, 2014

No More Brushes

A few weeks ago, I bit the bullet and finally ordered a paint sprayer. I had been wanting one for a really long time, and honestly, it would have been great to have one when we were painting all of the doors on the first floor, but I was just not ready to purchase one yet.

I was caught up in reading every review I could possibly find on all of the different types of paint sprayers and all the different brands. And then I thought I had found it, so I ordered it. It's known as The Critter. Bloggers have praised it, Amazon had amazing reviews, and it's price was amazing at only $50! Plus, it was just an attachment for an air compressor, which I already had.

It arrived in two days, via my Amazon Prime subscription, and I immediately brought it downstairs into my basement workspace. Now, this little paint sprayer is quite creative - it uses mason jars as the paint containers, which means you could buy a pack of twelve at the store and have a container for every paint color you need! I filled up the jar with my white paint, thinned a little with water, as the paint manufacturer suggested, and hooked it up to my air compressor. I let the compressor fill and when it was ready, I pulled the trigger to start spraying.


Except, it didn't spray. I fiddled with the height of the nozzle and the opening in the straw, but it still wouldn't spray. I messed with it for an hour before I set it down for the night and gave it a rest. The next day, I started up with it again. I let the air compressor tank fill completely, and again, pulled the trigger. I messed with the nozzle, and finally got a little bit of paint to come out. I messed with the nozzle a bit more to see if I could get more to spray, but at that point, my air compressor ran out of air and needed time to refill.

I spent a total of three hours trying to get this thing to work, and the best point that I got to was being able to spray for about 30 seconds, at which point my air compressor ran out of air. Most of this was the fault of the air compressor, as I guess it wasn't strong enough to power The Critter, but I still didn't like the paint sprayer. When I did get it to spray, it was the smallest line of paint I have ever seen. In fact, you can actually see some of the test sprays on the sheet in the right side of the picture below - they were that small. I was painting the shelves in the hutch that I was refinishing, and I was maybe getting two inches of paint on every line. Overlapping was causing drips and minimal spacing was leaving visible lines when the paint dried, especially since I was using a semi-gloss paint over a flat primer.


It just wasn't working for me. The spray area was too small, and the fact that it didn't work well with my air compressor was enough for me to send it back. I'm sure that with the right equipment, The Critter would work really well, but based on the results that I saw, I believe that this sprayer would be best for detail work and not something large scale, like painting shelves, doors, or furniture.

Back to researching. It didn't take me long to find a different paint sprayer, and although it was more than double the cost of The Critter, I decided to go with the Wagner 518080 Control Spray Max, which is actually a HVLP spray gun that has a built-in air compressor. Like The Critter, it was delivered in two days via Amazon Prime, and when it arrived, I couldn't get it out of the box fast enough. I was so excited to give it a shot. I pieced it together, filled up one of the paint containers with my semi-gloss thinned paint and tested the spray on the plastic protective sheeting I had hanging from the wall in the basement.

And it worked! Amazingly and perfectly! All I had to was adjust the pressure of the spray to make it a little less globby and it was good to go. Painting one side of the shelf took approximately 15 seconds and it looked perfect. There wasn't a single drip, there weren't blotchy areas, the overlap was perfect without being too heavy, and I could even tilt it to the side to get into difficult areas and the paint would still feed through the straw!  Best of all, though, was that it dried without streaks and with a perfect semi-gloss finish, just like I asked it to!


I was in love, instantly, and actually, I still am. I have used this on shelves, doors, and actually full pieces of furniture and it has worked tremendously. And with the exception of it only coming with two containers, I am so happy with this spray gun that I couldn't recommend it more. I'm on the lookout for some additional containers that work with this model, and while I'm sure there are some available to purchase from Wagner, I'm wondering if there are any around-the-house items that may end up working, like perhaps an empty mayonnaise jar? Worth a shot, right?

I can't wait to use this more, and I already have a ton of projects in mind, because not only will this spray gun work for paint, but you can also use it with stains and finishes, which means refinishing the futon frame we have may end up taking way less time than anticipated. And, I can throw away all those brushes, and never have to clean one out again! Not really, but this spray gun will certainly cut back on the amount of brush cleaning I will have to do, which is always welcome.

Do you have a paint sprayer? What brand did you go with? Have you used it with products other than paint? Fill me in!

Wednesday, March 19, 2014

Sanding Indoors Makes a Mess

Whoa there, it's been a while, huh? I've kind of fallen off the wagon with blogging, and more specifically, Flash Sale Friday, because things have been so much busier than normal and I just haven't had the time! I'm really hoping to jump back on, so look for one at the end of the week!

In the meantime, I've been up to a lot. I have started to refinish some of the furniture for the house, and am still constantly looking for other pieces to add to our decor. I knew that I was taking a risk in sanding down the furniture in the basement, but it's just been too cold outside to do this in the garage or the driveway.


What I didn't realize was that even though my random orbital sander has a dust bag attached that it wouldn't catch everything. So, my basement ended up covered in a sheet of sawdust. And I'm talking like 1/8" of sawdust, everywhere, including on the top of the laundry detergent bottles and covering the hot water tank. Everywhere.

Prior to this, I was using our house vacuum to clean things up because they weren't that messy, but I just didn't think that my house vacuum would like that dust all that much, so I bought a Wet/Dry Vacuum, and boy am I glad that I did. The basement was a mess, and this thing worked soooo well, thankfully.


And now that the basement is clean again, I've started to actually paint and stain the furniture. It's a lengthy process, especially when I only have time to work on the projects when I get home from work.


All set up for painting, this is the two-piece hutch that will be going in the craft room. Along the right side of the picture you can start to see the drawers of the bureau, which will be refinished for the guest bedroom.  Once these two pieces are done, I'll start on my favorite item - the card catalog! One thing I have learned from this process is that I will be making a sanding station in the basement, cordoned off with some drop cloths, that way the entire basement doesn't end up in another layer of dust!

Live and learn, right?

What have you been up to recently? Any plans to refinish furniture?

Wednesday, February 26, 2014

How $45 Has Saved Me At Least 10 Hours

One piece of background information is needed for this post - I am a Google Chrome user. I'm sure most of you can understand the use of this browser, but if you haven't already made the switch from Firefox or (gasp!) Internet Explorer, please do for these reasons: safety, ability to share bookmarks across devices, integration with Google Accounts (Gmail, Calendar, Drive, Blogger, Analytics, AdSense, etc.), it's extensions (Pinterest, AnyDo, Evernote, etc.), and most importantly, it's tab-enabled. Now, what goes along with this post is the part about tabs - I am a tab hoarder.

Don't believe me? Well, I don't need to explain anything using words. I'll just show you a screenshot of my current browser.


I won't make you count, but as you can see, there are a lot of tabs open - 52 to be exact, but that's just on this one browser window, on this computer. I use almost all of these on a daily basis, and the others that I don't visit as frequently are there as a reminder that I need to check something.

Now, you're probably asking, "What does this have to do with this post?" Well, one of the tabs that I have open is above is the Sears webpage. I refresh the page every morning to check what's been put on sale. One day a few weeks ago, I finally had hit the jackpot. The DeWalt Random Orbital Sander that I had been eyeing was marked down to just $45! I decided to save on shipping so I stopped by the store after work with the intention of purchasing it. Turns out, though, that the price was only valid for online purchases, and the in-store price was $60 - not outrageous, but still more than I wanted to spend. Bummer, right?!

I was disappointed, but then I figured out a secret! I decided to just bring up the Sears website on my phone, order the sander, and set the delivery option to In-Store Pickup! Since I was already at the store, I just had to walk over to the Merchandise Pickup Window, and grab the sander. And I did just that.

I was able to get the sander for the online-only price of $45 and had it within 5 minutes at the pickup window. So, there's a tip for when you are in store. Always check the online price before making your purchase, because that nifty little "In-Store Pickup" option can help you save a lot of money!

Now, as the title of this post suggests, this sander has saved me hours and hours of time. How?

Sanding doors.

Sanding Doors with Power Sander

About two weeks ago, we removed all of the interior doors on the first floor to paint them. In addition to that, I also removed all of the hardware and gave it a good bath in some soapy water. They really needed some TLC, but that's for another post.

I wiped the doors down to get some of the grease and buildup off of them, and then sanded them down using my brand new random orbital sander! So, for a total of 10 doors (so far!), I was able to save myself at least 10 hours of sanding, since each door took me about 15 minutes with the sander rather than over an hour by hand.

Sanding Doors with Power Sander
Please ignore the gross painting/cleaning/tool-using clothes again. It's also necessary to dress in layers for working in the basement. 

Best investment ever. Seriously. I haven't even tackled the doors on the second floor yet, not to mention all of the furniture that I will be refinishing, so this is easily the best $45 I have spent so far in my home renovating and DIY-ing. And for the amount of doors I was sanding, I probably would have gone through that amount of money in sandpaper had I been sanding by hand!

We just put the last coat of paint on the doors and today is the end of the 24-hour curing process I like to let them sit through, so we will be putting them back on the frames tonight after work. I'm so excited to have doors back - the cats are messing with things in closets and it's just awkward because we can't have guests over when there's no bathroom door!

Have you purchased a tool using Sears' In-Store Pickup option? Were you able to catch a break in the price, making the purchase that much more justified?


Please Note: I was not compensated for writing this post. I was not contacted by Google Chrome or Sears to provide this information and review. All opinions are my own.  

Monday, February 24, 2014

The Power of Paint

This has to be one of the most exciting transformations that I have completed so far using just paint! Are you ready for it? Great, because I can't wait to show you!

Remember the corner bedroom that was the only room in the house that had natural wood-tone trim in it? Well, it's gone! Forever! The same weekend that we painted the small bedroom/craft room, we also tackled this room. With the help of a family friend (Thanks Again!!!) we were able to actually paint two rooms completely, one of which was the craft room that I already showed you. The other, I haven't yet - I'm not quite finished with some non-paint things, so that's on hold for right now.

But, this room. The transformation is amazing, guys! So let's get to it, right?

Here's the before. Please ignore the large rolled-up rug and the box of crap in the middle of the room.  The rug weighs over 100 pounds, and I just didn't feel like moving it.


Boring, right? I mean the wood is nice and all if you like stained wood, even though it's just bead-board, but it wasn't working for me.  So, we changed it. And now? I think it looks fabulous!

painted wood moulding


painted wood moulding

Huge difference, right? The power of paint, right there folks.  I am so in love with it and can't wait to start adding in the furniture I have planned for the space!

Now, while you may think that was just too easy, let me tell you that it wasn't as easy as it looked. It took two coats of green paint, two coats of primer on the wood, and then four coats of white paint in order to get the coverage we needed.  And not only that, but I had to do a lot of caulking where the seams on the bead-board were showing and the nail holes were never sealed.  

Also, you might not have noticed from the before pictures above, but the quarter round along the base of the moulding wasn't actually quarter round. It was concave, ugly, broken in some spots, and the worst thing I found was that whoever installed the moulding nailed it into the hardwood floors! I couldn't have been more furious when I found that out.  But, that explains the giant gaps between the moulding and the bead-board - it wasn't even attached!  


Instead of just working with it, however, I decided to replace it. A few 8' sections of quarter round wasn't going to be too much for me to handle, especially when it makes such a big difference in the way the room looks. So, I kept the old molding in place so that I could protect the floors when we were painting, and since the new quarter round I was buying was going to be slightly taller, I didn't have to worry about being neat down there at the bottom.  

quarter round

Once I had three coats of white paint on, I removed the existing foot moulding.  And it was so easy. In fact, after I had done one wall, I had to video the removal of the moulding on one of the others, because despite it being nailed into the hardwood floors, it came up like it was just installed with double-sided tape!


Next, I figured out the measurements of the amount of quarter round I needed, and then began cutting, using my miter box.  I ended up purchasing PVC quarter round because it was cheaper than wood and was already primed, so it made the project just a little easier for me.  Using the existing pieces of moulding as a guide, I was able to figure out the cuts that I would need to join the pieces together.  If you are not working with existing quarter round, figuring out the cuts is a lot easier than you would think. For a perfect 90 degree angle, which is what you will typically have in a room, you will need opposite 45 degree cuts on your two intersecting pieces. You want the cuts to be so that the back of the moulding is the longer side, which you can see in the picture below - that is a picture of the right side of a corner piece being cut.  

mitering moulding corners

For long walls that you need to add additional straight pieces to, think about the cuts like you accidentally cut a piece into two when you didn't mean to. Those two pieces will go back together perfectly, if you just put them back the same way you cut them. In other words, make sure that the pieces of moulding are facing the direction that you want them to, then do one of the cuts on one of the pieces, and then the same cut on the other.  Don't over-think the cuts - they will work out!

Make sure to dry-fit all of your pieces first, that way you can make any changes that you need to with additional cuts or even sanding. You want the pieces to fit tightly, but not too tight, as you don't want them to warp or bend.  

After you have your pieces cut perfectly, you are ready for install. I was so excited for this part, because I had just bought myself a pneumatic nail gun! I got it on sale at Sears, and after using some of my points from previous purchases, I only paid $60! Talk about a great deal, right?

air compressor nail gun

I already had my moulding pieces in place from the dry-fit, so I just moved around the room with my nail gun, putting one nail in the center of each piece, and then every 10 or so inches to each side, including one towards the end of each piece. After each piece was in, I tested to make sure that it was attached securely by gently pulling at it and then I added some extra nails when necessary.

using nail gun
Please ignore the gross painting/cleaning/tool-using clothes.  I was a stylish DIY'er until I ruined my favorite pair of jeans. 

Once all the moulding was installed, I caulked the seam between it and the baseboard, and put a little dab on all of the nail holes, and then put one last coat of paint on everything to blend it all in.

finished install of quarter round

After I was done, I was so proud and amazed at the way the room looked.  It's such a dramatic difference in the look, and it is so much brighter with all of the white paint! Now to add some furniture! Woohoo!

Do you have a pneumatic nail gun? Ever installed moulding before? I can't wait to do more!

Wednesday, June 19, 2013

New Home Survival List

When we first decided to buy a house, we know that when setting our budget, that we would have to allocate funds for things that we have never had to buy before. In living in an apartment and with family, there are items that you don't typically think about needing.  After you move into your new house, you'll then realize how many things you actually do need!

I've gotten a lot of questions about what types of tools and things you need that you wouldn't normally think about until you move in, so I have compiled this survival list of items you will need when you finally close on that new house!


I hope that you find this list helpful in your new home-owning adventures! If you notice that anything is missing, please let me know in the comments below and I will add the items to this list!  
Related Posts Plugin for WordPress, Blogger...
Pin It button on image hover