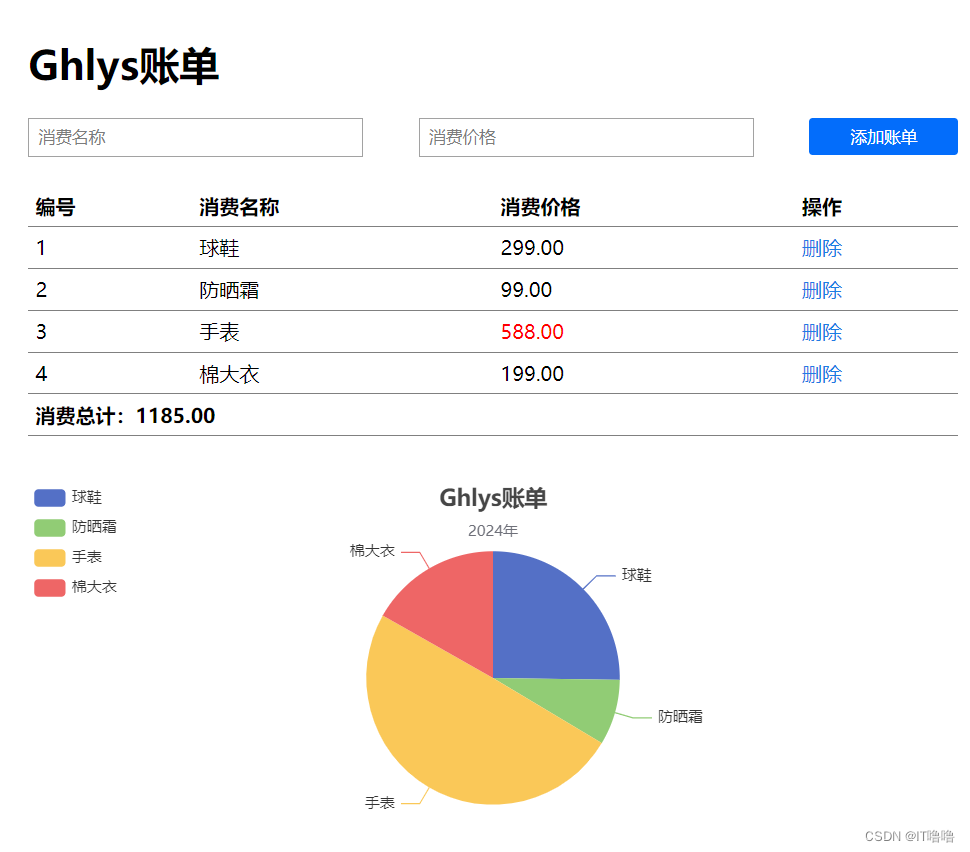
一、 实现效果
二、 代码
<!DOCTYPE html>
<html lang="en">
<head>
<meta charset="UTF-8">
<meta name="viewport" content="width=device-width, initial-scale=1.0">
<title>Document</title>
<style>
* {
margin: 0;
padding: 0;
outline: none;
color: inherit;
text-decoration: none;
}
#instance {
width: 50vw;
margin: 5vh 2vw;
}
.add {
display: flex;
justify-content: space-between;
width: 100%;
margin: 3vh 0;
input {
width: 100%;
height: 3vh;
border: 1px solid rgb(162, 162, 162);
margin: 0 3vw 0 0;
padding: 0.5vh 0.5vw;
}
input:focus {
box-shadow: 0px 0px 10px #036dfb;
}
input::placeholder {
color: rgb(124, 124, 124);
}
.addBtn {
width: 8vw;
height: 4vh;
border: none;
border-radius: 3px;
background-color: #036dfb;
color: white;
cursor: pointer;
}
.addBtn:active {
background-color: #1d7efe;
box-shadow: 0px 0px 10px #036dfb;
}
}
.container {
width: 100%;
table {
width: 100%;
border-collapse: collapse;
}
tr,
th,
td {
border-bottom: 1px solid grey;
text-align: left;
padding: 0.8vh 0 0.8vh 0.8vh;
a {
color: #1d7de4;
}
a:active {
color: none;
}
}
.active {
color: red;
}
.count {
font-weight: bolder;
}
}
.view {
width: 50vw;
height: 42vh;
margin-top: 5vh;
}
</style>
</head>
<body>
<div id="instance">
<h1>Ghlys账单</h1>
<!-- 添加账单功能 -->
<div class="add">
<input type="text" placeholder="消费名称" v-model.trim="newName">
<input type="text" placeholder="消费价格" v-model.number="newPrice">
<div> <button @click="add()" class="addBtn">添加账单</button></div>
</div>
<!-- 账单主体 -->
<div class="container">
<table>
<thead>
<tr>
<th>编号</th>
<th>消费名称</th>
<th>消费价格</th>
<th>操作</th>
</tr>
</thead>
<tbody>
<tr v-for="(item,index) in list" :key="item.id">
<td>{{index+1}}</td>
<td>{{item.name}}</td>
<td :class="{active:item.price.toFixed(2)>=500}">{{item.price.toFixed(2)}}</td>
<td><a href="#" @click="del(item.id)">删除</a></td>
</tr>
</tbody>
<tfoot>
<tr>
<td colspan="4" class="count">消费总计:{{total}}</td>
</tr>
</tfoot>
</table>
</div>
<!-- 可视化账单 -->
<div class="view">
</div>
</div>
<script src="https://cdn.jsdelivr.net/npm/vue@2/dist/vue.js"></script>
<!-- 引入acios包 -->
<script src="https://cdn.jsdelivr.net/npm/axios/dist/axios.min.js"></script>
<!-- 引echarts包 -->
<script src="https://cdn.jsdelivr.net/npm/echarts@5.4.3/dist/echarts.min.js"></script>
<script>
const instance = new Vue({
el: '#instance',
data: {
list: [],
newName: '',
newPrice: '',
myCharts: {}
},
computed: {
total() {
return this.list.reduce((sum, item) => sum + item.price, 0).toFixed(2)
}
},
methods: {
async getList() {
const res = await axios.get('https://applet-base-api-t.itheima.net/bill', {
params: {
creator: 'Ghlys'
}
})
this.list = res.data.data
this.myCharts.setOption({
series: [
{
data: this.list.map(item => ({ value: item.price, name: item.name }))
}
]
})
},
async add() {
if (!this.newName) {
alert('请输入商品名称')
this.newName = ''
this.newPrice = ''
return
}
if (!this.newPrice) {
alert('请输入商品价格')
this.newName = ''
this.newPrice = ''
return
}
else {
const res = await axios.post('https://applet-base-api-t.itheima.net/bill', {
creator: 'Ghlys',
name: this.newName,
price: this.newPrice
})
this.getList()
}
},
async del(id) {
const res = await axios.delete(`https://applet-base-api-t.itheima.net/bill/${id}`)
this.getList()
},
},
created() {
this.newName = ''
this.newPrice = ''
this.getList()
},
mounted() {
this.myCharts = echarts.init(document.querySelector('.view'))
this.myCharts.setOption({
title: {
text: 'Ghlys账单',
subtext: '2024年',
left: 'center'
},
tooltip: {
trigger: 'item'
},
legend: {
orient: 'vertical',
left: 'left'
},
series: [
{
name: 'Ghlys账单',
type: 'pie',
radius: '65%',
data: [
],
emphasis: {
itemStyle: {
shadowBlur: 10,
shadowOffsetX: 0,
shadowColor: 'rgba(0, 0, 0, 0.5)'
}
}
}
]
})
}
})
</script>
</body>
</html>
三、总结
3.1 关于HTML与CSS样式
- 表单完整结构代码如下:
tr表示行、th或tr表示列;rowspan属性 设置纵向合并单元格;colspan属性 设置横向合并单元格;- table与td之间默认有间距,可以给table添加
border-collapse: collapse;解决,但这样会出现重复的边框(不美观),所以我们一般使用border-collapse: collapse;这中解决方案有效消除间距,而且不会有重叠边框; - td,th,tr同时加边框,并不会出现叠加。
详情查阅官方文档
      <table>
        <thead>
          <tr>
            <th></th>
            ...
          </tr>
        </thead>
        <tbody>
          <tr>
            <td></td>
            ...
          </tr>
        </tbody>
        <tfoot>
          <tr>
            <td></td>
            ...
          </tr>
        </tfoot>
      </table>
- 输入框的提示文本样式控制:
input::placeholder {}; - 取消a链接的默认样式:
color: inherit; text-decoration: none; - 发光边框:
box-shadow: 0px 0px 10px #036dfb;
3.2 关于Vue语法
- 注意动态class加语法
:class="{xx:xx}" - v-model指令修饰符
v-model.trim:去收尾空格
v-model.number:转数字;
3.3 关于JS语法
.toFixed(修整位数):将字符串转换为小数;- axios发送get请求:
        async getList() {
          const res = await axios.get('https://applet-base-api-t.itheima.net/bill', {
            params: {
              creator: 'Ghlys'
            }
          })
          this.list = res.data.data
        },
- axios发送post请求:
async add() {
          const res = await axios.post('https://applet-base-api-t.itheima.net/bill', {  // 请求链接后面跟一个对象,对象内是需要发送的数据
            creator: 'Ghlys',
            name: this.newName,
            price: this.newPrice
          })
        }
数组。map():对数组每一项进行处理并返回处理结果。
箭头函数中如果返回值指定为对象,要在{}外面包一层(),否则会将返回的对象识别为一段代码段。
this.list.map(item => ({ value: item.price, name: item.name }))
3.4 关于功能
- 将需要多次用到的方法封装在methods中;
- 对输入框内的内容进行简单合法性(非空)判断;
- 添加新账单:
- v-model绑定数据;
- 点击按钮添加事件触发,事件内发起请求;
- 请求发出成功后需要重新渲染;
- 删除账单功能:与添加功能大同小异,根据接口文档传递对应参数即可。
需要注意的是,id并不是写死的,所以请求连接用``包含,并且使用${}语法。
const res = await axios.post(`https://applet-base-api-t.itheima.net/bill/${id}`)
- eCharts饼图渲染
- echarts的容器必须有宽高样式,否则不显示;
- 基于准备好的dom初始化echarts实例,所以需要__mounted__后渲染;
- 当我们想要动态更新实例,在axios异步获取数据后通过
实例.setOption({})填入数据与配置项即可; - 获取到的数组数据要进行转换为对象才能更新饼图,我们可以使用
数组.map()
methods: {
        async getList() {
          const res = await axios.get('https://applet-base-api-t.itheima.net/bill', {
            params: {
              creator: 'Ghlys'
            }
          })
          this.list = res.data.data
          //  动态跟新饼图
          this.myCharts.setOption({
            series: [
              {
                data: this.list.map(item => ({ value: item.price, name: item.name }))// 遍历数组每一个item,并返回一个对象{},对象内包含value与name,箭头函数中如果返回值指定为对象,要在{}外面包一层(),否则会将返回的对象识别为一段代码段
              }
            ]
          })
        },
mounted() {

   }     this.myCharts = echarts.init(document.querySelector('.view'))
        //不用let myCharts=...是因为以后会更新myCharts实例,但在实例在mounted中定义不能在其他地方引用,所以将当前myCharts实例挂到Vue实例上,这样子在其他地方也能引用myCharts实例
        this.myCharts.setOption({
          //  标题
          title: {
            text: 'Ghlys账单',  // 正标题
            subtext: '2024年',  // 子标题
            left: 'center'  // 控制居中
          },
          //  悬浮提示框
          tooltip: {
            trigger: 'item'
          },
          //  图例
          legend: {
            orient: 'vertical',  // 排列方向
            left: 'left'  // 排列位置
          },
          //  数据
          series: [
            {
              name: 'Ghlys账单',  //  控制悬浮时显示的数据标题
              type: 'pie',  // 图类型
              radius: '65%',  // 饼图半径
              data: [  // 数据需要动态异步更新,数据为对象数组,对象包含value与name,形如{ value: 1048, name: 'Search Engine' },
              ],
              emphasis: {
                itemStyle: {
                  shadowBlur: 10,
                  shadowOffsetX: 0,
                  shadowColor: 'rgba(0, 0, 0, 0.5)'
                }
              }
            }
          ]
        })
      }
3.5 报错
Failed to load resource: net::ERR_CONNECTION_TIMED_OUT
多数是网络问题,换下手机热点就好了。


 522
522

 被折叠的 条评论
为什么被折叠?
被折叠的 条评论
为什么被折叠?
 到【灌水乐园】发言


