


 本文档详细介绍了如何使用Dva CLI创建React应用,集成Antd UI库,定义路由,编写UI组件,管理Model以及实现数据列表的增删改查功能。项目环境包括dva 0.9.2,node 8.10.0,并提供了完整的步骤和代码示例。

本项目搭建过程参考 Dva官方快速上手教程
项目环境:(在该环境下测试通过,默认使用cnpm)
dva 0.9.2
node 8.10.0
安装 dva-cli
确保版本在 0.9.1 及以上
$ npm install dva-cli -g
$ dva -v
dva-cli version 0.9.2
创建新应用
$ dva new dva-demo
完成之后进入生成的项目文件夹并启动项目
$ cd dva-demo
$ npm start
在浏览器里打开 http://localhost:8000

使用 antd
antd 是淘宝前端团队开源的一个UI库
安装 antd 和 babel-plugin-import(babel-plugin-import 用来按需加载 antd 的脚本和样式)
$ cnpm install antd babel-plugin-import --save
编辑 .webpackrc,使 babel-plugin-import 插件生效(代码每行首个字符为 + 表示该行为新增内容,下同)
{
+  "extraBabelPlugins": [
+    ["import", { "libraryName": "antd", "libraryDirectory": "es", "style": "css" }]
+  ]
}
定义路由
创建一个数据列表页面,实现增删改查
新建路由组件routes/Products.js
import React from 'react';

const Products = (props) => (
  <h2>List of Products</h2>
);

export default Products;
添加路由信息到路由表 router.js
+ import Products from './routes/Products';
...
+ <Route path="/products" exact component={Products} />
然后在浏览器里打开 http://localhost:8000/#/products
编写 UI 组件
新建 components/ProductList.js 文件
import React from 'react';
import PropTypes from 'prop-types';
import { Table, Popconfirm, Button } from 'antd';

const ProductList = ({ products }) => {
  const columns = [{
    title: '名称',
    dataIndex: 'name',
  }, {
    title: '描述',
    dataIndex: 'desc'
  }];
  return (
    <Table
      dataSource={products}
      columns={columns}
    />
  );
};

ProductList.propTypes = {
  products: PropTypes.array.isRequired,
};

export default ProductList;
定义 Model
现在开始处理数据和逻辑:dva 通过 model 的概念把一个领域的模型管理起来,包含同步更新 state 的 reducers,处理异步逻辑的 effects,订阅数据源的 subscriptions 。
namespace表示在全局state上的keystate是初始值,在这里是空数组reducers等同于redux里的reducer,接收action,同步更新state
新建 modelmodels/products.js
export default {
  namespace: 'products',
  state: [],
  reducers: {},
};
在 index.js 里载入model
// 3. Model
+ app.model(require('./models/products').default);
connect 起来
dva 提供了 connect 方法将 model 和 component 串联起来
编辑 routes/Products.js
import React from 'react';
import { connect } from 'dva';
import ProductList from '../components/ProductList';

const Products = ({ dispatch, products }) => {
  return (
    <div>
      <h2>List of Products</h2>
      <ProductList products={products} />
    </div>
  );
};

// export default Products;
export default connect(({ products }) => ({
  products,
}))(Products);
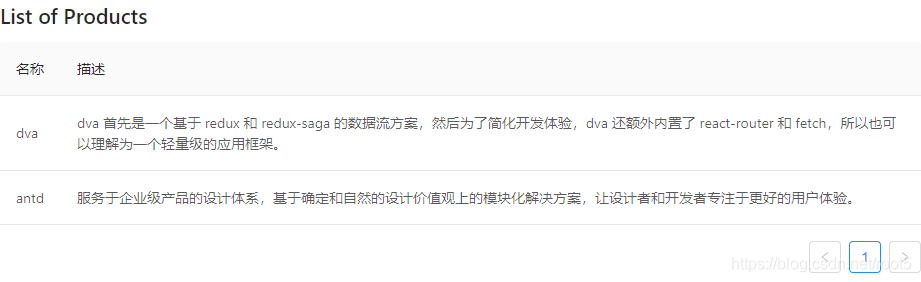
在 model 里面添加初始数据 models/products.js
export default {
  namespace: 'products',
  state: [
    {
      id: 1,
      name: 'dva',
      desc: 'dva 首先是一个基于 redux 和 redux-saga 的数据流方案,然后为了简化开发体验,dva 还额外内置了 react-router 和 fetch,所以也可以理解为一个轻量级的应用框架。'
    },
    {
      id: 2,
      name: 'antd',
      desc: '服务于企业级产品的设计体系,基于确定和自然的设计价值观上的模块化解决方案,让设计者和开发者专注于更好的用户体验。'
    },
  ],
  reducers: {},
};
刷新浏览器看到以下效果
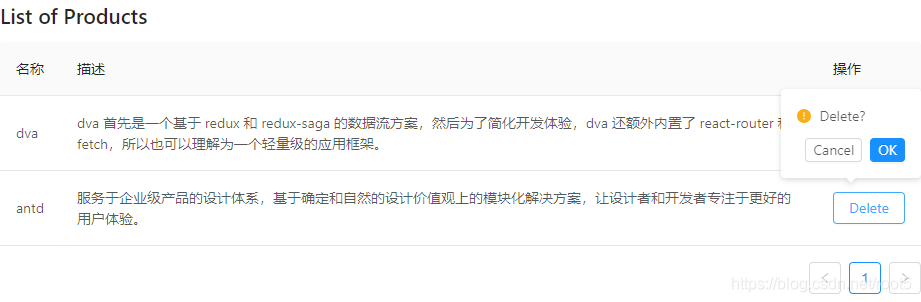
添加删除等功能
编辑 components/ProductList.js
+ import { Table, Popconfirm, Button } from 'antd';

+ const ProductList = ({ onDelete, products }) => {
...
+   }, {
+     title: 'Actions',
+     render: (text, record) => {
+       return (
+         <Popconfirm title="Delete?" onConfirm={() => onDelete(record.id)}>
+            <Button>Delete</Button>
+         </Popconfirm>
+       );
+     },
+   }];
...
ProductList.propTypes = {
+   onDelete: PropTypes.func.isRequired,
  products: PropTypes.array.isRequired,
};
...
编辑 models/products.js
reducers: {
+    'delete'(state, { payload: id }) {
+       return state.filter(item => item.id !== id);
+     },
  },
编辑 routes/Products.js
+ const Products = ({ dispatch, products }) => {
+   function handleDelete(id) {
+     dispatch({
+       type: 'products/delete',
+       payload: id,
+     });
+   }
  return (
    <div>
      <h2>List of Products</h2>
+       <ProductList onDelete={handleDelete} products={products} />
    </div>
  );
};
刷新浏览器看到以下效果
使用 Class 语法创建拥有 增/删/改/查 功能的数据列表页面
定义路由
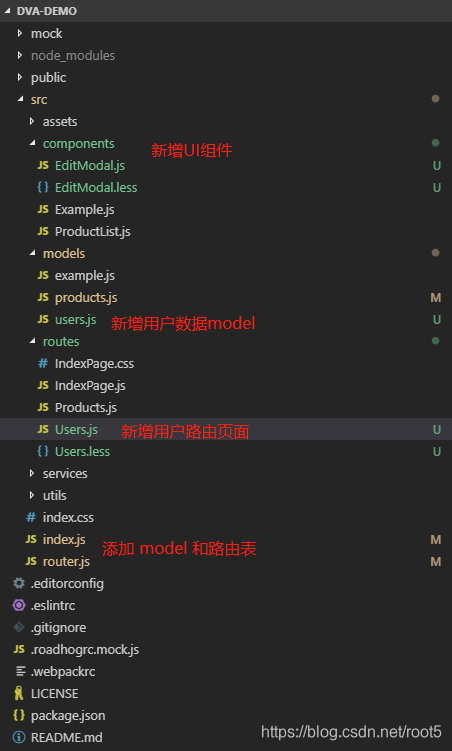
新建路由组件routes/Users.js
import React, { Component } from 'react';
import { connect } from 'dva';
import styles from './Users.less';
import { LocaleProvider } from 'antd';
import zhCN from 'antd/lib/locale-provider/zh_CN';

import { Table, Popconfirm, Button } from 'antd';
import * as lodash from 'lodash';
import EditModal from '../components/EditModal';


class Users extends Component {
  constructor(props) {
    super(props);
    this.state = {
      editModalVisible: false, // 修改弹框显示状态
      selectedRecord: null, // 当前选中的记录
    };
    this.columns = [{
      title: 'ID',
      dataIndex: 'id',
      }, {
        title: '名称',
        dataIndex: 'name',
      }, {
        title: '性别',
        dataIndex: 'sex',
        render: (text) => {
          return (
            text === 'F' ? '女' : '男'
          );
        },
      }, {
        title: '年龄',
        dataIndex: 'age'
      }, {
        title: '操作',
        render: (text, record) => {
          return (
            <div>
              <Button onClick={()=> this.onShowEidtModal(record)}>Edit</Button>
              <Popconfirm title="Delete?" onConfirm={() => this.onDelete(record.id)}>
                <Button>Delete</Button>
              </Popconfirm>
            </div>
          );
        },
      }
    ];
  }


  componentWillMount() {
    this.props.dispatch({ type: 'users/init'});
  }

  componentDidMount() {
  }

  componentWillReceiveProps(nextProps) {

  }

  handleAdd = () => {
    this.setState({
      editModalVisible: true,
    })
  }

  onDelete = (id) => {
    let { dispatch, userList } = this.props;
    let newUserList =  userList.filter(user => user.id != id);
    dispatch({
      type: 'users/saveUserList',
      payload: newUserList
    })
  }

  onShowEidtModal = (record) => {
    console.log('onShowEditModal(), record:', record);
    this.setState({
      editModalVisible: true,
      selectedRecord: record,
    });
  }

  handleOk = (newUser, type) => {
    console.log('handleOk(), newUser:', newUser);
    const { dispatch, userList } = this.props;
    let newUserList = userList || [];
    if (type == 0) {
      newUserList.push(newUser);
    } else if (type == 1 && !!newUserList) {
      for(let i = 0; i < newUserList.length; i ++) {
        if (newUserList[i].id == newUser.id) {
          newUserList[i] = newUser;
        }
      }
    }

    dispatch({
      type: 'users/saveUserList',
      payload: newUserList,
    })
    this.setState({
      editModalVisible: false,
      selectedRecord: null,
    })
  }

  handleCancel = (e) => {
    console.log('handleCancel:', e);
    this.setState({
      editModalVisible: false,
      selectedRecord: null,
    })
  }

  render() {
    const { userList } = this.props;
    console.log('users => render(), userList:', userList);
    const {
      editModalVisible, selectedRecord } = this.state;

    console.log('render(), editModalVisible:', editModalVisible, 'selectedRecord:', selectedRecord);
    return (
      <LocaleProvider locale={zhCN}>
        <div className={styles.container}>
          <Button onClick={() => this.handleAdd()}>添加</Button>
          <Table
            dataSource={userList}
            columns={this.columns}
          />
          {
            editModalVisible &&
            <EditModal
              type={lodash.isEmpty(selectedRecord) ? 0 : 1}
              data={selectedRecord}
              handleOk={this.handleOk}
              handleCancel={this.handleCancel}
            />
          }
        </div>
      </LocaleProvider>
    );
  }
}

function mapStateToProps(state) {
  const { userList } = state.users;
  return {
    userList,
  };
}

export default connect(mapStateToProps)(Users);
新建 users/Users.less
.container {
  position: absolute;
  top: 0;
  left: 0;
  right: 0;
  bottom: 0;
  margin: 0;
  background-color: antiquewhite;
}
添加路由信息到路由表 router.js
+ import Users from './routes/Users';
...
+ <Route path="/users" exact component={Users} />
然后在浏览器里打开 http://localhost:8000/#/users
编写 UI 组件
新建 components/EditModal.js 文件
import React, { Component } from 'react';
import styles from './EditModal.less';
import {
  Modal,
  Form,
  Input,
  DatePicker,
  TimePicker,
  Select,
  Cascader,
  InputNumber,
}
from 'antd';
const uuidv1 = require('uuid/v1');

const { Option } = Select;

class EditModal extends Component {
  constructor(props) {
    super(props);
    this.state = {
      id: !!props.data && props.data.id || null,
      name: !!props.data && props.data.name || null, // 当前选中的记录
      sex: !!props.data && props.data.sex || null, // 当前选中的记录
      age: !!props.data && props.data.age || null, // 当前选中的记录
    };
  }

  handleOk = (e) => {
    console.log(e);
    const { id, name, age, sex } = this.state;
    let user = {
      id,
      name,
      age,
      sex,
    };
    if (!id || id === 'undefined' || id === '') {
      user.id = uuidv1();
      this.props.handleOk(user, 0);
    } else {
      this.props.handleOk(user, 1);
    }
  }

  handleCancel = (e) => {
    console.log(e);
    this.props.handleCancel(e);
  }

  handleChangeName = (e) => {
    this.setState({
      name: e.target.value,
    })
  }

  handleChangeSex = (sex) => {
    console.log('handleChangeSex(), sex:', sex);
    this.setState({
      sex,
    })
  }

  handleChangeAge = (e) => {
    this.setState({
      age: e.target.value,
    })
  }

  getFormDom() {
    const { name, age, sex } = this.state;
    return (
      <div className={styles.form}>
        <div>
          <lable>姓名</lable><Input value={name} onChange={this.handleChangeName} />
        </div>
        <div>
          <lable>性别</lable>
          <Select defaultValue={sex || "F"} style={{width: '100%'}} onChange={this.handleChangeSex} >
            <Option value="M">男</Option>
            <Option value="F">女</Option>
          </Select>
        </div>
        <div>
          <lable>年龄</lable><Input value={age} onChange={this.handleChangeAge} />
        </div>
      </div>
    )
  }

  render() {
    return (
      <div>
        <Modal
          title={this.props.type === 0 ? '添加' : '修改'}
          onOk={this.handleOk}
          onCancel={this.handleCancel}
          visible={true}
        >
          {this.getFormDom()}
        </Modal>
      </div>
    );
  }
}

export default EditModal;
新建 components/EditModal.less 文件
.form {
  > div {
    display: flex;
    margin: 10px 0;
    text-align: center;
    align-items: center;
    justify-content: flex-start;

    > lable {
      width: 80px;
    }
  }
}
定义 Model
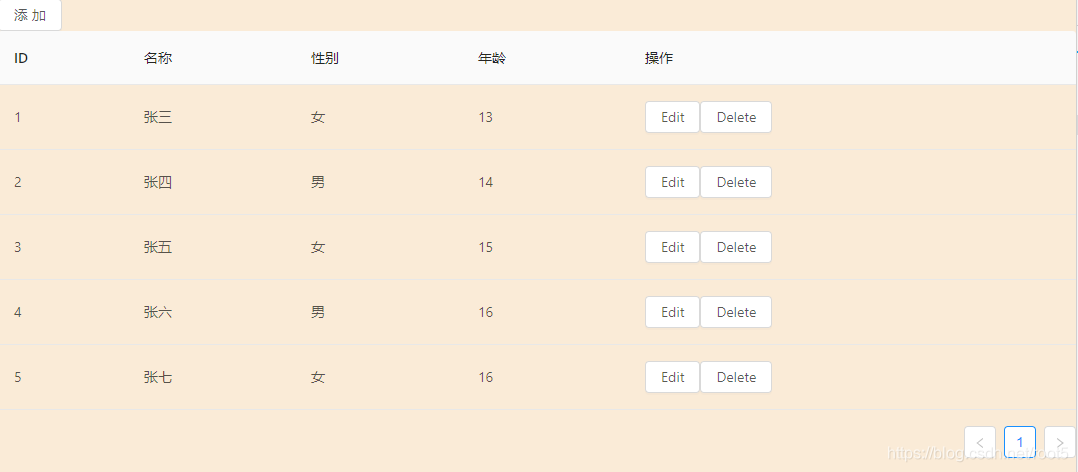
新建 model models/users.js
export default {
  namespace: 'users',
  state: {
    userList: [],
  },
  reducers: {
    saveUserList(state, { payload }) {
      console.log('model users => reducers/saveUserList(), payload:', payload);
      return { ...state, userList: Object.assign([], payload || []) };
    }
  },
  effects: {
    *init(_, { call, put, select }) {
      //获取后台数据
      const userList = [{
        id: 1,
        name: '张三',
        age: 13,
        sex: 'F'
      }, {
        id: 2,
        name: '张四',
        age: 14,
        sex: 'M'
      }, {
        id: 3,
        name: '张五',
        age: 15,
        sex: 'F'
      }, {
        id: 4,
        name: '张六',
        age: 16,
        sex: 'M'
      }, {
        id: 5,
        name: '张七',
        age: 16,
        sex: 'F'
      }];
      yield put({
        type: 'saveUserList',
        payload: userList
      });
    }
  },
  subscriptions: {
    setup({ dispatch, history }) {
      return history.listen(({ pathname, query }) => {
      });
    }
  },
};
在 index.js 里载入model
// 3. Model
+ app.model(require('./models/users').default);
然后在浏览器里打开 http://localhost:8000/#/users
看到如下效果

到此完成基本功能,详见源码 github
文中若有错误或者需要改进的地方,欢迎大家留言指正,或到github提交issues


 1052
1052

 被折叠的 条评论
为什么被折叠?
被折叠的 条评论
为什么被折叠?
 到【灌水乐园】发言


