

Marilyn icon tutorial.
Go from  to
to  : tutorial for PSCS.
This tutorial assumes you have an intermediate knowledge of Photoshop Creative Suite. If you don't, you're pretty much screwed. I've given you all the general commands instead of the shortcuts, to make it easier to find everything.
Starting image: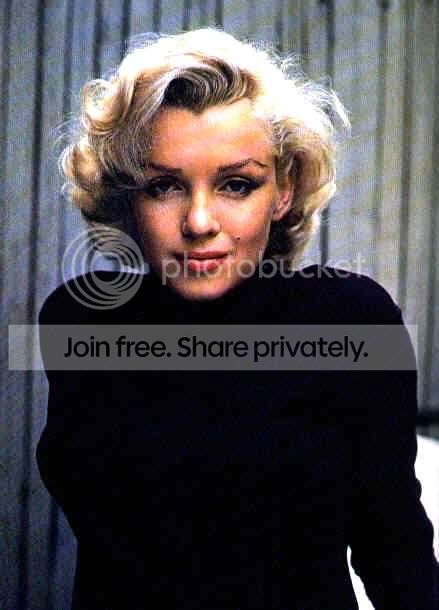
Crop this as you like, and then it's time for initial processing. We'll call this Stage One:
1. Image > Adjustments > Shadow/Highlight (shadows 50%, highlights 0%)
2. Auto Level.
3. Filter > Sharpen > Unsharp Mask (50%). Do this twice.
4. Zoom up close (500%) and, using the Blur tool (100% hard round brush 5px, strength 45%), carefully blur the skin and lighter blue stripes of the background, as well as any expanse of colour that looks pixellated and grainy. Be careful to avoid her hair, eyes, nostrils, and lips.
5. Using the Sharpen tool (soft round brush 3px, strength 30%) swipe over her eyes and mouth once. Zoom out and check how it looks-- it might need one more pass, but be careful you don't overdo it.
6. You might have to adjust the colouring, if you don't like the tint of the image; click Image > Adjustments > Variations. Then select one click to the left of center on the fine/coarse scale and diddle with the tone you want.
That should be it for prepping. It should look something like this: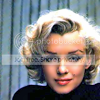
Now for Stage Two:
1. Duplicate your base and lower its opacity to 50%, then blur it with Filter > Blur > Gaussian Blur and a radius of 2.5.
2. Layer > New Fill Layer > Solid Color, use #000E2D and set the layer to Exclusion, 50% opacity.
3. Open and drag onto your icon this blurry gradient , and apply Filter > Transparency > Eliminate White (a PS plug-in available here for both Mac and Windows). Set this layer to Color Burn, 100% opacity.
4. Duplicate the base image, drag the layer to the top, desaturate it (Image > Adjustments > Desaturate or Shift + Ctrl + U) and set it to Soft Light at 100% opacity.
5. Set your foreground colour to black (#000000) and your background colour to white (#FFFFFF). Then create a gradient map (Image > Adjustments > Gradient Map) and set it to Hard Light at 50% opacity.
Your image at this point should look like this: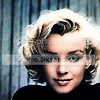
Here's a screencap of what your layers should look like: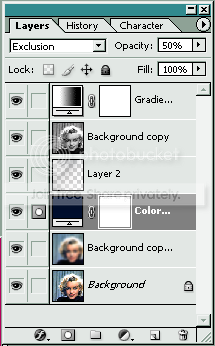
You can leave it square, add a border and text, but I think the colouring and her face are enough (I love textless icons) and just want to give it a little visual interest and offset the linear nature of the stripes with a bit of curve.
6. Flatten all layers.
7. Select > All, then Edit > Cut and Edit > Paste.
8. Select > Modify > Border, 1px.
9. Select > Modify > Smooth, 10px. The corners and a slim border around the icon will be selected; hit Delete.
10. Select > Inverse, then Select > Modify > Border, 1px.
11. Layer > New > Layer, then with black (#FFFFFF) as the foreground colour, use the Paint Bucket Tool to fill the selected border. You'll notice that the black has "spilled" over the selection.
12. Select > Inverse, then hit Delete several times until all the spilled-over colour is erased.
13. Select > Deselect, then make the white background layer invisible (click so the eye beside the layer in the palette goes away), and you've got yourself an icon.
14. Save it as a .png, interlaced, with transparency on.
Final image: I've love to see what youall come up with, feel free to post your versions in the comments below.
to : tutorial for PSCS.This tutorial assumes you have an intermediate knowledge of Photoshop Creative Suite. If you don't, you're pretty much screwed. I've given you all the general commands instead of the shortcuts, to make it easier to find everything.
Starting image:
Crop this as you like, and then it's time for initial processing. We'll call this Stage One:
1. Image > Adjustments > Shadow/Highlight (shadows 50%, highlights 0%)
2. Auto Level.
3. Filter > Sharpen > Unsharp Mask (50%). Do this twice.
4. Zoom up close (500%) and, using the Blur tool (100% hard round brush 5px, strength 45%), carefully blur the skin and lighter blue stripes of the background, as well as any expanse of colour that looks pixellated and grainy. Be careful to avoid her hair, eyes, nostrils, and lips.
5. Using the Sharpen tool (soft round brush 3px, strength 30%) swipe over her eyes and mouth once. Zoom out and check how it looks-- it might need one more pass, but be careful you don't overdo it.
6. You might have to adjust the colouring, if you don't like the tint of the image; click Image > Adjustments > Variations. Then select one click to the left of center on the fine/coarse scale and diddle with the tone you want.
That should be it for prepping. It should look something like this:
Now for Stage Two:
1. Duplicate your base and lower its opacity to 50%, then blur it with Filter > Blur > Gaussian Blur and a radius of 2.5.
2. Layer > New Fill Layer > Solid Color, use #000E2D and set the layer to Exclusion, 50% opacity.
3. Open and drag onto your icon this blurry gradient
, and apply Filter > Transparency > Eliminate White (a PS plug-in available here for both Mac and Windows). Set this layer to Color Burn, 100% opacity.4. Duplicate the base image, drag the layer to the top, desaturate it (Image > Adjustments > Desaturate or Shift + Ctrl + U) and set it to Soft Light at 100% opacity.
5. Set your foreground colour to black (#000000) and your background colour to white (#FFFFFF). Then create a gradient map (Image > Adjustments > Gradient Map) and set it to Hard Light at 50% opacity.
Your image at this point should look like this:
Here's a screencap of what your layers should look like:
You can leave it square, add a border and text, but I think the colouring and her face are enough (I love textless icons) and just want to give it a little visual interest and offset the linear nature of the stripes with a bit of curve.
6. Flatten all layers.
7. Select > All, then Edit > Cut and Edit > Paste.
8. Select > Modify > Border, 1px.
9. Select > Modify > Smooth, 10px. The corners and a slim border around the icon will be selected; hit Delete.
10. Select > Inverse, then Select > Modify > Border, 1px.
11. Layer > New > Layer, then with black (#FFFFFF) as the foreground colour, use the Paint Bucket Tool to fill the selected border. You'll notice that the black has "spilled" over the selection.
12. Select > Inverse, then hit Delete several times until all the spilled-over colour is erased.
13. Select > Deselect, then make the white background layer invisible (click so the eye beside the layer in the palette goes away), and you've got yourself an icon.
14. Save it as a .png, interlaced, with transparency on.
Final image:
I've love to see what youall come up with, feel free to post your versions in the comments below.