TabLayout is used to implement horizontal tabs. TabLayout is introduced in the design support library to implement tabs. Tabs are created using the newTab() method of TabLayout class. The title and icon of Tabs are set through setText(int) and setIcon(int) methods of TabListener interface respectively. Tabs of layout are attached over TabLayout using the method addTab(Tab) method.
What we are going to build in this article?
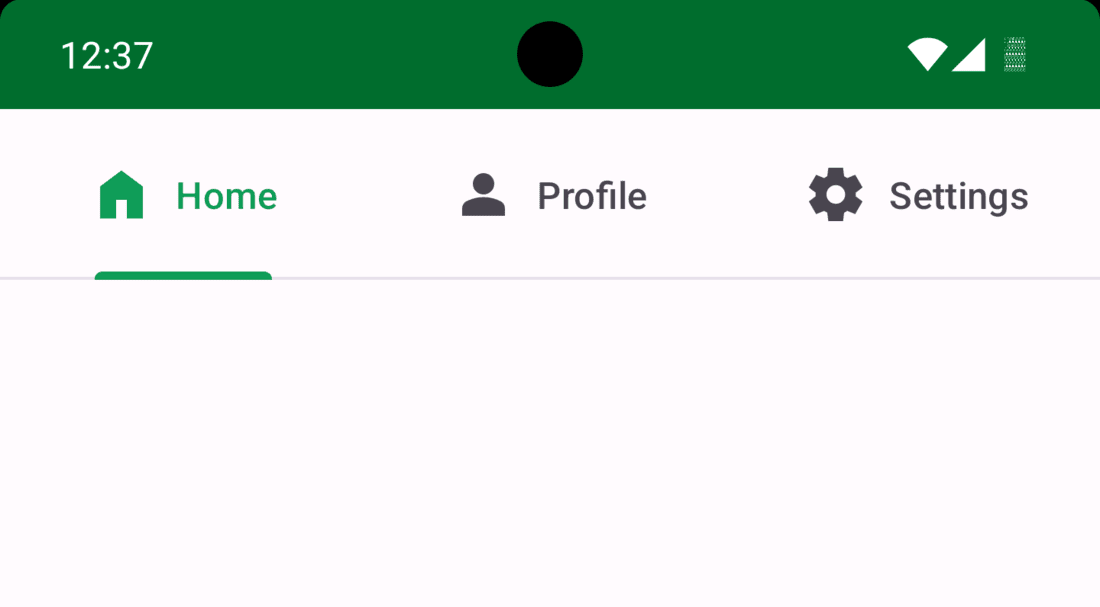
In this article, we will make three separate tabs with their respective icons with the help of viewPager. A sample video of what we are going to build in this article is shown below. Note that we are going to implement this project in Java Language.
Step by Step Implementation
Step 1: Create a new project
If you don’t know how to create a new project in Android Studio then you can refer to How to Create/Start a New Project in Android Studio?
Step 2: Adding required dependency
Navigate to app > Gradle Scripts > build.gradle.kts(module) and add the following dependency in it:
implementation ("com.google.android.material:material:1.12.0")Step 3: Create a new blank fragment
Right click on app folder then go to New > Fragment > Fragment (Blank), then proceed to add a name to your Fragment. We will be keeping it as MainFragment. Below is the code for the fragment
package org.geeksforgeeks.demo;

import android.os.Bundle;
import android.view.LayoutInflater;
import android.view.View;
import android.view.ViewGroup;
import android.widget.TextView;
import androidx.annotation.NonNull;
import androidx.annotation.Nullable;
import androidx.fragment.app.Fragment;

public class MainFragment extends Fragment {
    private TextView textView;

    @Nullable
    @Override
    public View onCreateView(@NonNull LayoutInflater inflater, @Nullable ViewGroup container, @Nullable Bundle savedInstanceState) {
        // Inflate the layout for this fragment
        View view = inflater.inflate(R.layout.fragment_main, container, false);

        // Assign variable
        textView = view.findViewById(R.id.text_view);

        // Get title from arguments (if available)
        Bundle args = getArguments();
        if (args != null) {
            String sTitle = args.getString("title");
            // Set title on TextView
            textView.setText(sTitle);
        }

        // Return the view
        return view;
    }
}
package org.geeksforgeeks.demo

import android.os.Bundle
import android.view.LayoutInflater
import android.view.View
import android.view.ViewGroup
import android.widget.TextView
import androidx.fragment.app.Fragment

class MainFragment : Fragment() {
    private lateinit var textView: TextView
    override fun onCreateView(
        inflater: LayoutInflater, container: ViewGroup?,
        savedInstanceState: Bundle?
    ): View {
        val view = inflater.inflate(R.layout.fragment_main, container, false)

        // Assign variable
        textView = view!!.findViewById(R.id.text_view)

        // Get Title
        val sTitle = requireArguments().getString("title")

        // Set title on text view
        textView.text = sTitle

        // return view
        return view
    }
}
<?xml version="1.0" encoding="utf-8"?>
<FrameLayout xmlns:android="http://schemas.android.com/apk/res/android"
    xmlns:tools="http://schemas.android.com/tools"
    android:layout_width="match_parent"
    android:layout_height="match_parent"
    tools:context=".MainFragment">

    <TextView
        android:layout_width="match_parent"
        android:layout_height="match_parent"
        android:id="@+id/text_view"
        android:textSize="32sp"
        android:textStyle="bold"
        android:gravity="center"/>
</FrameLayout>
Step 4: Creating a new adapter for ViewPager
Right click on MainActivity file and go to New > Kotlin Class/File then set the name for your adapter. We will keeping it as ViewPagerAdapter. Below is the code for your adapter class file
package org.geeksforgeeks.demo;

import android.os.Bundle;
import androidx.annotation.NonNull;
import androidx.fragment.app.Fragment;
import androidx.fragment.app.FragmentActivity;
import androidx.viewpager2.adapter.FragmentStateAdapter;
import java.util.List;

public class ViewPagerAdapter extends FragmentStateAdapter {
    private final List<String> titles;

    // Constructor
    public ViewPagerAdapter(@NonNull FragmentActivity activity, List<String> titles) {
        super(activity);
        this.titles = titles;
    }

    // Returns the number of items (fragments) in ViewPager
    @Override
    public int getItemCount() {
        return titles.size();
    }

    // Creates and returns a fragment for a given position
    @NonNull
    @Override
    public Fragment createFragment(int position) {
        MainFragment fragment = new MainFragment();
        Bundle args = new Bundle();
        args.putString("title", titles.get(position));
        fragment.setArguments(args);
        return fragment;
    }
}
package org.geeksforgeeks.demo

import android.os.Bundle
import androidx.fragment.app.Fragment
import androidx.fragment.app.FragmentActivity
import androidx.viewpager2.adapter.FragmentStateAdapter

class ViewPagerAdapter(
    activity: FragmentActivity,
    private val titles: List<String>
) : FragmentStateAdapter(activity) {
    override fun getItemCount(): Int = titles.size

    override fun createFragment(position: Int): Fragment {
        return MainFragment().apply {
            arguments = Bundle().apply {
                putString("title", titles[position])
            }
        }
    }
}
Step 5: Add 3 icons to your drawable folder
Navigate to res > drawable and right click on the folder and go to New > Drawable Resource file. Create 3 such files and add names as home.xml, person.xml and settings.xml. Below are the code for the drawable files.
<vector xmlns:android="http://schemas.android.com/apk/res/android"
    android:width="24dp"
    android:height="24dp"
    android:viewportWidth="960"
    android:viewportHeight="960">
  <path
      android:pathData="M160,840v-480l320,-240 320,240v480L560,840v-280L400,560v280L160,840Z"
      android:fillColor="#e8eaed"/>
</vector>
<vector xmlns:android="http://schemas.android.com/apk/res/android"
    android:width="24dp"
    android:height="24dp"
    android:viewportWidth="960"
    android:viewportHeight="960">
  <path
      android:pathData="M480,480q-66,0 -113,-47t-47,-113q0,-66 47,-113t113,-47q66,0 113,47t47,113q0,66 -47,113t-113,47ZM160,800v-112q0,-34 17.5,-62.5T224,582q62,-31 126,-46.5T480,520q66,0 130,15.5T736,582q29,15 46.5,43.5T800,688v112L160,800Z"
      android:fillColor="#e8eaed"/>
</vector>
<vector xmlns:android="http://schemas.android.com/apk/res/android"
    android:width="24dp"
    android:height="24dp"
    android:viewportWidth="960"
    android:viewportHeight="960">
  <path
      android:pathData="m370,880 l-16,-128q-13,-5 -24.5,-12T307,725l-119,50L78,585l103,-78q-1,-7 -1,-13.5v-27q0,-6.5 1,-13.5L78,375l110,-190 119,50q11,-8 23,-15t24,-12l16,-128h220l16,128q13,5 24.5,12t22.5,15l119,-50 110,190 -103,78q1,7 1,13.5v27q0,6.5 -2,13.5l103,78 -110,190 -118,-50q-11,8 -23,15t-24,12L590,880L370,880ZM482,620q58,0 99,-41t41,-99q0,-58 -41,-99t-99,-41q-59,0 -99.5,41T342,480q0,58 40.5,99t99.5,41Z"
      android:fillColor="#e8eaed"/>
</vector>
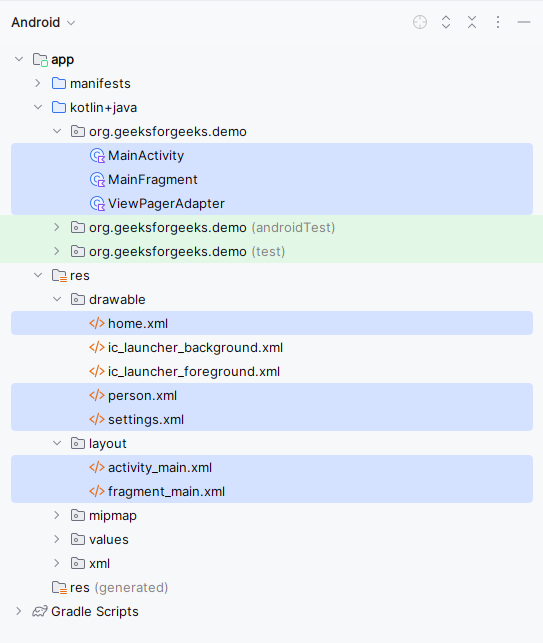
Below is how the directory structure will look like after creating and adding all the files:
Step 6: Working with MainActivity and it layout file
Navigate to app > java > package-name > MainActivity and also to res > layout > activity_main.xml and add the below code to those files. The code for the MainActivity file is provided in both Java and Kotlin.
Main Activity:
package org.geeksforgeeks.demo;

import android.os.Bundle;
import androidx.appcompat.app.AppCompatActivity;
import androidx.core.content.ContextCompat;
import androidx.viewpager2.widget.ViewPager2;
import com.google.android.material.tabs.TabLayout;
import com.google.android.material.tabs.TabLayoutMediator;
import java.util.Arrays;
import java.util.List;

public class MainActivity extends AppCompatActivity {

    private TabLayout tabLayout;
    private ViewPager2 viewPager;

    @Override
    protected void onCreate(Bundle savedInstanceState) {
        super.onCreate(savedInstanceState);
        setContentView(R.layout.activity_main);

        // Initialize views
        tabLayout = findViewById(R.id.tab_layout);
        viewPager = findViewById(R.id.view_pager);

        // List of tab titles & icons
        List<String> tabTitles = Arrays.asList("Home", "Profile", "Settings");
        int[] tabIcons = {R.drawable.home, R.drawable.person, R.drawable.settings};

        // Set up ViewPager2 with adapter
        viewPager.setAdapter(new ViewPagerAdapter(this, tabTitles));

        // Connect TabLayout with ViewPager2 using TabLayoutMediator
        new TabLayoutMediator(tabLayout, viewPager, (tab, position) -> {
            tab.setText(tabTitles.get(position));
            tab.setIcon(ContextCompat.getDrawable(this, tabIcons[position]));
        }).attach();
    }
}
package org.geeksforgeeks.demo

import android.os.Bundle
import androidx.appcompat.app.AppCompatActivity
import androidx.core.content.ContextCompat
import androidx.viewpager2.widget.ViewPager2
import com.google.android.material.tabs.TabLayout
import com.google.android.material.tabs.TabLayoutMediator

class MainActivity : AppCompatActivity() {

    private lateinit var tabLayout: TabLayout
    private lateinit var viewPager: ViewPager2

    override fun onCreate(savedInstanceState: Bundle?) {
        super.onCreate(savedInstanceState)
        setContentView(R.layout.activity_main)

        // Initialize views
        tabLayout = findViewById(R.id.tab_layout)
        viewPager = findViewById(R.id.view_pager)

        // List of tab titles & icons
        val tabTitles = listOf("Home", "Profile", "Settings")
        val tabIcons = intArrayOf(R.drawable.home, R.drawable.person, R.drawable.settings)

        // Set up ViewPager2 with adapter
        viewPager.adapter = ViewPagerAdapter(this, tabTitles)

        // Connect TabLayout with ViewPager2 using TabLayoutMediator
        TabLayoutMediator(tabLayout, viewPager) { tab, position ->
            tab.text = tabTitles[position]
            tab.icon = ContextCompat.getDrawable(this, tabIcons[position])
        }.attach()
    }
}
<?xml version="1.0" encoding="utf-8"?>
<LinearLayout
    xmlns:android="http://schemas.android.com/apk/res/android"
    xmlns:app="http://schemas.android.com/apk/res-auto"
    xmlns:tools="http://schemas.android.com/tools"
    android:layout_width="match_parent"
    android:layout_height="match_parent"
    android:orientation="vertical"
    tools:context=".MainActivity">

    <com.google.android.material.tabs.TabLayout
        android:layout_width="match_parent"
        android:layout_height="?actionBarSize"
        android:id="@+id/tab_layout"
        app:tabInlineLabel="true"/>

    <androidx.viewpager2.widget.ViewPager2
        android:layout_width="match_parent"
        android:layout_height="match_parent"
        android:id="@+id/view_pager"/>

</LinearLayout>
