JSP Standard Tag Library (JSTL) provides a collection of tags that simplify JSP development by eliminating the need to write Java code directly inside JSP pages. One of the most commonly used JSTL tags is <c:forEach>, which is used to iterate over collections such as List, Set, Array, and Map.
- Removes Java code from JSP pages.
- Makes JSP pages cleaner and easier to maintain.
- Supports iteration over List, Set, Array, Map, and other collections.
In Spring MVC applications, controllers often send collections of data to JSP pages. JSTL makes it easy to display those collections dynamically without using scriptlets.
Syntax of JSTL forEach Tag
Syntax 1: Iterate Collection
<c:forEach var="item" items="${collection}">
${item}
</c:forEach>
- var: specifies the variable name used during each iteration.
- items: specifies the collection, array, or list to iterate through.
Syntax 2: Iterate with begin, end and step
<c:forEach var="num" begin="1" end="10" step="2">
${num}
</c:forEach>
- begin: specifies the starting value of iteration.
- end: specifies the ending value and step defines the increment value.
Steps to Implement Iterating List on JSP using JSTL in Spring MVC
Follow these steps to create a Spring MVC application that passes a List from the controller to a JSP page and displays its elements using the JSTL <c:forEach> tag.
Step 1: Create a Maven Project
- Open STS IDE.
- Click File - New - Maven Project
- Select Create a Simple Project and select Archetypes
- Click Next

Enter the following details:
- Group Id: com.gfg
- Artifact Id: SpringMVCJSTLForEachExample
- Packaging: war
Click Finish.
Step 2: Add Required Dependencies
Add Spring MVC, Servlet API, and JSTL dependencies to the pom.xml file.
<project xmlns="https://maven.apache.org/POM/4.0.0"
    xmlns:xsi="https://www.w3.org/2001/XMLSchema-instance"
    xsi:schemaLocation="https://maven.apache.org/POM/4.0.0 https://maven.apache.org/xsd/maven-4.0.0.xsd">
    <modelVersion>4.0.0</modelVersion>
    <groupId>com.geeksforgeeks</groupId>
    <artifactId>simple-calculator</artifactId>
    <packaging>war</packaging>
    <version>0.0.1-SNAPSHOT</version>
    <name>simple-calculator Maven Webapp</name>
    <url>http://maven.apache.org</url>

    <dependencies>
        <dependency>
            <groupId>junit</groupId>
            <artifactId>junit</artifactId>
            <version>3.8.1</version>
            <scope>test</scope>
        </dependency>

        <!-- https://mvnrepository.com/artifact/org.springframework/spring-webmvc -->
        <dependency>
            <groupId>org.springframework</groupId>
            <artifactId>spring-webmvc</artifactId>
            <version>5.3.18</version>
        </dependency>

        <!-- https://mvnrepository.com/artifact/javax.servlet/javax.servlet-api -->
        <dependency>
            <groupId>javax.servlet</groupId>
            <artifactId>javax.servlet-api</artifactId>
            <version>4.0.1</version>
            <scope>provided</scope>
        </dependency>

        <dependency>
            <groupId>jstl</groupId>
            <artifactId>jstl</artifactId>
            <version>1.2</version>
        </dependency>
    </dependencies>

    <build>
        <finalName>simple-calculator</finalName>
        <plugins>
            <plugin>
                <groupId>org.apache.maven.plugins</groupId>
                <artifactId>maven-war-plugin</artifactId>
                <version>2.6</version>
                <configuration>
                    <failOnMissingWebXml>false</failOnMissingWebXml>
                </configuration>
            </plugin>
        </plugins>
    </build>
</project>
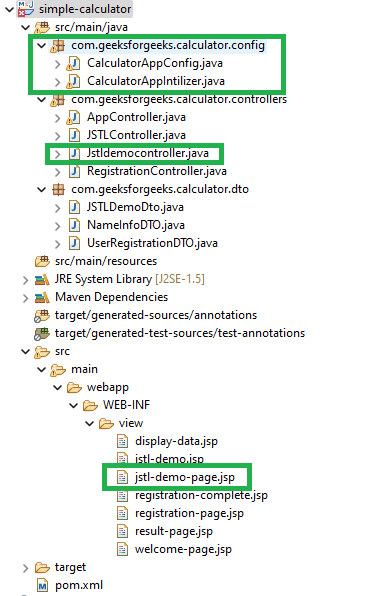
Before moving into the coding part let's have a look at the file structure in the below image.
Step 3: Configure Dispatcher Servlet( CalculatorAppIntilizer.java)
Registers and configures the Spring DispatcherServlet, acting as the front controller for handling all incoming requests.
package com.geeksforgeeks.calculator.config;

import org.springframework.web.servlet.support.AbstractAnnotationConfigDispatcherServletInitializer;

public class CalculatorAppIntilizer extends AbstractAnnotationConfigDispatcherServletInitializer {

    @Override
    protected Class<?>[] getRootConfigClasses() {
        // TODO Auto-generated method stub
        return null;
    }

    // Registering the Spring config file
    @Override
    protected Class<?>[] getServletConfigClasses() {
        Class aClass[] = { CalculatorAppConfig.class };
        return aClass;
    }

    // Add mapping url
    @Override
    protected String[] getServletMappings() {
        String arr[] = { "/geeksforgeeks.org/*" };
        return arr;
    }

}
Step 4: Configure View Resolver(CalculatorAppConfig.java)
Configure InternalResourceViewResolver to resolve JSP pages.
package com.geeksforgeeks.calculator.config;

import org.springframework.context.annotation.Bean;
import org.springframework.context.annotation.ComponentScan;
import org.springframework.context.annotation.Configuration;
import org.springframework.web.servlet.ViewResolver;
import org.springframework.web.servlet.config.annotation.EnableWebMvc;
import org.springframework.web.servlet.view.InternalResourceViewResolver;

@EnableWebMvc
@Configuration
@ComponentScan(basePackages = "com.geeksforgeeks.calculator.controllers")
public class CalculatorAppConfig {

    // setup ViewResolver
    @Bean
    public InternalResourceViewResolver viewResolver() {
        InternalResourceViewResolver viewResolver = new InternalResourceViewResolver();
        viewResolver.setPrefix("/WEB-INF/view/");
        viewResolver.setSuffix(".jsp");
        return viewResolver;
    }

}
Step 5: Create Controller Class(Jstldemocontroller.java)
Create a controller that prepares a List of skills and sends it to the JSP page.
package com.geeksforgeeks.calculator.controllers;

import java.util.ArrayList;
import java.util.List;

import org.springframework.stereotype.Controller;
import org.springframework.web.bind.annotation.RequestMapping;
import org.springframework.web.servlet.ModelAndView;

@Controller
public class Jstldemocontroller {

    @RequestMapping("/jstldemo")
    public ModelAndView showHomePage() {

        // Create the List of Skills
        List<String> skills = new ArrayList<String>();
        skills.add("Data Science");
        skills.add("Data Structure");
        skills.add("Javascript");
        skills.add("Python");
        skills.add("SQL");

        // Using ModelAndView
        ModelAndView modelAndView = new ModelAndView();
        modelAndView.setViewName("jstl-demo-page");
        modelAndView.addObject("skillList", skills);

        return modelAndView;

    }

}
Step 6: Create JSP Page
This JSP page displays the List received from the controller and uses the JSTL <c:forEach> tag to iterate and render each skill individually on the browser.
<%@ taglib uri="http://www.oracle.com/technetwork/java/index.html" prefix="c"%>
<html>
<head>
</head>
<body>
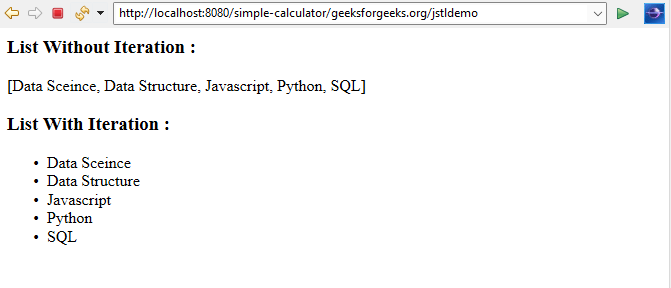
<h3>List Without Iteration :</h3>
${skillList}
<h3>List With Iteration :</h3>
<ul>
<c:forEach var="skill" items="${skillList}">
<li>${skill}</li>
</c:forEach>
</ul>
</body>
</html>
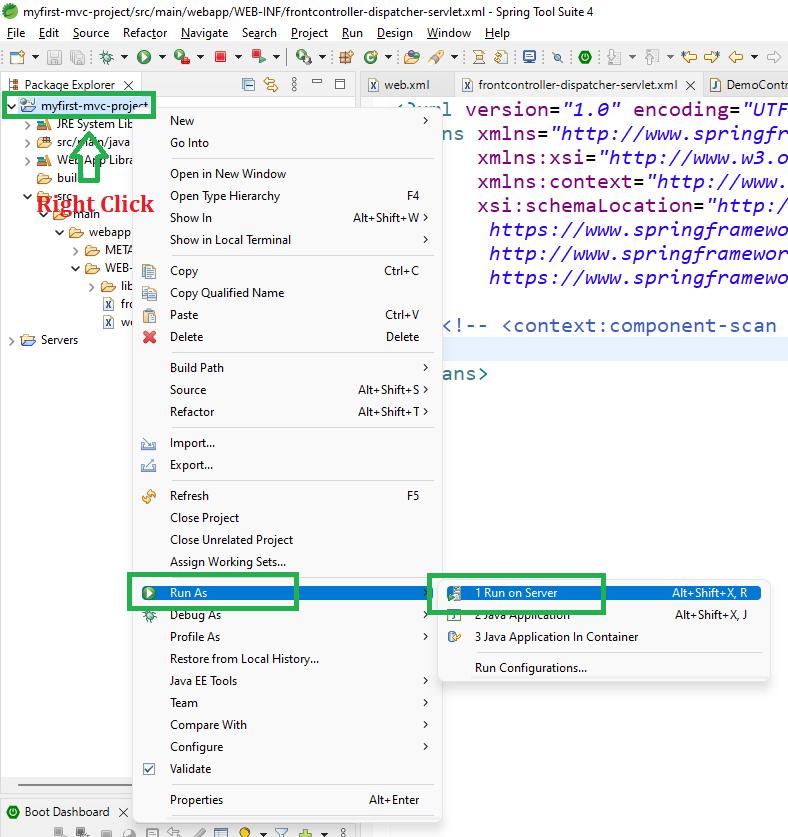
Step 7: Run the Application
- Right-click the project
- Select Run As - Run on Server
- Choose Apache Tomcat
- Click Finish
After that use the following URL to run your controller
http://localhost:8080/simple-calculator/geeksforgeeks.org/jstldemo
Output:
So on the output screen, you can see both the list with and without Iteration.